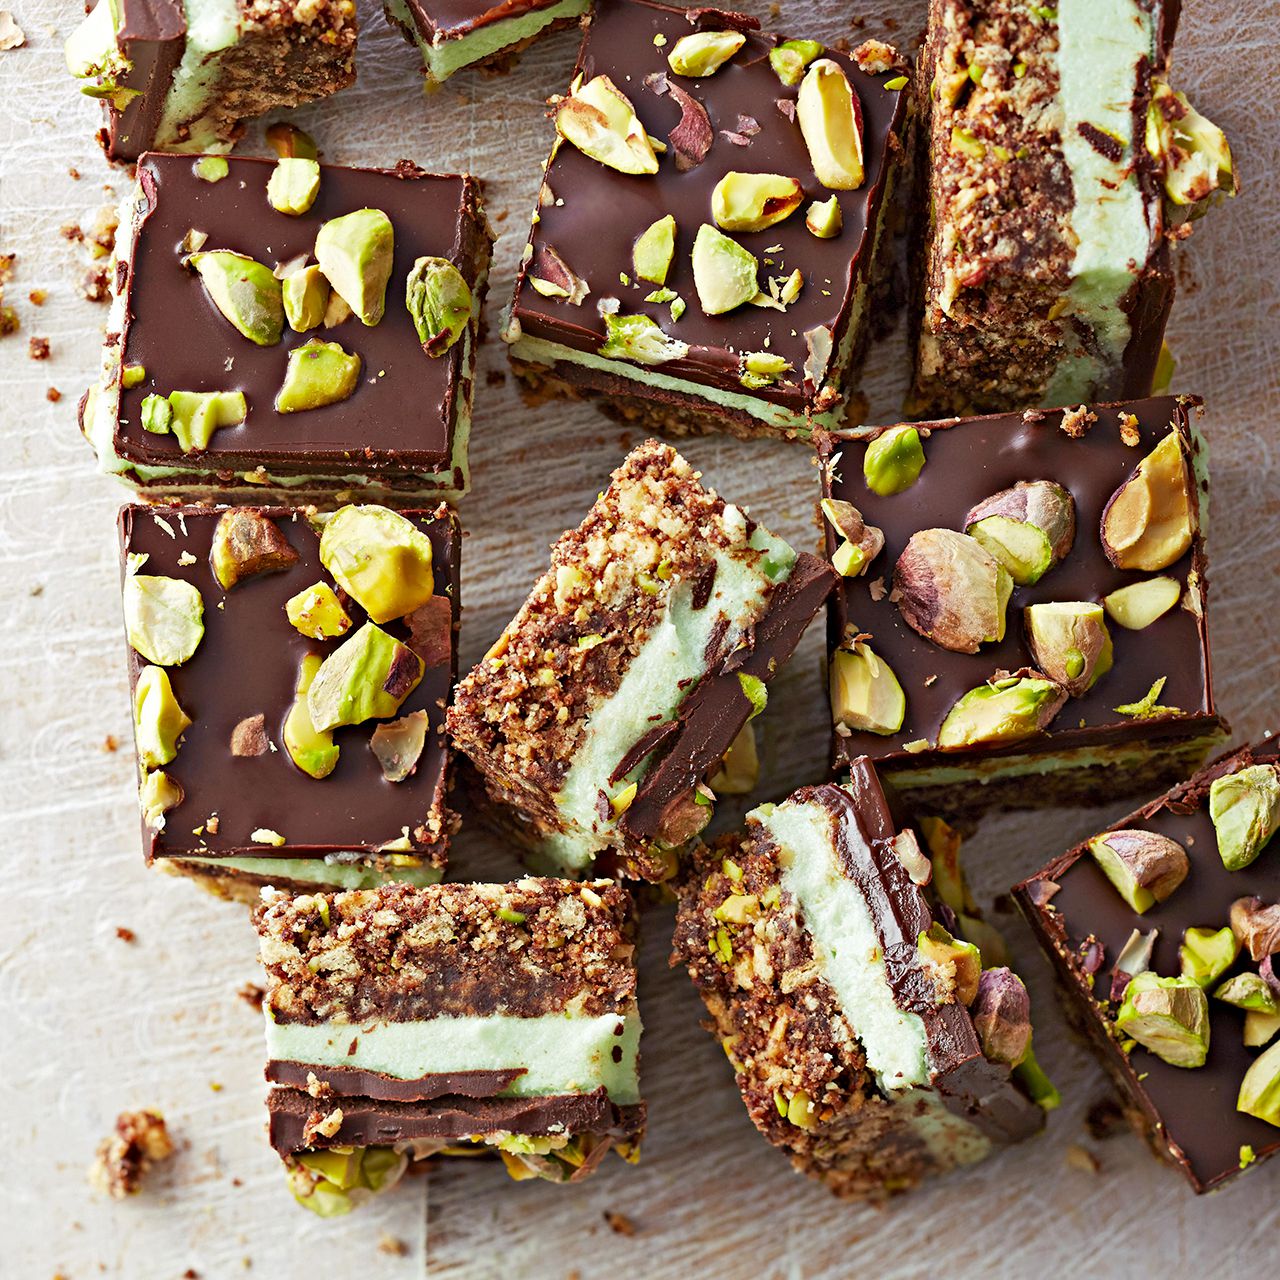
Some desserts politely sit on the table. Pistachio bars, however, tend to wink from the platter. They are creamy, nutty, buttery, just a little nostalgic, and green enough to make everyone ask, “Wait, what are those?” before taking two. This pistachio bars recipe is designed for home bakers who want a crowd-friendly dessert that tastes special without requiring pastry-school choreography.
The best version balances three things: a sturdy buttery crust, a smooth pistachio filling, and a crunchy nut topping. Too soft, and the bars slump like they missed their morning coffee. Too dry, and they taste like a cookie that forgot its purpose. The goal here is a sliceable dessert bar with a tender base, creamy center, and real pistachio flavor in every bite.
This recipe takes inspiration from classic American layered pistachio desserts, pudding bars, cream cheese bars, and shortbread-style cookie bases. The result is easy enough for a weekday bake but pretty enough for holidays, potlucks, baby showers, Easter brunch, St. Patrick’s Day parties, or the very important occasion known as “I found pistachios in the pantry.”
Why This Pistachio Bars Recipe Works
Pistachio desserts often fall into two camps: bright green retro desserts made with pistachio pudding mix, and bakery-style treats made with real chopped pistachios, pistachio paste, or pistachio butter. This recipe borrows the best from both. Instant pistachio pudding mix gives the filling its signature color, soft texture, and familiar flavor, while chopped pistachios bring natural nuttiness and a pleasant crunch.
The crust is baked first, which keeps the bottom from turning soggy after the creamy layer goes on top. Think of it as building a house: you would not install velvet curtains before pouring the foundation. The crust needs a short head start in the oven so it can hold up under the filling.
Cream cheese adds tang and body to the pistachio layer. Without it, the filling can taste sweet but flat. With it, the bars become richer, smoother, and more balanced. The whipped topping lightens the texture, so the dessert feels creamy rather than heavy. Finally, a shower of chopped pistachios on top tells everyone exactly what flavor they are about to enjoy. No mystery green square situation here.
Ingredients for Pistachio Bars
For the Buttery Crust
- 1 cup unsalted butter, softened
- 1/2 cup powdered sugar
- 2 cups all-purpose flour
- 1/4 teaspoon salt
- 1/2 cup finely chopped shelled pistachios
- 1/2 teaspoon vanilla extract
For the Creamy Pistachio Filling
- 8 ounces cream cheese, softened
- 1 cup powdered sugar
- 2 packages instant pistachio pudding mix, 3.4 ounces each
- 2 3/4 cups cold whole milk
- 1 teaspoon vanilla extract
- 1/4 teaspoon almond extract, optional but recommended
- 1 1/2 cups whipped topping, thawed
- 1/2 cup chopped pistachios
For the Topping
- 1 cup whipped topping
- 1/3 cup chopped pistachios
- 2 tablespoons white chocolate shavings, optional
- Pinch of flaky salt, optional
How to Make Pistachio Bars
Step 1: Prepare the Pan
Preheat the oven to 350°F. Line a 9-by-13-inch baking pan with parchment paper, leaving a little overhang on the sides. This makes it much easier to lift the bars out later. If parchment paper is the quiet hero of clean dessert slicing, consider this its standing ovation.
Step 2: Make the Crust
In a large bowl, beat the softened butter and powdered sugar until smooth and creamy. Add the vanilla extract, flour, salt, and finely chopped pistachios. Mix until a soft dough forms. It may look crumbly at first, but keep mixing gently until the butter pulls everything together.
Press the dough evenly into the bottom of the prepared pan. Use the bottom of a measuring cup to flatten it into a level layer. Bake for 18 to 22 minutes, or until the edges are lightly golden and the center looks set. Do not overbake it; the crust should be firm but still tender.
Step 3: Cool the Crust Completely
Let the crust cool completely before adding the filling. This step matters. Warm crust plus creamy filling equals a slippery dessert landslide. Give the crust time to settle down, relax, and become the dependable base it was born to be.
Step 4: Make the Cream Cheese Layer
In a mixing bowl, beat the softened cream cheese with powdered sugar until smooth. Add vanilla extract and almond extract if using. The almond extract is optional, but it helps deepen the pistachio flavor without making the bars taste like marzipan. A little goes a long way, so resist the urge to pour like you are watering a houseplant.
Step 5: Make the Pistachio Pudding Mixture
In a separate bowl, whisk the instant pistachio pudding mix with cold milk for about 2 minutes, until it begins to thicken. Let it stand for 3 to 5 minutes. The pudding should be thick but spreadable.
Step 6: Combine the Filling
Beat the pudding mixture into the cream cheese mixture until smooth. Fold in 1 1/2 cups of whipped topping and 1/2 cup chopped pistachios. Folding keeps the texture light and airy. Stirring aggressively will still work, but folding gives the bars a creamier, fluffier finish.
Step 7: Assemble the Bars
Spread the pistachio filling over the cooled crust. Use an offset spatula to smooth the top. Add a thin layer of whipped topping, then sprinkle with chopped pistachios. For extra flair, add white chocolate shavings and a tiny pinch of flaky salt. The salt is optional, but it makes the sweetness pop and keeps the dessert from tasting one-note.
Step 8: Chill Before Slicing
Cover the pan and refrigerate for at least 4 hours, or overnight for the cleanest slices. Chilling allows the filling to firm up and the flavors to blend. When ready to serve, lift the bars out using the parchment overhang. Slice with a sharp knife, wiping the blade between cuts.
Pro Tips for Perfect Pistachio Dessert Bars
Use Softened Cream Cheese
Cold cream cheese is the fastest route to lumps. Let it sit at room temperature until soft enough to blend smoothly. If you forgot, cut it into cubes and let it rest for 15 to 20 minutes. Do not microwave it until melted; melted cream cheese can make the filling loose.
Choose Unsalted Pistachios
Unsalted pistachios give you better control over the flavor. Salted pistachios can work in a pinch, but reduce or omit the added salt in the crust and topping. If the nuts taste stale, the bars will too. Pistachios should smell fresh, sweet, and nutty.
Chop the Nuts Finely for the Crust
Large pistachio pieces can make the crust crumble unevenly. Finely chopped nuts blend into the dough and help create a more consistent bite. Save the larger, prettier pieces for the topping, where they can show off like tiny green confetti.
Do Not Skip the Chill Time
Pistachio bars need patience. If you slice too soon, the filling may smear. The flavor also improves after chilling because the pudding, cream cheese, and crust have time to settle into one harmonious dessert instead of three separate roommates.
Flavor Variations
Chocolate Pistachio Bars
Add 1/2 cup mini chocolate chips to the filling or drizzle melted dark chocolate over the chilled bars. Chocolate and pistachio are a classic match because the bittersweet cocoa balances the sweet, creamy filling.
Lemon Pistachio Bars
Add 1 teaspoon lemon zest to the crust and another teaspoon to the filling. Lemon brightens the pistachio flavor and makes the dessert taste fresher, especially in spring and summer.
Cherry Pistachio Bars
Fold 1/3 cup finely chopped maraschino cherries into the filling, then pat them dry first so they do not add excess moisture. The red and green color combination makes these bars festive for Christmas, Valentine’s Day, or anyone who enjoys a dessert with a little retro diner energy.
Graham Cracker Pistachio Bars
For a quicker crust, combine 2 cups graham cracker crumbs with 1/2 cup melted butter and 2 tablespoons sugar. Press into the pan and bake for 10 minutes. This version is slightly sweeter and softer than the shortbread crust.
How to Serve Pistachio Bars
Serve these bars cold, straight from the refrigerator. They pair beautifully with coffee, black tea, iced latte, or a glass of cold milk. For a party platter, cut them into small squares because the filling is rich. A 9-by-13-inch pan can make 20 generous bars or 30 smaller party-size pieces.
If you want a bakery-style presentation, add a small swirl of whipped topping to each square and sprinkle with finely chopped pistachios. A few white chocolate curls also look elegant without requiring advanced decorating skills. In other words, you get the “I planned this” look with very little actual planning.
Storage and Make-Ahead Instructions
Because these pistachio bars contain cream cheese, milk, and whipped topping, they should be refrigerated. Store them in an airtight container in the refrigerator for 3 to 4 days. For the best texture, keep them covered so the crust does not absorb refrigerator odors. Nobody wants pistachio bars with a hint of leftover onion.
You can make the crust one day ahead, cool it completely, cover the pan, and store it at room temperature. Add the filling the next day and chill until set. Fully assembled bars can also be made a day in advance, which makes them perfect for holidays and potlucks.
Freezing is possible, but the texture may soften slightly after thawing because pudding-based fillings can release moisture. If freezing, place sliced bars on a parchment-lined tray until firm, then transfer them to an airtight container with parchment between layers. Thaw in the refrigerator before serving.
Common Mistakes to Avoid
Adding Filling to a Warm Crust
This is the most common mistake. The filling can melt, loosen, and refuse to slice neatly. Always cool the crust fully before spreading the pistachio layer.
Using Too Much Milk
Follow the milk measurement closely. Pudding mix thickens based on the ratio of powder to liquid. Too much milk creates a runny filling that may taste fine but will not hold its shape.
Overmixing the Whipped Topping
Fold whipped topping gently into the pudding mixture. Overmixing can deflate the filling and make it dense. The goal is creamy and light, not pudding cement.
Slicing Without Chilling
Warm or barely chilled bars are messy. Delicious, yes, but messy. Chill thoroughly, then use a sharp knife for neat squares.
Nutrition and Allergen Notes
Pistachios are tree nuts, so this recipe is not safe for anyone with a tree nut allergy. Instant pudding mix, whipped topping, and cream cheese may also contain dairy or other allergens depending on the brand. Always read labels carefully if serving guests with dietary restrictions.
These bars are a dessert, not a salad wearing a green costume. That said, pistachios do bring protein, fiber, and healthy fats to the recipe. The dessert is still sweet and creamy, so enjoy it as a treat. A small square after dinner is satisfying, especially when paired with coffee or tea.
Frequently Asked Questions
Can I make pistachio bars without pudding mix?
Yes, but the recipe will need adjustments. You can use pistachio paste or pistachio butter for a more natural flavor, then stabilize the filling with cream cheese and whipped cream. The color will be more muted, and the flavor will taste nuttier and less retro-sweet.
Can I use homemade whipped cream?
Yes. Use 2 1/2 cups freshly whipped cream in place of the whipped topping. For best results, stabilize it with a little powdered sugar so it holds up after chilling.
Can I make these bars gluten-free?
Yes. Use a reliable 1:1 gluten-free flour blend in the crust or make a gluten-free graham cracker crust. Check the pudding mix and toppings to confirm they are gluten-free.
Why are my pistachio bars too soft?
The most likely causes are too much milk, under-chilling, warm crust, or low-fat ingredients that do not set as firmly. Use full-fat cream cheese and chill the bars for at least 4 hours.
Recipe Card: Easy Pistachio Bars
Prep Time
25 minutes
Bake Time
18 to 22 minutes
Chill Time
4 hours
Total Time
About 4 hours 45 minutes
Yield
20 to 30 bars
Instructions Summary
- Preheat oven to 350°F and line a 9-by-13-inch pan with parchment paper.
- Beat butter and powdered sugar, then mix in vanilla, flour, salt, and chopped pistachios.
- Press dough into the pan and bake until lightly golden.
- Cool crust completely.
- Beat cream cheese with powdered sugar, vanilla, and optional almond extract.
- Whisk pudding mix with cold milk until thickened.
- Combine pudding and cream cheese mixtures, then fold in whipped topping and pistachios.
- Spread filling over crust, add topping, and chill for at least 4 hours.
- Slice with a clean sharp knife and serve cold.
Personal Experience: What Baking Pistachio Bars Teaches You
The first thing you learn when making pistachio bars is that the color alone does half the marketing. Put a tray of beige cookies on a table and people may politely take one. Put down a pan of pale green pistachio dessert bars with chopped nuts on top, and suddenly everyone becomes a dessert detective. “What’s in these?” “Are they mint?” “Is this fancy?” The answer is: pistachio, no, and only emotionally.
In real home baking, pistachio bars are wonderfully forgiving. The crust does not need to be rolled, shaped, crimped, braided, laminated, or otherwise turned into a weekend project. You press it into a pan, bake it, and move on with your life. That makes this recipe especially useful when you need something impressive but do not want to spend the day negotiating with pie dough.
The most important experience-based tip is to respect the cooling and chilling stages. Many bakers get excited after spreading the filling and want to slice right away. This is understandable. The bars look ready. They smell ready. Your fork is definitely ready. But the filling needs time to set. When you chill the bars overnight, the difference is dramatic. The slices come out cleaner, the flavor becomes smoother, and the crust softens just enough to cut without crumbling.
Another lesson is that pistachios are small but mighty. If you use fresh, good-quality pistachios, the bars taste noticeably better. If the pistachios have been sitting open in the pantry since a forgotten holiday snack board, taste one first. Nuts can go stale or rancid, and no amount of pudding mix can fully hide that. Fresh pistachios give the dessert a warm, buttery flavor that makes each bite more interesting.
Texture also matters. A creamy pistachio filling is lovely, but without crunch, the dessert can feel too soft. That is why chopped nuts in both the crust and topping are worth the extra minute. The crust gets a subtle nutty bite, while the topping gives the finished bars that little crackle that makes people reach for another square.
These bars are especially practical for gatherings because they travel well when chilled. Bring them in the pan, keep them cold, and slice just before serving. If you are taking them to a potluck, cut smaller squares. People love bite-size desserts because they can pretend they are being reasonable while returning for a second and third piece. This is not a flaw. This is hospitality.
For family baking, pistachio bars are also fun because kids can help sprinkle the topping. Adults can handle the oven and mixing, while younger helpers decorate the top with chopped pistachios or white chocolate shavings. The finished dessert looks cheerful, seasonal, and a little playful. It is not a stiff, formal dessert. It is the kind of treat that says, “Yes, I made something special, but I am still approachable.”
The best part is how adaptable the recipe becomes once you understand the basic formula: crust, creamy filling, topping, chill. Add lemon zest for brightness, chocolate for richness, cherry for a retro twist, or a graham cracker crust when time is short. Once you make pistachio bars successfully, they become one of those dependable desserts you can customize for almost any occasion.
Conclusion
This pistachio bars recipe is creamy, nutty, buttery, colorful, and easy enough for home bakers of almost any skill level. The baked crust gives the bars structure, the pistachio pudding and cream cheese filling brings smooth flavor, and the chopped pistachios add the crunch that keeps every bite interesting. Whether you serve them at a holiday party, Sunday dinner, picnic, office potluck, or casual coffee break, these bars have a way of disappearing quickly.
The secret is simple: cool the crust, use softened cream cheese, measure the milk carefully, and chill the bars long enough to set. Do that, and you will have clean slices, balanced flavor, and a dessert that looks far more complicated than it really is. That is the kind of kitchen magic everyone can appreciate.
Note: This original article is written for web publication and is based on established American baking practices for pistachio dessert bars, shortbread-style crusts, pudding fillings, cream cheese desserts, and safe refrigerated storage. Always check ingredient labels for allergens before serving.