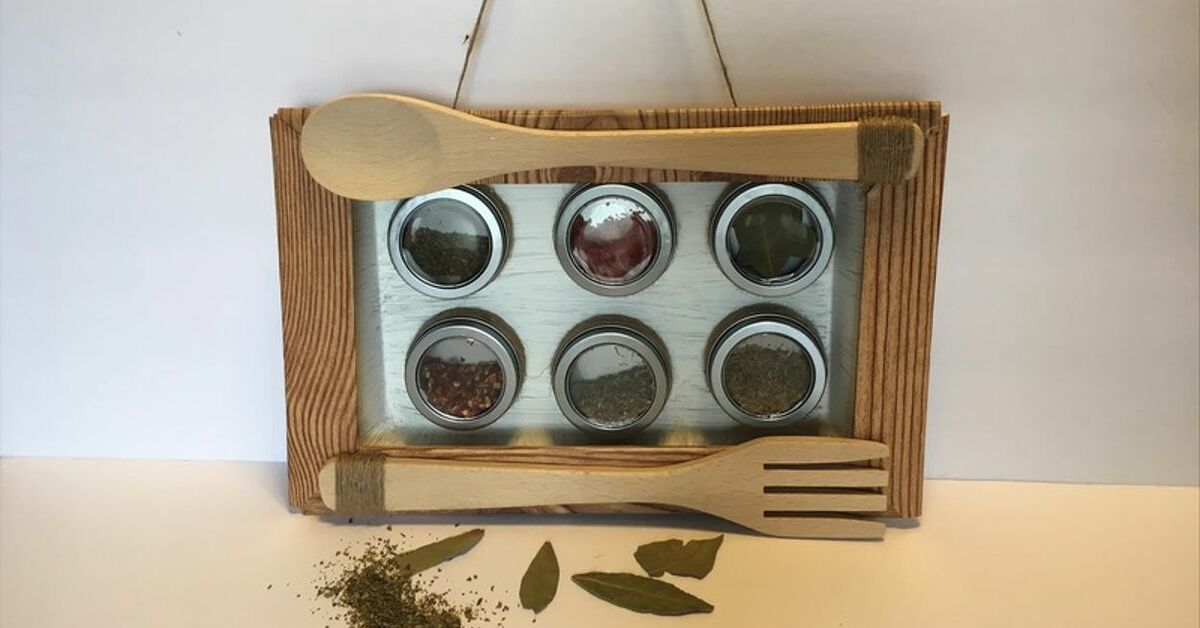
A farmhouse spice rack is one of those small kitchen projects that punches way above its weight. It does not require a truckload of lumber, a professional workshop, or the emotional strength needed to assemble a flat-pack pantry cabinet at midnight. What it does require is a simple plan, a little measuring, basic tools, and a clear idea of how you actually cook.
The charm of a farmhouse spice rack comes from the mix of function and warmth. It turns tiny jars of cumin, paprika, thyme, cinnamon, and “mystery powder from 2019” into something useful and attractive. Instead of digging through a cabinet like an archaeologist searching for garlic powder, you can see everything at a glance. Better still, a homemade spice rack lets you match your kitchen style, whether your farmhouse look leans rustic, modern, cottage, vintage, or “I found this board in the garage and now it has a destiny.”
This guide walks you through the full process: choosing a design, selecting materials, measuring jars, cutting wood, assembling shelves, adding rails, staining or painting, mounting the rack safely, labeling spices, and keeping everything fresh. By the end, you will know how to build a farmhouse spice rack that looks good, works hard, and politely tells clutter to leave the kitchen.
Why a Farmhouse Spice Rack Is Worth Making
A spice rack is not just decoration. It is a cooking system. When spices are easy to see and grab, weeknight cooking becomes faster and less chaotic. A wall-mounted rack frees up cabinet space. A pantry-door rack makes use of an overlooked surface. A countertop rack keeps daily seasonings near your prep zone. The best design depends on your kitchen layout, but the goal is always the same: make spices visible, reachable, and organized.
Farmhouse style is especially friendly to DIY projects because it welcomes texture and imperfection. Pine boards, reclaimed wood, beadboard backing, black metal hooks, white paint, soft gray stain, or a slightly distressed finish all work beautifully. You do not need the rack to look machine-made. In fact, a little character is the point. A tiny knot in the wood? Rustic charm. A brush mark in the paint? Handmade soul. A shelf that is slightly more enthusiastic on one side? That is what levels are for.
Choose the Best Spice Rack Design for Your Kitchen
Before you buy wood, decide where the spice rack will live. This one decision controls the size, depth, mounting method, and finish.
Wall-Mounted Farmhouse Spice Rack
A wall-mounted spice rack is ideal if you have open wall space near your food prep area. It becomes kitchen decor as well as storage. Keep the depth shallow, usually around 3 to 4 inches, so the rack does not stick out awkwardly. Add front rails to prevent jars from falling when someone closes a nearby cabinet with superhero energy.
Pantry-Door Spice Rack
A pantry-door spice rack is excellent for small kitchens. It uses vertical space that often goes ignored. The key is keeping the rack lightweight and slim enough so the door closes properly. Measure the door clearance before building. This is not optional unless you enjoy discovering problems after attaching screws.
Countertop Farmhouse Spice Rack
A countertop rack works well for renters or anyone who does not want to drill into walls. Make it stable, compact, and easy to clean around. This style is best for everyday spices rather than an entire collection. Keep the “holiday-only nutmeg army” somewhere else.
Cabinet-Interior Spice Rack
If you prefer a cleaner kitchen look, mount a shallow rack inside a cabinet or on the back of a cabinet door. This keeps spices hidden but organized. Just make sure the jars do not collide with shelves when the door closes.
Materials You Will Need
For a classic farmhouse rack that holds about 18 to 24 standard spice jars, gather the following:
- One 1×4 board for the sides and top
- One 1×3 or 1×4 board for shelves
- Thin square dowels or trim strips for front rails
- Optional beadboard, plywood, or shiplap-style backing
- Wood glue
- Brad nails, finish nails, or screws
- Sandpaper in medium and fine grits
- Wood filler
- Paint, stain, or clear protective finish
- Wall screws, anchors, or keyhole hangers
- Labels and matching spice jars, if desired
Pine is a beginner-friendly choice because it is affordable, easy to cut, and takes paint well. Poplar is another good option if you want a smoother painted finish. Reclaimed wood gives the most authentic farmhouse feel, but inspect it carefully for warping, old nails, splinters, or mystery substances. “Rustic” is lovely. “Tetanus with a handle” is less lovely.
Suggested Measurements and Cut List
You can customize the size, but here is a practical starting point for a wall-mounted farmhouse spice rack:
- Overall size: 18 inches wide by 24 inches tall
- Depth: 3.5 inches
- Side pieces: two boards at 24 inches
- Top and bottom pieces: two boards at 18 inches
- Interior shelves: three boards at about 16.5 inches, depending on wood thickness
- Front rails: three or four dowels or trim strips at about 16.5 inches
- Optional backing: one panel cut to fit the rear of the rack
Most standard spice jars need about 4.5 to 5.5 inches of vertical clearance. Taller jars may need 6 inches or more. Measure your jars before deciding shelf spacing. Do not design around imaginary jars unless imaginary tacos are also on the menu.
Tools for the Project
You do not need a professional shop to make a farmhouse spice rack. A miter saw or circular saw helps with straight cuts, but many home improvement stores can cut boards for you. You will also need a drill, measuring tape, pencil, clamps, level, sanding block or orbital sander, and a small nailer or hammer. If you use screws, pre-drill pilot holes to reduce splitting, especially near board ends.
A pocket-hole jig can make assembly cleaner, but it is not required. Wood glue plus brad nails or small screws will work for a basic rack. The important part is keeping everything square. Clamps are your quiet little assistants here. They do not talk much, but they prevent chaos.
Step-by-Step: How to Build a Farmhouse Spice Rack
Step 1: Count and Sort Your Spices
Start by taking inventory. Group spices into everyday, occasional, baking, spicy, savory, and duplicates. You may discover that you own three jars of cinnamon and no black pepper. This is normal kitchen archaeology. Decide how many jars deserve prime real estate on the rack. The rack should serve your cooking habits, not your guilt about using turmeric once.
Step 2: Measure the Jars
Measure the height and diameter of your spice jars. If you plan to transfer everything into matching jars, buy or choose those first. Uniform jars look clean and make labeling easier. However, mismatched jars can look charming on a rustic farmhouse rack if you organize them neatly.
Step 3: Cut the Wood
Cut the side pieces, top, bottom, shelves, rails, and backing according to your measurements. Mark each piece lightly with pencil. Dry-fit the frame before gluing anything. A dry fit is the woodworking version of “try it on before removing the tags.” It helps you catch problems early.
Step 4: Sand Every Piece
Sand cut edges and faces until smooth. Start with medium-grit sandpaper and finish with a finer grit. Pay special attention to the front rails and shelf edges because hands will touch them often. Wipe away dust before assembly or finishing. Dust left under paint or stain creates a gritty texture that says, “I rushed this,” even if the rest of the rack looks great.
Step 5: Assemble the Outer Frame
Lay out the two side pieces with the top and bottom pieces to form a rectangle. Apply wood glue at the joints, clamp everything square, then secure with brad nails or screws. Check diagonally from corner to corner. If both diagonal measurements match, the frame is square. If not, gently adjust before the glue sets.
Step 6: Add the Shelves
Mark shelf positions on both side pieces. For standard jars, spacing shelves about 5.5 to 6 inches apart usually works well. Apply wood glue to shelf ends, place each shelf on the marks, clamp if needed, and fasten from the sides. Use a level or square so the shelves do not lean. Slanted shelves are exciting only when you are storing race cars.
Step 7: Attach Front Rails
Install a thin rail across the front of each shelf. Place the rail about 1 to 1.5 inches above the shelf surface. This keeps jars from tipping out while still letting you read labels. Square dowels, narrow trim, or even small metal rods can work. For farmhouse style, wood rails look warm and traditional, while black metal rods add a modern rustic touch.
Step 8: Add a Backing Panel
A backing panel is optional, but it adds strength and style. Beadboard is perfect for farmhouse kitchens. Thin plywood is simple and budget-friendly. You can also use horizontal strips to mimic shiplap. Attach the backing with glue and small nails. If the rack will hang on a wall, backing also helps keep the frame from twisting over time.
Step 9: Fill, Sand, and Finish
Fill nail holes with wood filler, let it dry, and sand smooth. For a painted farmhouse look, try warm white, creamy ivory, sage green, soft black, dusty blue, or muted gray. For a stained look, test the color on scrap wood first. Pine can absorb stain unevenly, so a pre-stain wood conditioner can help create a smoother result. Apply stain with the grain, wipe off excess, and let the finish cure according to the product instructions.
If you want a distressed finish, paint the rack, let it dry, then lightly sand corners and edges where natural wear would happen. Do not attack it like you are angry at the furniture. Farmhouse distressing should whisper, not scream.
Step 10: Mount the Rack Safely
A spice rack may seem lightweight, but glass jars add up. Whenever possible, mount into wall studs. If studs are not available, use wall anchors rated for the expected weight. Mark your holes, use a level, drill pilot holes if needed, and fasten the rack securely. For a clean look, use keyhole hangers or a French cleat. For a pantry-door rack, use shorter screws that will not poke through the other side of the door. That surprise is rarely appreciated.
Farmhouse Style Ideas That Make It Look Custom
Small details give a handmade spice rack its personality. Add a small label holder to each shelf: “Baking,” “Savory,” “Heat,” and “Everyday.” Use black cup pulls, tiny brass nameplates, or painted stencil lettering. A top ledge can hold a mini plant, a salt cellar, or a tiny sign that says “Seasoned with Love,” because apparently kitchens are legally required to have at least one charming phrase.
For a modern farmhouse look, pair white paint with natural wood shelves. For a rustic look, use dark stain and matte black hardware. For a cottage farmhouse style, choose beadboard backing and soft pastel paint. For a vintage market feel, use reclaimed wood and imperfect hand-lettered labels.
How to Organize Spices on the Rack
A beautiful rack is only useful if it stays organized. Arrange spices in the way your brain naturally searches. Alphabetical order works for detail-oriented cooks. Cooking zones work better for people who think in meals: taco spices together, baking spices together, Italian herbs together, and everyday seasonings on the easiest shelf.
Label the tops or fronts of jars, depending on how they sit. Include purchase or refill dates if you want to track freshness. Ground spices and dried herbs lose strength over time, so it is smart to smell and taste them occasionally. If paprika smells like red dust and regret, it is time to replace it.
Keep spices away from direct heat, bright sunlight, and moisture. That means the wall right above the stove is usually not the best place, even if it looks convenient. Heat and steam can shorten flavor life and cause clumping. A nearby side wall, pantry door, or cabinet interior is usually a better choice.
Common Mistakes to Avoid
The first mistake is building too shallow or too narrow. Measure real jars and allow finger space so you can grab them easily. The second mistake is skipping rails. Even a small rail can prevent a dramatic oregano avalanche. The third mistake is mounting the rack with weak hardware. Use studs or proper anchors. A spice rack falling off the wall is not rustic. It is just loud.
Another common mistake is overloading the rack. Farmhouse style looks best when it has breathing room. If you own 63 spices, build a larger rack, use two racks, or store backup jars elsewhere. The display rack should hold what you use most often.
Budget-Friendly Variations
You can build a farmhouse spice rack on a tight budget by using scrap wood, leftover paint, and repurposed jars. Old fence pickets, pallet boards, or cabinet trim can work if they are clean, dry, and safe to use indoors. A thrifted wooden shelf can also become a spice rack with added rails and fresh paint.
If you want a faster project, buy a simple unfinished wood rack and customize it. Add beadboard backing, replace the rails, paint it, distress it, and mount it with better hardware. You still get the farmhouse look without starting from raw lumber.
Experience Notes: What Making a Farmhouse Spice Rack Teaches You
Building a farmhouse spice rack sounds small, but it teaches nearly every lesson a beginner DIYer needs. The first lesson is that measuring matters more than enthusiasm. Enthusiasm is wonderful, but it will not make a 20-inch shelf fit inside an 18-inch frame. Before cutting anything, line up your actual spice jars on the counter and measure the total width. Add extra space for fingers, labels, and the occasional oddly shaped jar that refuses to conform to society.
The second lesson is that simple projects still deserve patience. Sanding feels boring until you skip it and notice rough edges every time you reach for cumin. A quick sanding pass before assembly and another before finishing makes the rack feel handmade in the good way, not handmade in the “splinter buffet” way. The same goes for wood filler. Filling nail holes takes a few minutes, but it makes paint look cleaner and more intentional.
The third lesson is that finish changes everything. One unfinished pine rack can become five different designs depending on paint or stain. White paint with light distressing feels classic farmhouse. Dark walnut stain feels warmer and more rustic. Sage green feels cozy and current. Matte black can turn the same rack into a modern farmhouse accent. Test your finish on a scrap piece first because wood can be moody. Pine, especially, sometimes stains with blotchy areas around knots. A conditioner or a lighter stain can save the day.
The fourth lesson is that mounting is part of the build, not an afterthought. Many DIY projects look finished on the workbench but fail when installed poorly. A spice rack full of glass jars has weight, and that weight moves slightly every time someone grabs a bottle. Use a stud whenever possible. If you use drywall anchors, choose anchors rated for the load and install them correctly. Once mounted, give the rack a gentle test before loading it completely. Gentle means gentle, not a full wrestling match.
The fifth lesson is that organization is personal. Some cooks want alphabetical order. Others want “spices I use when pretending dinner was planned.” Both are valid. The best spice rack supports your habits. Put everyday seasonings at eye level. Place baking spices together if you bake often. Keep chili powder, cumin, smoked paprika, and oregano close if taco night is a weekly event. A rack becomes truly useful when it reflects real cooking, not a photo shoot.
Finally, making a farmhouse spice rack reminds you that practical projects can still be beautiful. You are not just storing jars. You are creating a small daily convenience. Every time you cook, the rack saves a few seconds, reduces clutter, and adds warmth to the room. That is the magic of a good DIY project: it quietly improves ordinary life, one labeled jar at a time.
Conclusion
A farmhouse spice rack is a beginner-friendly project with a big payoff. It helps organize your kitchen, keeps favorite seasonings within reach, and adds handmade character to the space. Whether you choose a wall-mounted rack, pantry-door rack, countertop version, or cabinet interior design, the best result starts with real measurements and honest cooking habits.
Use sturdy wood, add front rails, sand carefully, choose a finish that matches your kitchen, and mount the rack safely. Then label your jars in a way that makes sense for your routine. The final result should feel warm, useful, and personal. After all, farmhouse style is not about perfection. It is about comfort, function, and giving your paprika a nicer place to live.