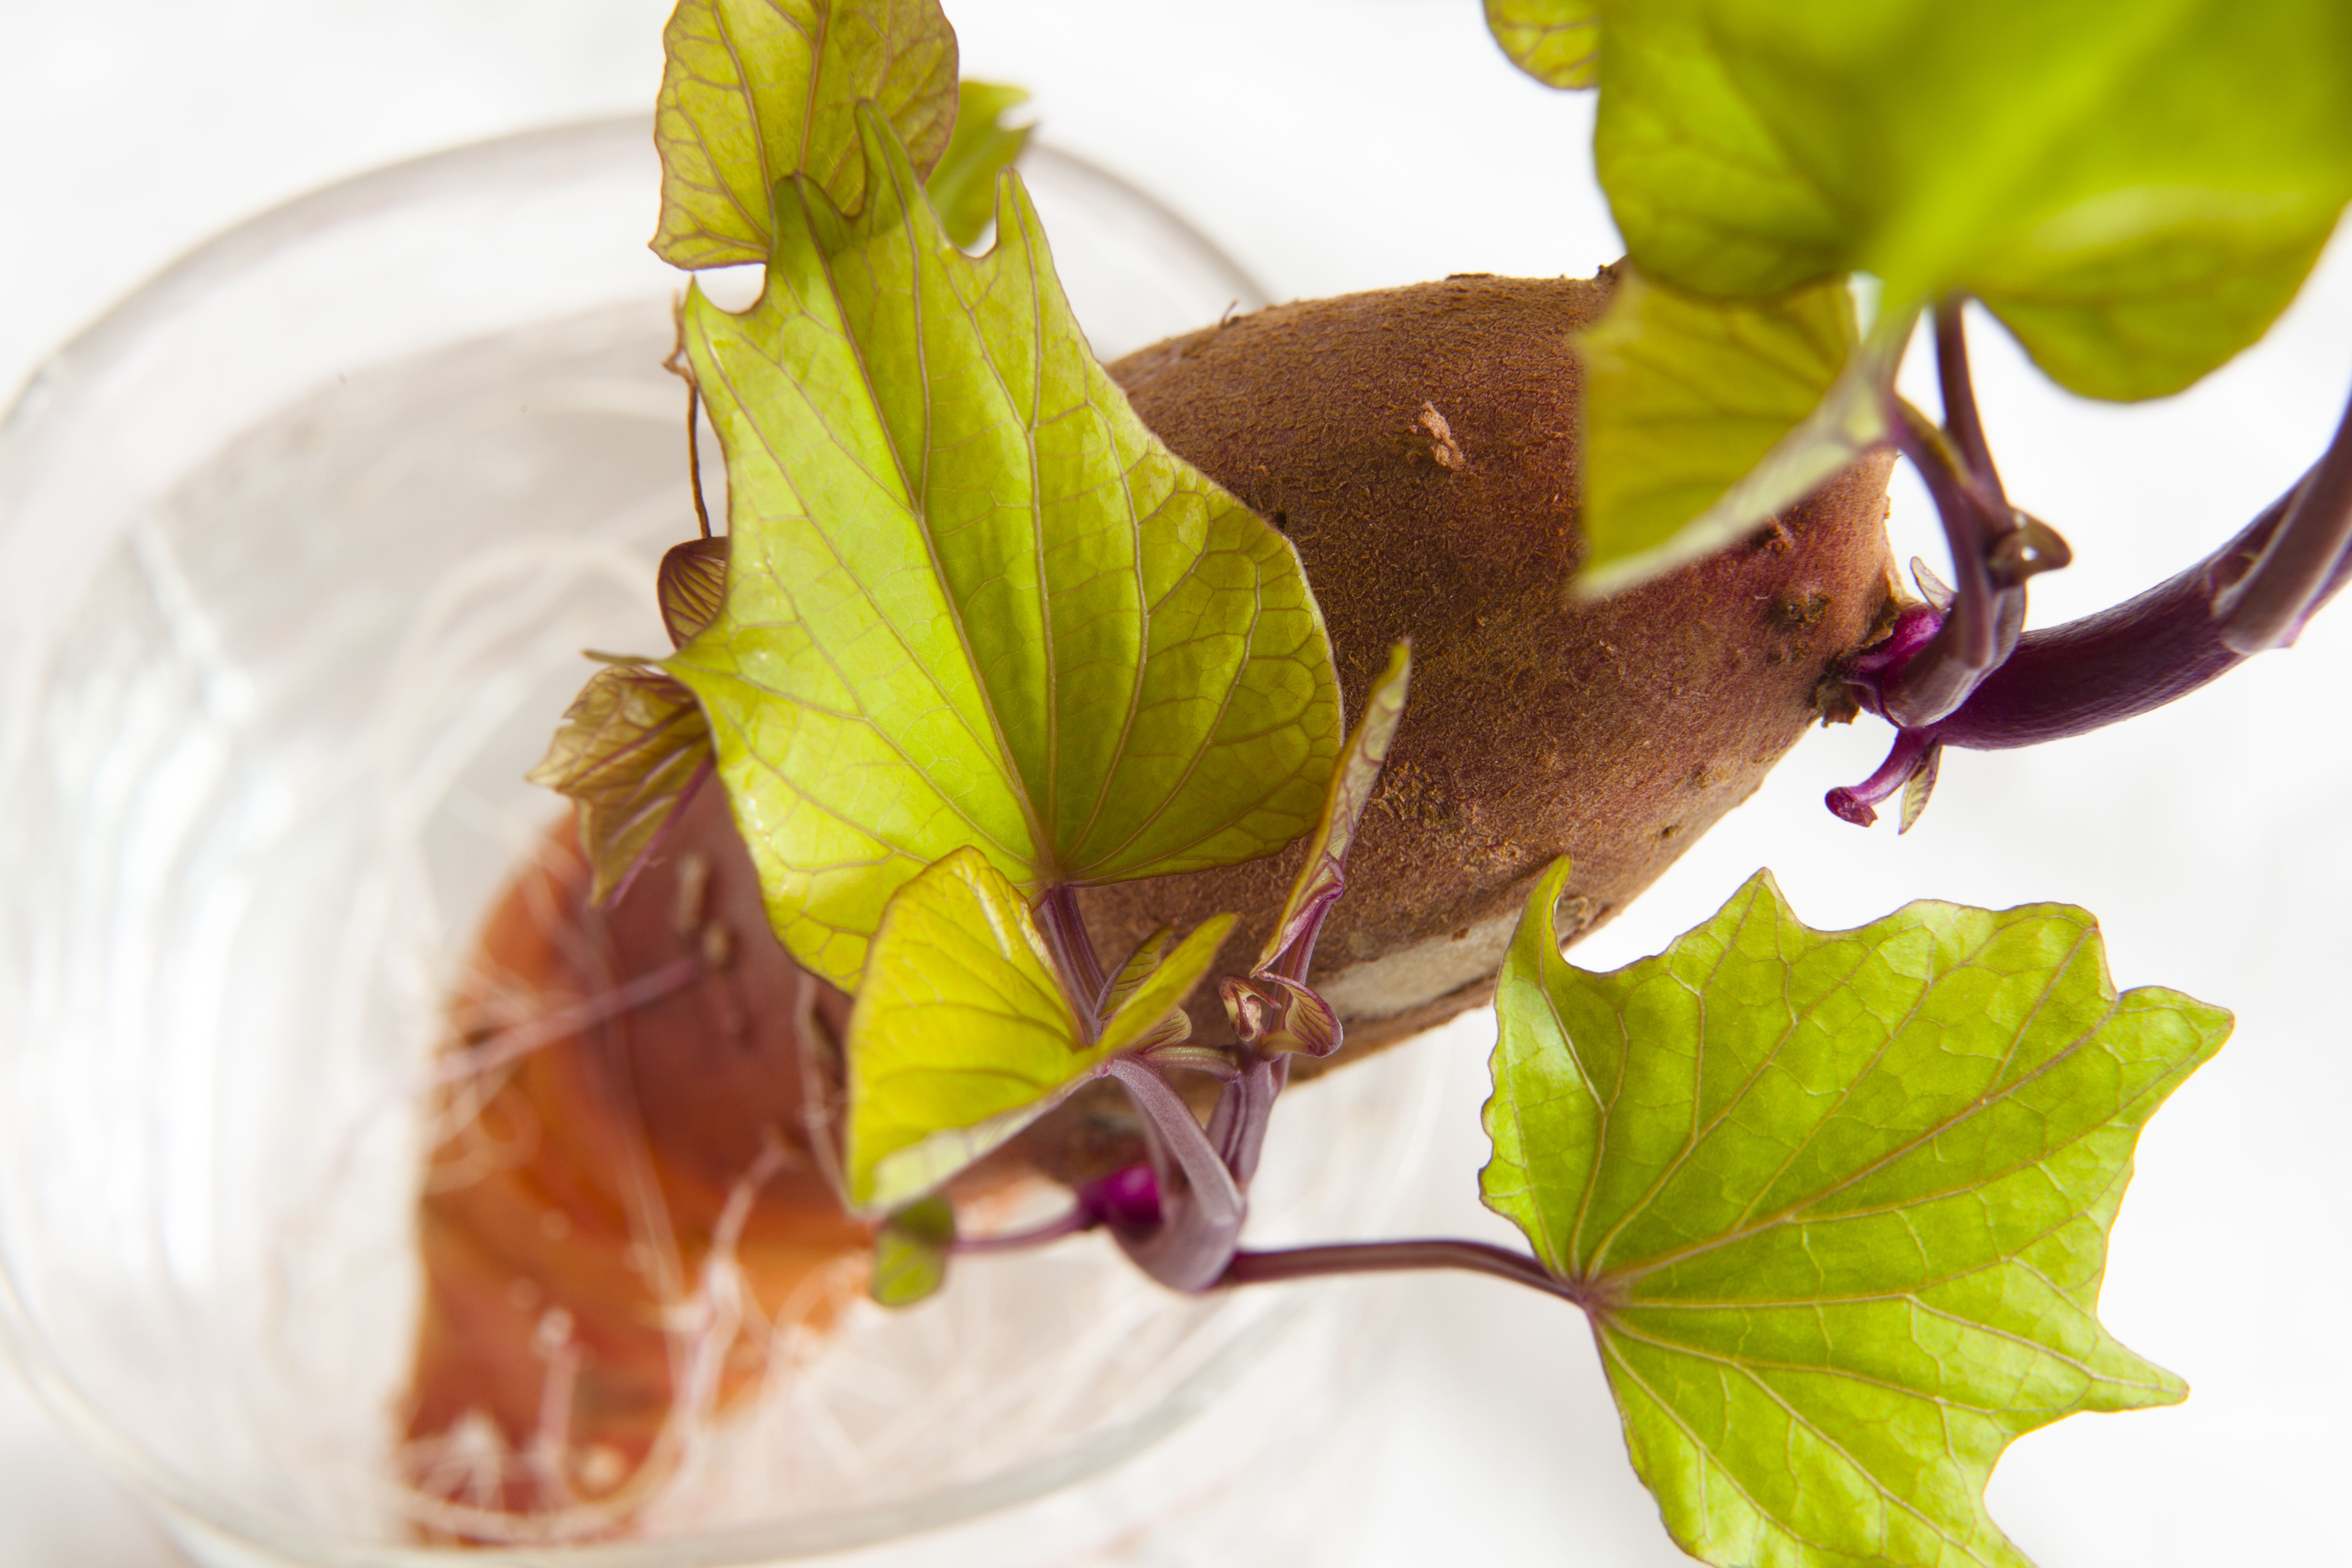
If you have ever left a sweet potato on the counter a little too long and discovered leafy sprouts waving at you like tiny green flags, congratulations: you have already met sweet potato slips. These slips are the young shoots used to grow new sweet potato plants. Unlike regular potatoes, sweet potatoes are not usually grown by planting chunks of tuber in the ground. They are grown from slips, which are rooted sprouts produced from a mature sweet potato root.
Learning how to start sweet potato slips is one of those gardening skills that feels a little magical, a little old-fashioned, and surprisingly practical. You take one healthy sweet potato, give it warmth, moisture, patience, and a cozy place to wake up, and it rewards you with several young plants. It is basically the vegetable garden version of cloning, except less science-fiction and more “I found this jar on the windowsill.”
In this guide, you will learn how to grow sweet potato slips at home, when to start them, which sweet potatoes to choose, how to root slips, when to transplant them, and how to avoid the common mistakes that turn a promising project into a mushy orange disappointment.
What Are Sweet Potato Slips?
Sweet potato slips are young shoots that grow from a mature sweet potato root. Each slip can become a separate sweet potato plant once it develops roots and is transplanted into warm garden soil. A healthy slip usually has a green stem, several leaves, and either small roots already forming or the ability to root quickly in water or moist growing medium.
The important thing to remember is that sweet potatoes are not the same as Irish potatoes. A regular potato grows from seed pieces, or chunks of potato with “eyes.” A sweet potato grows best from slips. Planting a whole sweet potato directly in the garden may produce vines, but it is not the most efficient or predictable method for growing a strong crop.
When Should You Start Sweet Potato Slips?
Timing matters. Sweet potatoes love heat and have absolutely no interest in pretending otherwise. Start slips about 6 to 8 weeks before your outdoor planting date. In many parts of the United States, that means starting them indoors in late winter or early spring and transplanting them after all danger of frost has passed.
The garden soil should be warm before slips go outside. A good rule is to wait until nighttime temperatures are consistently above 60°F and the soil has warmed nicely. If tomatoes are still shivering in your garden, sweet potatoes are not ready to move in either.
Quick Timing Example
If your average last frost date is around May 1, you might start sweet potato slips indoors in mid-March. If your last frost date is later, start later. Gardeners in warm southern climates can often begin earlier, while northern gardeners may need to use season extenders, black plastic mulch, raised beds, or a very sunny location to give sweet potatoes the long warm season they prefer.
Choose the Right Sweet Potato for Slips
The best slip starts with the best “mother” sweet potato. Choose a firm, healthy, unblemished sweet potato with no soft spots, mold, cuts, or signs of rot. Certified disease-free sweet potatoes or slips are ideal because diseases can travel from the root into the new plants. If you saved sweet potatoes from last year’s garden and the crop was healthy, those can work well. Grocery store sweet potatoes can also sprout, but results are less predictable because some may have been treated to reduce sprouting or may carry unknown disease issues.
For the home gardener, a medium-sized sweet potato is usually easier to handle than a giant one. It should look fresh and alive, not like it has been on a long emotional journey in the back of the pantry.
Two Easy Methods for Starting Sweet Potato Slips
There are two popular ways to start sweet potato slips at home: the water method and the soil or sand method. Both can work. The soil method is often closer to commercial and extension-style recommendations because it encourages strong, natural sprout growth. The water method is fun, visible, and popular with beginners because you can watch the roots develop day by day.
Method 1: Starting Sweet Potato Slips in Water
The water method is simple and satisfying. You suspend part of the sweet potato in water, keep it warm and bright, and wait for shoots to grow. This is the classic windowsill science-project method, except the final grade is dinner.
To do it, wash the sweet potato gently without scrubbing off the skin. Insert three or four toothpicks around the middle of the sweet potato. Place it pointed-end down in a glass or jar so that the lower half sits in water and the upper half remains above the rim. Put the jar in a warm, bright location, but avoid a cold windowsill at night.
Change the water every few days to keep it fresh. In a couple of weeks, roots may begin to form below the waterline and sprouts may appear above. Some sweet potatoes sprout quickly; others take their sweet, sweet-potato time. Warmth is the secret. A room around 75°F to 85°F is much better than a chilly corner.
Method 2: Starting Sweet Potato Slips in Soil or Sand
The soil or sand method is excellent for producing sturdy slips. Fill a shallow tray, nursery flat, or container with moist sand, light potting mix, or a loose seed-starting medium. Lay the sweet potato on its side and cover it with about 1 to 2 inches of the medium, leaving it warm and evenly moist.
Place the tray in a warm location. A heat mat can help if your house is cool. The medium should stay damp like a wrung-out sponge, not soggy like a swamp auditioning for a mosquito documentary. Within a few weeks, shoots should emerge from the buried sweet potato. When they reach a usable size, you can remove and root them.
How to Remove Slips from the Sweet Potato
Once the shoots are about 6 to 10 inches long and have several leaves, they are ready to separate. Gently twist or cut each slip from the sweet potato. Try not to damage the base of the slip. Some gardeners prefer twisting because the shoot often comes away cleanly. Others use clean scissors or a small knife for better control.
After removing the slip, place it in a glass of clean water with the lower stem submerged. Keep the leaves above the water. In several days, roots should begin growing from the lower nodes. Once roots are about 1 to 2 inches long, the slip is ready for potting up or transplanting outdoors if the weather is warm enough.
How to Root Sweet Potato Slips
Rooting sweet potato slips is usually easy. The stem nodes are eager to produce roots when given moisture and warmth. Place freshly removed slips in water or tuck them into a moist potting mix. If using water, change it regularly so it stays fresh. If using potting mix, keep it evenly moist and place the slips in bright indirect light for a few days while they recover.
Once rooted, slips should look firm and perky. If a slip wilts slightly right after removal, do not panic. Plants are dramatic. Give it water, warmth, and a little time. However, if the stem turns mushy or black, discard it and use a healthier slip.
When and How to Transplant Sweet Potato Slips
Sweet potato slips should be transplanted outdoors only after the weather is reliably warm. Choose a sunny location with loose, well-drained soil. Sweet potatoes grow best in sandy or loamy soil that allows roots to expand without fighting clay clods like tiny underground weightlifters.
Prepare the bed by loosening the soil 8 to 10 inches deep. Raised beds are a great choice, especially in areas with heavy soil. Avoid using too much nitrogen fertilizer because it can encourage lush vines at the expense of storage roots. In other words, your plants may look like jungle royalty but produce a disappointing harvest underground.
Plant slips about 12 to 18 inches apart in rows spaced 3 to 4 feet apart. Bury the lower portion of the stem, leaving the top leaves above the soil. Water deeply after planting. For the first week, keep the soil consistently moist while the slips settle in.
Best Growing Conditions for Sweet Potatoes
Sweet potatoes need full sun, warm soil, and a long growing season. Most varieties need roughly 90 to 120 days to mature, depending on the cultivar and growing conditions. They are especially productive in hot summer weather, which makes them a favorite in many southern gardens and a rewarding challenge in cooler regions.
Soil
Loose, well-drained soil is ideal. Heavy clay can produce misshapen roots or slow growth. If your soil is compacted, grow sweet potatoes in raised beds, wide ridges, or large containers. Compost can improve soil structure, but avoid making the bed overly rich in nitrogen.
Water
Keep young slips evenly moist after transplanting. Once established, sweet potatoes are fairly resilient, but consistent moisture supports better root development. Avoid waterlogged soil because it can encourage rot.
Sunlight
Give sweet potatoes at least 6 to 8 hours of direct sunlight per day. More sun usually means stronger vines and better production, provided the plants also have enough water.
Common Mistakes When Starting Sweet Potato Slips
Starting Too Late
Sweet potato slips take time. If you start them only a week before planting season, you may find yourself staring at a stubborn root and whispering motivational speeches. Begin 6 to 8 weeks before transplanting so the slips have enough time to grow and root.
Using a Rotten or Damaged Sweet Potato
A soft or moldy sweet potato is not a good candidate. Rot spreads quickly in warm, moist conditions. Start with a healthy root, and remove any sweet potato that becomes mushy during the process.
Keeping the Setup Too Cold
Warmth is critical. Cool conditions slow sprouting dramatically. If your house is chilly, use a seed-starting heat mat or place the tray in a consistently warm area.
Overwatering
Moist is good. Soggy is trouble. Whether you use water, sand, or potting mix, keep things fresh and clean. If the container smells bad, the sweet potato is probably not thriving; it is resigning.
Transplanting Before the Soil Is Warm
Sweet potato slips dislike cold soil. Transplanting too early can stunt them or cause them to fail. Wait until the garden has truly warmed up.
Can You Start Slips from Store-Bought Sweet Potatoes?
Yes, you can start slips from store-bought sweet potatoes, but there are a few cautions. Some grocery store sweet potatoes may sprout beautifully, while others may be slow or reluctant. They may also carry disease, and you may not know the variety. If you want dependable results, buy certified disease-free slips or seed stock from a reputable supplier.
That said, store-bought sweet potatoes are a fun and affordable experiment. Choose organic sweet potatoes if possible, since they may be less likely to have been treated to suppress sprouting. Even then, the best approach is to start more than one root so you have backup plants.
How Many Slips Can One Sweet Potato Produce?
One healthy sweet potato can produce several slips, often enough for a small home garden. The exact number depends on the variety, size of the root, temperature, moisture, and how long you allow it to keep producing. After you remove the first slips, more may continue to grow from the same root.
For a small family garden, starting two or three sweet potatoes can provide plenty of slips. If you only have a tiny raised bed, one productive root may be enough. Sweet potato vines spread generously, so do not plant more slips than your garden can politely host.
How to Care for Slips Before Planting
If your slips are rooted but the weather is not ready, pot them in small containers filled with quality potting mix. Keep them in a warm, bright spot and water when the surface begins to dry. This keeps them healthy until outdoor conditions improve.
Before transplanting, harden off the slips. Set them outside in a protected location for a few hours each day, gradually increasing their exposure to sun and wind over 5 to 7 days. Hardening off helps prevent transplant shock. Think of it as garden orientation week, minus the awkward name tags.
Harvest Expectations After Starting Your Own Slips
Once planted, sweet potato slips grow into vigorous vines. The plants usually need a long frost-free season to produce full-sized roots. Harvest before a hard frost, because cold can damage sweet potatoes. After digging, sweet potatoes are commonly cured in warm, humid conditions to improve sweetness, heal small cuts, and extend storage life.
Starting strong slips does not guarantee a perfect harvest, but it gives your crop a much better beginning. Healthy slips, warm soil, full sun, and loose beds are the foundation of sweet potato success.
Personal Experience and Practical Tips for Starting Sweet Potato Slips
Starting sweet potato slips teaches patience in the most charmingly vegetable-based way possible. The first time many gardeners try it, they expect instant sprouts. They set a sweet potato in a jar, check it twelve minutes later, and feel personally betrayed. Sweet potatoes do not work on internet speed. They work on plant speed, which is slower, quieter, and much better for your blood pressure.
One useful experience is to start more roots than you think you need. Not every sweet potato sprouts at the same pace. One may produce shoots like it is training for the Olympics, while another just sits there looking decorative. By starting two or three, you protect yourself from disappointment and give yourself enough slips to choose the strongest ones.
The soil method often produces sturdier slips than the jar method, especially if the tray is kept warm. The water method is still worth trying because it lets you see what is happening. For beginners, that visibility is motivating. Watching roots form in the jar can make the whole process feel less mysterious. However, if you want a serious batch of slips for the garden, a tray of moist sand or light potting mix is usually more practical.
Another lesson: warmth matters more than almost anything. A sweet potato on a cold windowsill may sprout slowly or not at all. A sweet potato in a warm room, on top of a refrigerator, or near a heat mat usually wakes up faster. Bright light becomes more important once the shoots appear, but warmth is what often gets the process started.
Cleanliness also helps. Change water often if you use a jar. If you use potting mix or sand, keep it moist but not soggy. A bad smell is a warning sign. Healthy slip production should smell earthy or neutral, not like a forgotten lunchbox. If rot appears, remove the affected root before it spreads.
When removing slips, be gentle. A slip with several leaves and a firm stem is far better than a tiny shoot removed too early. Let the shoot reach at least 6 inches if possible. Then place it in water and wait for roots. The rooting stage is encouraging because sweet potato slips often respond quickly. Within days, small white roots may appear along the lower stem.
Transplanting is where many gardeners get too excited. The first warm afternoon of spring is not enough. Sweet potatoes need consistently warm weather. Wait until nights are mild and the soil is warm. If you plant too early, the slips may survive but sulk for weeks. A sulking sweet potato is not dead, exactly, but it is not winning any productivity awards.
In small gardens, spacing matters. Sweet potato vines sprawl enthusiastically. Give them room or plan to guide the vines along the bed. Raised beds make harvesting easier and help keep the soil loose. If you garden in heavy clay, raised beds or large containers can make a huge difference in root shape and size.
Finally, label your varieties. At planting time, you may be certain you will remember which slip is which. By harvest time, after months of watering, weeding, and summer heat, all vines may look like green spaghetti. A simple plant label saves confusion and helps you decide which variety deserves space next year.
The best part of starting sweet potato slips is that it turns one root into many plants. It is inexpensive, satisfying, and surprisingly forgiving. Give the slips warmth, moisture, and time, and they will usually reward you with strong vines and, eventually, a harvest that makes the whole project feel like garden magic.
Conclusion
Starting sweet potato slips is a simple, rewarding way to grow your own sweet potatoes from the very beginning. Choose a healthy sweet potato, start it 6 to 8 weeks before planting time, keep it warm and moist, remove strong shoots, root them, and transplant them only after the soil has warmed. Whether you use the water method or the soil method, the goal is the same: healthy slips with strong stems and roots.
Sweet potatoes are generous plants when given the right conditions. They love heat, sunshine, loose soil, and a little patience from the gardener. Start with good slips, and you are already halfway to a productive harvest.