Painting a basket is one of those suspiciously easy DIY projects that makes people think you suddenly became the kind of person who owns matching storage bins and says things like “intentional texture.” In reality, all it takes is the right prep, the right paint, and enough patience to avoid blasting a poor innocent basket with one thick coat that dries like a frosted cupcake gone wrong.
If you have an old wicker basket from a thrift store, a tired rattan bin that has seen better decades, or a plastic storage basket that is useful but visually offensive, paint can absolutely save the day. A fresh finish can make a basket look coastal, modern, farmhouse, boho, vintage, or delightfully expensive even when it absolutely was not.
In this guide, you’ll learn how to paint baskets step by step, which paint works best for different basket materials, how to avoid drips and gummy texture, and how to get a finish that actually lasts. We’ll also cover design ideas, common mistakes, and a few real-world lessons from people who have learned the hard way that “just wing it” is not always a craft strategy.
Why Painted Baskets Are Worth the Effort
Baskets are already useful, but painted baskets do more than hold blankets, toys, mail, or bathroom clutter. They also become part of your decor. A plain woven basket can look too rustic in a sleek room. A shiny plastic bin can stick out in a cozy living space. Paint bridges that gap.
One coat can turn a cheap basket into a custom storage piece. Two coats and a little painter’s tape can make it look like you paid boutique prices for it. That is the kind of math DIY people enjoy.
Painting baskets is also beginner-friendly. Unlike painting furniture, you usually do not need a workshop, a whole weekend, or a dramatic emotional commitment. Most basket makeovers are small, affordable, and forgiving.
Know Your Basket Before You Paint
Before you pick a color, figure out what your basket is made of. This matters because the best paint for wicker baskets is not always the best paint for plastic baskets.
Natural wicker, rattan, seagrass, willow, or reed
These woven baskets are absorbent and textured. They often take paint beautifully, but they also trap dust and can drink up paint faster than expected. Spray paint is great for an all-over finish, while acrylic craft paint works well for stripes, dipped edges, color-blocking, and hand-painted detail.
Previously painted wicker
If the basket already has an old finish, check for flaking paint, glossy spots, or rough areas. These baskets usually need a little more prep so the new coat sticks instead of sliding around like bad frosting.
Plastic baskets
Plastic can be painted, but it needs the right product. Standard craft paint may scratch off easily unless you prep and seal carefully. A spray paint made for plastic is often the easiest route, especially for solid-color coverage.
Wire or metal baskets
Metal baskets can also be painted, but they need different prep, especially if they have rust or a slick factory finish. If your project is mostly woven natural fiber or plastic, the process below is your sweet spot.
Supplies You’ll Need
- Basket
- Vacuum with brush attachment or a clean dry paintbrush
- Mild dish soap and water
- Microfiber cloths
- Fine-grit sandpaper for glossy or rough areas
- Painter’s tape
- Drop cloth, cardboard, or kraft paper
- Primer, if needed
- Spray paint, acrylic craft paint, or latex paint depending on the basket
- Small angled brush or foam brush for details
- Clear sealer or topcoat, if needed
- Gloves and a mask if you’re spray painting
How To Prep a Basket for Paint
Prep is the least glamorous part of the project, which is exactly why people skip it and then act shocked when the finish chips. Do not be those people.
1. Remove dust and loose debris
Baskets collect dust deep in the weave, especially if they’ve been sitting in a closet, attic, garage, or thrift store corner next to a lamp with no shade. Use a vacuum with a brush attachment, a soft duster, or a small clean paintbrush to remove surface dust from the inside and outside.
2. Clean off grime
If the basket has smudges, sticky spots, or mystery residue that should remain a mystery, wipe it down with a microfiber cloth dampened with warm water and a little dish soap. Natural wicker should not be soaked. Clean lightly, then wipe away soap residue with a clean damp cloth.
If you spot mildew on a natural woven basket, clean carefully and let it dry fully with good airflow before you even think about opening paint.
3. Let it dry completely
This step matters more than people think. Paint and moisture are terrible roommates. A basket that still feels damp can end up with uneven coverage, peeling paint, or a finish that never cures properly.
4. Sand only if needed
If the basket is glossy, already painted, or has flaky finish, lightly sand the problem spots. You are not trying to flatten the weave or punish the basket for its past. You just want to scuff the surface enough to help the primer or paint grip.
Choose the Best Paint for the Job
Spray paint for baskets
Spray paint is usually the easiest option for painting baskets, especially wicker and rattan. It reaches into crevices better than a brush and gives a more even all-over finish. It is ideal for:
- Solid-color makeovers
- Large baskets
- Intricate woven texture
- Fast projects with a smooth finish
If you want a matte, satin, glossy, or chalky look, spray paint gives you lots of choices. Just work in a well-ventilated area and use multiple light coats instead of one heavy coat. Heavy coats are how you end up with drips, clogged weave, and regret.
Acrylic craft paint for baskets
Acrylic craft paint is perfect for decorative designs. Use it when you want stripes, painted rims, color-blocking, geometric accents, floral details, or an ombre look. It is especially good for small indoor baskets that do not need industrial-strength durability.
Use a small flat or angled brush and follow the natural lines of the weave. That gives you cleaner edges and helps the design look intentional instead of “my brush had a side quest.”
Latex or brush-on paint
Brush-on paint can work on baskets, especially for a more textured or artisanal finish. It is handy if you want partial coverage instead of a full painted surface. Just remember that thick brush-on paint can pool in the weave, so work with a light hand.
Plastic-specific spray paint
If you are painting a plastic basket, use a paint formulated for plastic when possible. Plastic is nonporous and can reject regular paint more easily. Test in a hidden spot first, especially with flexible or slick storage baskets.
Do You Need Primer?
Sometimes yes, sometimes no. That annoyingly depends on the basket and the paint.
Use primer when:
- The basket is already painted
- The surface is glossy or slick
- You are making a dramatic color change, like dark brown to white
- You want better durability on a basket that will get frequent use
For natural wicker, primer can also save paint because woven surfaces tend to absorb product. For some plastic-specific paints, the product may be designed to skip primer. Read the can instead of trusting your inner chaos goblin.
Step-by-Step: How To Paint Baskets
Step 1: Protect your workspace
Lay down a drop cloth, cardboard, or kraft paper. If you are spray painting, work outside or in a very well-ventilated area. Windy weather is not your friend unless you want your patio to receive a surprise makeover too.
Step 2: Tape off any design areas
If you want a dipped look, stripes, a painted bottom, or color-blocked sections, use painter’s tape. Press it down firmly, but do not mash it so hard into the weave that removing it becomes a scavenger hunt.
Step 3: Prime if needed
Apply a light coat of primer and let it dry according to the label. On wicker and rattan, spray primer often reaches the weave more evenly than a brush. On a brush-painted project, use slow, consistent strokes to avoid puddling.
Step 4: Apply the paint in light coats
For spray paint, hold the can the recommended distance from the basket and move in smooth, side-to-side passes. Start spraying just off the edge of the basket, sweep across, and stop off the other edge. Overlap slightly with each pass. Thin coats are the secret sauce.
For brush painting, load only a little paint at a time. Paint along the weave rather than fighting it. If you miss tiny gaps, do not panic. Let the first coat dry, then come back with a second pass and a smaller brush.
Step 5: Let it dry, then add a second coat
Almost every basket looks better with two coats than one. The first coat establishes coverage. The second coat makes it look finished. Rushing this stage is how fingerprints get immortalized in your project.
Step 6: Remove tape carefully
Remove painter’s tape slowly once the paint is dry to the touch or according to the product instructions. Pulling too fast can lift soft paint or leave jagged edges.
Step 7: Seal only if the basket needs it
If the basket is decorative and will mostly sit there looking pretty and holding throw blankets, you may not need a topcoat. If it will be used daily, live in a bathroom, hold toys, or spend time outdoors, add a clear protective sealer.
Best Basket Painting Ideas
Dipped basket look
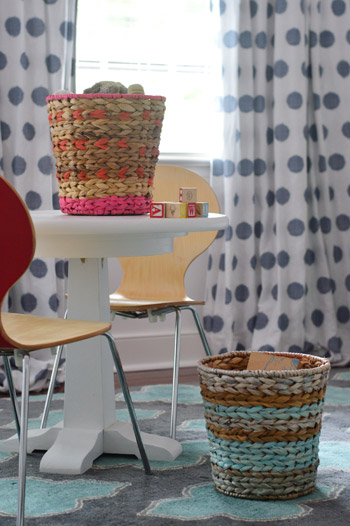
Paint the bottom third in white, black, sage, navy, or terracotta. This is one of the easiest ways to modernize a natural woven basket.
Thin stripes
Follow the horizontal weave lines with acrylic paint for clean, subtle stripes. This works beautifully in entryways, kids’ rooms, and laundry spaces.
Ombre basket
Blend two or three shades upward from the bottom for a soft gradient. This works best with acrylic craft paint and a patient hand.
Color-blocked storage bins
Paint sections in different colors to assign baskets by person or purpose. Great for family mudrooms, toy storage, and shared closets.
Muted vintage finish
Try dusty blue, soft olive, warm cream, or weathered gray for a thrifted basket that needs a second life without shouting about it.
Common Mistakes to Avoid
- Painting a dirty basket
- Using thick coats that clog the weave
- Skipping dry time between coats
- Using the wrong paint on plastic
- Forgetting ventilation during spray painting
- Sealing before the paint has fully dried
- Handling the basket too soon because “it probably looks dry”
How To Make Painted Baskets Last Longer
Once the basket is finished, treat it like a real decor piece, not a wrestling prop. Avoid scraping it against rough walls or floors. Store natural woven baskets in dry spaces with airflow. If the basket lives outdoors or in a damp area, choose paint and sealer rated for that use.
For indoor baskets, routine dusting goes a long way. A quick pass with a vacuum brush attachment keeps the weave clean without grinding dirt into the finish. If the basket gets scuffed over time, small touch-ups are easy, especially if you saved the paint color. Future you will be thrilled. Or at least mildly appreciative.
Final Thoughts
If you have been wondering how to paint baskets without ruining them, the answer is surprisingly simple: clean well, choose the right paint, work in light coats, and let the basket dry like your whole reputation depends on it. Whether you want a full-color transformation or just a small painted detail, baskets are one of the easiest home decor pieces to customize.
The beauty of this project is that it can be practical and stylish at the same time. A painted basket can organize your mess, upgrade your room, and make a thrift-store find look custom. That is a pretty excellent return for one afternoon, a few supplies, and a healthy respect for dry time.
Real-Life Experiences and Lessons From Painting Baskets
The first time many people paint a basket, they assume it will behave like a flowerpot or a wooden crate. Then the basket reminds them that woven texture has opinions. Paint disappears into some areas, gathers in others, and somehow reveals dust you were completely sure you had already cleaned. That does not mean the project is hard. It just means baskets reward patience more than brute force.
A common experience is finding a beautiful thrifted wicker basket with great shape and deeply questionable color. Maybe it is orange-brown in a room that wants soft neutrals, or maybe it has yellowed with age and now gives off “retired Easter decor from 1997.” Once painted, though, that same basket can look fresh, intentional, and much more expensive. This is why painted basket makeovers are so addictive. You start with one. Suddenly you are staring at every basket in your house like a casting director.
Another real lesson is that small designs often look better than full coverage. Many DIYers expect to paint every inch, only to realize that leaving some natural texture visible creates a richer result. A dipped base, a painted rim, or thin stripes across the weave can feel more sophisticated than a completely coated basket. The natural material still brings warmth, while the paint adds style. It is the home-decor version of knowing when to accessorize and when to calm down.
People also learn quickly that spray paint is both a hero and a menace. It is fantastic for reaching deep weave and giving even coverage, but only if you use a light hand. One enthusiastic pass too many, and the basket starts to look gummy. The smartest painters go slower than they think they need to. They rotate the basket, spray from different angles, let coats dry properly, and accept that perfection usually comes from layering rather than blasting.
There is also the emotional journey of painter’s tape. At first, it feels like an unnecessary extra step. Then you peel it off and get those clean lines, and suddenly you understand why people become loyal to it. Tape is what turns “cute craft” into “where did you buy that?” Especially on baskets, where the weave can make freehand edges look messy, masking really helps.
Perhaps the most useful lesson is that painted baskets are not just decorative. They solve problems. A basket can hide dog toys, wrangle chargers, tame bathroom products, sort pantry items, or corral the mountain of random stuff that appears by the front door for no apparent reason. When the basket also matches the room, it stops looking like storage and starts looking like decor. That is the sweet spot.
So yes, painting baskets is a craft project. But it is also a practical upgrade, a budget-friendly makeover, and a strangely satisfying way to make everyday clutter look like it belongs in your home on purpose.