Note: This project is designed with safety in mind. Use battery-operated LED tea lights for the easiest and safest glow, especially if kids are helping or if the lanterns will be used indoors.
Turn an Empty Tin Can Into a Valentine’s Day Lantern
Some Valentine’s Day decorations whisper “romance.” Others shout “I spent too much money at a craft store and now I own glitter in three places I did not know existed.” An upcycled tin lantern lands perfectly in the middle: charming, inexpensive, personal, and just rustic enough to make your dinner table look like it was styled by someone who owns a hot glue gun and knows how to use it responsibly.
This DIY Valentine’s Day tin lantern project transforms a clean empty can into a glowing luminary decorated with hearts, initials, dots, arrows, or a sweet “XOXO” pattern. It is a simple craft, but the finished result feels surprisingly special. The punched holes let light shine through like tiny stars, while the painted surface gives the lantern a polished holiday look. Best of all, you are reusing something that might otherwise land in the recycling bin. That is upcycling with a wink.
Whether you are making Valentine table decorations, a handmade gift, a cozy mantel display, or a budget-friendly craft for a classroom or family night, this guide walks you through every step. You will learn how to prep the can, create a design template, punch the pattern cleanly, paint it beautifully, add a handle if desired, and light it safely.
Why an Upcycled Tin Lantern Is Perfect for Valentine’s Day
Valentine’s Day decor can easily tip into too much pink, too many plastic hearts, and enough ribbon to restrain a parade float. A tin can lantern keeps things sweet without feeling fussy. It is handmade, reusable, and customizable. You can make it romantic with a heart pattern, playful with polka dots, modern with a geometric design, or sentimental with initials.
Upcycling also adds meaning. Instead of buying a one-season decoration, you are giving a second life to an everyday container. Empty soup cans, tomato cans, coffee cans, and vegetable cans all work well. The project is also flexible: make one lantern as a small Valentine gift, or create a group of three to five lanterns for a glowing centerpiece.
Great Uses for Valentine Tin Can Lanterns
Use your finished lanterns on a dining table, entryway bench, mantel, bookshelf, covered porch, or dessert station. They also make thoughtful handmade gifts when filled with candy, a note, or a battery tea light. For parties, you can personalize each lantern with a guest’s initial and use it as a place card. Suddenly, your seating chart has mood lighting. Very fancy.
Materials You Will Need
Before you start, gather your supplies. Having everything ready makes the project smoother and reduces the chance of wandering around the house holding a hammer while asking where the painter’s tape went.
Basic Supplies
- 1 clean empty tin can, label removed
- Water for freezing inside the can
- Hammer
- Large nail, awl, or metal punch
- Towel or folded cloth
- Permanent marker
- Painter’s tape or masking tape
- Paper template or graph paper
- Work gloves
- Metal file or sandpaper for sharp edges
- Spray paint or acrylic paint suitable for metal
- Battery-operated LED tea light
Optional Decorative Supplies
- Red, pink, white, gold, or metallic paint
- Clear sealant
- Floral wire or sturdy craft wire for a handle
- Ribbon, twine, lace, or raffia
- Heart stickers or vinyl decals
- Paint pens for lettering
- Small drill bit for cleaner handle holes
Step 1: Choose the Right Can
The best can for a DIY tin lantern is sturdy, smooth, and free from major dents. Soup cans and vegetable cans are excellent for small lanterns. Coffee cans or large tomato cans work well for bigger centerpieces. Avoid thin soda cans for this specific punched-hole method because they bend easily and can create sharper edges.
Wash the can thoroughly with warm soapy water, then remove the label. If glue remains, soak the can for a few minutes and scrub it with a sponge. Dry the outside, but do not worry about drying the inside if you are moving straight to the freezing step.
Safety Tip: Check the Rim
After opening a can, the top edge may be sharp. Smooth it with a metal file, sandpaper, or a safety can opener that leaves a cleaner edge. Wear gloves while handling cut metal. Valentine’s Day should involve hearts, not surprise finger bandages.
Step 2: Fill the Can With Water and Freeze It
Fill the can almost to the top with water and place it upright in the freezer overnight. The ice supports the can from the inside while you punch holes into the metal. Without that support, the can may collapse or dent as you hammer the design.
Leave a little space at the top because water expands as it freezes. If the bottom bulges slightly after freezing, let the can sit for a few minutes before working. You can also place it on a towel to keep it steady.
Step 3: Plan Your Valentine’s Day Design
A good lantern design is simple enough to punch but detailed enough to glow beautifully. Think in dots, not lines. Every hole becomes a point of light, so your design should be made from dotted outlines.
Easy Valentine Pattern Ideas
- A large heart in the center
- Two overlapping hearts
- “XOXO” in dotted letters
- A cupid arrow wrapping around the can
- Your initials inside a heart
- Rows of tiny hearts
- Random polka dots with one bold heart
- A heart-shaped constellation pattern
If you are new to this craft, start with one large heart. It is easy to draw, easy to punch, and very forgiving. If one hole goes slightly rogue, congratulations: your heart has personality.
Step 4: Create and Attach the Template
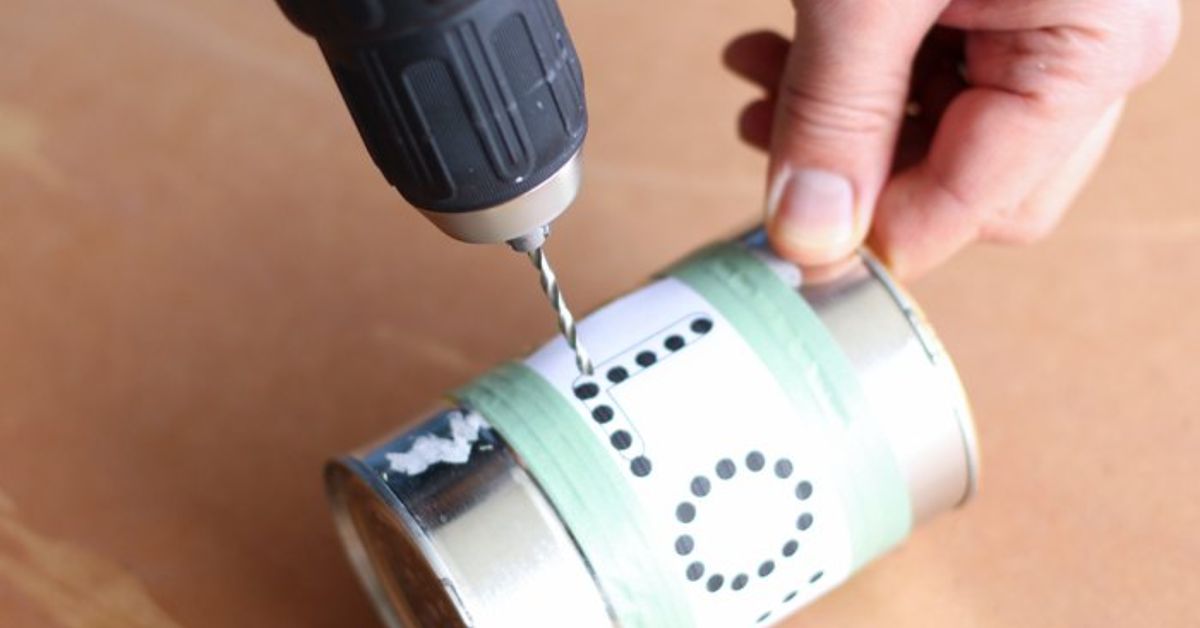
Draw your design on paper, or print a simple heart outline. Graph paper is helpful because it keeps spacing even. Mark dots along the outline about 1/4 inch apart. Larger spacing creates a softer glow; closer spacing creates a brighter, more detailed design.
Wrap the template around the frozen can and secure it with painter’s tape. Make sure the paper lies flat against the metal. If the design shifts while you work, the finished heart may look like it has been through an emotional breakup.
Step 5: Punch the Holes
Place the frozen can on its side on a folded towel. The towel keeps the can from rolling and protects your work surface. Put on gloves, position the nail or awl over the first dot, and tap gently with the hammer until the metal is pierced. Continue around the design.
You do not need to smash the nail through the can. Small, controlled taps work best. Try to keep the holes consistent, but do not obsess over perfection. Handmade lanterns look beautiful because they are handmade. Tiny irregularities give the glow character.
How to Make the Design Brighter
For brighter light, punch a few larger holes in key spots, such as the center of a heart, the end of an arrow, or around the rim. You can use a slightly larger nail for accent holes. Do not place holes too close together, or the metal may tear.
Step 6: Add Handle Holes If You Want a Hanging Lantern
If you want to hang the lantern, punch or drill two holes near the top rim on opposite sides of the can. Later, you can thread wire through these holes to make a handle. A hanging tin lantern looks lovely on a shepherd’s hook, porch hook, or indoor decorative branch. Just remember that hanging lanterns should use LED lights only, not open flames.
Step 7: Melt the Ice and Dry the Can
Once the design is punched, run warm water over the outside of the can or let it sit in the sink until the ice loosens. Remove the ice and dry the can completely. Pay attention to the inside, the punched holes, and the bottom seam. Paint adheres better when the metal is dry.
If any holes have sharp burrs inside the can, gently file them down. This is especially important if kids will handle the finished lantern.
Step 8: Paint the Lantern
Paint turns the project from “empty bean can” into “artisan Valentine luminary.” Spray paint gives the smoothest finish, but acrylic craft paint can also work if it is made for metal or sealed afterward. Classic Valentine colors include red, blush pink, white, burgundy, rose gold, and metallic gold.
Painting Tips for a Cleaner Finish
- Paint outdoors or in a well-ventilated area.
- Use light coats instead of one heavy coat.
- Let each coat dry before adding another.
- Turn the can upside down to paint the bottom edge.
- Clear clogged holes with a toothpick before the paint fully dries.
For a romantic farmhouse look, paint the can white and lightly dry-brush pink over the raised edges. For a bold Valentine centerpiece, paint it deep red and add gold dots around the top. For a modern style, try matte black with a heart pattern; the contrast looks dramatic when lit.
Step 9: Add a Wire Handle
Cut a piece of craft wire long enough to arch over the can. Thread one end through a side hole, twist it securely, then repeat on the other side. Use pliers if needed. Keep the handle simple, or wrap it with ribbon or twine for extra charm.
If the lantern will sit on a table, you can skip the handle. A handle is decorative, but not required. In fact, handle-free lanterns often look cleaner in a centerpiece arrangement.
Step 10: Decorate the Outside
This is where the project becomes personal. Tie a small ribbon around the top, add a lace band around the middle, write a name with a paint pen, or glue on a tiny paper tag that says “Be Mine.” Keep decorations away from punched holes so the light can shine through.
If you plan to use the lantern outdoors, choose weather-resistant decorations or keep the design simple with paint and sealant. Paper hearts are cute until rain turns them into emotional confetti.
Step 11: Light It Safely
Place a battery-operated LED tea light inside the can. LED lights are the best choice because they do not create an open flame, do not melt wax, and are safer around children, pets, curtains, table runners, and other decorations.
If you choose to use a real tea light, place the lantern on a heat-resistant surface, keep it away from anything flammable, and never leave it unattended. Metal can become hot, so do not pick up a lit lantern with bare hands. Blow out the candle before moving it. Safety may not sound romantic, but neither does explaining scorch marks on the dining table.
Creative Design Variations
Rustic Valentine Lantern
Use a plain silver can, punch a simple heart, and wrap twine around the rim. Add a small kraft paper tag with a handwritten message. This style looks sweet with farmhouse decor, wood trays, and neutral linens.
Glam Valentine Lantern
Paint the can metallic gold or rose gold. Punch a repeating heart pattern and add a satin ribbon handle. Use warm white LED lights for a soft glow. This version looks elegant on a dinner table or dessert bar.
Kids’ Valentine Craft Version
Adults should handle the punching, filing, and any sharp metal edges. Kids can help draw the template, choose paint colors, add stickers, and place the LED light inside. For a classroom-friendly version, prepare the punched cans ahead of time and let children decorate them with paint pens and adhesive foam hearts.
Personalized Couple’s Lantern
Punch two initials inside a heart, such as “A + J.” Add the year on the back with a paint pen. This makes a cute anniversary keepsake, wedding shower decoration, or handmade Valentine gift.
Common Mistakes and How to Avoid Them
The Can Dents While Punching
This usually happens when the can is not frozen solid or the hammering is too forceful. Freeze the can overnight and use gentle taps. Let the tool do the work instead of attacking the poor can like it owes you money.
The Pattern Looks Uneven
Use graph paper or mark dots before punching. If the template slips, stop and re-tape it. A slightly uneven handmade design is fine, but a moving template can turn “heart” into “mysterious potato.”
The Paint Blocks the Holes
Apply thin coats and clear the holes with a toothpick while the paint is still soft. Spray from different angles lightly rather than blasting paint straight into the design.
The Lantern Is Too Dim
Use a brighter LED tea light, add more holes, or create a second row of accent dots around the main design. Painting the inside white or metallic can also help reflect more light.
How to Style Your Valentine Tin Lantern
A single lantern is lovely, but a small collection creates more impact. Try grouping three cans in different heights. Use a large tomato can, a standard soup can, and a small tomato paste can. Paint them in coordinating shades of red, pink, and white. Place them on a tray with faux rose petals, greenery, wrapped candies, or small paper hearts.
For a romantic dinner, set one lantern at each end of the table and keep the centerpiece low so guests can actually see each other. Nothing says “romance” like making eye contact over pasta instead of peering around a giant floral arrangement.
For a front porch display, use several lanterns along a step or windowsill with LED lights. Avoid placing them where wind can knock them over. If using them outdoors, seal the paint and bring the lanterns inside after the holiday to prevent rust.
How to Store and Reuse the Lantern
One of the best parts of this upcycled Valentine craft is that it can be reused. After Valentine’s Day, remove ribbons or paper decorations and store the lantern in a box with other seasonal decor. Wrap it in tissue paper to protect the paint.
You can also repaint it for another holiday. A heart lantern can become wedding decor, anniversary decor, or a cozy bedroom accent. A dotted pattern without hearts can be reused for summer patios, fall tables, or holiday mantel displays. Upcycling does not have to be a one-night romance.
Experience Notes: What I Learned Making Valentine Tin Lanterns
The first thing you learn when making an upcycled tin lantern is that simple designs win. It is tempting to sketch an elaborate heart with swirls, initials, arrows, tiny stars, and maybe a miniature Cupid if ambition has taken over your common sense. But once you begin punching holes into frozen metal, you realize that every dot takes time. A clean heart shape with evenly spaced holes often looks better than a complicated design that becomes crowded.
Freezing the can makes a huge difference. When I tried a test can without ice, the metal dented quickly and the pattern looked wobbly. With ice inside, the can stayed firm and the nail went through more cleanly. The towel underneath also mattered. It stopped the can from rolling and made the hammering quieter. Quieter is good, especially if you are crafting at night and do not want your household to think you are building furniture for a tiny raccoon.
Another useful lesson is to keep the holes medium-sized. Very tiny holes look delicate, but they do not always let enough light through. Larger holes shine brighter, but too many large holes can weaken the design. A mix works beautifully: small holes for the outline and a few larger accent holes near the center or around the rim. When the LED candle turns on, that combination gives the lantern depth.
Paint choice also changes the mood. Pink feels playful, red feels classic, white feels clean and farmhouse-inspired, and metallic gold feels surprisingly elegant. Matte paint gives a modern look, while glossy paint reflects more light. If you are making several lanterns, using two or three related colors looks more intentional than painting every can the same shade.
The biggest practical tip is to use LED tea lights. They are easy, safe, and reusable. Real candles can look beautiful, but the metal gets hot and the flame requires attention. With LED lights, you can place lanterns on a mantel, shelf, or dinner table without worrying as much. You still want common sense, of course, but LED lights make the project more relaxed.
Finally, the charm of this DIY project is not perfection. The paint may have a tiny drip. One hole may be slightly off. The heart may lean a little to the left like it has strong opinions. That is part of the appeal. Handmade Valentine decor feels warm because someone took the time to make it. An upcycled tin lantern is inexpensive, sustainable, and personal, but it also has that magical quality every good craft should have: it makes ordinary stuff feel special.
Conclusion
Learning how to make an upcycled tin lantern for Valentine’s Day DIY is a fun way to turn a basic household item into a glowing decoration with personality. With a clean can, a simple heart template, a frozen water trick, careful hole punching, and a little paint, you can create a handmade lantern that looks charming on a table, mantel, porch, or gift tray.
This project is budget-friendly, beginner-friendly, and easy to customize. Make one for a sweet handmade gift, or create a whole set for a romantic dinner display. Keep the design simple, use LED tea lights, and let the tiny punched holes do what they do best: turn a recycled can into a warm Valentine glow.