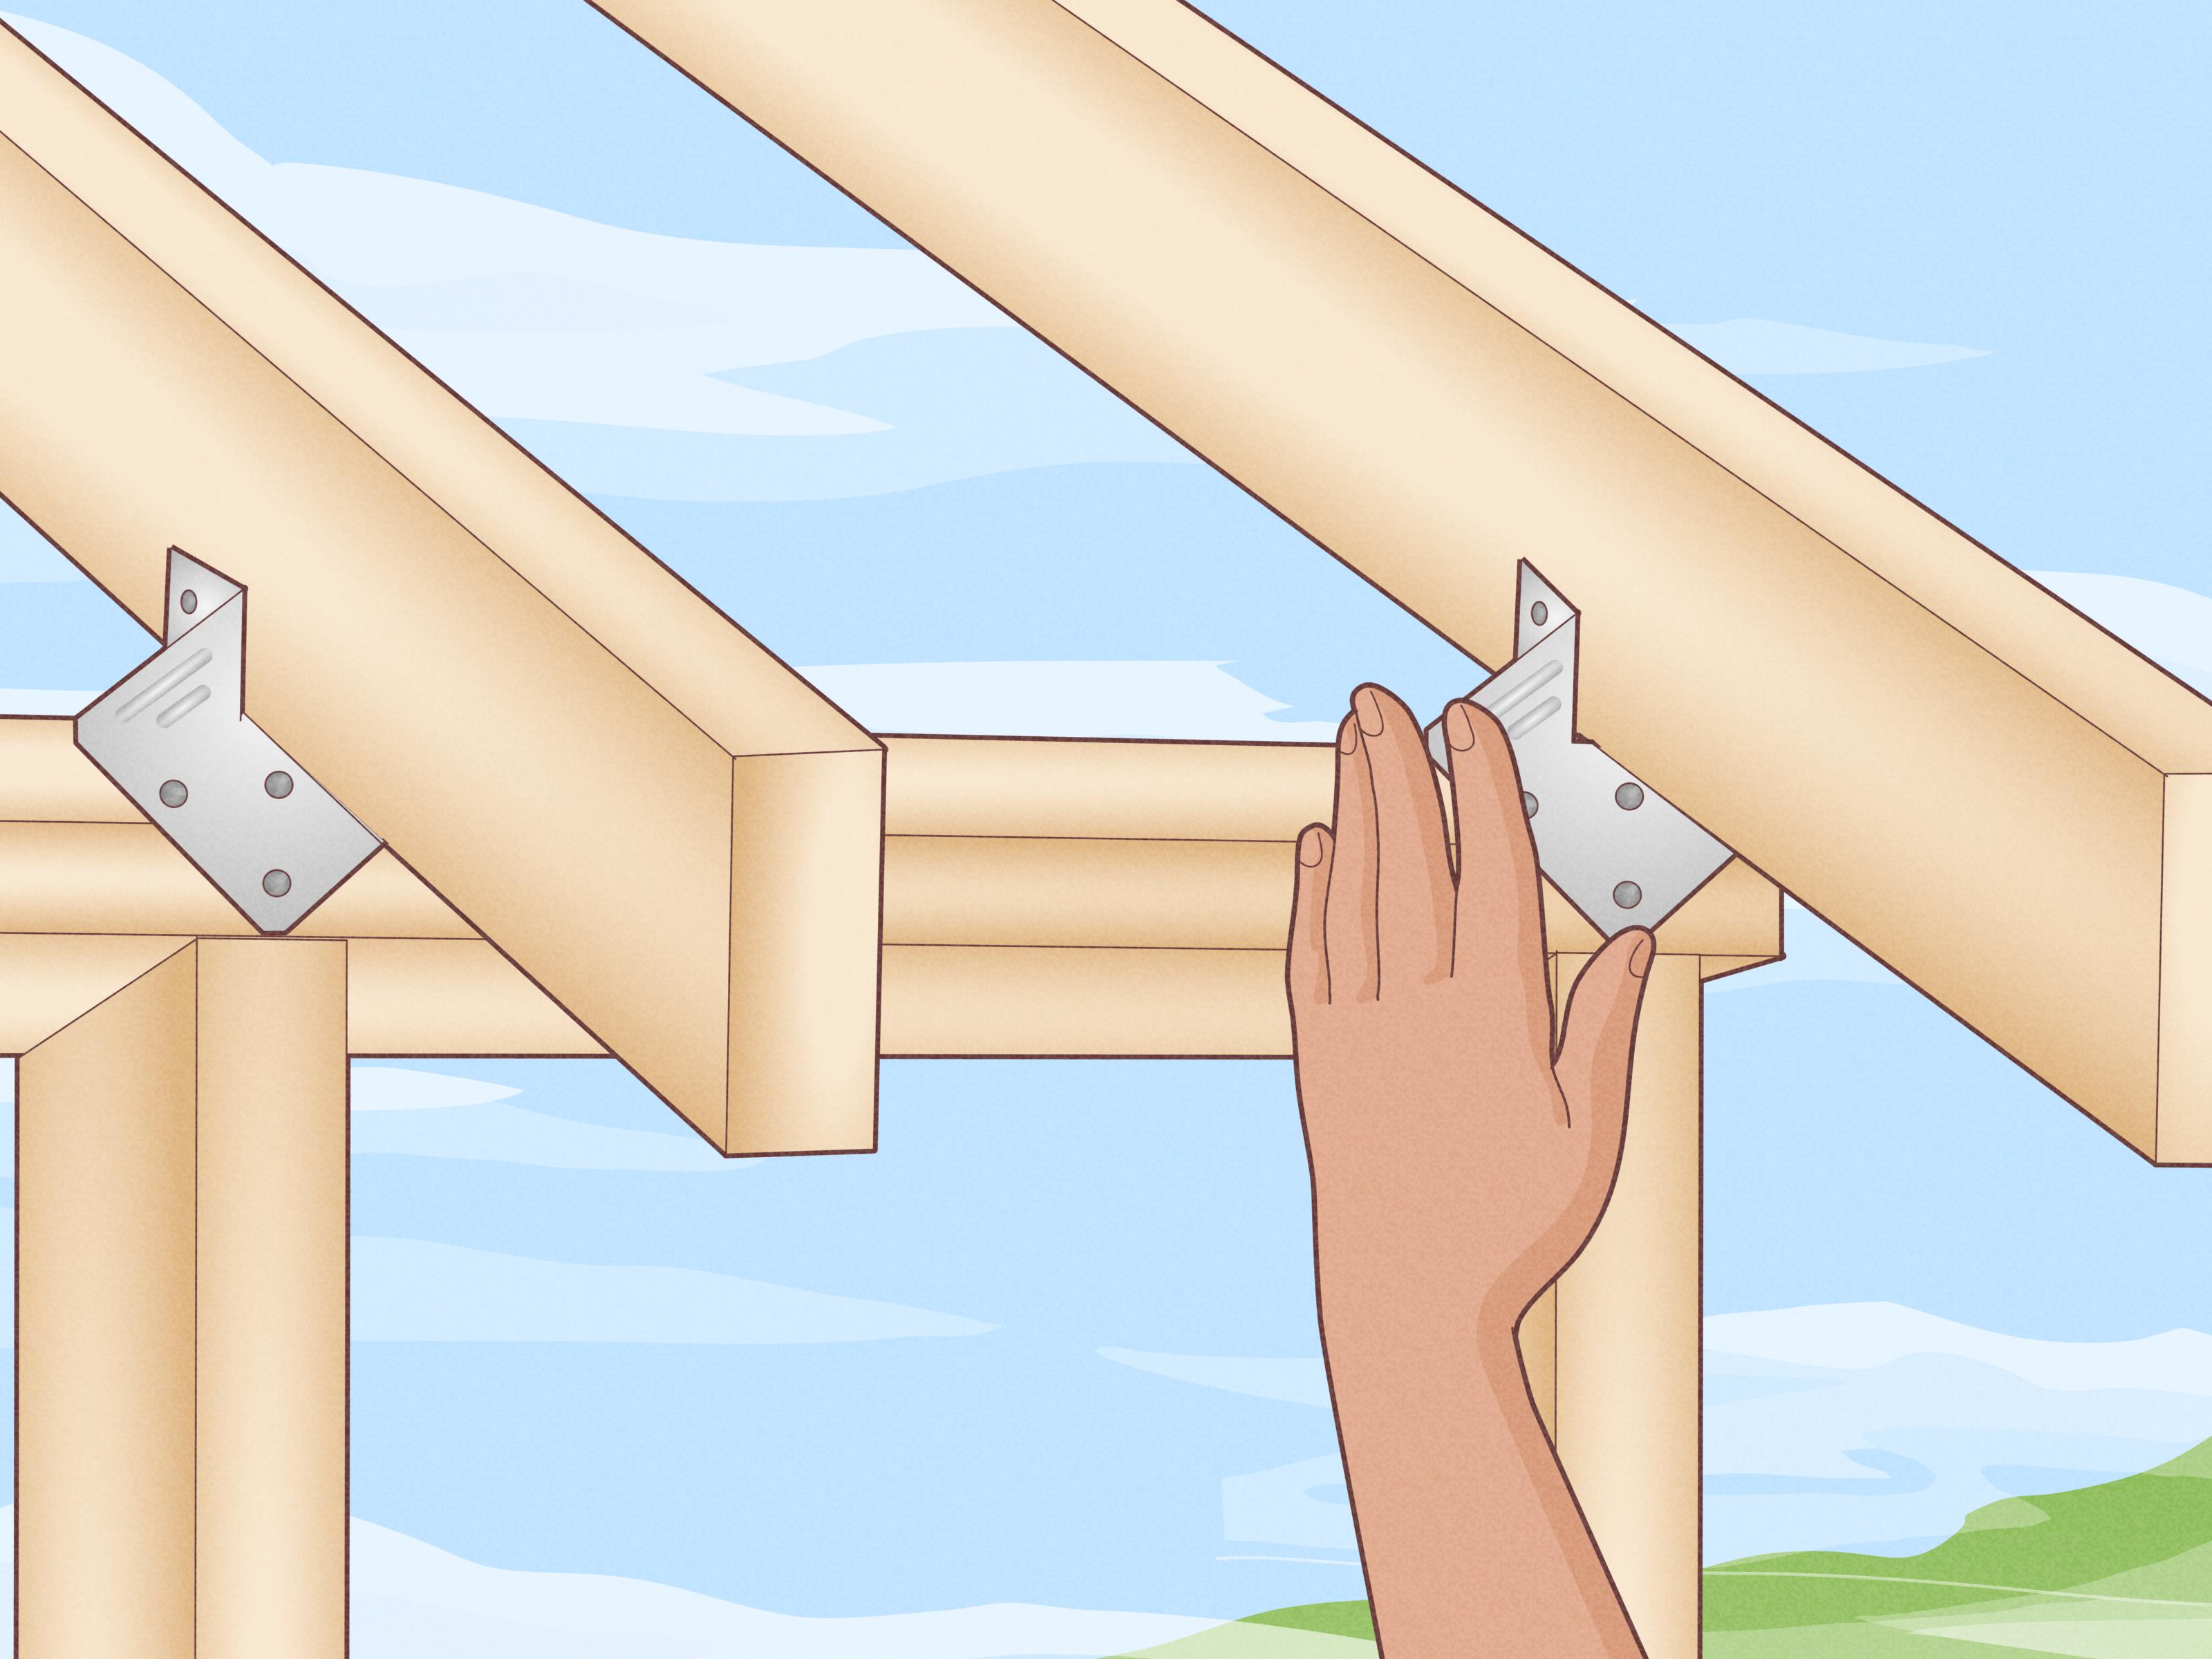
Hurricane clips are small pieces of metal with a very big job: helping keep your roof attached to your walls when high winds decide to act like an unpaid demolition crew. Also called hurricane ties, roof-to-wall connectors, or uplift connectors, these metal brackets strengthen the connection between roof rafters or trusses and the wall top plate.
In hurricane-prone and high-wind regions, this connection matters because wind does not simply “push” on a house. It can create uplift forces that try to peel the roof away from the walls. Once the roof goes, rain, pressure, debris, and structural damage can quickly turn a bad day into a very expensive one.
This guide explains how to install hurricane clips in 9 practical steps, including planning, choosing connectors, placing fasteners correctly, avoiding common mistakes, and knowing when to call a licensed contractor or structural engineer. The goal is not to turn your attic into a weekend circus. The goal is to help you understand the right process so the job is safe, code-compliant, and strong enough to matter.
Important safety note: Hurricane clip installation may involve attic work, ladders, roofing, structural framing, electrical hazards, permits, and local code requirements. If you are not experienced with structural carpentry, hire a licensed contractor. A clip installed incorrectly is mostly decoration with nails.
What Are Hurricane Clips?
Hurricane clips are galvanized or stainless-steel metal connectors designed to fasten a roof rafter or truss to the wall framing below it. They help create a stronger roof-to-wall connection, which is one part of a larger structural concept called a continuous load path.
A continuous load path means the forces from wind are transferred from the roof, through the walls, and down into the foundation. In plain English: the house is tied together from top to bottom instead of politely hoping gravity handles everything.
There are several types of hurricane connectors, including compact clips, twist straps, single straps, double straps, saddle ties, gusset angles, and retrofit structural screws. The right choice depends on your roof framing, wall type, local wind zone, building code, and manufacturer specifications.
Why Installing Hurricane Clips Matters
Hurricane clips help resist wind uplift, especially where rafters or trusses meet the top plate of an exterior wall. Older homes may rely mainly on toenails, which are nails driven at an angle through the rafter or truss into the wall plate. Toenailing may be acceptable in some low-wind situations, but it generally provides less uplift resistance than properly installed metal connectors.
Properly installed hurricane clips can also support wind mitigation improvements, insurance inspections, and retrofit programs in some states. However, insurance credit rules vary, and inspectors often look closely at whether every rafter or truss is connected, whether the correct nails were used, and whether the installation matches manufacturer instructions.
Tools and Materials You May Need
Before beginning, gather the right supplies. At minimum, most projects require hurricane clips or ties approved for your framing condition, manufacturer-specified nails or screws, a hammer or palm nailer, measuring tape, pencil, flashlight or headlamp, work gloves, eye protection, dust mask, knee pads, and a safe ladder or attic access system.
Use only the fasteners specified by the connector manufacturer. Many hurricane ties require specific structural connector nails, such as 8d or 10d galvanized nails, depending on the model and application. Do not substitute drywall screws, deck screws, random leftover nails, or “mystery hardware from the coffee can.” Structural connectors are tested as systems, meaning the clip and fastener work together.
How to Install Hurricane Clips: 9 Steps
Step 1: Check Local Building Codes and Permit Rules
Start by checking your local building department’s requirements for roof-to-wall connections. Codes can vary by state, county, city, wind zone, roof type, and whether the work is new construction or a retrofit. Coastal areas often have stricter requirements because salt air, high winds, and storm exposure are not exactly gentle house guests.
If your home is in a hurricane-prone region, a high-wind zone, or a designated wind-borne debris area, you may need specific connector types, fastener schedules, corrosion-resistant materials, inspections, or engineering approval. If you are upgrading an existing home, ask whether the work qualifies as a structural retrofit and whether a permit is required.
Step 2: Inspect the Roof-to-Wall Connection
Next, inspect the area where the roof rafters or trusses meet the wall top plate. In new construction, this is usually visible before drywall and exterior sheathing fully cover the framing. In existing homes, access may be through the attic, soffit, or during reroofing when eave sheathing is removed.
Look for signs of damage, rot, insect activity, cracked framing, loose connections, missing fasteners, or corroded metal. If the wood is soft, split, badly notched, or deteriorated, do not simply nail a shiny clip over the problem and declare victory. Damaged framing may need repair or replacement before hurricane clips can do their job.
Also identify whether your roof uses rafters or engineered trusses. Trusses should not be cut, drilled, altered, or modified without engineering guidance. They may look like regular lumber, but structurally they are more like a carefully balanced math problem wearing a hard hat.
Step 3: Choose the Correct Hurricane Clip or Tie
Select a connector that matches your framing condition. Common residential options include H-shaped hurricane ties, twist straps, rafter-to-top-plate clips, saddle ties, and longer straps that extend down toward wall studs. Some connectors are designed for single-sided installation, while others wrap over the top of the rafter or truss.
Read the manufacturer’s installation guide before buying a box of clips. Confirm the connector fits your lumber size, roof pitch, load requirement, installation side, and fastener type. For coastal homes or locations exposed to salt spray, stainless steel or higher-corrosion-resistant connectors may be necessary. Standard galvanized hardware may not last long in harsh marine environments.
When in doubt, ask a contractor, engineer, or building official. The strongest-looking connector is not always the correct connector. A wrong connector fully nailed is still wrong; it just took more effort.
Step 4: Mark Every Rafter or Truss Location
For hurricane clips to be effective, the upgrade should be consistent. In most roof-to-wall retrofit guidance, every accessible rafter or truss along the exterior wall line should receive an approved connection. Skipping every third connection because the attic got hot is not a structural strategy.
Use a pencil or marker to identify each connection point. If you are working from an attic, move carefully and step only on properly supported framing or platforms. Never step directly on drywall ceiling panels. Drywall is excellent at holding paint, not people.
Check for obstructions such as electrical wiring, plumbing vents, HVAC ducts, insulation, and recessed lighting. Plan your work path before opening a tool bag. This saves time and reduces the chance of accidentally turning a simple retrofit into a surprise repair project.
Step 5: Position the Clip Correctly
Hold the hurricane clip against the rafter or truss and the wall top plate according to the manufacturer’s diagram. The connector should sit tight against the wood with the proper flanges aligned to the correct framing members. Fastener holes should land fully over solid wood, not at the edge of a board or over empty air.
Some hurricane ties are installed on the inside face of the wall, some on the outside face, and some can be installed on either side depending on the model and application. Follow the product instructions and local inspection requirements. Do not bend, flatten, trim, or “customize” the connector unless the manufacturer specifically allows it.
Pay special attention to birdsmouth cuts on rafters. The clip should connect solid portions of framing without relying on weak, thin, cracked, or overcut wood. If the connection looks questionable, pause and get professional advice.
Step 6: Install the Correct Fasteners
Drive the specified nails or screws into every required hole listed in the manufacturer’s instructions. Many connector products have more holes than are required for a specific installation, while others require all designated holes to achieve the published capacity. The installation guide matters here.
Use corrosion-resistant structural connector nails or approved screws. Do not use drywall screws because they are brittle and not designed for this kind of structural load. Do not use common nails if the connector requires a particular diameter and length. A nail that is too short may not provide enough holding power; a nail that is too large may split the wood.
If space is tight, a palm nailer can be helpful in attics or eaves. Keep the fasteners straight, seat them fully, and avoid overdriving. A connector should be snug against the wood, not mangled into it like it lost an argument with a hammer.
Step 7: Repeat the Installation at Each Connection
Move along the wall line and install clips at each marked rafter or truss. Work methodically. A good rhythm is inspect, position, fasten, check, photograph, then move to the next bay.
If you discover an area where a standard clip will not fit because of blocking, ducts, tight framing, masonry walls, or limited access, do not improvise with random metal straps. Use an approved alternative, such as a different listed connector, engineered structural screws, or a contractor-designed retrofit method. Building officials may also require specific documentation for alternative solutions.
For masonry walls, gable ends, hip roofs, and complex roof shapes, installation details can differ significantly. A wood-frame rafter-to-top-plate connection is not the same as a roof-to-masonry-wall connection. Treat each condition separately.
Step 8: Document the Work Before It Is Covered
Take clear photos of each completed connection before insulation, sheathing, soffit panels, or drywall hides the work. Documentation is useful for inspections, insurance mitigation reports, future repairs, and your own peace of mind.
Include photos that show the connector type, fastener pattern, rafter or truss connection, and wall plate connection. If you hired a contractor, request product information, permit records, inspection approvals, invoices, and any wind mitigation documentation that applies in your state.
This step may feel boring, but future-you will appreciate it. Future-you is usually the person standing in the attic with a flashlight wondering what past-you did.
Step 9: Schedule Inspection and Complete Related Wind Upgrades
After the clips are installed, arrange any required building inspection. An inspector may verify connector type, placement, fasteners, corrosion resistance, and whether all required roof framing members are attached.
Remember that hurricane clips are only one part of wind-resistant construction. Strong roof-to-wall connections help, but they work best with a complete wind mitigation plan: sealed roof deck, properly nailed roof sheathing, impact-rated openings or shutters, reinforced garage doors, secure gable ends, wall-to-floor connections, and foundation anchorage.
Think of it like a chain. Strengthening one link is helpful, but wind will look for the weakest link. Wind is rude that way.
Common Mistakes to Avoid
Using the Wrong Nails or Screws
The most common mistake is using whatever fasteners are nearby. Hurricane clips should be installed with manufacturer-approved fasteners. Substituting weaker screws or undersized nails can reduce the connector’s rated performance.
Leaving Holes Empty Without Checking Instructions
Some connectors require specific holes to be filled. Others have optional holes for certain applications. Always follow the product guide. Empty holes may be acceptable in one installation and a failed inspection in another.
Installing Clips on Damaged Wood
Clips need solid wood to transfer loads. Rotten, split, or severely notched framing should be repaired before connectors are installed.
Skipping Rafters or Trusses
A few clips are better than none, but a proper retrofit usually requires consistent connections at every rafter or truss along the exterior wall. Spotty installation can leave weak points.
Ignoring the Bigger Load Path
Roof-to-wall connectors help hold the roof down, but the load still needs to continue through the walls and into the foundation. If the wall framing or foundation connection is weak, the house may still be vulnerable.
New Construction vs. Retrofit Installation
Installing hurricane clips during new construction is usually easier because the framing is open and accessible. Builders can install connectors before drywall, soffits, insulation, and roofing details make everything more cramped.
Retrofit installation is more challenging. In existing homes, contractors may access the connection from the attic, remove soffit materials, or install connectors during reroofing when the roof edge is exposed. Reroofing is often one of the most practical times to upgrade roof-to-wall connections because some of the necessary areas are already open.
If you own an older home, especially in a coastal or high-wind area, a wind mitigation inspection can identify what type of roof-to-wall connection you currently have. The report may classify connections as toenails, clips, single wraps, double wraps, or other systems depending on state inspection standards.
Should You DIY Hurricane Clip Installation?
Some experienced DIYers can install hurricane clips in accessible framing areas, especially in unfinished structures. However, this is not a beginner project. It involves structural connections, confined spaces, potential code requirements, and sometimes working near roof edges or electrical systems.
Hire a licensed contractor if the project involves complex framing, masonry walls, engineered trusses, extensive soffit removal, roof work, structural damage, corrosion problems, or insurance documentation. Also hire a professional if you simply do not enjoy crawling through an attic while insulation tries to become part of your personality.
A professional can also help determine whether clips, straps, engineered screws, or a combination of connectors makes the most sense for your home.
Extra Experience-Based Tips for Installing Hurricane Clips
After reviewing real-world installation practices and common retrofit challenges, one lesson stands out: access is often the hardest part of the job. On paper, installing hurricane clips looks simple. Hold metal bracket, drive nails, repeat. In reality, attic heat, tight eaves, insulation, awkward angles, old framing, and poor lighting can make the work much slower.
The first practical tip is to prepare the work area before you start fastening anything. Clear loose insulation away from the connection points, but do not compress or discard it unnecessarily. Use a strong headlamp instead of relying only on a flashlight. Lay temporary boards across ceiling joists if needed, making sure they are properly supported. A stable work platform helps prevent accidents and improves nail placement.
Second, buy the right nailer or hammering tool for the space. A standard hammer works in open framing, but it can be frustrating in a cramped attic bay where you can only swing three inches. A palm nailer is often useful because it can drive structural connector nails in tight areas. However, make sure you can control it carefully. Fasteners still need to go into the correct holes at the correct angle.
Third, label your connectors and keep the manufacturer instructions nearby. Many hurricane ties look similar, but small differences matter. Some are designed for left-hand or right-hand installation. Some allow installation on either side. Some require a specific nail pattern for uplift loads. Keeping the guide nearby prevents “close enough” decisions, and in structural work, close enough can be expensive.
Fourth, photograph as you go. Do not wait until the entire job is finished and the attic is dark. Take photos after every few connections. Good documentation helps inspectors, insurance reviewers, contractors, and future homeowners understand what was installed. Use wide shots and close-ups. A blurry picture of “some metal thing somewhere in the attic” is not especially helpful.
Fifth, pay attention to corrosion. In coastal regions, hardware and fasteners may need higher corrosion resistance. Salt air can attack metal over time, especially in vented attics and near roof edges. Mixing incompatible metals can also create corrosion problems. Use connector and fastener combinations recommended by the manufacturer.
Sixth, remember that more metal is not automatically better. Installing a second random strap over a properly installed clip does not guarantee improved performance. Structural connectors are rated based on tested configurations. If a connection needs more capacity, the solution should come from an approved detail, engineer, or manufacturer guidance.
Seventh, never cut engineered trusses to make room for a connector. This deserves its own tiny marching band. Trusses are designed as complete systems. Cutting or modifying one member can change how loads move through the roof. If a connector will not fit, use a different approved connector or consult an engineer.
Eighth, do not ignore comfort and timing. Attic temperatures can become dangerous in warm climates. Work early in the morning, take breaks, drink water, and avoid rushing. A rushed installation increases the chance of missed holes, crooked fasteners, damaged wiring, and personal injury.
Finally, treat hurricane clips as part of a bigger home-hardening plan. If your roof deck is poorly attached, your garage door is weak, your gable end is unbraced, or your windows are unprotected, wind can still cause major damage. Roof-to-wall connectors are powerful upgrades, but the best protection comes from a system: roof deck, wall connections, openings, garage door, and foundation all working together.
Conclusion
Installing hurricane clips is one of the most important upgrades for improving a home’s resistance to wind uplift. These small connectors help tie the roof framing to the walls, creating a stronger path for storm forces to travel through the structure instead of ripping it apart.
The basic process is straightforward: check code, inspect framing, choose approved connectors, mark each rafter or truss, position the clip correctly, install the specified fasteners, repeat at every connection, document the work, and schedule inspection. The details, however, matter a lot. Correct fasteners, solid framing, proper placement, corrosion resistance, and full-code compliance make the difference between a real structural upgrade and a box of metal souvenirs nailed to wood.
If your home is in a hurricane-prone or high-wind region, hurricane clips are worth serious attention. Whether you install them during new construction, add them during reroofing, or hire a contractor for a retrofit, the goal is the same: help keep the roof where roofs belongon the house, not auditioning for flight school.