A guest bathroom may be one of the smallest rooms in the house, but it has a surprisingly large job. It needs to look inviting, function smoothly, survive humidity, and convince visitors that you definitely did not finish cleaning it seven minutes before they arrived.
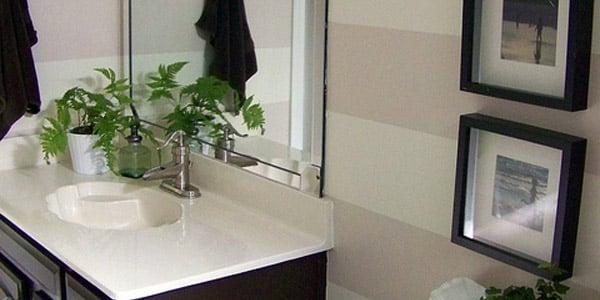
Fortunately, transforming a tired guest bath does not require moving plumbing, tearing out tile, or entering a long-term relationship with a remodeling contractor. Painted striped walls can give the room architectural rhythm, personality, and the polished appearance of wallpaper at a fraction of the cost. Add a better mirror, updated lighting, fresh hardware, and thoughtfully chosen accessories, and an ordinary bathroom can suddenly feel like a carefully designed boutique-hotel powder room.
This guide explains how to plan and complete a guest bathroom makeover with painted striped walls, including color selection, measuring, taping, moisture-resistant paint, styling, common mistakes, and practical lessons learned from tackling the project.
Why Painted Stripes Work So Well in a Guest Bathroom
Stripes create visual structure without requiring expensive materials. Depending on their direction, width, color, and contrast, they can look traditional, coastal, playful, contemporary, or quietly sophisticated.
Vertical stripes draw the eye upward and can make a low ceiling feel taller. Horizontal stripes encourage the eye to move across the room, helping a narrow bathroom appear wider. Wide stripes generally look calm and modern, while narrow stripes produce more energy and detail. Tone-on-tone stripes offer subtle movement, whereas high-contrast combinations create a bold focal point.
Painted stripes are especially useful in a small guest bathroom because they add pattern without occupying physical space. Unlike bulky furniture or elaborate wall paneling, a striped paint treatment leaves every valuable inch available for storage, towels, and actual human beings. Painting also offers more flexibility than permanent wallpaper because the pattern can later be primed and covered when your decorating tastes inevitably have another personality change.
Plan the Makeover Before Opening a Paint Can
The best bathroom transformations begin with a plan rather than an enthusiastic trip through the home-improvement store. Before choosing colors, decide which existing features will stay. Consider the vanity, countertop, floor tile, shower surround, toilet, and permanent metal finishes.
These fixed elements should guide the new palette. A cream floor may clash with icy white paint, while gray tile might look dull beside a brownish beige. Photograph the room in daylight and evening light, then compare paint samples against the surfaces that will remain.
Choose a Clear Design Direction
A striped bathroom looks most cohesive when the overall style can be described in a few words. For example:
- Classic navy and white with polished nickel fixtures
- Warm taupe and cream with brass accents
- Soft sage and off-white with natural wood
- Charcoal and pale gray with matte black hardware
- Dusty blue and warm white with woven accessories
A simple direction prevents the room from becoming a showroom for every idea you have ever saved online. Stripes already provide visual interest, so the remaining accessories should support the pattern rather than compete for attention.
Decide Where the Stripes Will Go
Covering every wall can create an immersive effect, but it also requires additional measuring and careful alignment around corners. For a faster makeover, paint one accent wall behind the vanity or toilet and use the lighter stripe color on the remaining walls.
Another option is to stripe the upper portion of the walls and install painted trim, beadboard, or a solid color below. This approach adds traditional character and protects lower wall areas from bumps and splashes.
Select Bathroom-Appropriate Paint
Bathrooms expose paint to steam, condensation, soap residue, and frequent cleaning. A beautiful wall treatment will not remain beautiful for long if the coating begins to peel, blister, or develop mildew.
Choose a high-quality acrylic or latex interior paint formulated for bathrooms or high-humidity spaces. Satin and semi-gloss finishes are popular because they resist moisture and are easier to clean than conventional flat paint. Some modern bathroom-specific products also offer moisture resistance in lower-sheen finishes, making a softer matte appearance possible when the manufacturer approves it for humid rooms.
Use compatible finishes for both stripe colors. Combining an ordinary flat paint with a shiny semi-gloss paint can create a stronger contrast than expected and may make one stripe harder to clean. A deliberate tone-on-tone treatment using different sheens can be attractive, but it should be tested before covering the room.
Test Colors in the Actual Bathroom
Paint chips are helpful, but bathroom lighting can dramatically alter color. Warm vanity bulbs may turn a gray-beige shade muddy, while cool bulbs can make a pleasant blue appear chilly. Paint large sample boards and move them around the room for at least a day.
For a forgiving striped design, select two colors that share an undertone. Warm white works naturally with beige, clay, taupe, muted coral, and olive. Crisp white pairs more easily with navy, charcoal, cool blue, and blue-green. When uncertain, use the lightest color as the base and a slightly deeper version from the same color family for the stripe.
Tools and Materials
- Bathroom-rated interior paint in two colors
- Primer, if needed
- Painter’s tape suitable for delicate painted surfaces
- Tape measure
- Long level or laser level
- Pencil and eraser
- Angled paintbrush
- Standard roller and small foam or microfiber roller
- Paint trays and liners
- Drop cloths
- Lightweight spackle and putty knife
- Fine-grit sanding sponge
- Clean cloths and mild detergent
- Caulk and caulk gun, if trim has gaps
A small roller provides better control inside the taped stripes than a full-size roller. It also reduces the likelihood of bumping the wrong section and adding an accidental third color called “panicked touch-up.”
Prepare the Bathroom Properly
Remove towels, artwork, outlet covers, switch plates, countertop accessories, and anything else that can collect dust or paint droplets. Take down the mirror when practical. If it remains in place, protect it carefully with paper and painter’s tape.
Wash the walls with a mild detergent solution to remove hairspray, soap film, dust, and fingerprints. Rinse away residue and allow the surfaces to dry completely. Fill nail holes, sand repairs smooth, and caulk visible gaps around trim.
Visible mildew must be addressed before painting, and the moisture source should be corrected. Run an exhaust fan that vents outdoors during showers and after the room has been used. Paint should never be treated as a magical lid for an active moisture problem; moisture is remarkably talented at finding a way back.
If the home was built before 1978, disturbing old coatings through sanding or scraping may create lead-contaminated dust. Follow lead-safe practices or consult a qualified professional before beginning aggressive surface preparation.
How to Paint Clean, Even Stripes
Step 1: Apply the Base Color
Paint the entire striped area with the lighter color. Cut in around the ceiling, trim, corners, and fixtures before rolling the main surfaces. Apply a second coat when necessary.
Allow the base coat to dry and cure according to the paint and tape manufacturers’ directions. Applying tape to soft paint can lift the finish when the tape is removed. Waiting is not exciting, but neither is repainting half the bathroom because impatience won.
Step 2: Calculate the Stripe Width
Measure the total wall height for horizontal stripes or wall width for vertical stripes. Divide that number by the approximate stripe width you want. Adjust the measurement slightly so the pattern finishes neatly rather than ending with one tiny stripe squeezed into a corner.
For example, a 96-inch wall height can be divided into twelve 8-inch horizontal stripes. A 120-inch-wide wall could accommodate ten 12-inch vertical stripes. Sketch the pattern on paper first and note which sections receive the accent color.
Step 3: Mark the Pattern
Begin from the most visible corner or edge. Make small pencil marks at each interval, then connect them using a long level or laser level.
Do not assume the ceiling, floor, vanity, or door frame is perfectly level. Houses contain many surprises, and remarkably straight construction is not always one of them. Trust the level rather than nearby architectural lines.
Step 4: Position the Painter’s Tape Correctly
Place tape outside the sections that will receive the accent color so the painted stripes retain their intended width. Mark the sections to be painted with small tape tabs or pencil arrows. This simple step prevents the classic mistake of carefully painting the wrong alternating section.
Press the tape edges firmly with a clean plastic putty knife, old gift card, or similar smooth tool. Avoid pulling the tape aggressively as you apply it because stretched tape can shift or curve.
Step 5: Seal the Tape Edges
For especially crisp lines, brush or roll a thin coat of the base color over the tape edge on the side that will receive the accent color. Any paint that seeps underneath will match the existing wall. After this sealing coat dries, the contrasting color can be applied with much less bleeding.
This technique is particularly valuable on lightly textured drywall, where tape alone may not seal every tiny recess.
Step 6: Paint the Contrasting Stripes
Use a small roller to apply the second color in light, controlled coats. Roll in the direction of the stripe and avoid loading the roller so heavily that paint pools against the tape.
Two thin coats usually produce cleaner results than one thick coat. Keep the roller texture consistent so the stripes do not look different when viewed under vanity lights.
Step 7: Remove the Tape Carefully
Follow the tape manufacturer’s removal instructions. Many painting guides recommend removing tape while the final coat remains slightly tacky, pulling it slowly back over itself at approximately a 45-degree angle. If the paint has fully dried across the tape edge, lightly score stubborn areas with a sharp utility blade before peeling.
Keep a small artist’s brush nearby for touch-ups. Even experienced painters occasionally find a tiny bleed or uneven corner. That is not failure; it is simply the wall requesting one final favor.
Complete the Guest Bathroom Makeover
Update the Mirror
A mirror is often the largest decorative object in a guest bathroom. Replace a plain builder-grade mirror with a framed version, or add a moisture-resistant frame around the existing glass. Choose a shape that balances the stripe direction. A round mirror softens strong vertical or horizontal lines, while a rectangular mirror reinforces a tailored look.
Improve the Lighting
Outdated lighting can make fresh paint look dull. Replace a tired vanity fixture with one sized appropriately for the mirror. Warm or neutral white bulbs generally create a more welcoming atmosphere than harsh blue-toned light.
Always use fixtures rated for the intended bathroom location, and hire a licensed electrician when wiring changes exceed your experience. Electricity and enthusiastic guessing make poor roommates.
Coordinate the Hardware
Replacing the faucet, towel ring, toilet-paper holder, cabinet knobs, and light fixture can make the room feel intentional. The finishes do not have to match perfectly, but repetition helps. For example, combine matte black hardware with a black mirror frame, or repeat brushed brass in the light fixture and vanity pulls.
Add Practical Storage
Guest bathrooms should make essential items easy to locate. A shallow shelf above the toilet, a mirrored medicine cabinet, vanity organizers, or a small basket of rolled towels can add storage without crowding the floor.
Keep the visible selection edited. Guests need soap, towels, tissues, and perhaps a few basic toiletries. They do not need to study your complete collection of nearly empty shampoo bottles. Wall-mounted storage, larger mirrors, and restrained color palettes can make compact bathrooms feel more functional and visually open.
Use Accessories to Reinforce the Palette
Choose towels, a shower curtain, bath mat, artwork, and countertop accessories that repeat one or both stripe colors. Natural wood, woven baskets, greenery, and warm metal finishes can keep a cool palette from feeling sterile.
Because the walls already have pattern, use mostly solid textiles. One smaller complementary print is enough. Otherwise, the bathroom may begin to resemble a very fashionable optical exam.
Common Mistakes to Avoid
- Skipping wall cleaning: Paint adheres poorly to soap residue, dust, and oily products.
- Taping uncured paint: Fresh base paint may peel away during tape removal.
- Measuring from an uneven floor: Use a level rather than trusting surrounding surfaces.
- Forgetting tape width: Tape placement determines the finished stripe dimensions.
- Using overly sharp contrast everywhere: High-contrast stripes can overwhelm a very small room.
- Applying thick coats: Excess paint may seep beneath tape or create raised edges.
- Ignoring ventilation: Persistent humidity can damage even a carefully painted finish.
- Adding too many accessories: Patterned walls need breathing room.
Real-World Experience: What the Project Teaches You
The most important lesson from a striped-wall bathroom makeover is that the actual painting is not the hardest part. Planning and measuring consume far more time than rolling on the accent color. On the first wall, it is tempting to begin placing tape after making a few quick calculations. That approach usually works beautifully until the final stripe is three inches wide and appears to have arrived late to the party.
Drawing the wall to scale prevents that problem. Even a rough sketch reveals how the pattern will meet corners, trim, mirrors, and tile. It also helps determine whether the accent color should appear behind the vanity or whether the base color will create a cleaner frame around the mirror.
Lighting tests are equally valuable. A warm beige that looks sophisticated in a sunny room may appear strangely yellow in a windowless guest bath. A deep navy can look elegant in the morning and almost black at night. Large painted sample boards provide a much more honest preview than tiny chips. They can also be held beside towels, flooring, hardware, and the vanity before money is spent on full gallons.
Another lesson is that textured walls require patience. Painter’s tape may look perfectly sealed while still leaving microscopic channels beneath its edge. Brushing the base color over that edge before applying the contrast coat takes extra time, but it dramatically reduces touch-up work. The method feels unnecessary until the first piece of tape is removed and reveals a line sharp enough to make an overly organized person emotional.
It is also helpful to work in short sections. Bathrooms contain toilets, sinks, door trim, plumbing connections, and awkward corners that make long strips of tape difficult to manage. Applying and checking several feet at a time produces straighter lines than wrestling with one enormous strip while leaning across the vanity.
Do not rush the styling stage after the walls are complete. Fresh stripes can make older accessories look more dated than they did before. Instead of buying everything immediately, reinstall the essential fixtures and observe the room for a day. You may discover that the existing vanity looks surprisingly good once the wall color changes, or that only the mirror and light fixture need replacement.
One practical approach is to divide the budget into three categories: paint and supplies, functional upgrades, and decorative details. Spend first on durable paint, good tape, lighting, ventilation, and storage. Towels and artwork can be changed later, but repairing peeling paint or replacing a poorly selected fixture costs more.
Finally, accept that minor imperfections are normal. A tiny uneven line behind the toilet will not ruin the room, and no guest will enter carrying a level and an inspection flashlight. Step back before attempting endless corrections. From normal viewing distance, the overall pattern, fresh palette, and coordinated details matter far more than a pencil-width irregularity beside the baseboard.
The finished bathroom should feel clean, comfortable, and memorable without becoming precious. When visitors notice the walls, compliment the room, and can still find the hand towel without assistance, the makeover has accomplished its mission.
Conclusion
A guest bathroom makeover with painted striped walls delivers a dramatic visual change without demanding a full renovation budget. The key is to choose bathroom-appropriate paint, coordinate the colors with permanent finishes, calculate the pattern carefully, seal the tape edges, and allow sufficient drying time.
Finish the transformation with improved lighting, a well-proportioned mirror, practical storage, and a restrained selection of accessories. The result can feel custom, polished, and welcomingeven when the makeover began with little more than two paint cans, a roll of tape, and the optimistic belief that every wall in the house is perfectly straight.
Note: This article synthesizes established guidance from U.S. paint manufacturers, home-improvement specialists, environmental authorities, and interior-design publications. Product instructions should always take priority because drying, curing, ventilation, and tape-removal requirements vary by material.