Note: This article is written for web publication and synthesizes practical plaster-repair guidance from reputable U.S. preservation, home improvement, manufacturer, paint, and safety resources. Always follow product labels and local safety rules, especially in homes built before 1978.
Why Plaster Deserves a Little Respect Before You Attack It With a Putty Knife
Plaster walls are like the grandparents of interior surfaces: tough, full of character, and not always thrilled when someone shows up with a power sander. Compared with modern drywall, plaster is denser, harder, and often layered over wood lath, metal lath, masonry, or blueboard. That layered structure is what gives older plaster walls their solid feel, but it also means patching plaster takes a bit more thought than smearing filler into a dent and hoping the paint gods are kind.
The good news? Most cracks, nail holes, chips, and moderate plaster damage can be repaired beautifully with basic tools, patience, and the right materials. The secret is not speed. The secret is preparation, bonding, layering, feathering, and knowing when the wall is quietly whispering, “Please call a pro.” This guide walks you through how to patch plaster perfectly, from diagnosing the damage to sanding, priming, painting, and avoiding the classic rookie mistakes that make a patch look like a pancake stuck to the wall.
First, Identify the Type of Plaster Damage
Before mixing compound or opening a tub of patching plaster, study the problem area. Plaster repair works best when you match the repair method to the damage. A tiny nail hole does not need the same treatment as a loose section of lath-and-plaster wall, just like a paper cut does not need a full hospital drama soundtrack.
Hairline Cracks
Hairline cracks are thin, shallow cracks that often appear from normal house movement, seasonal humidity changes, or old paint layers. If the plaster around the crack is firm, these can usually be filled with a compatible patching compound or setting-type joint compound, then sanded, primed, and painted.
Wide Cracks
Wider cracks need more support. Simply filling a wide crack with spackle may work for about three days, after which the crack returns like it owns the place. For cracks wider than a hairline, open the crack slightly, remove loose debris, apply mesh tape if needed, and use multiple thin coats of compound.
Small Holes and Chips
Nail holes, screw holes, small dents, and chipped plaster are the easiest plaster repairs. These typically need cleaning, a thin coat of patching compound, light sanding, and primer. For small repairs, lightweight spackle can be convenient, but harder patching plaster or setting-type compound is often more durable.
Large Holes
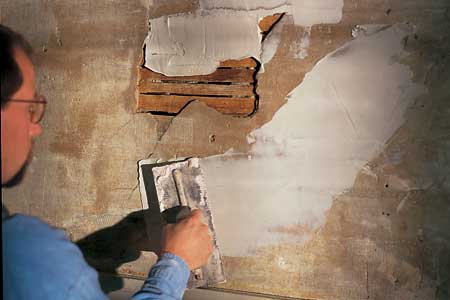
Large holes require structure behind the patch. If the lath is still intact, you can build the repair in layers. If the backing is missing or damaged, you may need to install new lath, metal mesh, or a backing board before applying plaster. Skipping this step is how patches become wall craters wearing makeup.
Loose or Bulging Plaster
If the plaster moves when pressed, sounds hollow, or bulges away from the wall, the plaster may have detached from the lath. In many older homes, plaster keysthe hardened plaster that squeezed between the lath stripsbreak over time. Loose plaster often needs to be reattached with plaster washers or adhesive before surface patching begins.
Tools and Materials for a Smooth Plaster Patch
You do not need a contractor’s truck full of mysterious buckets, but the right tools make the job cleaner and more professional. Gather everything before you start, because nothing says “DIY adventure” like running through the house with wet plaster on your hand looking for sandpaper.
Basic Tools
- Putty knife or 3-inch taping knife for small repairs
- 6-inch and 10-inch taping knives for feathering wider patches
- Utility knife or painter’s tool for opening cracks
- Stiff brush or vacuum for removing dust
- Sanding sponge or 220-grit sandpaper
- Bucket and mixing paddle for dry patching products
- Drop cloth, painter’s tape, safety glasses, and dust mask
Useful Materials
- Patching plaster for durable plaster repairs
- Setting-type joint compound for strong, sandable patches
- Ready-mixed joint compound for final skim coats
- Fiberglass mesh tape for cracks and seams
- Plaster bonding agent for better adhesion
- Primer for sealing the repaired area before painting
- Plaster washers or adhesive for loose lath-and-plaster sections
Safety Comes First, Especially in Older Homes
If your home was built before 1978, assume old paint may contain lead unless it has been tested. Sanding, scraping, or disturbing old painted surfaces can create hazardous dust. For larger repairs, lead-safe work practices are essential. That means containing dust, avoiding aggressive dry sanding, cleaning carefully, and hiring a certified professional when needed. A perfect patch is not worth turning your living room into a science experiment.
Also watch for moisture damage. If plaster is soft, stained, powdery, or crumbly, do not just patch over it. Find the source first. A roof leak, plumbing issue, condensation problem, or exterior water intrusion can ruin a fresh repair quickly. Plaster patches need a clean, firm, dry surface to bond properly.
How to Patch Small Holes in Plaster
Small holes are the best place to build plaster confidence. They are forgiving, quick, and unlikely to make you question your life choices.
Step 1: Clean the Hole
Use a utility knife or putty knife to remove loose plaster, flaking paint, and dust. Slightly undercutting the edges can help the patching material lock into place. Do not gouge aggressively; you are preparing the hole, not excavating for buried treasure.
Step 2: Dampen or Bond the Surface
Old plaster can be thirsty. If it pulls moisture from the patch too quickly, the repair may dry weakly or fail to bond. Lightly dampen the area with a sponge or apply a plaster bonding agent if recommended for your product.
Step 3: Fill in Thin Layers
Press patching plaster or setting-type compound firmly into the hole. For deeper holes, use multiple layers rather than one thick blob. Thick patches shrink, crack, or dry unevenly. Build the repair slightly proud of the wall, then feather the edges.
Step 4: Sand, Prime, and Paint
Once the patch is fully dry, sand lightly until smooth. Wipe away dust with a damp cloth, let the surface dry, then apply primer. Primer prevents the patch from flashing through the paint as a dull or shiny spot. Finally, paint the area, feathering the paint into the surrounding wall.
How to Repair Cracks in Plaster Walls
Cracks are sneaky. The visible line is only part of the issue. The goal is to create a repair that bonds well, moves as little as possible, and blends into the wall.
Step 1: Open the Crack Slightly
Use a utility knife, painter’s tool, or crack opener to create a shallow V shape along the crack. This gives the patching material more surface area to grip. Remove loose plaster and dust with a brush or vacuum.
Step 2: Check for Movement
Press gently on both sides of the crack. If the plaster flexes or sounds hollow, repair the loose plaster first. Filling a moving crack is like taping a broken chair leg and calling it furniture restoration.
Step 3: Apply Mesh Tape for Wider Cracks
For wider cracks, apply self-adhesive fiberglass mesh tape over the crack. Mesh tape helps bridge the gap and reduce the chance of the crack showing again. Keep the tape flat with no wrinkles.
Step 4: Apply Compound in Feathered Coats
Spread setting-type joint compound or patching plaster over the crack and tape. Keep the first coat narrow, press it firmly into the surface, and let it set. Apply a second coat wider than the first, then a third coat wider still if needed. Feathering is the art of making the patch disappear gradually instead of ending with a visible ridge.
Step 5: Sand Lightly
When dry, sand only enough to smooth the repair. Oversanding can expose mesh tape or create a dip. A damp sponge can also soften edges and reduce dust on final coats.
How to Patch Large Holes in Lath-and-Plaster Walls
Large plaster holes require patience because you are rebuilding layers, not just filling space. If the wood lath is intact, the repair is much easier. If lath is broken or missing, replace it or add backing before applying plaster.
Step 1: Remove Loose Material
Cut away loose plaster until the edges are firm. Avoid enlarging the hole more than necessary, but do not leave crumbly edges. A patch is only as strong as the surface it bonds to.
Step 2: Repair or Replace the Lath
If wood lath is loose, refasten it carefully with screws. If sections are missing, install new lath or metal lath so the plaster has something to grip. The first coat needs to push into openings and form strong keys.
Step 3: Dampen the Edges
Lightly dampen exposed plaster and lath. This slows moisture absorption and improves bonding. Do not soak the wall. You want damp, not swampy.
Step 4: Apply the Base Coat
Mix patching plaster or base coat according to the manufacturer’s instructions. Press it into the lath so it keys behind the strips or mesh. Keep this coat recessed slightly below the finished wall surface. Scratch or roughen it before it sets so the next coat can bond.
Step 5: Build the Second Coat
After the base coat firms up, apply a second coat to bring the patch closer to the surrounding surface. Use a straightedge or wide knife to keep the patch flat. Let it set fully.
Step 6: Finish With a Thin Top Coat
Use a fine plaster finish coat or joint compound to create the final smooth surface. Feather the edges several inches beyond the repair. For textured plaster, imitate the surrounding texture with a sponge, brush, or stippling technique before the final coat fully dries.
The Secret to an Invisible Patch: Feathering
Feathering is what separates a clean plaster repair from a wall that looks like it is hiding a secret. Instead of stopping the compound right at the hole or crack, spread each coat wider than the last. A small hole may need a repair area 6 inches wide. A larger crack may need feathering 10 to 12 inches or more on each side.
Hold the knife at a low angle and apply pressure to the outer edge. The center should cover the repair; the edges should fade thinly into the existing wall. After sanding and priming, the transition becomes much harder to see. Think of it as blending makeup for your wall, except the wall will not ask whether you noticed anything different.
Common Plaster Patching Mistakes to Avoid
Using Too Much Material at Once
Thick patches dry slowly and are more likely to crack. Multiple thin coats are stronger, smoother, and easier to control.
Skipping Primer
Paint absorbs differently into patching compound than into old painted plaster. Without primer, the repaired area may show through as a dull spot, shiny spot, or color mismatch.
Sanding Too Aggressively
Heavy sanding can damage surrounding paint, expose tape, or create uneven depressions. Sand gently and check the surface with your hand, not just your eyes.
Patching Over Moisture Problems
Stains, bubbling paint, soft plaster, and recurring cracks may point to water damage or movement. Fix the cause first or the patch will fail.
Ignoring Loose Plaster
If the plaster is detached from the lath, surface compound will not solve the problem. Reattach loose plaster before cosmetic repair.
When to Call a Professional
Many plaster repairs are DIY-friendly, but some situations deserve professional help. Call a plasterer, restoration contractor, or qualified repair specialist if a ceiling is sagging, a large wall section is loose, water damage is extensive, decorative plaster molding is broken, or you suspect lead paint and the repair will disturb a large painted area.
Historic homes also deserve extra care. Original plaster contributes to the character and value of many older buildings. In those cases, preserving and repairing existing plaster is often better than tearing it out and replacing it with drywall. A skilled plaster professional can match old textures, stabilize loose areas, and use compatible materials that respect the original wall system.
Real-World Experience: What Actually Makes Plaster Patching Look Professional
After working through many plaster repairs, the biggest lesson is simple: the wall rewards patience and punishes shortcuts with theatrical enthusiasm. The first time someone patches plaster, the temptation is to fill the hole in one heroic scoop, smooth it once, and celebrate early. Then the patch dries, shrinks, cracks around the edge, and suddenly the wall looks like it has a raised island on it. The better approach is less dramatic but far more successful: clean carefully, apply thin layers, let each layer dry or set properly, and keep widening the repair until the transition disappears.
One useful habit is to inspect the wall with both your eyes and your fingertips. Eyes can miss subtle ridges, especially under soft room lighting. Your hand will notice a raised edge immediately. Run your palm gently across the dried patch before priming. If you can feel a ridge, the paint will probably reveal it. A small amount of additional feathering at this stage saves a lot of annoyance later.
Lighting also matters. A patch that looks perfect at noon may look bumpy at night when a lamp shines across the wall. Professional painters often use a work light held at a low angle to reveal imperfections. This technique is mildly rude to your confidence but extremely useful. The light shows ridges, dips, scratches, and sanding marks before primer locks them into place.
Another experience-based tip: do not rush the painting stage. Fresh patching materials can be more porous than the surrounding wall, so primer is not optional if you want a uniform finish. Spot-prime the patch first, let it dry, then paint. For older walls with faded paint, touching up only the patched area may still show a color difference. In that case, repainting the whole wall from corner to corner gives the cleanest result.
Texture matching is where many otherwise good repairs become obvious. If the old wall has a subtle sand finish, brush marks, roller stipple, or hand-troweled waves, a perfectly smooth patch may stand out. Before the final coat dries, experiment on cardboard with a damp sponge, small brush, or roller to mimic the surrounding texture. Matching the texture is often more important than achieving glassy smoothness.
Finally, respect the age of the wall. Old plaster has survived temperature swings, settling, furniture bumps, questionable wallpaper choices, and possibly several decades of people saying, “We’ll fix that next weekend.” A good repair does not fight the wall; it works with it. Stabilize what is loose, remove what is failed, use compatible materials, and build the surface back in layers. Do that, and your plaster patch will not just look good on day one. It will keep looking good long after the tools are back in the closet.
Conclusion: Perfect Plaster Patching Is Mostly Preparation
Patching plaster perfectly is not about magic. It is about understanding the wall, choosing the right repair method, and refusing to rush the boring but important steps. Clean the damage, stabilize loose plaster, use bonding techniques when needed, build patches in layers, feather the edges, sand lightly, prime carefully, and paint with patience.
Whether you are fixing a tiny nail hole, a stubborn crack, or a larger lath-and-plaster repair, the goal is the same: a strong patch that disappears into the wall. Done correctly, plaster repair preserves the beauty and durability of your home’s original surfaces. Done carelessly, well, let’s just say your wall may develop a personality. And not the charming kind.