If you have ever looked at a French knot and thought, “Beautiful, but that hairstyle clearly requires three arms, a personal stylist, and a small prayer circle,” good news: it does not. The French knotalso called a French twistis one of those rare hairstyles that looks wildly elegant while secretly being a lot less dramatic than it appears. It can work for weddings, job interviews, brunch, date night, or those moments when your hair is misbehaving and you want to look intentional instead of attacked.
The trick is not chasing perfection. A modern French knot hairstyle looks better when it has a little softness, a little movement, and a little personality. In other words, if one tiny piece escapes near your temple, that is not failure. That is atmosphere.
In this guide, you will learn exactly how to make a French knot the easy way in 11 simple steps, plus practical tips for different hair lengths, texture issues, and hold problems. Whether you want a sleek updo or a relaxed French knot hair style with face-framing pieces, this walkthrough will help you get there without turning your bathroom into a crisis zone.
What Is a French Knot Hairstyle?
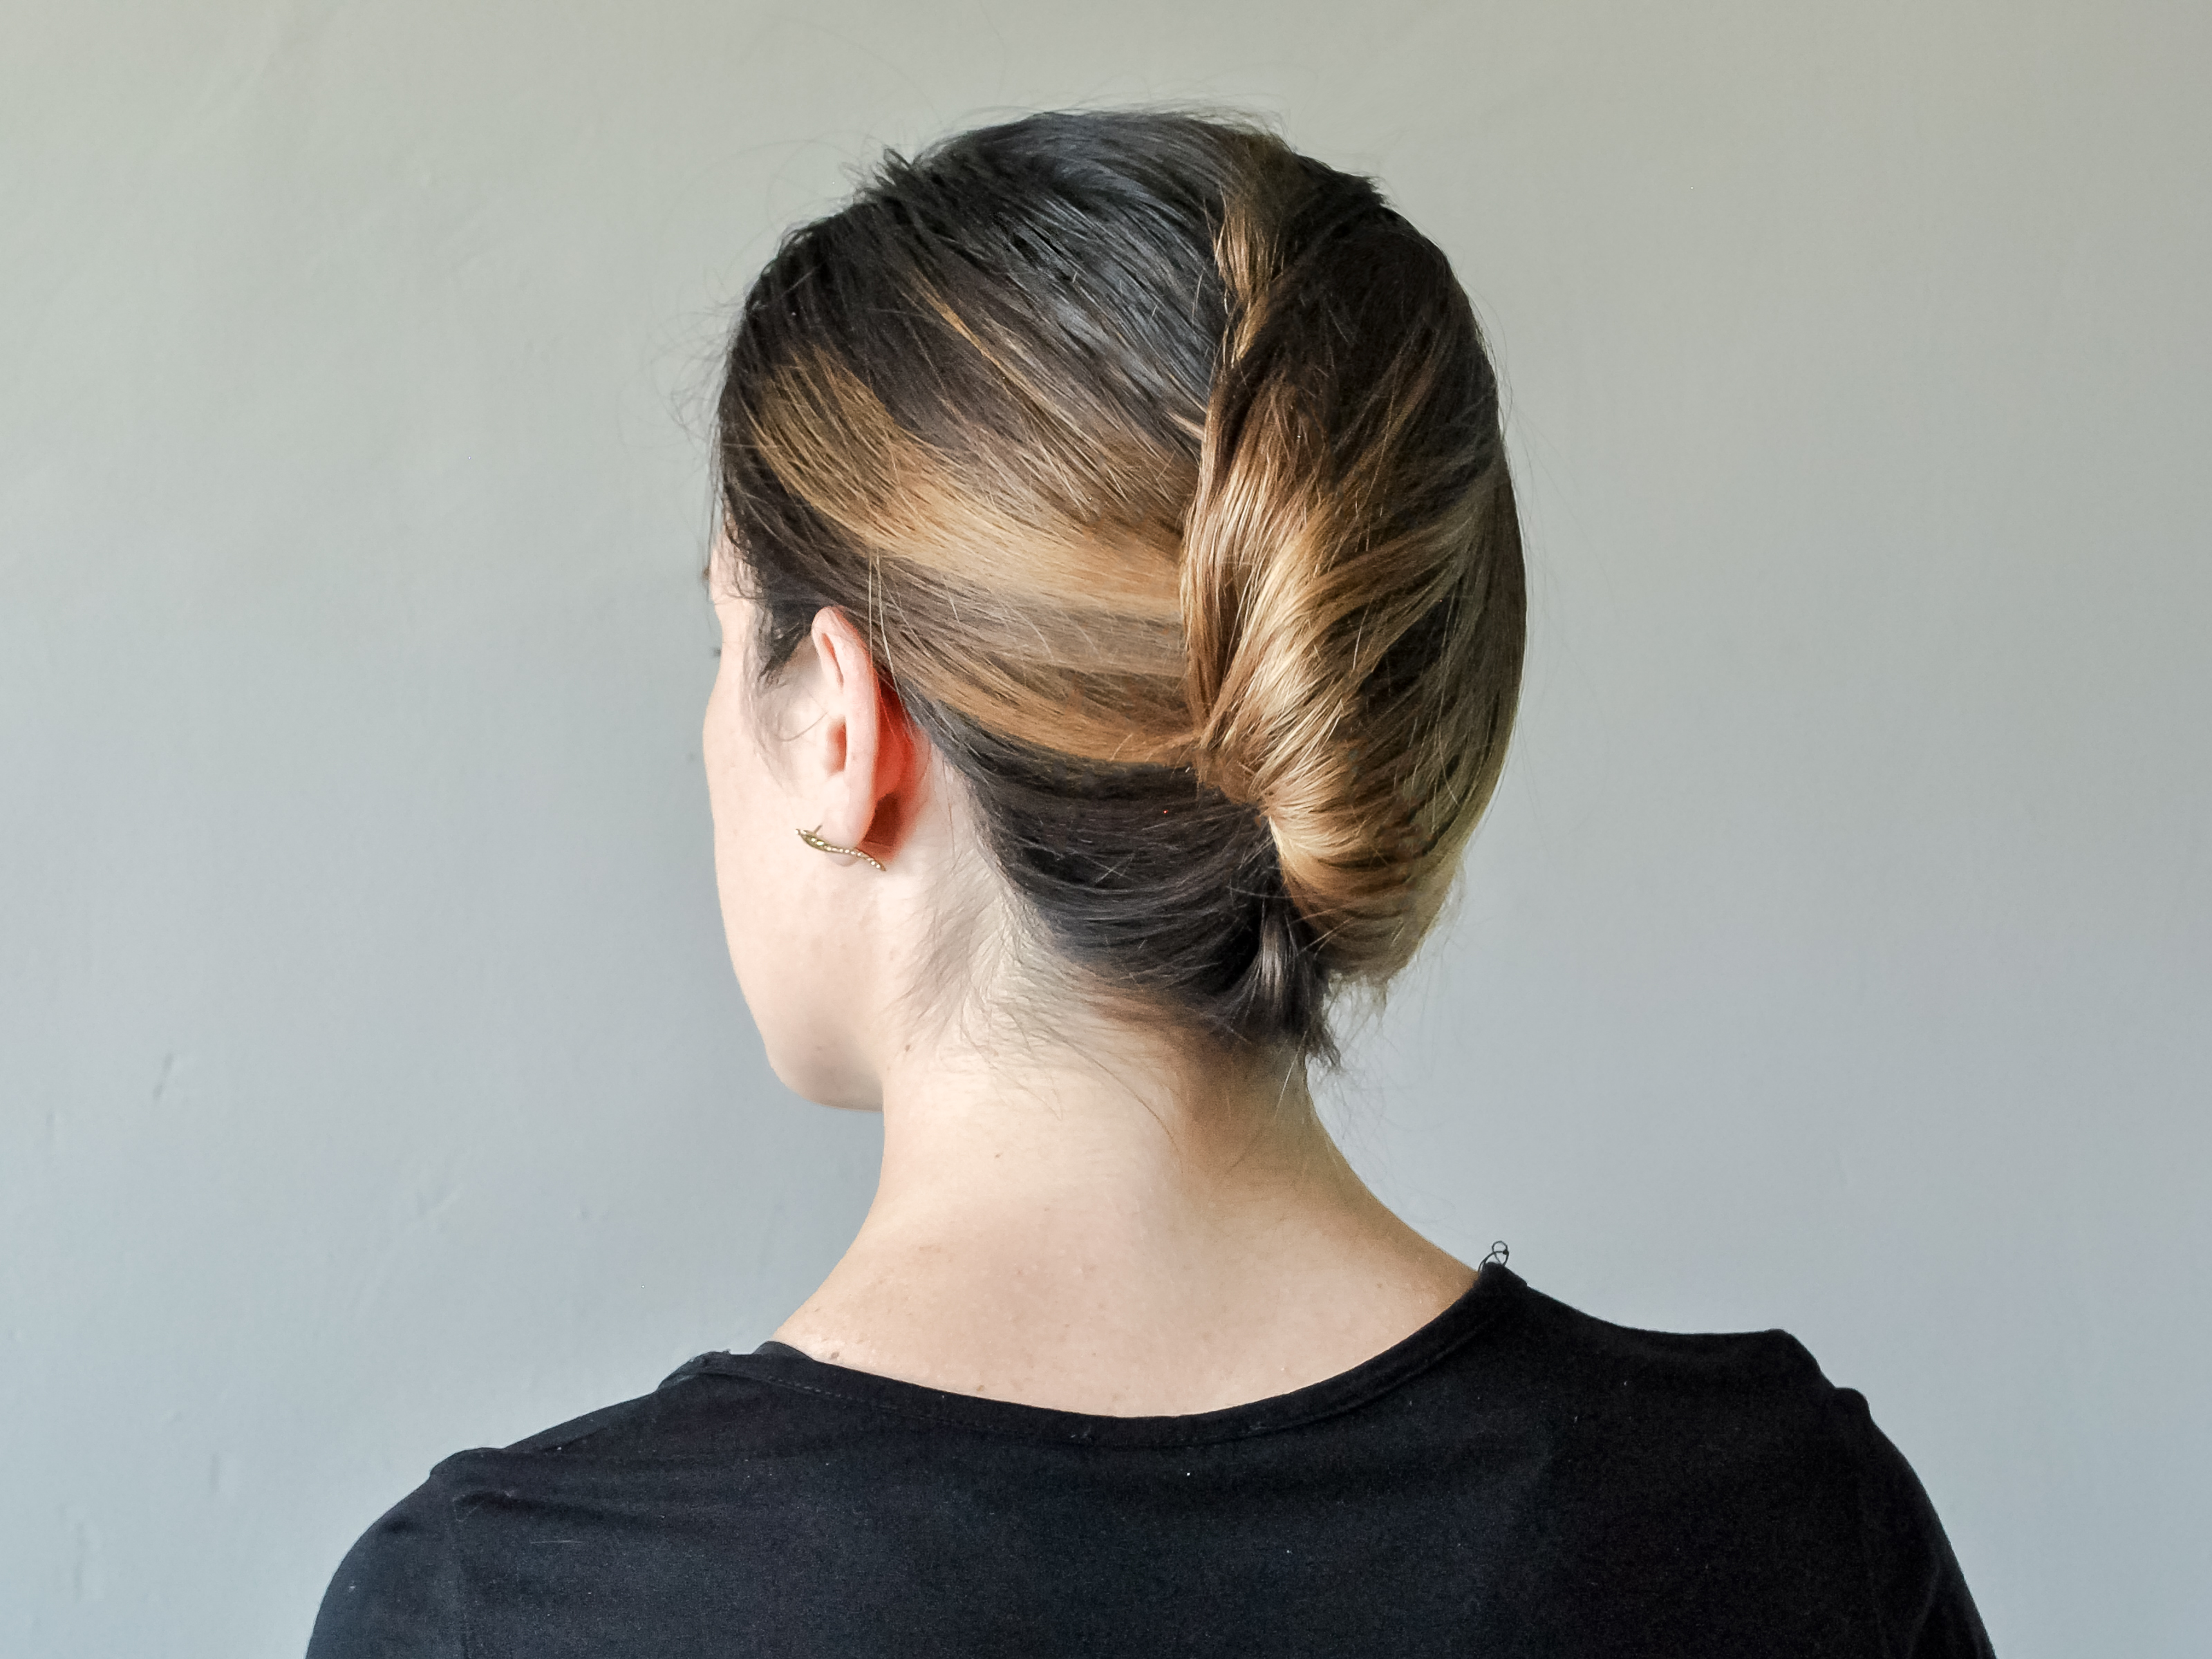
A French knot is a classic updo where the hair is gathered, twisted upward, tucked inward, and pinned so it forms a vertical roll against the back of the head. The result is polished, timeless, and surprisingly versatile. You can wear it smooth and formal, or loosen it up for a more casual, modern finish.
One reason the French knot easy way works so well is that the structure is simple: sweep, anchor, twist, tuck, pin, and refine. Once you understand the rhythm, the hairstyle stops feeling mysterious and starts feeling like a very stylish survival skill.
Why the French Knot Is Still So Popular
The French knot has serious staying power because it solves multiple hair problems at once. It gets hair off your neck, works with second-day hair, looks dressy without requiring curls or braids, and can be adjusted for everything from office meetings to formal events. It also pairs beautifully with accessories like combs, pins, bows, pearls, or flowers.
And yes, it has that “I have my life together” energy even if you created it while reheating coffee and looking for your other earring.
What You Need Before You Start
- Bobby pins or U-pins
- A brush or comb
- Light hairspray or workable hold spray
- Texture spray, dry shampoo, or volumizing mousse if your hair is slippery
- A mirror, patience, and perhaps a mild willingness to do one practice round
If your hair is very long or thick, keep a large claw clip nearby as a backup plan. If your hair is fine, a little texture powder or dry shampoo at the roots can make a huge difference. The goal is grip, not helmet hair.
How to Make French Knot Easy Way Hair Style: 11 Steps
Step 1: Start With Hair That Has Some Grip
A French knot usually behaves better on hair that is not freshly washed. Super-clean hair can be slippery, soft, and determined to escape. If your hair feels too silky, mist in dry shampoo, texture spray, or a light mousse from mid-length to root area. This helps the pins hold and gives the shape a little backbone.
Do not soak your hair in product. You want texture, not a science experiment.
Step 2: Brush Through Tangles Without Flattening Everything
Use a brush or comb to remove knots, but do not overwork your hair if you want a softer finish. If you are aiming for a sleek French knot hairstyle, smooth everything back neatly. If you prefer a modern look, keep a bit of natural texture and let the style feel slightly relaxed.
This is also the moment to choose your part. A center part looks chic and balanced. A side part adds softness and a little glamour. Both work.
Step 3: Leave Out Face-Framing Pieces if You Want a Softer Look
Before gathering your hair, decide whether you want a few pieces loose around your face. Leaving out light tendrils near the temples or bangs can make the French knot look less severe and more wearable for everyday styling. If you want a more classic or formal updo, keep all the hair together.
This small decision changes the vibe dramatically. Same hairstyle, different personality.
Step 4: Sweep Your Hair to One Side
Gather all your hair at the back of your head and sweep it slightly to one side, as if you were starting a very low side ponytail without using an elastic. Hold it flat against the back of your head with your non-dominant hand.
This step creates the base shape. Keep the hair snug, but not painfully tight. You are making a hairstyle, not testing your pain tolerance.
Step 5: Create a Vertical Anchor Line With Bobby Pins
Now insert bobby pins vertically along the center back of your head where the twist will sit. Crisscross them slightly to build a stronger foundation. Think of these pins as scaffolding. They are the quiet heroes of the entire French knot easy method.
If your hair is thick, use more pins than you think you need. If your hair is fine, place them close enough together to create real support. This anchor line is what helps the twist stay upright instead of slowly sliding into emotional ruin.
Step 6: Twist the Length of Your Hair Upward
Take the loose length of your hair and begin twisting it upward toward the crown. The tighter the twist, the sleeker and smaller the knot will look. A looser twist creates a fuller, softer shape. Choose based on your hair type and the finish you want.
If your hair is medium length, this may feel very manageable. If your hair is long, keep tension on the twist as you lift it so the shape stays controlled.
Step 7: Fold and Tuck the Ends Inward
Once the twist is lifted against your head, tuck the ends of your hair into the seam of the roll. This is what creates the classic French knot silhouette. If your ends are short or layered, tuck in what you can and do not panic over every tiny piece. Those can be pinned down in the next step.
If you like a more casual or trendy version, you can leave a little texture or a few curled ends visible at the top. A French knot does not have to look frozen in time to look beautiful.
Step 8: Pin the Twist Into the Anchor
Insert bobby pins or U-pins horizontally into the twist so they catch the vertical anchor pins underneath. This is the lock-in moment. Add pins along the seam and any area that feels loose. For extra hold, weave the pin into the twist, then angle it back toward the scalp.
A French pin can work beautifully here too, especially if you like minimalist tools. The important thing is that the pin grabs both the rolled hair and the foundation beneath it.
Step 9: Adjust the Shape With Your Fingers
Stand back from the mirror and look at the profile and back. Is the twist too flat? Gently pull a little fullness at the crown. Is it too loose? Add one or two more pins. Are face-framing pieces doing something weird? Smooth or reposition them with your fingertips.
This is where the hairstyle starts looking intentional. Tiny adjustments matter. The difference between “I tried” and “I meant to do this” is often about fifteen seconds of editing.
Step 10: Smooth Flyaways, But Keep Some Life in the Hair
Use a dab of styling cream, a touch of serum, or a light mist of hairspray to settle flyaways. Avoid overloading the style with stiff product. A modern French knot hair style looks better when it still has movement. Smooth the obvious troublemakers, then let the rest of the hair breathe.
If your hair is curly or textured, do not feel pressured to flatten everything. A textured French knot can look sculptural, romantic, and incredibly chic.
Step 11: Finish With Hold and Optional Accessories
Finish with workable hairspray to help the style last. Then decide whether you want to accessorize. A comb, decorative pin, pearl clip, velvet bow, or fresh flower can elevate the entire look in seconds. If you are going for minimalist elegance, leave it alone and let the shape do the talking.
Congratulations: you now know how to make a French knot the easy way without sacrificing style, sanity, or your entire morning.
Quick Fixes for Common French Knot Problems
If the Twist Keeps Slipping
Your hair may be too clean or too heavy. Add more texture spray, create a stronger vertical pin base, and use more U-pins. Very long hair may hold better with a claw clip variation if you are styling in a hurry.
If Your Layers Pop Out
Use shorter pins near the seam and tuck smaller pieces in sections rather than all at once. A little styling cream can also help guide layers into place.
If the Style Looks Too Tight
Gently loosen the crown and pull out a couple of soft pieces near the face. The French knot should look elegant, not like it is judging everyone in the room.
If You Have Shorter Hair
Try a smaller, lower twist with extra pins. You can also use a claw clip version that mimics the French knot shape without requiring every end to stay perfectly hidden.
Best Occasions to Wear a French Knot
- Work events and office days
- Weddings and cocktail parties
- Date nights and dinners out
- Graduations and formal photos
- Hot days when you want your hair off your neck
- Any day you want to feel expensive on a very normal budget
Extra Experience and Real-Life Styling Notes
One of the most interesting things about learning a French knot is that the first attempt often feels clumsy, but the second or third attempt suddenly clicks. Many people expect the hairstyle to be technically difficult when it is really more about rhythm than complexity. Once your hands understand the sequencesweep, pin, twist, tuck, secureit becomes a practical go-to style rather than a once-a-year experiment.
A common real-life experience is discovering that the “perfect” French knot is not actually the most flattering one. When people first try it, they often pull every strand too tightly because they assume elegance means absolute control. Then they look in the mirror and wonder why the style feels harsh. Usually, the answer is simple: the hairstyle needs softness. A little volume at the crown, a few pieces around the face, or a slightly looser twist can make the entire look more modern and more personal.
Another practical lesson is that hair texture changes everything. Someone with fine, straight hair may need dry shampoo, texture spray, and a small army of pins. Someone with wavy or curly hair may need fewer products because the natural grip already exists. Thick hair often creates a gorgeous, full knot, but it may require sectioning or stronger pins. So if a tutorial seemed easy on someone else and a little chaotic on your own head, that does not mean you failed. It usually means you need to adapt the method to your texture, length, and density.
There is also a huge difference between a French knot for daily wear and one for a formal event. For everyday styling, people often prefer a lived-in version with movement, less perfection, and maybe even a visible accessory. It feels effortless and stylish. For formal occasions, the same basic structure can become sleek, refined, and photo-ready with more smoothing and cleaner tucking. That flexibility is part of why the hairstyle has lasted for generations. It can be polished, relaxed, romantic, dramatic, or quietly professional depending on how you finish it.
Many stylists and regular at-home hair experimenters also discover that second-day hair is basically the French knot’s best friend. Hair with a little texture tends to hold shape better, pin more easily, and cooperate with less fuss. Freshly washed hair often acts innocent right before it slides out of every pin five minutes later. That is the kind of betrayal you do not forget.
Finally, there is the confidence factor. A French knot has a strange and wonderful effect: the second you put your hair up in that clean vertical twist, your whole outfit seems more intentional. A plain black top looks chic. Simple earrings look expensive. Even your posture sometimes improves, which feels unfair but useful. It is one of those hairstyles that can elevate your appearance without demanding celebrity-level effort. And honestly, any hairstyle that makes you look polished while requiring only a handful of pins deserves at least a little respect.
Conclusion
If you want an elegant updo that is actually realistic to do at home, the French knot easy way is worth learning. It is classic without being boring, polished without being fussy, and flexible enough to suit different lengths, textures, and occasions. The secret is not perfection. The secret is a good foundation, the right amount of grip, and enough confidence to let the style have a little personality.
So the next time you want a hairstyle that looks refined, modern, and a little bit French in spirit, skip the panic and reach for the bobby pins. Your French knot can absolutely be easy, and yes, it can still look like you know exactly what you are doing.
Note: This HTML contains only the <body> portion, uses standard American English, and has been cleaned to avoid unnecessary citation artifacts or publishing clutter.