Before you toss another empty soda or water bottle into the recycling bin, pause for a second. That humble plastic bottlethe one currently rolling around your kitchen counter like it pays rentcan become part of a surprisingly sturdy, colorful, and useful trash can. Yes, a trash can made of plastic bottles is a real DIY project, not just something your overly ambitious craft friend would attempt at 2 a.m. with a glue gun and a dream.
Making a DIY plastic bottle trash can is a creative way to reuse plastic bottles, reduce household waste, and build something functional from materials you probably already have. It is also budget-friendly, beginner-friendly, and oddly satisfying. There is something deeply pleasing about turning “trash” into a container for trash. That is the kind of full-circle moment that deserves a tiny round of applause.
This guide breaks the project into six simple steps. You will learn how to collect and clean bottles, prepare a frame, connect the bottles safely, shape the bin, reinforce the structure, and finish it so it looks less like a recycling accident and more like an intentional eco-friendly home project. Whether you want a small craft-room bin, a patio recycling container, or a conversation-starting trash can for a classroom, this plastic bottle craft is practical, customizable, and a great weekend project.
Why Make a Trash Can Out of Plastic Bottles?
Plastic bottles are lightweight, durable, and easy to cut, drill, tie, and arrange. Those qualities make them ideal for upcycling projects. Instead of buying another plastic bin, you can reuse bottles and create a container that fits your space, style, and budget.
This project is especially useful if you enjoy recycled crafts, sustainable home ideas, school projects, garden organization, or DIY storage solutions. It is also a great teaching project because it shows how everyday materials can be redesigned instead of discarded. The finished trash can works best for dry waste such as paper, wrappers, craft scraps, plastic packaging, and lightweight household trash. For wet garbage or food scraps, use a removable liner or place a washable container inside.
Materials You Will Need
You do not need a professional workshop to make this project. Most supplies are inexpensive and easy to find. The exact quantity depends on the size of the trash can you want to build.
- 25 to 60 clean plastic bottles of similar size
- Thin galvanized wire, zip ties, strong cord, or nylon fishing line
- A round or square frame for the top and bottom
- Scissors or a utility knife
- A hand drill, heated awl, or hole punch suitable for plastic
- Pliers for tightening wire
- Sandpaper or tape for smoothing sharp edges
- Optional: spray paint, acrylic paint, stickers, fabric trim, or rope handles
- Optional: a trash bag, removable liner, or inner bucket
For the frame, you can use an old wire basket ring, a metal embroidery hoop, sturdy cardboard covered with tape, a wooden ring, or even repurposed coat hangers shaped into circles. The frame is the skeleton of the trash can, so do not skip it unless you want your bin to wobble like a baby giraffe on roller skates.
Step 1: Collect, Sort, and Clean the Bottles
Start by collecting plastic bottles of the same general size and shape. Standard water bottles, soda bottles, and sparkling water bottles work well. Bottles with ridges add visual texture, while smooth bottles are easier to decorate. Try to use bottles made from PET plastic, commonly used for beverage containers, because they are lightweight and flexible enough for crafting.
Remove labels and caps unless you want to use the caps as decorative details. Wash each bottle with warm, soapy water, rinse thoroughly, and let it dry completely. This step matters more than it sounds. A bottle that once held orange soda may look innocent, but if you trap sticky residue inside your project, your trash can may become a luxury resort for ants.
Sort the bottles by size and color. Clear bottles create a clean, modern look. Green or blue bottles can make the bin look playful. Mixed colors give the project a cheerful, mosaic-style appearance. If you want a more polished result, keep the bottle arrangement consistent from top to bottom.
Helpful Tip
Use bottles that are not crushed, cracked, or heavily scratched. Damaged bottles can weaken the structure and make the finished trash can look messy.
Step 2: Decide the Size and Shape of Your Trash Can
Before cutting or drilling anything, decide how large your trash can should be. A small desk bin may need only 20 to 30 bottles. A medium household bin may need 40 to 60 bottles. A larger outdoor dry-waste bin may require even more bottles plus a stronger frame.
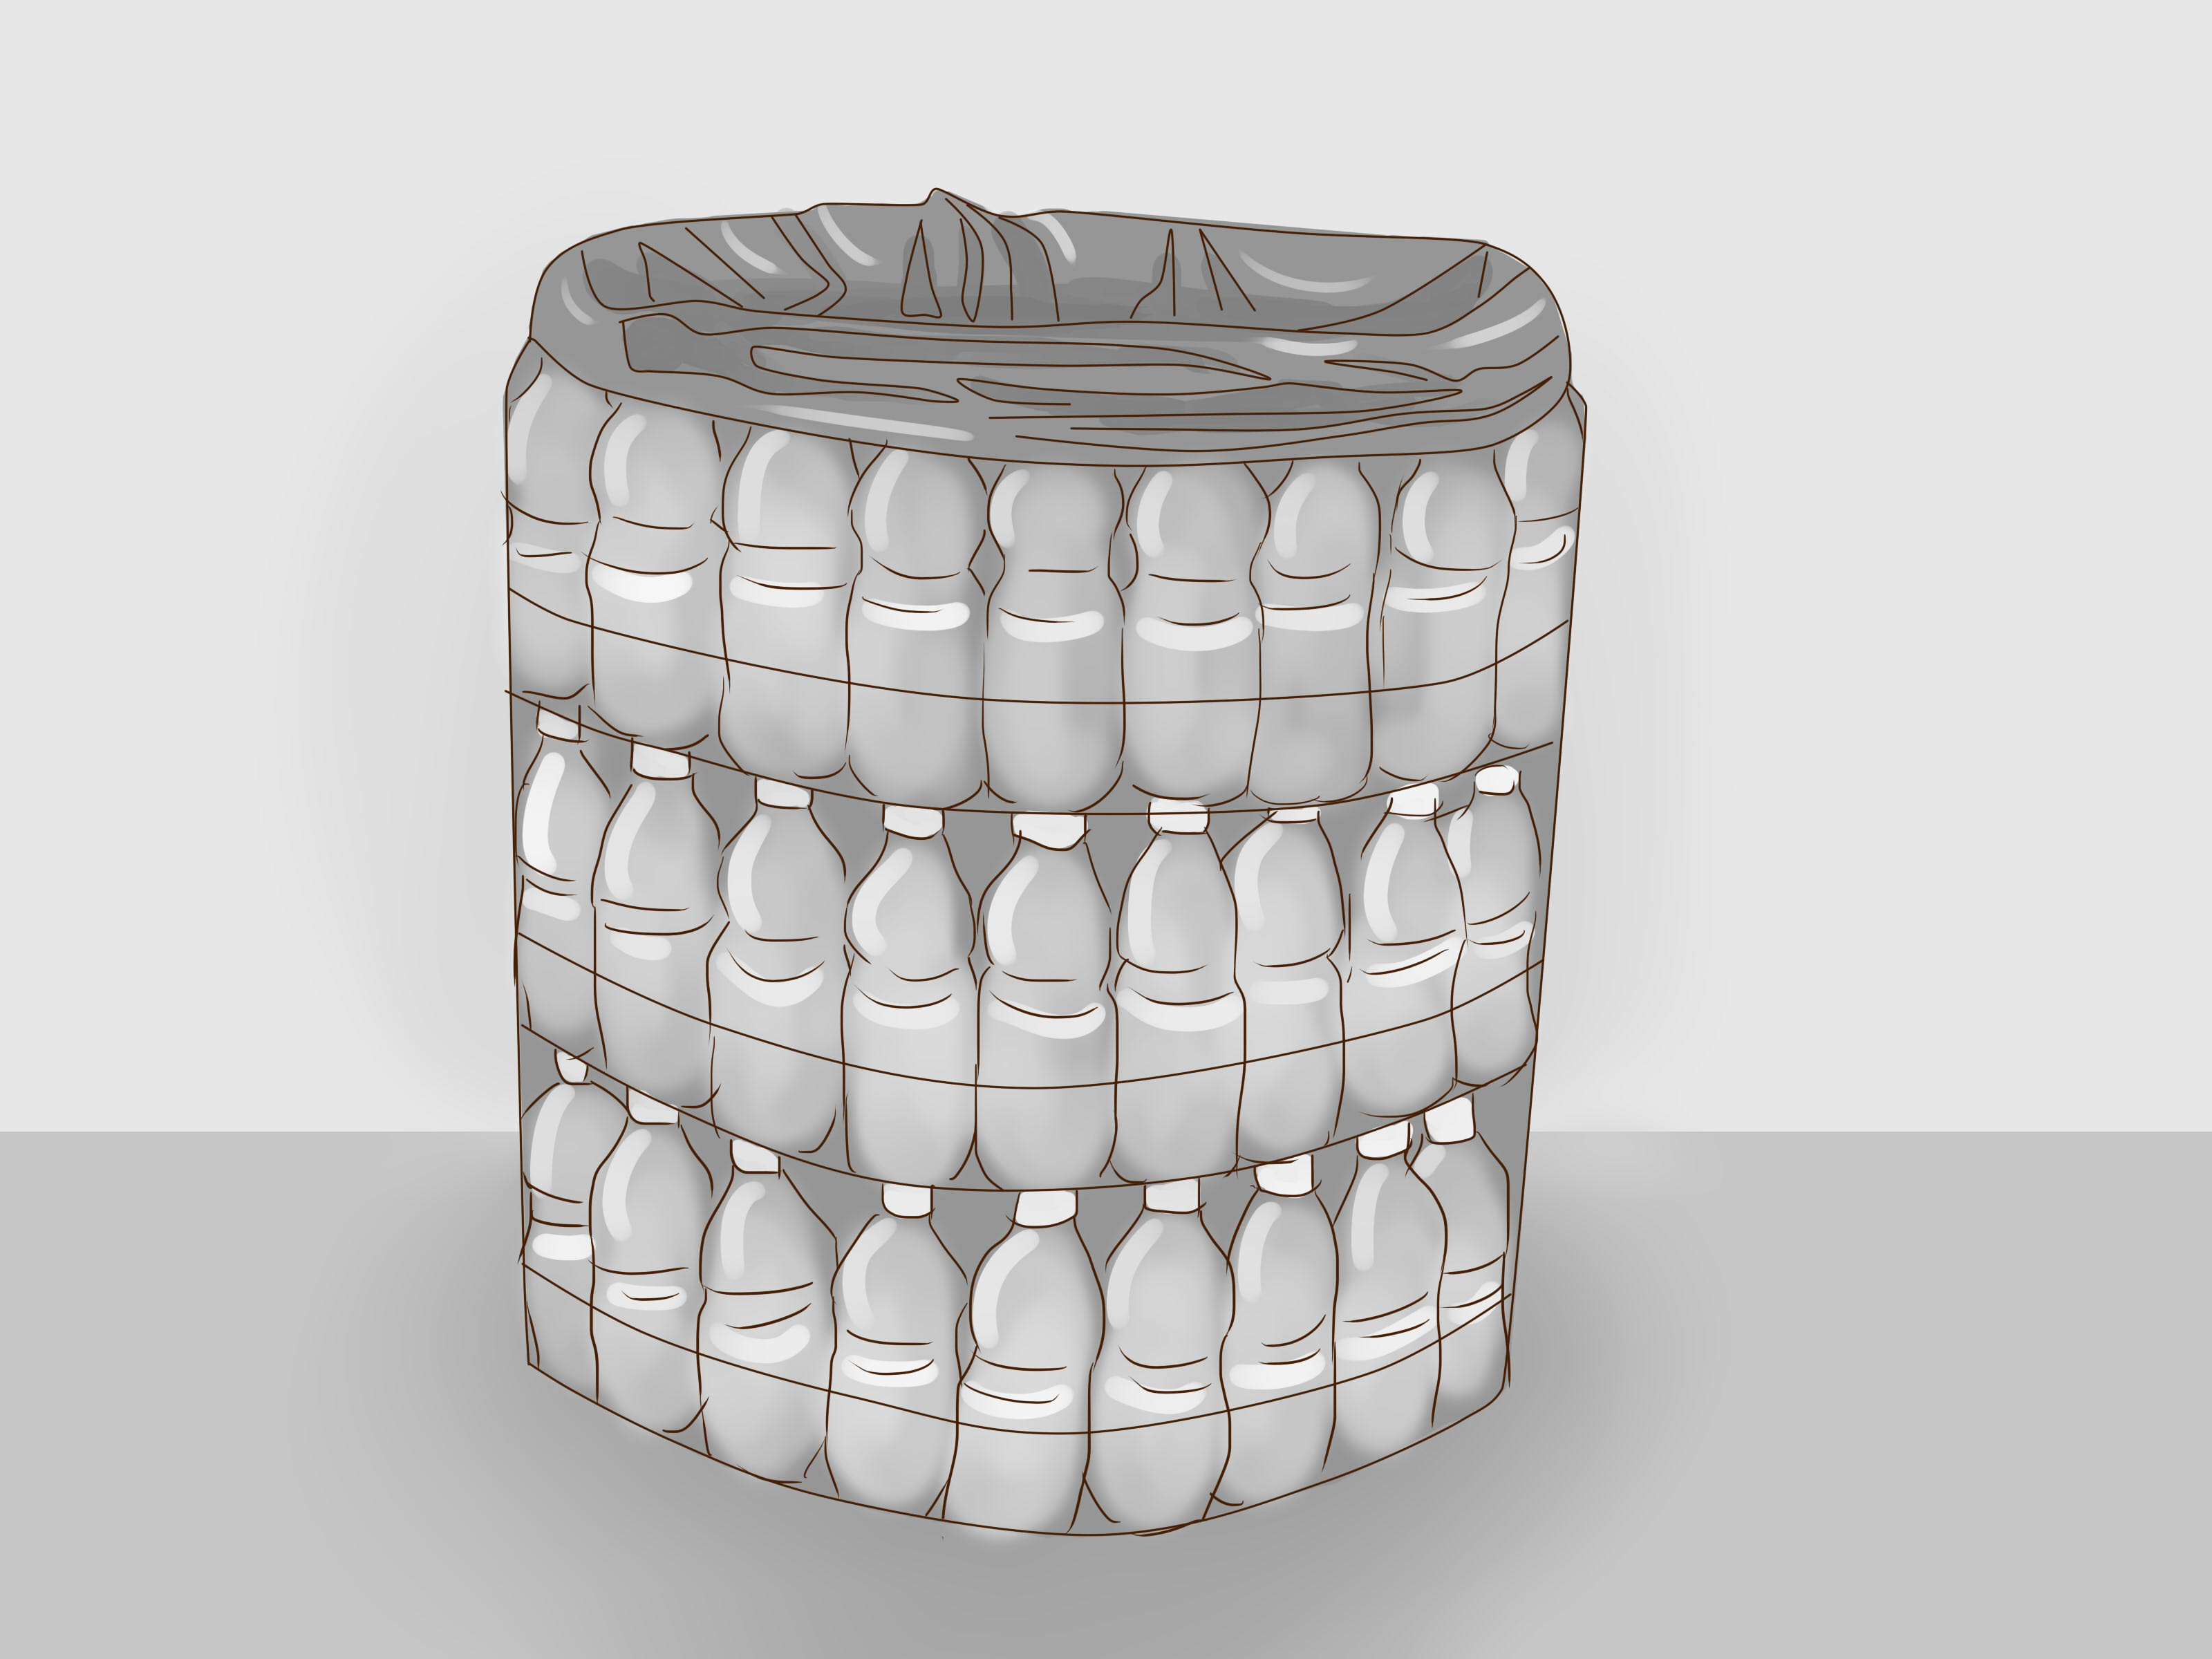
The easiest shape is a cylinder. A round bin distributes pressure evenly and is simple to assemble with bottles arranged vertically around two circular frames. A square or rectangular bin is also possible, but it needs stronger corners and more careful measuring.
Place your bottles around the bottom frame to estimate spacing. The bottles should sit close together without being squeezed too tightly. Leave enough space between them for wire or zip ties. If you plan to use a trash bag inside, make the opening wide enough so the bag can fold over the rim.
For a neat design, place the bottle bottoms at the base and the bottle necks near the top. This creates a slightly tapered, decorative look. For a chunkier design, alternate bottles up and down. Both methods work, but the vertical bottle method is usually stronger for beginners.
Step 3: Prepare the Frame
The frame gives the trash can its shape. You need one ring or square frame for the bottom and one for the top. The bottom frame keeps the bottles aligned, while the top frame creates a clean rim and helps the bin stay open.
If you are making a round trash can, use two metal hoops, wire circles, or sturdy plastic rings. If you are using wire, shape it into a circle and twist the ends tightly with pliers. Wrap the joint with tape to prevent sharp points. For a square bin, create two matching square frames from wood strips, thick wire, or rigid plastic tubing.
Make sure both frames are the same size. If the top is larger than the bottom, your bin may flare outward. If the bottom is larger than the top, the bin may look like it is trying to become a flowerpot. A slight taper is fine, but extreme shape differences can make the structure unstable.
Safety Note
When cutting wire or plastic, wear gloves and work on a stable surface. Keep sharp tools away from children, pets, and anyone who says, “I’m just going to help real quick” while holding scissors upside down.
Step 4: Drill Holes and Attach the Bottles
Now it is time to connect the bottles to the frame. Use a small drill bit, awl, or heated metal skewer to make holes near the top and bottom of each bottle. Make two holes near the bottom and two holes near the shoulder or neck area. These holes allow you to thread wire, cord, or zip ties through the bottles and attach them securely.
If you use a drill, go slowly. Plastic can crack if you apply too much pressure. If you use a heated awl, work in a well-ventilated area and avoid breathing fumes. Do not melt large sections of plastic; you only need small holes.
Attach the lower part of each bottle to the bottom frame first. Then attach the upper part to the top frame. Tighten each connection enough to hold the bottle in place, but not so tightly that the plastic collapses. Continue around the frame until the sides are complete.
Wire creates a very strong structure, but zip ties are easier for beginners. If you use zip ties, trim the ends neatly and turn the cut edges toward the inside of the bin. If you use wire, twist the ends with pliers and tuck them away so they do not scratch hands or tear trash bags.
Design Option
For a more decorative trash can, place bottle caps back on the bottles after assembly. Caps can add color and make the top edge look more finished. Just make sure the caps do not interfere with the rim or trash bag placement.
Step 5: Reinforce the Structure
Once the bottles are attached, test the bin gently. Press the sides, lift it slightly, and check whether any bottles twist or wobble. If the trash can feels flimsy, add reinforcement before decorating. This is the DIY equivalent of checking the foundation before choosing curtains.
You can reinforce the bin by running extra wire or cord horizontally around the middle of the bottles. Thread it through additional holes or wrap it around the bottle bodies. This creates a belt that holds the sides together. For taller bins, add two reinforcement bands: one near the lower third and one near the upper third.
You can also add a base. A simple base can be made from sturdy cardboard, plywood, plastic sheet, or the bottom of an old bucket. Cut it to fit inside the bottom frame and attach it with wire, glue, or zip ties. A base helps the trash can hold its shape and prevents small pieces of trash from falling through.
If you plan to use the bin outdoors, choose materials that tolerate moisture. Galvanized wire, nylon cord, plastic sheet, and weather-resistant paint are better choices than untreated cardboard. For indoor use, cardboard is fine if you keep the bin dry.
Step 6: Finish, Decorate, and Use Your New Trash Can
At this point, your trash can made of plastic bottles is functional. But let us be honest: functional and fabulous are not always the same thing. A few finishing touches can make the project look intentional and attractive.
Smooth any rough plastic or wire edges with sandpaper, tape, or fabric trim. Add a rope handle on each side if you want to move the bin easily. Paint the frame to match your room. Wrap the top rim with jute rope for a rustic look, or use colorful tape for a classroom-friendly design. You can even label the bin “Paper,” “Plastic,” “Craft Scraps,” or “Dry Waste” to encourage proper sorting.
If you want a cleaner interior, place a removable liner inside. A small bucket, fabric liner, or standard trash bag works well. The liner is especially helpful if you use the bin for everyday household waste. For best results, reserve the bottle bin for dry materials and empty it regularly.
Congratulations: you have officially turned plastic bottles into a useful trash can. Somewhere, a landfill just felt mildly less powerful.
Best Uses for a Plastic Bottle Trash Can
A DIY plastic bottle trash can is not ideal for every kind of waste, but it has many practical uses around the home, school, or workspace. It is excellent for paper waste in a home office, wrapping paper scraps in a craft room, lightweight packaging in a garage, or dry garden waste on a patio.
Teachers can use this project as part of an environmental science lesson, Earth Day activity, or classroom recycling challenge. Families can make it as a weekend craft and use the finished bin in a playroom. Small businesses can create one for a break room or event booth to show a commitment to sustainability.
The project also makes a strong visual statement. A bin made from plastic bottles reminds people how many single-use containers pass through daily life. It turns a familiar object into a conversation starter. That is one reason upcycled home projects are so effective: they are not only useful, but they also make people think.
Common Mistakes to Avoid
Using Dirty Bottles
Always clean and dry bottles before building. Sticky residue can cause odors, attract insects, and make the project unpleasant to handle.
Skipping the Frame
A frame keeps the bin sturdy. Without it, the bottles may lean, twist, or collapse. Even a simple wire frame makes a big difference.
Making the Holes Too Large
Small holes are better. Large holes can tear, especially when the bin is moved or filled with trash.
Using the Bin for Wet Garbage
This type of trash can is best for dry waste. Wet garbage can leak, smell, and make cleaning difficult unless you use a waterproof liner.
Forgetting Sharp Edges
Trimmed plastic, wire, and zip ties can be sharp. Cover or tuck away rough edges before using the bin.
How to Customize the Project
One of the best parts of making a trash can from plastic bottles is that every version can look different. For a minimalist look, use clear bottles and silver wire. For a bright kids’ room, use colored caps and painted frames. For a garden or patio, wrap the rim with rope and use green bottles for a nature-inspired style.
You can also change the bottle direction. Bottles placed vertically create a clean column effect. Bottles placed horizontally can create a woven or stacked appearance, although that method takes more patience and stronger support. If you enjoy detailed craftwork, you can cut bottles into strips and weave them into panels, but that is a more advanced version of the project.
Another useful idea is to create separate bins for different waste categories. One bottle bin can hold paper, another can hold plastic packaging, and another can collect craft scraps. Add labels to make sorting easy. This is especially helpful in classrooms, offices, and shared spaces where people need gentle reminders that “recycling” is not the same as “throw everything into one heroic blue bin.”
Cleaning and Maintenance Tips
To keep your plastic bottle trash can in good condition, empty it often and wipe it with a damp cloth. If it gets dusty, rinse it outside with mild soap and water, then let it dry completely. Avoid placing it near high heat, open flames, or direct sunlight for long periods, because heat can weaken plastic over time.
Check the wire, zip ties, or cord every few weeks. If anything loosens, tighten it right away. Replace broken bottles if needed. Since the project is modular, you can repair one section without rebuilding the entire bin.
If you decide you no longer want the trash can, separate the materials as much as possible before recycling or disposing of them. Remove wire, zip ties, rope, and decorations so the plastic bottles can be handled appropriately according to your local recycling rules.
Experience Notes: What It Is Really Like to Make a Trash Can From Plastic Bottles
The first thing you notice when making a trash can out of plastic bottles is that collecting enough bottles takes longer than expected. One or two bottles look like plenty when they are cluttering the kitchen counter. But once you arrange them around a frame, they suddenly seem to shrink. For a medium bin, you may need several weeks of saved bottles or a friendly request to neighbors, coworkers, or family members. The good news is that people are usually happy to donate empty bottles. The bad news is that they may also ask why you are hoarding them like a raccoon with a Pinterest account.
Cleaning is the part everyone wants to skip, but it makes the biggest difference. Bottles that are rinsed immediately after use are much easier to prepare. Bottles that sat in a hot car with leftover lemonade are a different story, and not a charming one. A good habit is to rinse each bottle, remove the label, and let it dry upside down before adding it to your project pile. By the time you are ready to build, the boring prep work is already done.
During assembly, the most useful lesson is to avoid rushing the holes. If holes are uneven, the bottles hang crooked. If they are too close to the edge, the plastic may tear. A simple template helps. Mark the first bottle carefully, then use it as a guide for the rest. This saves time and keeps the rows looking neat. It may feel fussy, but it prevents the finished bin from looking like it survived a small household tornado.
Another real-world tip is to build the project on the floor or a large table. Plastic bottles roll, frames shift, zip ties disappear, and wire seems to develop a personal desire to poke your fingers. Give yourself room. Keep tools in a bowl or tray. If children are helping, let them sort bottles, choose colors, remove labels, or decorate finished sections while an adult handles cutting and drilling.
The finished trash can is surprisingly lightweight. That is wonderful when you need to move it, but it also means the bin can tip if it is too tall and narrow. A slightly wider base makes it more stable. Adding a simple bottom panel also helps. If the bin will sit in a busy area, place a small weight under the liner or use a heavier base material.
Decorating is where the project becomes personal. A plain bottle bin has a cool recycled look, but a decorated one can match a room. Rope gives it a handmade farmhouse feel. Bright tape makes it fun for kids. A coat of paint on the frame can make the whole piece look more finished. The trick is not to overdecorate the bottles themselves if you still want people to recognize the upcycled material. Part of the charm is seeing what it used to be.
In daily use, this trash can works best for light, dry waste. It is perfect beside a desk, in a craft corner, near a gift-wrapping station, or in a classroom. It is not the best choice for coffee grounds, food scraps, or anything wet unless you use a reliable liner. Think of it as a stylish dry-waste bin, not a replacement for a heavy-duty kitchen garbage can.
The biggest reward is not just the finished bin. It is the shift in perspective. After making one useful object from discarded bottles, you start looking at packaging differently. A bottle is no longer just a bottle. It might become a planter, scoop, bird feeder, organizer, or another useful item. That is the heart of upcycling: not pretending waste is beautiful, but noticing when something still has a job left to do.
Conclusion
Creating a trash can made of plastic bottles is a smart, affordable, and creative way to reuse materials that often pile up quickly at home. With clean bottles, a sturdy frame, careful holes, strong connectors, and a little patience, you can build a practical bin that is useful for dry waste and attractive enough to keep in plain sight.
This project is also flexible. You can make it small or large, round or square, colorful or minimalist. You can use it in a craft room, office, classroom, garage, or patio. More importantly, it encourages a simple habit: before throwing something away, ask whether it can be reused first. Sometimes the answer is yes. Sometimes the answer is “yes, and apparently it can become a trash can.”
Note: This article is based on practical recycled-craft methods, common plastic bottle upcycling techniques, household reuse guidance, and general waste-reduction principles. Always follow local recycling rules and use adult supervision when cutting, drilling, or heating plastic.