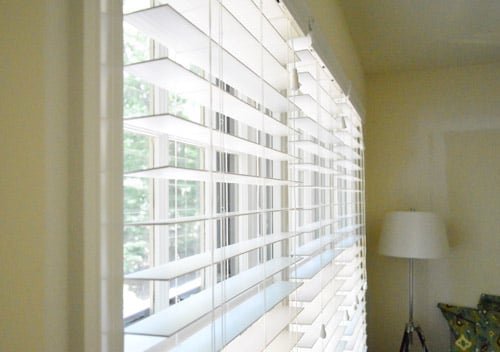
White faux wood window blinds are the home improvement version of a crisp white shirt: classic, surprisingly practical, and capable of making almost any room look more polished in about an afternoon. They give you the clean look of painted wood without the same level of worry about moisture, warping, or budget shock. That makes them especially popular in kitchens, bathrooms, laundry rooms, bedrooms, rental homes, and busy family spaces where real life occasionally includes steam, fingerprints, pets, and someone eating cereal near the window.
The good news? Installing white faux wood blinds is a very manageable DIY project. You do not need to be a professional carpenter, own a truck full of tools, or speak fluent “contractor.” You do, however, need accurate measurements, the right mounting style, a steady level, and the patience to avoid drilling holes while muttering, “Eh, close enough.” Blinds are not very forgiving when installed crooked; they will remind you every morning when sunlight sneaks in at a dramatic angle.
This guide walks through how to measure, choose, install, test, and maintain white faux wood blinds for a clean, durable result. Whether you are replacing tired aluminum mini blinds or giving a room a bright new finish, the steps below will help you do the job neatly, safely, and with fewer “why is this bracket upside down?” moments.
Why White Faux Wood Blinds Are So Popular
White faux wood blinds combine the warm, structured appearance of wood blinds with the practicality of synthetic materials. Most faux wood blinds are made from PVC, vinyl, composite materials, or a mix of engineered materials designed to resist moisture better than natural wood. That is why they are commonly used in humid areas where real wood blinds might swell, crack, or warp over time.
The white finish is another reason homeowners love them. White blinds reflect light, brighten rooms, and blend easily with trim, walls, and window frames. They work with farmhouse, coastal, traditional, modern, transitional, and minimalist interiors. In short, white faux wood blinds are not picky. They can look right at home next to subway tile, gray walls, natural oak floors, or a suspiciously large collection of houseplants.
Main Benefits of White Faux Wood Blinds
White faux wood blinds offer privacy, light control, durability, and a clean decorative finish. Their horizontal slats can be tilted to soften daylight, block direct glare, or create privacy without completely darkening a room. They are also generally easier to clean than fabric shades because dust can be wiped from the slats with a microfiber cloth or vacuum brush attachment.
Compared with real wood blinds, faux wood blinds are usually more budget-friendly and more resistant to moisture. Compared with thin aluminum blinds, they look more substantial and decorative. Their thicker slats also help create a more finished architectural look, especially when paired with a matching valance.
Before You Start: Inside Mount vs. Outside Mount
Before buying or installing white faux wood window blinds, decide whether you want an inside mount or outside mount. This choice affects how you measure, where you place brackets, and how the finished blinds look.
Inside Mount
An inside mount means the blinds fit within the window frame. This creates a clean, built-in appearance and keeps the trim visible. It is a popular choice when the window frame is deep enough and square enough to hold the blind hardware. Inside mount blinds look sleek, but they require more precise measurements because the blind must fit inside the opening without rubbing the sides.
For an inside mount, measure the width of the window opening at the top, middle, and bottom. Use the narrowest width. Then measure the height at the left, center, and right. Use the longest height. Also measure the depth of the window frame to make sure there is enough room for the headrail and brackets.
Outside Mount
An outside mount means the blinds are installed on the wall, trim, or molding outside the window opening. This option is useful when the window frame is too shallow, uneven, or unattractive. Outside mount blinds can also provide better light control because they overlap the window edges, reducing light gaps along the sides.
For an outside mount, measure the area you want the blinds to cover. Many homeowners add extra width on both sides of the window for better privacy and light coverage. You may also add height above and below the opening, depending on your window design and the desired look.
Tools and Materials You Will Need
Most white faux wood blind installations require basic household tools. Gather everything before you begin so you are not balancing a headrail in one hand while searching for a pencil with the other. That is how DIY projects turn into slapstick comedy.
- White faux wood blinds with included brackets and hardware
- Steel measuring tape
- Pencil
- Level
- Drill or screwdriver
- Drill bits for pilot holes
- Step stool or ladder
- Wall anchors, if mounting into drywall without studs
- Safety glasses
- Microfiber cloth for cleanup
A steel measuring tape is strongly recommended because cloth or flexible tape can stretch and cause inaccurate measurements. With blinds, even a small measuring mistake can make the difference between “perfect fit” and “why does this look like it belongs in another house?”
How to Measure for White Faux Wood Blinds
Accurate measuring is the most important part of the entire project. Installation is usually straightforward, but bad measurements are difficult to hide. The goal is to measure each window individually, even if two windows appear identical. Houses settle, trim shifts, and window openings often vary more than expected.
Measuring for Inside Mount Blinds
Measure the inside width of the window frame in three places: top, middle, and bottom. Record the narrowest measurement. This prevents the blinds from being too wide for the tightest part of the opening. Next, measure the inside height in three places: left, center, and right. Record the longest measurement so the blind reaches the sill properly.
Finally, measure the depth from the front edge of the frame to the glass or obstruction. Compare that depth with the blind manufacturer’s mounting requirements. Some blinds can be mounted with minimal depth, but a fully recessed look usually requires more room.
Measuring for Outside Mount Blinds
For outside mount blinds, measure the full area you want to cover. Start with the window opening or trim, then add extra width for overlap. This helps block side light and increases privacy. Measure the height from where the headrail will sit down to where the blinds should end. If you are mounting above the trim, make sure there is enough flat surface for the brackets.
Outside mount blinds are more forgiving than inside mount blinds, but they still need to be level and centered. A small measuring error can make the blinds look off-balance, especially on a white wall where every shadow is ready to testify against you.
Step-by-Step Guide to Installing White Faux Wood Window Blinds
The exact process may vary slightly by brand, but most white faux wood blinds follow a similar installation pattern. Always read the manufacturer’s instructions included with your blinds before drilling.
Step 1: Unpack and Check the Parts
Open the box and lay out the headrail, slats, mounting brackets, screws, valance clips, valance, end caps, wand, and any hold-down brackets. Compare the contents with the instruction sheet. It is much easier to notice a missing screw before installation than after one bracket is already mounted and your motivation has started filing a complaint.
Step 2: Mark the Bracket Locations
Hold the brackets in position and mark the screw holes with a pencil. For inside mount blinds, brackets usually sit inside the top corners of the window frame. For outside mount blinds, brackets are placed above or beside the window opening on the wall or trim.
Use a level to make sure the bracket marks line up. Even if your trim looks straight, check it. Older homes especially enjoy keeping secrets. A level helps prevent crooked blinds and uneven light gaps.
Step 3: Drill Pilot Holes
Drill small pilot holes where you marked the screw locations. Pilot holes make it easier to drive screws straight and reduce the chance of splitting wood trim. If you are drilling into drywall and cannot hit a stud, use appropriate wall anchors. Faux wood blinds can be heavier than aluminum blinds, so secure support matters.
Step 4: Attach the Mounting Brackets
Screw the brackets firmly into place. Do not overtighten to the point that screws strip or brackets bend. The brackets should feel snug, stable, and aligned. If your blind is wide, it may include a center support bracket. Install it according to the manufacturer’s directions, making sure it does not interfere with the internal lift mechanism.
Step 5: Install the Valance Clips
Many white faux wood blinds include a decorative valance that covers the headrail. Depending on the mounting style and product design, valance clips may be attached before or after the blind is placed into the brackets. Inside mount installations often require attaching the clips earlier because space becomes tighter after the headrail is installed.
Step 6: Place the Headrail Into the Brackets
Lift the blind headrail into the brackets. Make sure the front of the blind faces the room and the tilt mechanism is accessible. Once the headrail is seated correctly, close or snap the bracket doors according to the product instructions. The blind should feel secure before you let go.
Step 7: Attach the Wand and Valance
Attach the tilt wand if your blinds include one. Then snap or clip the valance into place. On outside mount blinds, valance returns may be used on the sides to give the installation a finished, box-like look. Check that the valance is straight and evenly spaced.
Step 8: Test Operation
Lower and raise the blinds slowly using both hands on the bottom rail if they are cordless. Tilt the slats open and closed with the wand. The blinds should move smoothly without rubbing, scraping, or twisting. If they catch on one side, check whether the headrail is fully seated or whether the brackets are slightly misaligned.
Common Installation Mistakes to Avoid
Even a beginner can install white faux wood blinds successfully, but a few common mistakes can make the project harder than it needs to be.
Measuring Only Once
Measure twice before ordering and again before drilling. Window openings are often uneven. Measuring only one spot can lead to blinds that are too wide, too short, or awkwardly fitted.
Skipping the Level
Your eyes are helpful, but they are not a level. A slightly crooked blind may not bother you during installation, but it becomes very noticeable once the slats are lined up against sunlight.
Using Weak Anchors
White faux wood blinds can be heavier than some other window treatments. If mounting into drywall, use anchors rated for the weight and follow the hardware instructions. A blind that falls down is not a design feature.
Forgetting Child Safety
Cordless window coverings are strongly preferred in homes with young children. If older corded blinds are present, cords should be kept out of reach and replaced with safer options when possible. Modern cordless faux wood blinds are widely available and make everyday operation cleaner and safer.
Cleaning and Maintaining White Faux Wood Blinds
White blinds look beautiful, but they do show dust. Fortunately, faux wood blinds are easy to maintain. Close the slats and dust from side to side with a microfiber cloth, duster, or vacuum brush attachment. Then tilt the slats the opposite direction and repeat.
For smudges, use a damp cloth with mild soap and water. Avoid harsh chemicals, abrasive pads, or soaking the blinds. Faux wood materials are moisture-resistant, but the internal hardware and ladder cords still benefit from gentle care. In kitchens, where grease can mix with dust, clean more often to prevent buildup.
Design Tips for White Faux Wood Blinds
White faux wood blinds are versatile, but small design choices can make them look even better. Match the blind color as closely as possible to your window trim for a seamless look. If your walls are warm white or cream, choose a soft white rather than a stark blue-white. If your trim is bright white, a clean white blind usually works best.
Two-inch slats are a popular choice because they provide a plantation-shutter-inspired look without the cost of shutters. Wider slats also create a more open view when tilted. For small windows, standard two-inch faux wood blinds still look balanced and substantial.
In bedrooms, pair white faux wood blinds with curtains for softness and extra light control. In kitchens and bathrooms, use them alone for a clean, moisture-friendly finish. In living rooms, they can create a crisp backdrop that lets furniture, rugs, and artwork take center stage.
When to Call a Professional
Installing blinds is usually DIY-friendly, but there are times when professional help makes sense. Consider hiring an installer if your windows are unusually tall, hard to reach, arched, angled, bay-style, or surrounded by delicate tile or stone. Professional installation may also be worth it if you are ordering custom blinds for many windows and want every detail to match.
You should also call for help if you are unsure about drilling into metal, masonry, tile, or old plaster. The right fastener matters, and using the wrong one can damage the wall or create a weak installation.
Real-World Experiences: What Installing White Faux Wood Blinds Teaches You
After installing white faux wood window blinds in real homes, one lesson becomes clear very quickly: the measuring stage deserves more respect than the drilling stage. Many people assume the “hard part” is using the tools, but the real challenge is making sure the blinds are the correct size and mounted in the correct position. A drill can only follow the marks you give it. If the marks are wrong, the drill will happily help you make a permanent mistake.
One common experience is discovering that two windows in the same room are not exactly the same size. They may look identical from across the room, but the tape measure tells a different story. One opening might be 1/8 inch narrower at the top, while the other has a slightly deeper frame. This is why measuring each window separately is so important. Labeling each blind by room and window location can save confusion later, especially when installing several blinds at once.
Another practical lesson is that white faux wood blinds instantly reveal whether the surrounding trim needs cleaning or touch-up paint. Fresh white blinds can make old caulk lines, dusty sills, and chipped trim more noticeable. Before installation, wipe the window frame, clean the glass, and touch up paint if needed. It adds a little time, but the finished result looks much more professional.
For inside mount installations, the biggest surprise is often how tight the working space feels. Attaching valance clips, closing bracket doors, and positioning the headrail can require patience, especially on narrow windows. It helps to dry-fit the blind before fastening everything permanently. Make sure the bracket doors can open and close and that the headrail can slide into place without hitting the window lock or crank.
For outside mount installations, centering is everything. A blind that overlaps the window evenly on both sides looks intentional and polished. A blind that sits slightly too far left looks like it was installed during a power outage. Mark the center of the window and the center of the headrail before lifting the blind into place. This simple trick makes alignment much easier.
Another experience worth noting is the weight difference. Faux wood blinds feel sturdier than lightweight vinyl or aluminum blinds. That sturdiness is part of their appeal, but it also means brackets must be secure. If the screws do not bite into solid material, do not ignore it. Use proper anchors or reposition the brackets where they can hold safely.
Finally, the finished effect is usually more dramatic than expected. White faux wood blinds can make a room feel cleaner, brighter, and more finished without changing furniture or paint. They are one of those upgrades that quietly improves the whole space. No fireworks, no parade, just a window that suddenly looks like it has its life together.
Conclusion
Installing white faux wood window blinds is one of the most rewarding DIY upgrades for homeowners who want better privacy, cleaner style, and practical light control. The project is beginner-friendly, but it rewards careful measuring, straight bracket placement, secure hardware, and patient testing. Choose inside mount blinds for a streamlined built-in look or outside mount blinds for better coverage and flexibility. Either way, white faux wood blinds can brighten a room, complement nearly any decor style, and stand up well in everyday spaces.
The key is simple: measure accurately, install securely, and do not rush the final adjustments. Once the blinds are up, cleaned, and working smoothly, you will have a polished window treatment that looks custom without requiring a custom-sized panic attack.