Need a check mark in Microsoft Word? You’ve got optionslots of them. Some are perfect for a one-time “Yep, this is done” moment (✓).
Others create clickable checkboxes you can tick like a tiny productivity goblin collecting digital accomplishments.
In this guide, you’ll learn 8 easy, reliable ways to insert a check mark (tick mark) or checkbox in Word on Windows and Mac,
plus tips on choosing the right style so your document looks professionalnot like it got dressed in the dark.
Quick cheat sheet: pick your check mark style
- Need a simple symbol (static): Use Insert → Symbol, Unicode Alt+X, or AutoCorrect.
- Need a clickable checkbox (interactive): Use the Developer tab checkbox content control.
- Need a graphic check icon (pretty, resizable): Use Insert → Icons.
- Need many check marks in a list: Use bullets or copy/paste.
1) Insert a check mark using Symbol (the classic, safest method)
If you want the most universally understood approach, Word’s built-in Symbol picker is your best friend.
It works across versions, doesn’t require memorizing codes, and won’t surprise your coworkers with mysterious Wingdings hieroglyphs.
Steps (Windows or Mac)
- Place your cursor where you want the check mark.
- Go to Insert → Symbol → More Symbols.
- In the Font drop-down, try Segoe UI Symbol, Arial Unicode MS (if available), or Wingdings.
- Choose a check mark (✓ / ✔) or a checkbox style (☑ / ☐), then click Insert.
Pro tip
If you don’t see the style you want, switch fonts in the Symbol dialog. Many check marks live in symbol-focused fonts like
Segoe UI Symbol (Windows) or Apple Symbols (Mac).
2) Type a Unicode code, then press Alt+X (the “wizard” shortcut)
This is one of Word’s slickest tricks: you type a Unicode value, then press Alt+X, and Word converts it into a symbol.
It’s fast, it’s clean, and it makes you look like you know secret keyboard kung fu.
Common Unicode codes for check marks
- 2713 + Alt+X → ✓ (check mark)
- 2714 + Alt+X → ✔ (heavy check mark)
- 2611 + Alt+X → ☑ (ballot box with check)
Example
Type 2714, then press Alt+X. Boom: ✔.
To switch back, put your cursor after the symbol and press Alt+X again (Word toggles between the code and the symbol).
When to use this
Use Unicode + Alt+X when you insert check marks often and want speed without messing with symbol menus.
It’s also great when you want consistent, standard characters (not font-dependent doodles).
3) Use Wingdings character codes (fast, but font-dependent)
Wingdings is the “ancient scroll” of office symbols: powerful, widely available, and occasionally confusing.
The big catch: the check mark appears correctly only if the text is formatted in the right Wingdings font.
Option A: Insert via Symbol dialog with character code
- Go to Insert → Symbol → More Symbols.
- Set Font to Wingdings.
- In Character code, type
252(a common plain check mark in Wingdings). - Click Insert.
Option B: Type the code with Alt (Windows, numeric keypad)
- Turn on Num Lock.
- Hold Alt and type
0252on the numeric keypad. - Apply the Wingdings font to that character if it doesn’t show as a check mark.
Reality check (pun intended)
Wingdings check marks can look great, but they’re not “true” Unicode characters. If someone changes the font later,
your check mark can turn into… something that definitely isn’t a check mark. Use it when you control the formatting.
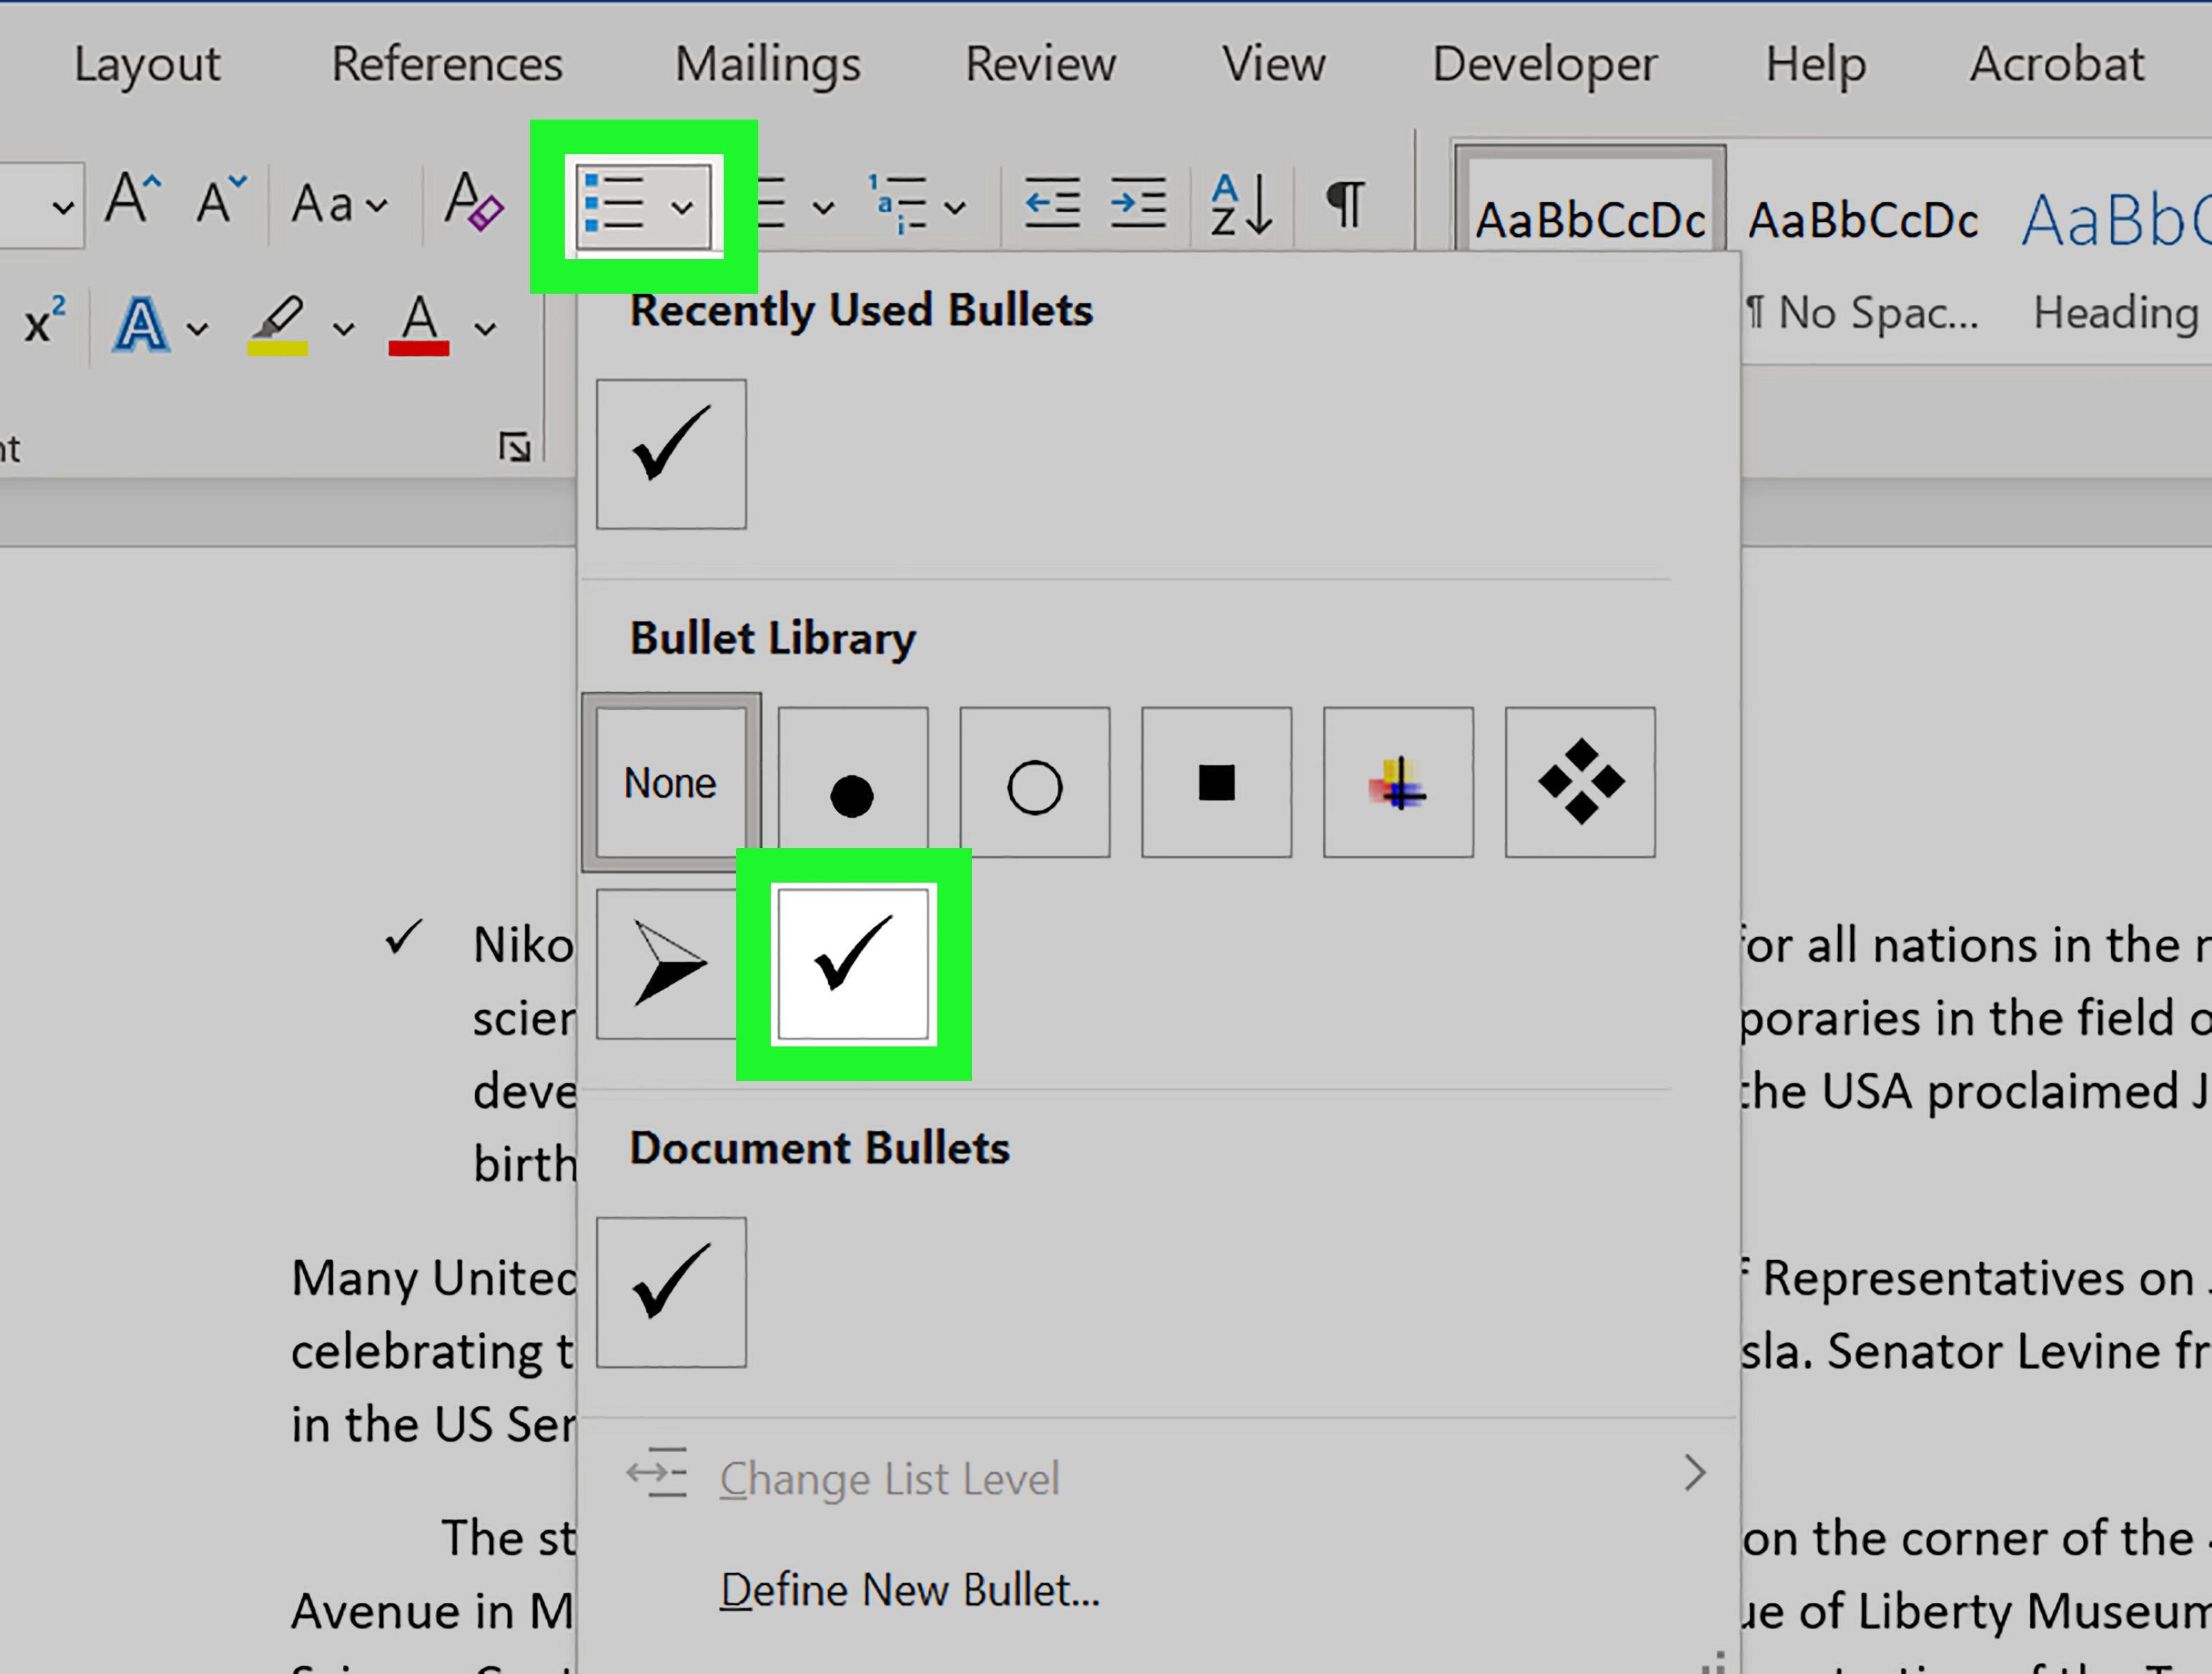
4) Add check marks as custom bullets (perfect for to-do lists)
Want every line in your list to start with a check markwithout manually inserting 47 symbols like a caffeine-fueled woodpecker?
Use a custom bullet.
Steps
- Select your list (or place the cursor where the list will begin).
- Go to Home → click the arrow next to Bullets.
- Choose Define New Bullet → Symbol.
- Pick a font like Wingdings or Segoe UI Symbol, select a check mark, then click OK.
Bonus: make it look intentional
If you’re building a checklist-style document, consider using a two-column table:
check marks in the left column, text in the right. It keeps alignment tidy and stops the list from drifting sideways like a shopping cart with a bad wheel.
5) Insert a clickable checkbox (Developer tab content control)
If you want a checkbox people can click to check/uncheck inside the document, this is the method.
It’s the closest thing Word has to an interactive checklist without turning your file into a full-blown form.
Step 1: Turn on the Developer tab
- Go to File → Options → Customize Ribbon.
- Check Developer in the main tabs list.
- Click OK.
Step 2: Insert the checkbox control
- Place your cursor where you want the checkbox.
- Go to Developer → in Controls, click Check Box Content Control.
- Copy/paste that checkbox to make a whole checklist fast.
Why this is great
- It’s interactive: click to toggle checked/unchecked.
- It’s consistent: all checkboxes match.
- It’s ideal for forms, approvals, and task lists that live digitally.
Small warning
If someone opens the document in a limited Word viewer or exports to certain formats, interactivity may change.
If you need a “works everywhere” checkbox, use a static symbol like ☐ / ☑.
6) Insert a check mark icon (resizable, modern-looking graphics)
Sometimes a plain ✓ isn’t enoughyou need a bold, clean check icon that can be resized, recolored, and used like a design element.
For that, use Word’s built-in Icons.
Steps
- Go to Insert → Icons.
- Search for
checkortick. - Select an icon and click Insert.
- Resize it like an image; use Graphics Format options if you want styling changes.
When icons win
Use icons for slides, polished handouts, marketing docs, and “this must look nice” materials.
Icons also avoid font issues because they’re graphic objects, not characters.
7) Create your own check mark shortcut with AutoCorrect (type a trigger, get ✓)
If you insert check marks constantly, AutoCorrect is your secret weapon. You type a short trigger (like ckm),
then Word automatically replaces it with ✓. It’s like building your own tiny keyboard macrowithout the drama.
Steps
- Insert a check mark once (using any method you like).
- Select the symbol and copy it (
Ctrl+C/Cmd+C). - Go to File → Options → Proofing → AutoCorrect Options.
- In Replace, type something you’ll remember (e.g.,
ckmrk). - In With, paste your check mark.
- Click Add → OK.
AutoCorrect best practices
- Pick a trigger you’ll never type by accident, like
;;checkorckm✓. - Make different triggers for different styles: ✓ vs ✔ vs ☑.
- Test in a new document to confirm it works the way you expect.
8) Use Character Map / Emoji & Symbols / copy-paste (the “I just need it now” method)
When you’re in a hurry, the best method is the one that takes 12 seconds and zero brain cells.
That’s where system character pickers and copy/paste shine.
Windows options
- Emoji panel: Press
Win + .(Windows key + period), then search for “check.” - Character Map: Open Character Map, pick a font, and insert ✓ / ✔ / ☑ (availability varies by font).
- Copy/paste: Copy one of these:
✓✔☑and paste into your document.
Mac options
- Character Viewer: Press
Control + Command + Space, search “check,” and insert. - Copy/paste: Yes, it’s still undefeated.
Tip for compatibility
If you paste a check mark and it shows as an empty box (□), it usually means the current font doesn’t support that character.
Select the symbol and switch the font to something more Unicode-friendly (like a standard system font).
FAQ: Check mark vs checkboxwhat’s the difference?
Is a check mark the same as a checkbox?
Not exactly. A check mark (✓) is a symbol. A checkbox is a box that may be empty (☐) or checked (☑),
and it can be either static (just a symbol) or interactive (clickable control from the Developer tab).
Why does my check mark change when I change fonts?
If you used Wingdings/Webdings-style methods, the check mark depends on the font to display correctly.
If you want a check mark that behaves like a normal character across fonts, use Unicode (like 2713 + Alt+X).
What’s the best method for professional documents?
- Formal reports: Unicode check marks (Alt+X) or Symbol insertion.
- Digital forms: Developer tab checkbox content control.
- Design-heavy docs: Icons.
Conclusion: Pick the easiest check mark method for your document
Adding a check mark to a Word document isn’t hardunless you accidentally open Wingdings and summon a flock of decorative bats.
For most people, Insert → Symbol or Unicode + Alt+X is the sweet spot: fast, clean, and consistent.
If you’re building a checklist people will actually click, the Developer tab checkbox is the clear winner.
Try two methods today: one for “quick symbols” and one for “interactive checkboxes.” Once you’ve got both in your toolbox,
you’ll never waste time hunting through menus againbecause you have better things to do, like finishing tasks so you can put more check marks next to them.
Field Notes: real-world “check mark” moments (about )
Check marks seem simple until they collide with real life: team templates, shared documents, printing quirks, and that one coworker who loves changing fonts
like it’s a personality trait. Here are some common scenarios and what tends to work best.
Scenario 1: The shared to-do list that everyone edits. You create a neat checklist, send it to the team, and by the next day the spacing is off,
half the check marks look different, and someone has added emojis like “🔥” for “urgent.” If the list needs to be clickable, the Developer tab checkbox
content control is usually the most consistent. Everyone sees the same control, and it’s easy to copy down a list. If you don’t need interactivity,
check-mark bullets are a strong alternative because they keep alignment tidy and reduce manual symbol insertion.
Scenario 2: The printed form. Printed documents don’t care if a checkbox is clickablethey care if it’s visible and lines up nicely.
For print, a static checkbox symbol (☐) followed by a tab or consistent spacing often looks cleaner than an interactive control.
Also, many print workflows convert documents to PDF. Static symbols and Unicode characters tend to survive that trip with fewer surprises.
Scenario 3: “Why did my check mark turn into a weird character?” This usually happens when someone used Wingdings or Webdings,
then the document’s font got changed (or content got copied into a different styled paragraph). The fix is almost always the same:
either reapply the correct Wingdings font to that character, or switch to a Unicode method (like 2713 + Alt+X) so the symbol is font-independent.
If you’re working in a corporate template with strict fonts, Unicode is your calm, reliable choice.
Scenario 4: You need a big, bold check mark for emphasis. A symbol character can work, but it might not scale beautifully at large sizes.
In those cases, inserting a check icon (Insert → Icons) often looks more polished, especially in headings, callouts, or “approved” stamps.
Icons also behave like graphics, so they’re easier to position visuallybut they can be slower to manage if you need dozens of them in a list.
Scenario 5: You insert check marks all day long. If your job involves reviewing, approving, auditing, grading, or tracking tasks,
AutoCorrect is a game-changer. Setting up triggers like ;;ok → ✓ and ;;done → ✔ can shave minutes off repetitive work.
It also keeps your symbols consistent across documentssomething that matters more than people think when a document becomes a “standard” template.
The big lesson: choose the method that fits the document’s life. Will it be edited by others? Printed? Converted to PDF?
Shared across Windows and Mac? Once you match the check mark style to how the document will be used, Word stops being “mysteriously annoying”
and becomes… well, slightly less annoying. And that’s basically a miracle.