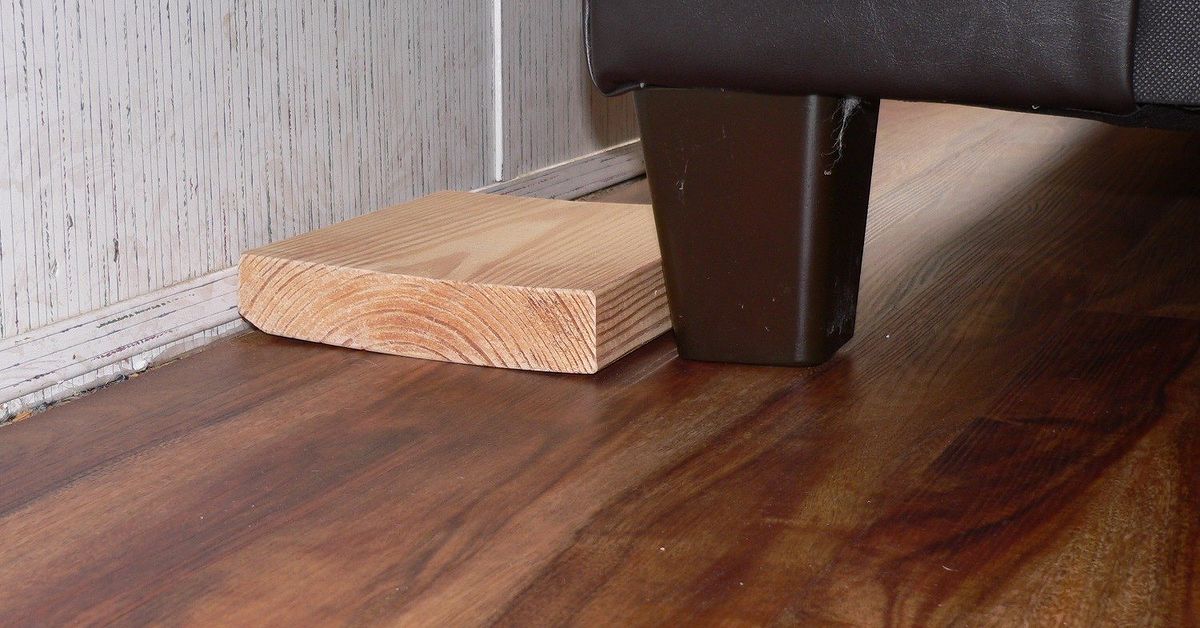
There are two kinds of people in this world: people who notice the couch slowly creeping into the wall, and people who only notice after the paint has a mysterious gray smudge shaped like a sofa back. If your couch keeps rubbing the wall, denting drywall, crushing curtains, blocking outlets, or trapping dust bunnies with long-term leases, DIY couch/wall spacers may be the small home project you never knew you needed.
A couch wall spacer is a simple buffer placed behind or under a sofa to keep it a set distance from the wall. It can be made from wood, rubber feet, furniture bumpers, PVC, foam blocks, felt pads, or a custom rail. The goal is not to build a medieval barricade behind your sectional. The goal is to create a neat, reliable gap that protects your wall, improves airflow, keeps cords safe, and makes your room feel intentionally arranged rather than accidentally squished.
The best part? You do not need to be a professional carpenter. If you can measure a couch, cut or buy a spacer material, and resist the urge to eyeball everything like a cowboy with a tape measure allergy, you can make couch/wall spacers in an afternoon.
What Are DIY Couch/Wall Spacers?
DIY couch/wall spacers are homemade or customized pieces that prevent a sofa, loveseat, sectional, recliner, or daybed from sitting flush against a wall. They act like invisible bumpers. Some attach to the wall, some attach to the couch frame, and others simply sit on the floor behind the furniture.
Most couch spacers are designed to create a gap of about 2 to 6 inches. A smaller gap may be enough to protect paint and baseboards. A larger gap can help with airflow, curtain clearance, heat registers, plugs, charging cables, or decorative lighting. The right size depends on your room, your couch style, and the problem you are trying to solve.
Why Your Couch Should Not Always Touch the Wall
Pushing a sofa flat against the wall seems practical, especially in a small living room. It opens up floor space and makes the layout feel tidy at first glance. But over time, a couch that sits tight against drywall can cause several annoying problems.
Wall Damage and Paint Marks
Fabric, leather, wood frames, and metal hardware can rub against painted walls. Even a couch that looks still is not truly still. People sit, flop, lean, bounce, nap, and occasionally perform the dramatic “I am exhausted” collapse. That motion can leave scuffs, dents, scratches, and shiny wear marks on the wall.
Blocked Airflow
Furniture pressed tightly against exterior walls can reduce airflow. In humid rooms or colder climates, this may encourage condensation or musty odors behind the couch. A small gap helps air move more freely and makes it easier to clean hidden dust.
Crushed Curtains and Cords
If your couch sits under a window, it can trap curtain panels behind it. If it sits near an outlet, it may bend plugs or put pressure on cords. A simple spacer can protect both fabric and electrical accessories.
Better Room Design
Designers often recommend pulling furniture slightly away from walls when space allows. Even a few inches can make a living room feel more layered, comfortable, and deliberate. A couch spacer helps maintain that gap without daily furniture wrestling.
Best Materials for DIY Couch/Wall Spacers
The best material depends on whether you want the spacer to be visible, removable, soft, strong, cheap, or stylish. Here are the most practical options.
Wood Blocks or a Wood Rail
Wood is the classic DIY choice because it is sturdy, inexpensive, and easy to customize. A simple 2×2 or 2×4 board can be cut to length and placed behind the sofa. You can paint or stain it to match the baseboard or floor. For a cleaner look, use a long rail that runs behind the couch instead of random blocks that look like they escaped from a construction site.
Rubber Furniture Feet
Rubber feet or bumpers work well when you want grip. They can be attached to the back legs or rear frame of the couch. Rubber helps reduce sliding and softens contact if the couch moves.
Felt Pads
Felt pads are useful for lighter protection, especially if the couch barely touches the wall. They are not ideal for creating a large gap, but they can prevent scratches and reduce noise. Use thicker felt pads if the couch frame has a hard edge.
PVC Pipe
PVC pipe can make surprisingly effective spacers. Cut short sections and place them horizontally behind the couch legs or vertically against the baseboard. PVC is lightweight, affordable, and easy to clean. Paint it if you do not want white plastic peeking out like a plumbing project with social anxiety.
Foam Blocks
Dense foam can work for renters or temporary setups. It is soft and wall-friendly, but it may compress over time. Choose high-density foam rather than flimsy packaging foam that collapses after one movie night.
Clear Silicone Bumpers
Clear silicone bumpers are discreet and good for small gaps. They are often sold as cabinet, door, or wall protectors. They can be attached to the back of the couch or to the wall where contact happens.
How Much Space Should You Leave Behind a Couch?
For most homes, a gap of 3 to 5 inches behind the couch is a smart starting point. That is enough room to reduce wall contact, improve airflow, and protect curtains or cords without stealing too much floor space. If you only need paint protection, 1 to 2 inches may be enough. If you need space for floor-length curtains, plug-in lamps, radiator clearance, or a narrow sofa table, consider 6 inches or more.
The easiest method is to test the gap before building anything permanent. Pull the couch forward, sit on it, walk around the room, open nearby doors, check outlet access, and see whether the layout still feels comfortable. A spacer should solve a problem, not create a new obstacle course.
DIY Couch/Wall Spacer Ideas
1. The Simple Wood Block Spacer
This is the fastest version. Cut two or three blocks of wood to the same depth, usually 3 or 4 inches. Place them between the wall and the back legs or frame of the couch. Add felt pads to the wall-facing side to prevent scratches.
This option is best for heavy sofas that do not move much. It is not the prettiest if visible, but behind a low-profile couch, nobody will know. Your secret is safe, unless you invite very curious guests who inspect baseboards for sport.
2. The Painted Back Rail
A painted wood rail is cleaner than separate blocks. Measure the length behind your couch and cut a board slightly shorter than the sofa width. Sand the edges, paint it to match the wall or trim, and place it along the floor behind the couch.
This style spreads pressure across a wider area and looks intentional. It is great for sectionals, long sofas, or couches used by kids and pets.
3. The Rubber Foot Stopper
Attach rubber feet or bumpers to the rear couch legs or frame. This creates a soft contact point and prevents the frame from scraping the wall. Use screws if the couch frame allows it, or heavy-duty adhesive if you need a no-drill option.
This is a good solution when you do not need a large gap but want to stop damage. Check the bumpers occasionally because adhesive can loosen with dust, heat, or repeated movement.
4. The PVC Pipe Spacer
Cut PVC pipe into equal sections, about 3 to 5 inches long. Cap the ends if you want a finished look. Place the pieces between the couch and wall or behind the rear legs. You can also run a longer piece horizontally along the baseboard.
PVC is especially useful in rooms where moisture or cleaning is a concern. It will not absorb spills the way unfinished wood can.
5. The Hidden Sofa Table Spacer
If you want function and style, build or buy a narrow console table behind the couch. A slim sofa table creates a natural spacer while adding room for lamps, books, plants, remotes, or a suspiciously large collection of charging cables.
This option works best when the couch is floated slightly away from the wall or when you have a larger living room. Keep the table narrow so it does not make the seating area feel cramped.
Tools and Supplies You May Need
You do not need every tool on this list. Choose based on the spacer design you plan to build.
- Tape measure
- Pencil
- Wood board, rubber bumpers, PVC, felt pads, or silicone guards
- Hand saw, miter saw, or pipe cutter
- Sandpaper
- Paint or stain
- Furniture-grade adhesive
- Screws, if attaching spacers to a wood frame
- Stud finder, if mounting anything to the wall
- Level
Step-by-Step: How to Make DIY Couch/Wall Spacers
Step 1: Identify the Problem Area
Move the couch forward and inspect the wall. Look for scuffs, dents, curtain pressure, outlet interference, baseboard damage, or signs of trapped moisture. Knowing the real problem helps you choose the right spacer.
Step 2: Measure the Needed Gap
Decide how far the couch should sit from the wall. A 3-inch spacer is a strong all-purpose choice. For curtains or cords, measure the exact clearance needed and add a little extra room so nothing is squeezed.
Step 3: Choose Your Spacer Type
Use wood for strength, rubber for grip, felt for light protection, PVC for easy cleaning, foam for temporary setups, or a sofa table for a decorative solution.
Step 4: Cut and Finish the Material
If using wood or PVC, cut all pieces to the same length. Sand sharp wood edges. Paint or stain visible pieces. Add felt pads to surfaces that touch the wall or floor.
Step 5: Test Before Attaching
Place the spacers behind the couch and push the furniture back gently. Sit on the couch and test movement. If the couch still reaches the wall, increase the spacer depth or reposition the pieces.
Step 6: Secure If Necessary
If the spacers shift, attach them to the couch frame, baseboard, or wall only when it is safe to do so. Renters may prefer removable adhesive strips or floor-based spacers. Homeowners can use screws, but avoid drilling blindly into walls where electrical wiring or plumbing may be present.
Safety Tips Before You Build
A couch spacer is not the same as a furniture anchor. If you are dealing with tall furniture, shelves, dressers, or entertainment units, use proper anti-tip restraints according to the product instructions. Couch spacers are for spacing and protection, not preventing heavy furniture from tipping.
Be careful around outlets. Do not use a spacer that pushes plugs sideways, bends cords sharply, or traps power strips behind upholstery. Leave enough room for plugs to sit naturally, or use low-profile outlet adapters where appropriate.
If you mount a spacer rail to the wall, fasten it into studs whenever possible. Drywall anchors can work for light-duty applications, but a couch can create repeated pressure. A spacer that falls off the wall every weekend is not a spacer; it is a recurring appointment with irritation.
Design Tips for Making Spacers Look Good
The most attractive couch spacers are the ones nobody notices. Paint wood spacers to match the baseboard, wall, or couch legs. Use black rubber bumpers for dark furniture and clear silicone pads for light walls. Keep the spacer lower than the couch back so it does not peek over the top like a shy prairie dog.
If your sofa is on legs and the floor beneath is visible, avoid bulky blocks. A slim rail or matching wood stop usually looks better. If your couch has a skirt or low base, you have more freedom because the spacer will be hidden.
Common Mistakes to Avoid
Using Soft Foam That Compresses
Soft foam may look promising, but it can flatten quickly. Once compressed, the couch may drift back toward the wall. Choose dense foam or a firmer material for long-term spacing.
Forgetting the Baseboard
Walls are not always flat from floor to sofa height. Baseboards stick out, outlets protrude, and curtain rods may affect spacing. Measure from the most protruding object, not just the drywall.
Making the Gap Too Big
A spacer should improve the room, not make the couch feel like it is floating in a different zip code. Test the layout before committing to a wide gap.
Ignoring Floor Movement
On hardwood, tile, or laminate, couches can slide. Add non-slip pads under the legs if the sofa moves when people sit down. A wall spacer works best when paired with floor grip.
Best DIY Spacer Setup for Different Rooms
Small Living Room
Use 2- to 3-inch rubber or wood spacers. Keep them hidden and low-profile. The goal is wall protection without sacrificing walking space.
Family Room
Choose a sturdy wood rail or rubber-foot spacer. Family rooms get more movement from kids, pets, guests, snacks, and the occasional remote-control search party.
Apartment or Rental
Use removable floor-based spacers, felt-backed blocks, or adhesive bumpers that do not damage paint. Avoid drilling unless your lease allows it.
Room With Curtains
Measure the curtain depth first. A 4- to 6-inch spacer usually gives fabric enough room to hang naturally instead of being crushed behind the couch.
Room With Exterior Walls
Allow a little extra airflow. A gap of 3 to 5 inches can make cleaning easier and may help reduce trapped moisture behind furniture.
DIY Couch/Wall Spacer Cost
This is a budget-friendly project. Felt pads or silicone bumpers may cost only a few dollars. Wood blocks or a small board are usually inexpensive. PVC is also affordable, especially if you already have scrap pieces from another project. A narrow sofa table costs more, but it adds storage and style.
For many homeowners, the best value is a painted wood rail with felt pads. It is strong, customizable, and easy to remove or repaint later. It also looks far better than tossing a brick behind the couch, which is technically effective but emotionally questionable.
Maintenance: Keep Your Spacers Working
Check your couch spacers every few months. Vacuum behind the sofa, inspect the wall, and make sure the spacers have not shifted. Replace adhesive bumpers if they peel. Tighten screws if anything feels loose. If the wall still gets marks, add a softer surface to the spacer or increase the gap slightly.
Also check the couch legs. If the sofa slides on hard flooring, the spacer may be doing too much work. Add non-slip furniture pads under the legs to reduce movement. When the couch stays put on the floor, the wall spacer lasts longer.
of Real-Life Experience: What You Learn After Making Couch/Wall Spacers
The first thing you learn when making DIY couch/wall spacers is that your wall is probably not as straight as you think. You measure one side, feel confident, cut your spacer, and then discover the other side has a baseboard, outlet cover, or mysterious bump that changes everything. This is why testing with cardboard first is surprisingly helpful. A scrap box can become a temporary spacer template before you cut wood or PVC.
The second lesson is that couches move more than expected. Even a heavy sofa can slide a little when people sit down, especially on smooth floors. If you only place a block behind the center of the couch, the ends may still angle backward and touch the wall. Using two or three evenly spaced supports usually works better than one large spacer.
Another practical experience: felt matters. A bare wood block can protect the wall from the couch but still mark the baseboard or paint if it shifts. Adding felt pads to the wall-facing side makes the spacer quieter and gentler. It also gives the project a more finished feel, even if nobody sees it.
Paint matching is worth the extra ten minutes. A raw pine spacer behind a dark sofa might not be obvious during the day, but at night, with lamps on, it can suddenly glow like a tiny unfinished lumberyard. Painting the spacer the same color as the trim or wall helps it disappear.
If you have curtains, build the spacer based on the curtain when it is hanging naturally, not when you pull it flat with your hand. Fabric needs breathing room. Too small of a gap can still crush the curtain folds and make the window treatment look wrinkled. A 5-inch gap often feels much better for curtain clearance than a tight 2-inch gap.
For renters, the best experience is usually a no-drill setup. A floor rail with felt on the back can work beautifully without touching the wall permanently. Add non-slip material under the rail if it slides. This gives you protection without sacrificing your security deposit to the drywall gods.
Finally, the biggest surprise is how much cleaner the room feels after adding spacers. Once the couch is not smashed against the wall, it becomes easier to vacuum, retrieve lost toys, manage cords, and notice dust before it becomes a full ecosystem. The project is small, but the payoff is real. It protects your paint, improves the layout, and gives your living room that subtle “someone thought this through” feeling.
Conclusion
DIY couch/wall spacers are simple, affordable, and surprisingly useful. Whether you use wood blocks, a painted rail, rubber bumpers, PVC pipe, felt pads, or a narrow sofa table, the goal is the same: protect your wall, preserve your couch, improve airflow, and keep your living room looking intentional.
Start with a small gap, test the room layout, and choose a material that matches your furniture and lifestyle. A well-made spacer should be sturdy, discreet, and easy to maintain. It may not be the flashiest DIY project in the house, but it is one of those clever little upgrades that quietly prevents damage every single day. Your wall will not send a thank-you card, but it absolutely should.
Note: This article synthesizes practical home-improvement, interior-design, safety, and furniture-protection guidance from reputable U.S. sources. Source links are intentionally omitted per the publishing request.