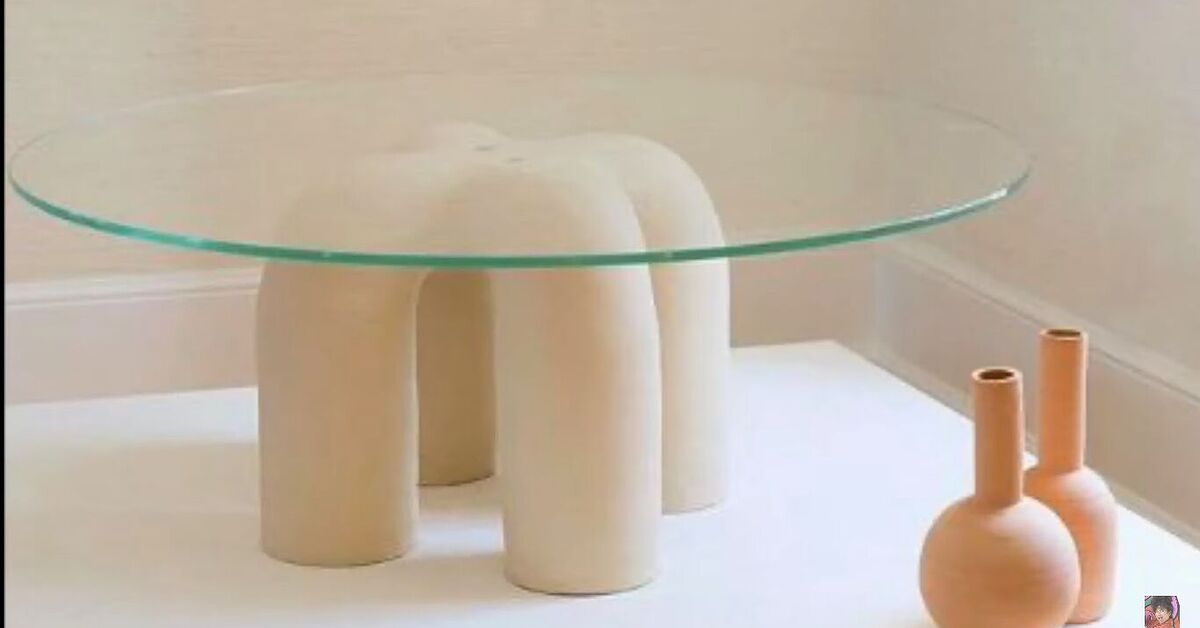
If you’ve ever looked at sculptural ceramic furniture and thought, “I love it, but my wallet just filed a restraining order,” this project is for you. The Eny Lee Parker look is all about tactile form, soft asymmetry, earthy color, and that magical handmade quality that makes a room feel less like a showroom and more like an artful little universe. The good news? You can absolutely create a table that captures that warm, clay-forward spirit at home. The smarter news? You should build it with a hidden structure instead of trusting a pile of decorative clay to hold your coffee, candles, and emotional baggage.
This tutorial shows you how to make a designer-inspired side table using pipes for the internal framework and clay for the sculptural surface. The result is a piece that feels handmade, modern, and expensive in the best possible way. It has the organic curves and earthy finish people love, but it is still grounded in practical DIY logic. In other words, it looks like art and behaves like furniture, which is exactly the kind of dual citizenship we want in home decor.
Even better, this version is flexible. You can make it taller, chunkier, smoother, wavier, moodier, lighter, or more rustic depending on your space. Want something that looks like it belongs in a calm, minimalist breakfast nook? Easy. Want a funky little pedestal table that looks like it wandered out of a boutique gallery and into your apartment? Also easy. The trick is understanding the difference between ceramic-inspired design and actual kiln-fired furniture-making. One is a stylish weekend project. The other is a whole studio practice with clay bodies, firing schedules, and very committed people in aprons.
What Makes This Style So Appealing?
Before cutting pipe or opening clay, it helps to understand why this look works so well. Sculptural furniture in this vein tends to rely on a few visual ideas:
- Chunky silhouettes: Thick legs, soft edges, and rounded forms feel substantial and calm.
- Visible handwork: Tiny imperfections, finger marks, and texture make the piece feel human instead of factory-perfect.
- Earthy colors: Clay, sand, chalk, ivory, pale mushroom, and warm off-white all fit beautifully.
- Material contrast: A hard internal structure hidden under a soft-looking shell creates visual tension in the best way.
- Quiet drama: The table should make a statement without screaming, “Look at me, I learned one dramatic trick on Pinterest.”
That is why pipes and clay make such a satisfying combination. Pipes give you strength, alignment, and repeatable geometry. Clay gives you softness, volume, and personality. Together, they let you fake the look of a high-design ceramic piece without asking air-dry clay to perform miracles it absolutely did not sign up for.
Choose the Right Type of Table First
The best version of this project is a small side table, drink table, or pedestal accent table. That is the sweet spot. A giant dining table made mostly from DIY clay sounds romantic until it starts acting like a cautionary tale. For a first attempt, aim for one of these:
- Side table: 16 to 20 inches wide, 18 to 24 inches tall
- Pedestal table: 12 to 16 inches wide, 20 to 26 inches tall
- Plant stand: 10 to 14 inches wide, 20 to 30 inches tall
If you want a coffee-table scale piece later, build the structure with heavier-duty pipe and a strong wood top, then use clay only as a sculptural skin. For now, smaller is smarter, easier to dry, less prone to cracking, and much friendlier to your patience.
Materials and Tools
Main Materials
- 1 tabletop base, such as a round MDF or plywood disc, 3/4-inch thick
- 1 bottom base disc, same size or slightly smaller
- PVC pipe or black iron pipe for the center support and leg structure
- Pipe fittings if using a multi-leg design
- PVC primer and cement if you are assembling PVC permanently
- Air-dry clay or lightweight modeling clay for the outer finish
- Strong construction adhesive or epoxy for joining wood and pipe components
- Primer suitable for your finished surface
- Acrylic paint in a clay, sand, ivory, or warm stone tone
- Matte or satin clear sealer
- Optional texture tools, sponge, flexible scraper, or rib tool
- Optional fine sandpaper, caulk, or lightweight spackle for smoothing
Tools
- Measuring tape
- Handsaw, miter saw, or pipe cutter depending on your materials
- Drill and screws if attaching pipe flanges to wood
- Utility knife
- Putty knife or palette knife
- Sanding block
- Drop cloth and gloves
The Best Build Strategy: Structure First, Sculpture Second
This is the core idea that makes the project work. Instead of making a full clay table and hoping for the best, you build a strong inner table first. Think of it as a skeleton. Then you wrap, coat, and sculpt the outer form so the finished piece looks chunky, seamless, and ceramic-inspired.
The safest build formula looks like this:
- A strong top and bottom made from wood or MDF
- A pipe-based center or leg structure to carry the load
- Clay added only as a non-structural surface layer
- Primer, paint, and sealer to unify the finish
That method gives you the look you want without the heartbreak of cracks, wobble, or dramatic table collapse during brunch. Brunch deserves better.
Step-by-Step: How to Make the Table
Step 1: Sketch the Silhouette
Start by deciding what kind of shape you want. Do you want one thick center pedestal? Three rounded legs? A stacked-bead look? A slightly wonky handmade column? Draw the profile from the side. Keep it simple. Organic does not mean random. You are aiming for intentional softness, not “I sneezed while measuring.”
A great beginner version is a round top with a single center pedestal. It is the easiest way to get that gallery-style look while keeping the engineering manageable. A 16-inch or 18-inch round top with a 20-inch height works beautifully as a side table.
Step 2: Build the Internal Frame
Cut your top and bottom discs if they are not pre-cut. Then measure and cut your center pipe. If you are using PVC, dry-fit everything first before gluing. If you are using black iron pipe, threaded sections and flanges make assembly easier and sturdier. Attach the pipe securely to the wood discs using flanges or a strong adhesive system rated for the materials you are combining.
Check for wobble on a level floor. Fix that now, not later. Clay is many things, but it is not a substitute for good table geometry.
If you want a more sculptural base, you can use multiple short pipe sections arranged in a triangle or clustered pattern between the two discs. That creates the visual impression of thick handmade legs once the clay is added. Keep the structure compact and symmetrical enough to remain stable.
Step 3: Bulk Out the Form
If your pipe is narrow but you want a fat, sculptural pedestal, bulk it out before adding clay. You can wrap the pipe with foam, cardboard tubes, builder’s paper, or other lightweight filler material, then tape or glue it in place. This reduces the amount of clay required and helps prevent heavy shrinkage or long dry times.
Think in layers. The inner frame handles strength. The bulk layer handles volume. The clay handles beauty. Everybody has a job, and nobody is overworked.
Step 4: Apply the Clay Skin
Now the fun starts. Roll or press your clay into panels and apply it over the bulked-out base. Work in sections. Smooth seams with a damp finger, sponge, or sculpting tool. If you want visible handwork, leave subtle marks. If you want a cleaner contemporary finish, smooth it down more carefully.
Do not make the clay too thick. Around 1/4 inch is usually plenty for a decorative skin. Thick applications take longer to dry and are much more likely to crack. If you are building bead-like forms or bulbous sections, use lightweight fillers inside those volumes instead of solid clay masses.
For the tabletop edge, you can wrap a thin strip of clay around the outer rim to soften the profile. Just avoid building a thick clay slab on top unless the wood below is doing the real work. The wood top should remain the structural surface.
Step 5: Refine the Shape
Step back often and look at the table from every angle. This style depends on silhouette more than tiny details. Ask yourself:
- Does the base feel balanced?
- Are the curves soft and intentional?
- Does the top feel visually grounded by the base?
- Does it look handcrafted, not messy?
You can add little ridges, shallow grooves, or rounded transitions where the base meets the top. These details help the piece feel custom and sculptural. The goal is not perfection. The goal is character with control.
Step 6: Let It Dry Slowly
This part matters more than most DIYers expect. Fast drying is one of the easiest ways to invite cracks, warping, or surface disappointment. Let the piece dry in a stable, ventilated area away from direct heat, fans, or aggressive sunlight. If the clay seems to be drying too fast, loosely cover parts of it with plastic so moisture leaves more evenly.
A small table may need several days. A thicker sculptural build may need closer to a week. Patience here pays off later. Clay likes calm. Clay does not respond well to panic.
Step 7: Patch and Sand
Once fully dry, inspect the table for hairline cracks, dents, or seam lines. Minor cracking is normal and fixable. Fill small imperfections with fresh clay, spackle, or an appropriate filler, then sand lightly once dry. You do not want to erase all the hand-touched quality, but you do want to remove anything that reads as accidental damage rather than intentional texture.
A combination of 220-grit and 320-grit sandpaper usually works well. Wear a dust mask, go slowly, and resist the urge to over-sand every charming irregularity out of the piece.
Step 8: Prime, Paint, and Seal
Prime the surface so the finish looks unified. Then paint with acrylic or another compatible furniture-safe coating in your chosen color. Warm white, pale clay, mushroom, sand, and terracotta-leaning neutrals all work well. You can keep the finish flat for an earthy look or go satin for a slightly more polished feel.
For extra depth, use two close tones and dry-brush lightly so the finish has movement. A perfectly flat single coat can sometimes look more fake than handmade. Subtle tonal variation feels more believable and more expensive.
Finish with a matte or satin sealer. That protects the surface from dust, fingerprints, and daily wear. If the table will hold drinks, candles, or plants, sealing becomes even more important.
Design Tips to Make It Look More Expensive
Keep the Palette Restrained
One of the fastest ways to cheapen a sculptural table is choosing the wrong color. Neon coral may be fun, but it will not usually whisper “quiet luxury ceramic moment.” Soft clay, warm off-white, chalk, bone, putty, faded sand, and pale mushroom tend to look richer.
Favor Shape Over Decoration
Do not overload the piece with patterns, appliqués, or too many flourishes. This style shines when the silhouette does the talking. A thick rounded leg, a subtle lip at the top, or a slightly asymmetrical pedestal is often enough.
Use Contrast in the Styling
Once finished, style the table with objects that highlight its texture. A smooth glass vase, a linen lampshade, a stack of art books, or a small bronze object all create nice contrast. The table should feel tactile, grounded, and a little poetic.
Common Mistakes to Avoid
- Making the clay structural: Decorative clay skin, yes. Load-bearing clay architecture, no.
- Applying clay too thickly: Thick clay dries unevenly and is more prone to cracking.
- Rushing the drying phase: Hair dryers and direct heat are not your friends here.
- Ignoring stability: If the frame wobbles before the clay goes on, the problem will not magically disappear.
- Skipping sealer: Unsealed porous surfaces can scuff, stain, and age badly.
- Over-smoothing the piece: Handmade should still look handmade.
Example Build: A Simple Sculptural Side Table
Here is an easy version to picture. Use an 18-inch round wood top and a 14-inch round wood bottom. Run one thick center pipe between them, then bulk the pipe out with a cardboard concrete form tube cut to size. Cover the tube with a 1/4-inch layer of air-dry clay, softening the connection where the pedestal meets the top and bottom so it looks more like a continuous sculpted form. Paint it in a pale clay or chalky ivory tone, then seal it in matte finish. The result is a compact side table with gallery energy and renter-friendly scale.
You can also create a three-leg version by attaching three evenly spaced pipes between the top and bottom discs, then wrapping each leg so it looks rounded and sculptural. That version reads more playful and a little more obviously handmade, which can be wonderful in a cozy living room or reading corner.
DIY Experience Notes: What This Project Actually Feels Like
There is a particular kind of satisfaction that comes from making a piece like this because it sits right between furniture building and sculpture. At first, it feels like a practical project. You measure the discs, cut the pipe, check the height, and convince yourself this will be a neat, orderly little build. Then the clay comes out, and suddenly you are no longer just assembling a table. You are negotiating with form, texture, proportion, and your own perfectionism. It becomes weirdly personal in the best way.
Most people discover the same thing around the halfway point: the table looks slightly ridiculous before it looks beautiful. That awkward middle stage is real. The pedestal may resemble a giant breadstick. The top may look too small. The texture may feel too rough. This is the moment when many DIY projects are unfairly judged. The secret is to keep going. Sculptural pieces almost always pass through an “Oh no, what have I done?” phase before they become “Wait, why does this actually look expensive?”
Another common experience is learning how much restraint matters. The first instinct is often to add more clay, more shape, more detail, more drama. But the most successful versions usually come from editing. Smoother transitions. Fewer bumps. One curve instead of five. A softer edge instead of a sharper one. The style feels artistic, but it is rarely chaotic. It has a calm confidence to it.
Drying time teaches patience in a way few modern hobbies do. You cannot bully clay into being ready faster. You can pace around it. You can stare at it. You can lightly touch it every three hours like a confused museum guard. But it will still dry on its own schedule. Oddly enough, that slow rhythm becomes part of the pleasure. The project asks you to look closely, adjust gently, and stop rushing. In a world full of fast content and next-day shipping, that feels almost luxurious.
There is also the tactile reward. Once painted and sealed, the finished table still carries the memory of your hands. Even when the surface looks refined, it does not feel anonymous. Tiny variations in the edge, subtle undulations in the base, and the softness of the profile all make it feel alive. Store-bought furniture can be beautiful, but handmade furniture has a way of introducing emotion into a room. It tells a different story.
And then there is the styling moment, which is frankly one of the best parts. When you place a lamp, a cup of coffee, or a little stack of books on top and see the piece functioning like real furniture, the whole project clicks into place. It is no longer a craft experiment. It is a finished object with presence. That transformation is what makes this kind of DIY so addictive.
For many makers, the first table also changes the way they think about home design. You start noticing silhouette more. You notice how warm whites differ from cool whites. You notice how matte finishes feel quieter than glossy ones. You realize that expensive-looking interiors are often less about buying fancy things and more about choosing shape, texture, and proportion thoughtfully. That is a useful lesson to carry into every future room update.
So yes, this project can be messy. It can test your patience. It can make your dining area look like a temporary sculpture lab for a few days. But it is also deeply fun, surprisingly meditative, and genuinely rewarding. By the end, you do not just have a table. You have a piece that feels collected, intentional, and unmistakably yours. And that is a pretty great trade for some pipe, clay, paint, and a weekend with ambitious ideas.
Conclusion
Making a DIY Eny Lee Parker-inspired table out of pipes and clay is less about copying a luxury piece and more about learning the language of sculptural design. When you combine a sturdy hidden frame with a tactile handmade finish, you get the best of both worlds: real functionality and serious visual character. Keep the structure smart, the clay layer modest, the drying slow, and the finish restrained. Do that, and you can create a table that feels artistic, elevated, and custom without turning your living room into a failed ceramics thesis.
The final result should look calm, earthy, and slightly irregular in a way that feels intentional. It should look like something you discovered, not something you mass-produced. And once you make one, do not be surprised if you start eyeing every empty corner in your home and thinking, “You know what this room needs? Another weirdly chic pedestal.”