A five-gallon bucket can hold flour, rice, sugar, pickles, emergency wateror the mystery sludge left over from somebody’s garage project. From across the room, those buckets may look identical. Up close, however, the details matter.
A food grade bucket is made and manufactured for safe contact with food under specific conditions of use. That definition involves more than the type of plastic. The resin, colorants, additives, manufacturing process, previous contents, temperature, food type, and condition of the container can all affect whether a bucket is appropriate for food storage. The U.S. Food and Drug Administration regulates substances used in food-contact materials, but consumers should not assume that every bucket carrying a familiar recycling number is automatically suitable for food.
The good news is that identifying a safe bucket is not difficult once you know what to examine. The following nine steps will help you separate dependable food storage containers from buckets better suited to paintbrushes, garden soil, or retirement.
What Does “Food Grade” Actually Mean?
In everyday language, “food grade” means that a container’s food-contact surface is made from materials considered suitable for its intended contact with food. It should not transfer substances to food at unsafe levels or cause unacceptable changes in taste, odor, or composition when used as directed. Food-contact suitability is tied to the intended use, which may include the type of food, storage time, and temperature. A bucket appropriate for cool, dry rice storage is not automatically appropriate for hot soup or long-term storage of oily foods.
Also, be careful with the phrase “FDA approved.” The FDA regulates food-contact substances and authorizes materials and uses through federal regulations and notification processes; it generally does not personally inspect every retail bucket and award it a tiny gold star. More accurate product language includes “made with FDA-compliant materials,” “suitable for food contact,” or “food safe for the stated use.”
How to Identify Food Grade Buckets in 9 Steps
Step 1: Look for Explicit Food-Contact Labeling
Start with the simplest and strongest clue: a clear statement that the bucket is intended for food storage or food contact. Look on the bucket, label, packaging, product listing, specification sheet, or manufacturer’s website for wording such as:
- Food grade
- Food safe
- Suitable for food contact
- Meets applicable FDA food-contact requirements
- Designed for storing food ingredients
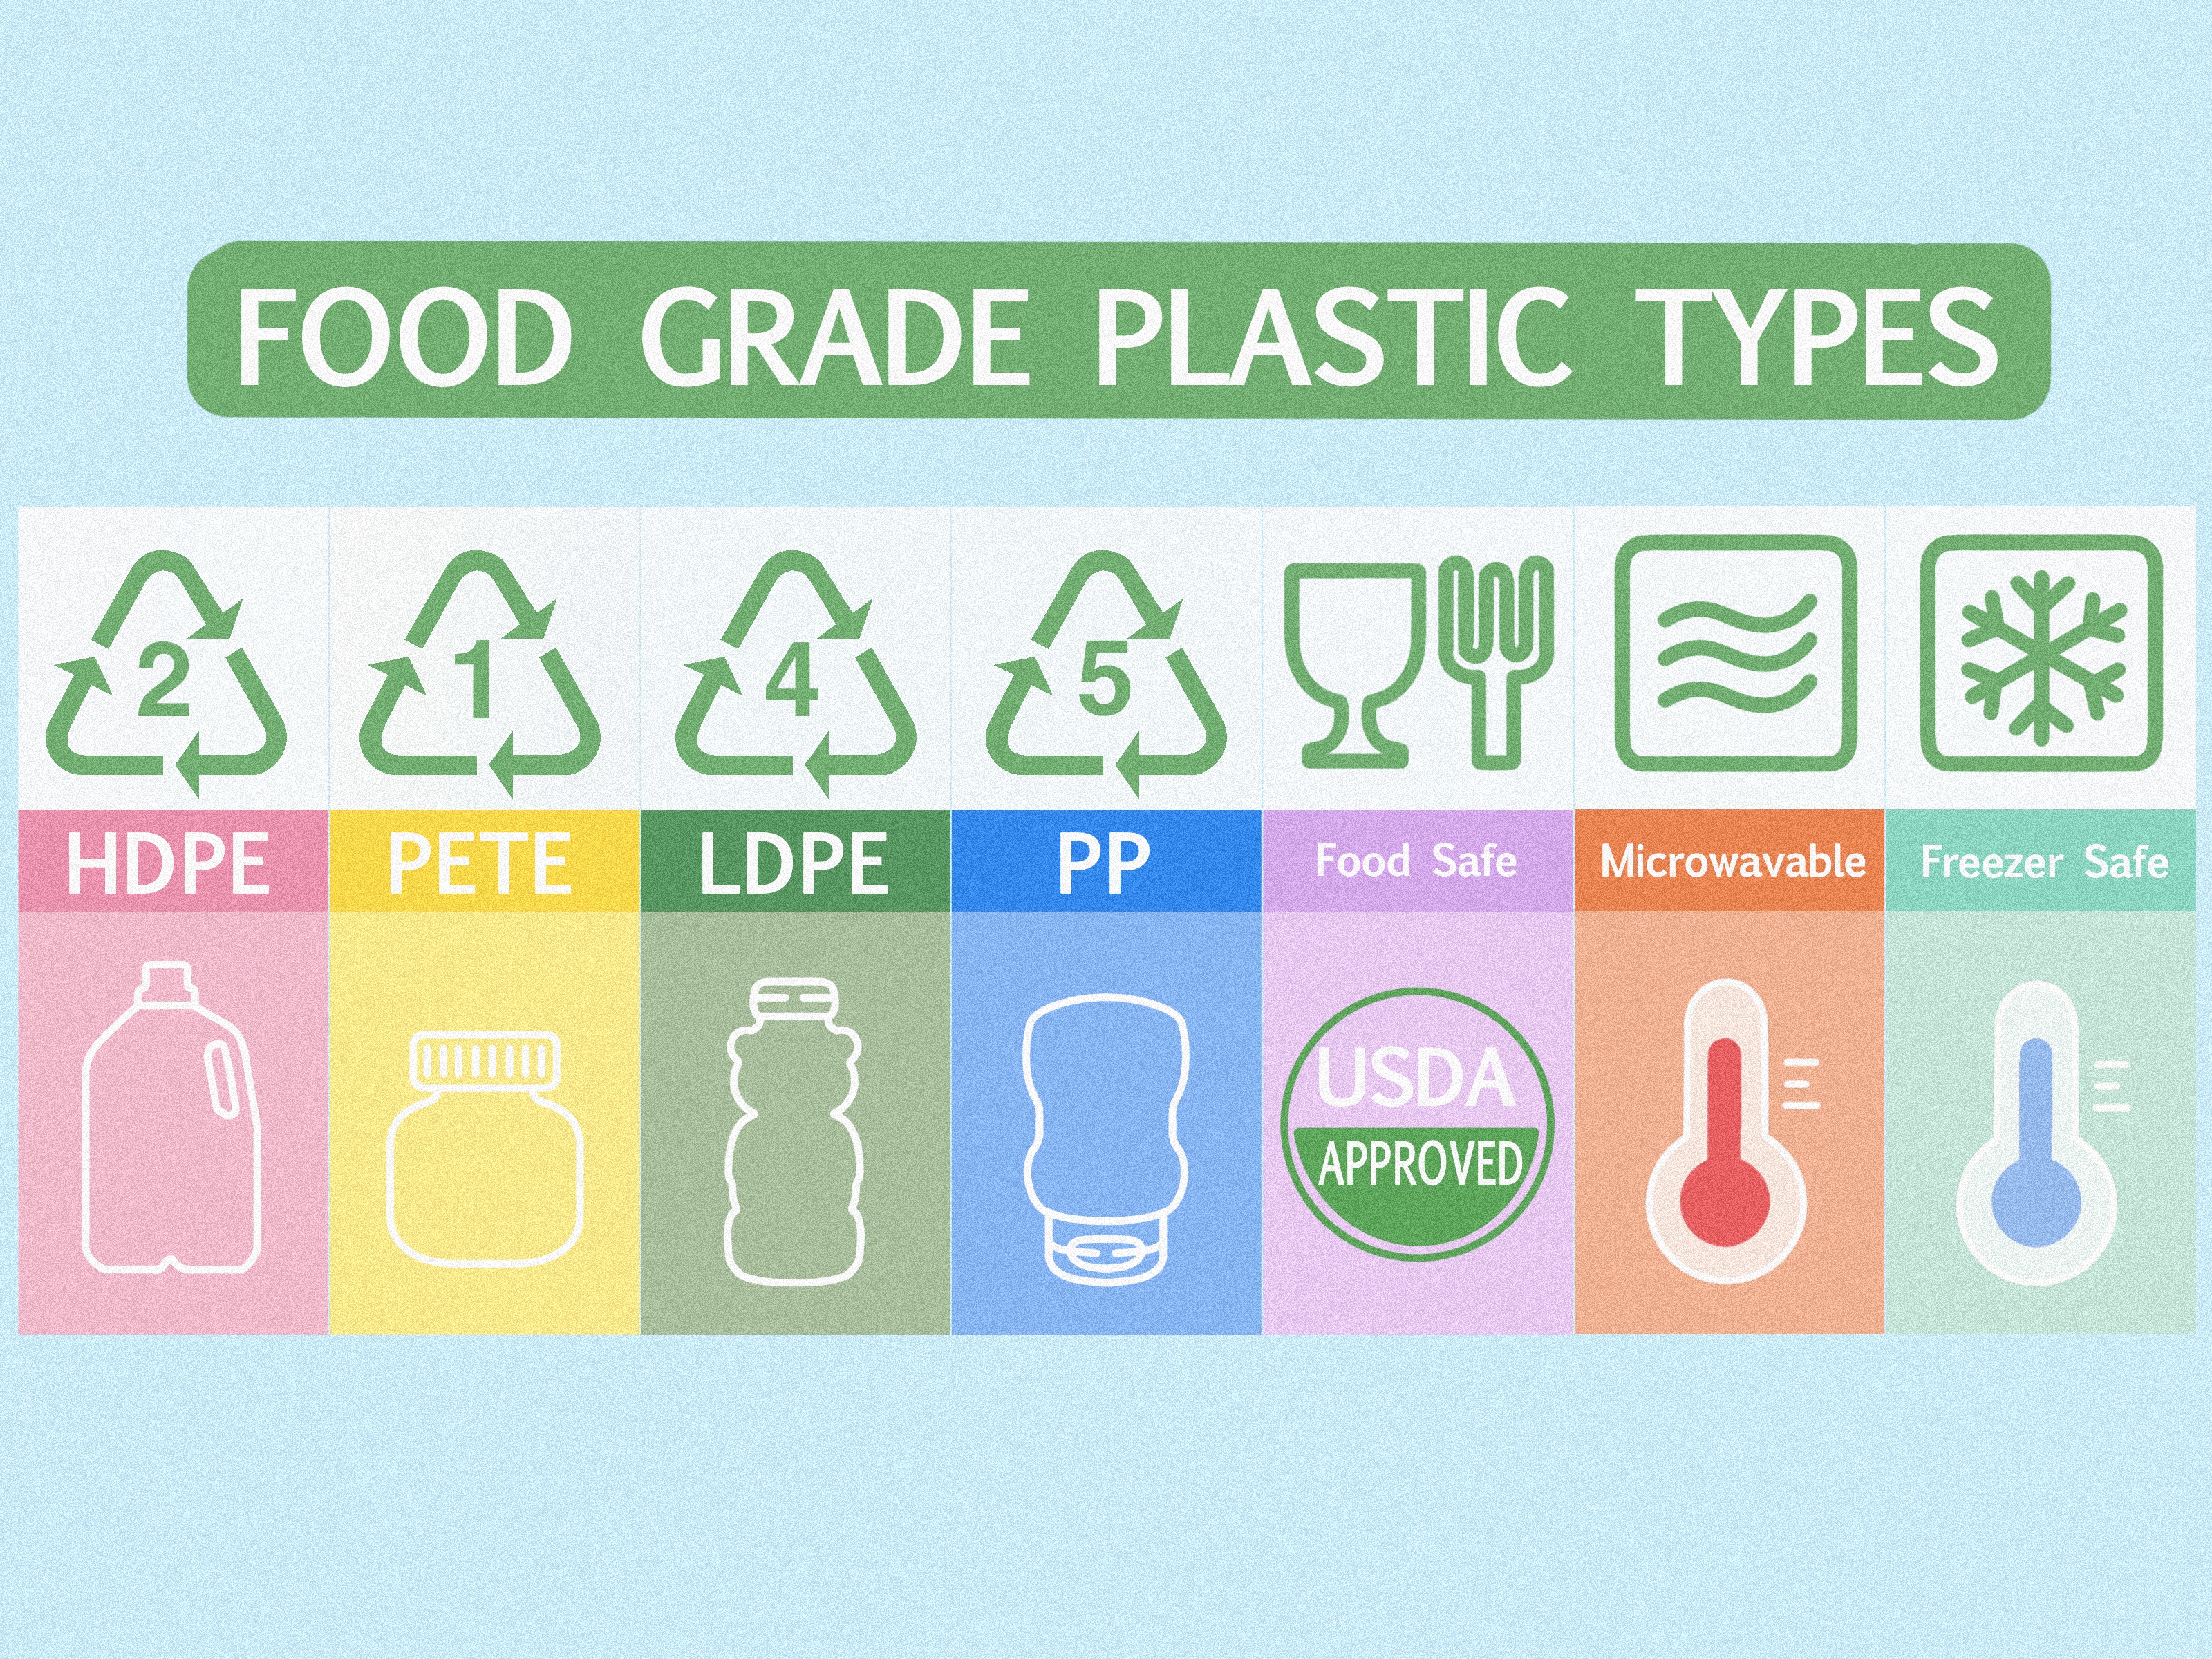
A fork-and-glass symbol may appear on some food-contact products, but its absence does not automatically make a U.S.-market bucket unsafe. Written manufacturer confirmation is more useful than trying to interpret a tiny molded icon that looks as though it was designed during a power outage.
Do not rely on a seller’s casual statement alone. “Sure, people use these for food all the time” is not a technical specification. Ask for a product data sheet or a clear statement from the manufacturer when the labeling is vague. Penn State Extension advises using containers specifically designed for food storage rather than assuming that any available container is acceptable.
Step 2: Identify the Manufacturer and Product Model
Turn the bucket over and inspect the bottom and sidewall. Look for a manufacturer’s name, logo, model number, mold code, lot number, or other traceable marking. Then search the exact productnot merely “white five-gallon bucket”in the manufacturer’s catalog.
Traceability matters because nearly identical buckets may be made with different resin blends, colorants, release agents, or recycled content. One product line may be marketed for food ingredients, while another from the same factory may be intended for paint, concrete products, or general utility use.
Step 3: Check the Resin Identification Code
Most plastic buckets have a resin identification code molded into the bottom. Common codes include:
- #2 HDPE: High-density polyethylene
- #5 PP: Polypropylene
- #1 PET or PETE: Polyethylene terephthalate, more common in bottles and jars than large buckets
Many food storage buckets are made from #2 HDPE plastic because it is durable and widely used in packaging. Polypropylene also appears in food-contact containers and lids. However, the resin code identifies the basic plastic family; it does not certify the finished bucket as food grade, reusable, recyclable in your community, or suitable for every food and temperature.
ASTM states that resin identification codes are used to identify resin type, not to promise recyclability or a particular end use. The EPA gives the same warning: the triangle resembles a recycling symbol, but it does not guarantee that the product is recyclable in your local program.
Think of the resin code as one clue, not the final verdict. Seeing “2 HDPE” is encouraging when it matches the manufacturer’s food-contact documentation. Seeing “2 HDPE” by itself is not permission to store 25 pounds of oatmeal in a bucket that previously held driveway sealer.
Step 4: Do Not Judge by Color Alone
White buckets are common in bakeries, restaurants, and food-processing operations, which is why many people associate white plastic with food safety. Yet color is not a food-grade certification. A white utility bucket may be intended only for nonfood uses, while a colored bucket may be manufactured with food-contact-compliant materials and colorants.
Color can help organize your pantryblue for rice, yellow for cornmeal, and red for snacks supposedly being saved for an emergencybut it cannot replace labeling or manufacturer documentation.
Step 5: Look for NSF Certification or Other Credible Compliance Information
Some commercial food-service buckets and containers carry an NSF certification mark or are listed as complying with an NSF standard. NSF food-equipment standards evaluate matters such as material safety, cleanability, hygienic design, and performance. NSF/ANSI 51 addresses materials and finishes used in commercial food equipment, while other standards may apply to finished equipment or particular uses.
An NSF mark is a strong positive sign when it applies to the exact product. Still, not every safe household food bucket is NSF certified, so the lack of an NSF logo is not automatic proof that a container is unsafe. Manufacturer documentation showing compliance with applicable U.S. food-contact requirements may also be sufficient.
Read certification claims carefully. “Made in a facility that produces NSF-certified products” does not necessarily mean the bucket in your hands is certified. Marketing language occasionally performs gymnastics that would impress an Olympic committee.
Step 6: Investigate What the Bucket Previously Contained
A used bucket should have a known history. The best candidates are containers that originally held ordinary food ingredients, such as icing, pickles, syrup, grains, or other products that did not leave difficult residues. Even then, confirm that the bucket was designed for reuse and can be thoroughly cleaned.
Never use a bucket for food if it previously held paint, solvents, pesticides, motor oil, cleaning chemicals, pool chemicals, construction compounds, or any unknown substance. Washing does not magically erase chemical history. Utah State University Extension warns against using containers that stored toxic materials, and USDA guidance cautions that reused packaging can create contamination risks.
A former frosting bucket may retain an obvious vanilla aroma. More concerning residues may be difficult to detect. When the previous contents are uncertain, retire the bucket from food duty and use it for tools, gardening supplies, or another nonfood purpose.
Step 7: Inspect the Bucket’s Physical Condition
A food-grade label does not make a damaged bucket young again. Examine the interior and exterior under bright light. Reject buckets with:
- Deep scratches or gouges
- Cracks, splits, or stress whitening
- Warped rims that prevent a tight seal
- Persistent stains, sticky residue, or embedded debris
- Strong odors that remain after washing
- Brittle, chalky, or sun-damaged plastic
- Mold around the rim, handle mounts, or lid gasket
Scratches and damaged surfaces are harder to clean effectively. Reusable food-contact containers should be smooth, cleanable, and maintained in sanitary condition. University of Minnesota Extension recommends washing reusable food-contact containers with detergent and water, sanitizing when appropriate, and allowing them to air-dry.
Step 8: Match the Bucket to the Food and Temperature
Food grade does not mean “invincible in every culinary situation.” Confirm that the bucket is suitable for what you intend to store and how you intend to use it.
- Dry staples: Rice, beans, flour, sugar, pasta, and similar foods need a clean, dry container with a tight lid and protection from pests and moisture.
- Fermentation: Pickles or sauerkraut require a food-grade container suitable for acidic brine, plus a method that keeps the produce submerged.
- Hot foods: Do not pour boiling or very hot food into a bucket unless the manufacturer permits that temperature and use.
- Freezer use: Confirm that the plastic and lid are rated for freezing, and leave suitable headspace for expansion.
- Water storage: Use a container sold for potable-water storage, not merely a clean-looking utility bucket.
Utah State University Extension lists food-grade buckets among suitable packaging options for several dry foods, while Penn State Extension recognizes food-grade plastic containers for fermentation. These recommendations remain use-specific; the container must match the process.
For some long-term dry-food systems, food is sealed inside an appropriate food-grade barrier bag before being placed in the bucket. The bag provides the primary food-contact and moisture barrier, while the bucket protects against punctures, pests, and physical damage. Follow tested recommendations for the specific food before using oxygen absorbers or other preservation methods.
Step 9: Verify the Lid, Clean the Bucket, and Label It
A bucket without the right lid is merely an ambitious open-top container. Use a lid designed for the bucket’s exact diameter and rim. For long-term storage, choose a lid that creates a dependable seal. Standard snap-on lids can work when properly fitted, while gasketed or screw-style lids make repeated access easier.
Before first use, wash the bucket and lid with warm water and dish detergent, rinse thoroughly, sanitize when appropriate, and allow every part to air-dry completely. Follow the manufacturer’s cleaning instructions, especially for removable gaskets. Moisture trapped beneath a lid can turn an orderly pantry project into a tiny indoor weather system.
Finally, label the bucket with the food name, packaging date, relevant lot or expiration information, and any storage treatment used. A date and contents label supports first-in, first-out rotation and prevents the classic pantry game called “Is This Flour, Powdered Sugar, or Something We Should Not Taste?” University extension guidance consistently recommends clean, approved, tightly sealed, and labeled food-storage containers.
Quick Food Grade Bucket Checklist
Before putting food into a bucket, confirm all of the following:
- The product is explicitly described as food grade or suitable for food contact.
- The manufacturer and model can be identified.
- The resin code matches the product documentation.
- The bucket’s color is not your only evidence.
- Any NSF or compliance claim applies to the exact bucket.
- The bucket never held chemicals or unknown materials.
- The surface is clean, smooth, odor-free, and undamaged.
- The bucket is suitable for the food, temperature, and storage duration.
- The lid seals correctly, and the container is cleaned, dried, dated, and labeled.
Common Mistakes to Avoid
Assuming Every #2 Bucket Is Food Grade
HDPE is commonly used in food packaging, but #2 identifies the general resin type. It does not reveal every additive, manufacturing control, previous use, or temperature limitation associated with the finished bucket.
Reusing a Chemical Bucket Because It Looks Clean
Appearance is not a residue test. A container that held chemicals should remain permanently outside your food-storage system.
Believing “BPA-Free” Automatically Means Food Grade
“BPA-free” addresses one chemical claim. It does not establish that the complete product is suitable for food contact, hot filling, fermentation, freezing, or long-term storage.
Ignoring the Lid
The bucket and lid work as a system. A loose, cracked, or mismatched lid allows moisture, odors, insects, and air to enter.
Experience-Based Lessons From Real-World Bucket Hunting
The most useful lesson from home pantry projects is that the bucket itself is often the least confusing part; the story attached to it creates the trouble. Consider two containers sitting side by side. The first is a new white bucket from a restaurant-supply store with a manufacturer name, product number, food-contact statement, matching gasketed lid, and clear cleaning instructions. The second is a free white bucket from a neighbor’s shed. It has a #2 symbol, a faint orange stain, no label, and a lid that closes only after a wrestling match. Both are white. Both are HDPE. Only one comes with evidence.
People are naturally attracted to the free bucket. Free is a powerful price, especially when you need six containers for rice, beans, flour, oats, sugar, and the heroic quantity of pasta purchased during a warehouse-store visit. Yet replacing spoiled foodor worrying about unknown chemical residuecosts more than buying a properly documented container.
Another common experience is collecting buckets from bakeries or restaurants. This can work well because many originally held icing, pickles, syrup, or dry ingredients. The smart approach is to ask three questions before taking one home: What did it contain? Is it marked or documented for food use? Has it been used for anything else since it was emptied?
A bucket that once held frosting but later became the mop-water bucket has changed careers and should not be recruited back into the pantry. Even buckets that contained food should be rejected if their history after emptying is unclear.
Odor is another practical issue. Food-safe plastic can absorb strong aromas. Pickle buckets may continue announcing “pickle” long after several washings. That does not automatically mean toxic contamination, but it can affect the next food’s aroma and flavor. A stubbornly scented bucket is better assigned to a compatible product, used with a suitable food-grade liner, or moved to nonfood storage. Nobody dreams of vanilla-scented rice with a surprise dill finish.
Lids create their own learning curve. A cheap lid that is difficult to remove may be fine for storage opened once a year, but annoying for flour used every weekend. Screw-style lids are convenient for frequently accessed staples, while properly fitted gasketed lids are useful when a dependable seal is important.
It is worth testing the lid before filling the bucket. Make sure it fits evenly, closes fully, and can be opened without damaging the rim. Discovering that a lid leaks after adding 35 pounds of sugar is an unnecessarily sticky form of education.
Organization also matters. Labeling only the front seems sufficient until the buckets are stacked with the labels facing a wall. Put the food name and date on the lid as well as the side. Use a consistent rotation system, keep buckets off damp concrete, and avoid locations with major temperature swings.
Cool, dry, dark storage supports food quality and helps packaging perform its job. Clemson and other extension services recommend tightly sealed rigid containers and cool, dry pantry conditions to reduce moisture and pest problems.
The final lesson is wonderfully unexciting: when evidence is missing, buy a new food-grade bucket from a reputable supplier. Pantry safety is not the ideal place for detective fiction. A clear label, traceable manufacturer, appropriate resin, sound condition, known history, correct lid, and intended-use instructions provide a far better foundation than color, rumor, or wishful thinking.
Conclusion
To identify a food grade bucket, begin with explicit food-contact labeling and manufacturer documentation. Use the resin code as supporting information, not proof. Confirm the bucket’s history, inspect its condition, match it to the food and temperature, and pair it with a secure lid. Never store food in a container that held chemicals or has an unknown past.
When all nine checks line up, a humble plastic bucket becomes an efficient pantry tool: sturdy, stackable, pest-resistant, and considerably less dramatic than discovering weevils in an open bag of flour. When the evidence does not line up, use the bucket for nonfood jobs and choose a verified food storage container instead.
Note: Food-contact suitability depends on the exact product and intended conditions of use. Follow the bucket manufacturer’s instructions and applicable food-safety guidance.