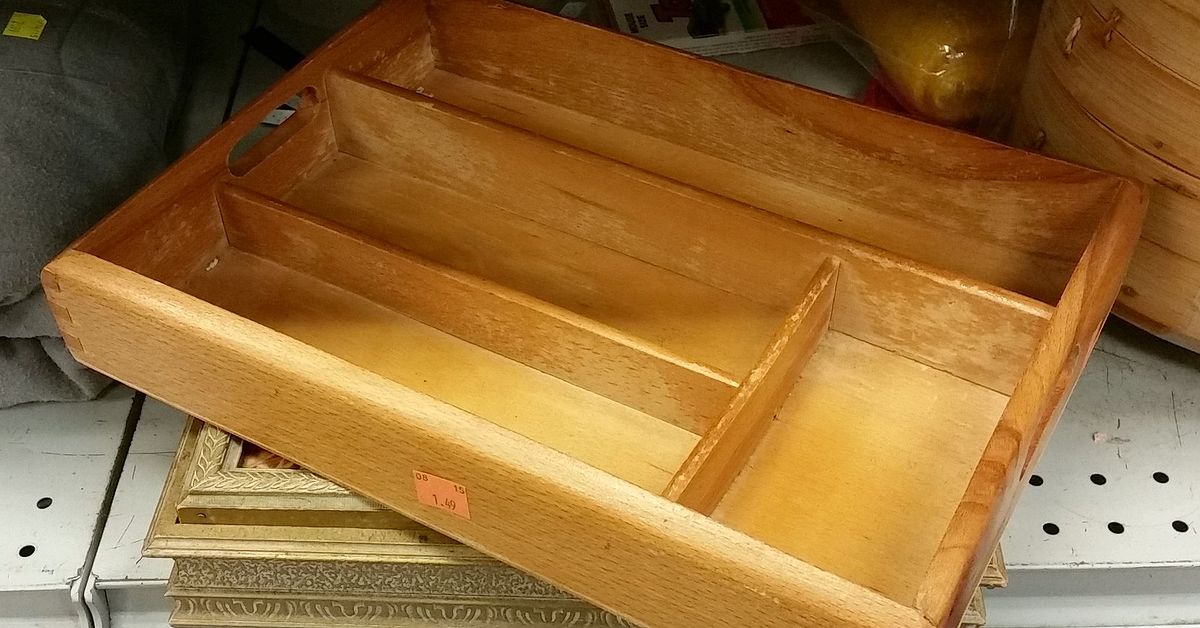
A silverware tray turned jewelry display is one of those home projects that makes you wonder why your necklaces were ever allowed to live in a tangled little goblin nest in the first place. It is simple, affordable, customizable, and oddly satisfying. One minute you have an old cutlery organizer sitting in a kitchen drawer, quietly judging your mismatched forks. The next, you have a charming wall-mounted jewelry organizer that displays necklaces, bracelets, rings, brooches, earrings, and tiny keepsakes like a boutique display case.
This DIY jewelry display project works because a silverware tray already has the bones of a great organizer. It has compartments. It has depth. It has structure. It was literally designed to separate small objects, which is exactly what jewelry needs. Instead of buying another generic jewelry stand, you can repurpose a wooden silverware tray, bamboo cutlery tray, vintage utensil drawer insert, or thrifted silverware box into something practical and pretty enough to hang beside a dresser, vanity, closet, or bedroom door.
Better yet, this project fits right into the sweet spot between organization, upcycling, and home décor. It saves money, keeps useful materials out of the trash, and gives your accessories a visible home. When jewelry is hidden in a drawer, it becomes a mystery pile. When it is displayed beautifully, it becomes part of your room’s personality.
Why Turn a Silverware Tray Into a Jewelry Display?
The best DIY projects solve a real problem without requiring a garage full of power tools or a dramatic “before” photo involving emotional background music. A silverware tray jewelry organizer solves several problems at once: tangled necklaces, missing earrings, overcrowded drawers, and the daily search for that one bracelet you swear you saw yesterday.
Jewelry storage works best when each piece has a specific place. Necklaces need room to hang. Earrings need pairs to stay together. Rings need small dishes or padded slots. Bracelets need hooks, pegs, or shallow compartments. A silverware tray gives you a ready-made layout for all of this. The long utensil channels are ideal for necklaces and bracelets, while smaller sections can hold rings, pins, brooches, watches, hair clips, or tiny perfume samples if you enjoy pretending your dresser is a glamorous backstage vanity.
There is also a strong sustainability angle. Reusing household items extends their life and reduces the need to buy something new. In practical terms, upcycling turns “I should probably donate this” into “look what I made.” A wooden tray that might have ended up in a closet can become an attractive wall display with just paint, hooks, lining, and a little imagination.
Choosing the Right Silverware Tray
Not every cutlery tray is equally ready for its jewelry-display era. The best choice depends on your space, your jewelry collection, and your preferred style. Wood and bamboo trays are usually the easiest to paint, stain, drill, and mount. Plastic trays can work for drawer organizers, but they may not look as polished on the wall unless you cover them with fabric, wallpaper, peel-and-stick vinyl, or decorative paper.
Wooden Silverware Trays
A wooden silverware tray is the classic choice. It can be sanded, painted, stained, waxed, or distressed. It also holds small screw hooks better than lightweight plastic. If you want a farmhouse jewelry organizer, coastal jewelry display, cottagecore wall organizer, or vintage vanity piece, wood gives you the most design flexibility.
Bamboo Cutlery Trays
Bamboo trays are popular because they are lightweight and clean-looking. They suit minimalist, boho, Scandinavian, and modern bedrooms. Bamboo can be left natural for a warm organic feel or painted for a sharper look. Just sand lightly before painting so the primer can grip the surface.
Vintage Silverware Boxes
A silverware box is slightly different from a flat tray, but it can become a beautiful jewelry chest. These boxes often have hinged lids, velvet-like interiors, and divided slots for flatware. With new fabric lining, small hooks, ring rolls, and maybe a fresh coat of paint, an old silverware box can become a one-of-a-kind jewelry box with serious heirloom energy.
Materials You’ll Need
You do not need fancy supplies to make a silverware tray turned jewelry display. Most materials are inexpensive and easy to find at craft stores, hardware stores, thrift shops, or in the mysterious drawer where all homes keep random screws, glue, and one battery that may or may not be alive.
- Wooden or bamboo silverware tray
- Fine-grit sandpaper
- Primer, paint, stain, or spray paint
- Small cup hooks, screw hooks, or decorative knobs
- Sawtooth hangers, D-rings, or picture-hanging hardware
- Fabric, felt, velvet, scrapbook paper, or peel-and-stick wallpaper
- Craft glue, wood glue, or decoupage medium
- Ruler, pencil, and painter’s tape
- Drill or awl for pilot holes
- Optional: cork, mesh, ribbon, pegboard, dowels, or small dishes
If you are making a renter-friendly version, skip permanent wall screws and use sturdy removable hanging strips rated for the display’s final weight. Always check the tray’s weight after adding hooks and jewelry. Necklaces are light, but a full collection of chunky bracelets can turn a cute wall display into a gravity experiment.
How to Make a Silverware Tray Jewelry Display
Step 1: Clean and Prep the Tray
Start by removing crumbs, dust, grease, or old drawer-liner residue. A tray that lived in a kitchen may have collected years of tiny mysteries, so clean it well with a mild soap solution and let it dry completely. If the tray is wood, sand it lightly to smooth rough areas and help paint or stain adhere.
If your tray has dents or old screw holes, fill them with wood filler and sand the surface once dry. This small step makes the final jewelry display look intentional rather than “I found this in a drawer five minutes ago and hoped for the best.”
Step 2: Plan the Layout
Before adding hooks, place your jewelry in the tray to test the layout. Long compartments can hold necklaces vertically. Short compartments can hold bracelets, earrings, rings, watches, pins, or small accessories. If you have many necklaces, use the longest sections for hooks. If earrings are your main problem, add cork, mesh, or ribbon to create an earring station.
Think about how you get dressed. Everyday jewelry should sit at eye level and be easy to grab. Special-occasion pieces can live in upper or side compartments. Heavy items should be placed lower, especially if the tray will hang on the wall.
Step 3: Paint, Stain, or Decorate
Paint changes everything. A plain brown tray can become matte black and modern, whitewashed and farmhouse-inspired, soft sage and cottage-style, or gold-accented and glam. If you prefer a natural look, use wood stain or furniture wax instead of opaque paint.
For extra personality, line the back of each compartment with fabric, felt, wallpaper, or scrapbook paper. Velvet and felt are especially useful because they help cushion delicate pieces and reduce scratching. Patterned paper adds charm, but avoid anything too busy if you want your jewelry to remain the star of the show.
Step 4: Add Hooks and Holders
Small screw hooks are perfect for necklaces and bracelets. Mark each hook placement with a pencil, keeping enough space between hooks so chains do not overlap. Drill tiny pilot holes before twisting in hooks, especially if the wood is hard. This prevents splitting and saves your wrists from a very unnecessary workout.
Decorative knobs can hold heavier necklaces or statement pieces. A dowel can become a bracelet bar. Ribbon stretched across a compartment can hold clip earrings or dangling earrings. Cork glued into a small section creates a practical place for studs and pins. Mesh or lace can also be mounted across one compartment for earrings with hooks.
Step 5: Install Hanging Hardware
Turn the tray over and add secure hanging hardware. Sawtooth hangers work for lightweight trays. D-rings with picture wire are stronger for heavier displays. If the tray is wide, use two hanging points so it stays level. Nobody wants a jewelry display that slowly tilts like it has secrets.
Hang it near your dresser, closet, vanity, or full-length mirror. Avoid bathrooms if you store delicate, silver, costume, or plated jewelry, because humidity can speed up tarnish and damage finishes. A bedroom wall or closet area is usually a safer choice.
Smart Jewelry Organization Ideas for Each Compartment
The beauty of a silverware tray jewelry display is that every compartment can do a different job. Instead of forcing all jewelry into one storage style, customize the tray around what you actually own.
Necklaces
Necklaces should hang individually whenever possible. Use the longest sections of the tray and add hooks in a single row. Keep delicate chains separate from chunky pendants. If you own layered necklaces, give them extra breathing room so they do not twist together.
Bracelets and Bangles
Bracelets can hang from hooks, rest on a small dowel, or sit in shallow compartments. Bangles look great stacked on a short wooden rod or arranged in a lined section. Cuff bracelets may need wider spacing, so test your layout before drilling.
Earrings
For dangling earrings, add mesh, lace, or ribbon across a compartment. For studs, glue cork or padded felt into a section and push pairs into place. You can also use small dishes or mini trays for everyday studs, but keep pairs together so your morning routine does not become a treasure hunt.
Rings
Rings need soft storage. Add felt ring rolls, small velvet-lined boxes, or a shallow catchall dish. To make ring rolls, wrap strips of foam, felt, or fabric tightly and glue them side by side into a compartment. Rings can then slide between the rolls and stay upright.
Brooches, Pins, and Keepsakes
Brooches and pins look fantastic in a silverware tray display because they are decorative by nature. Use cork, fabric-covered foam, or padded lining. You can also dedicate one small compartment to sentimental items: a locket, a vintage pin, a charm from a trip, or the necklace you wore to an event you still talk about like it happened last Tuesday.
Design Styles That Work Beautifully
A silverware tray turned jewelry display can match almost any home décor style. The tray is just the foundation; the finish gives it personality.
Farmhouse
Paint the tray white, cream, or soft gray. Lightly distress the edges with sandpaper and add bronze or black hooks. Use ticking stripe fabric, linen, or burlap-inspired paper for the backing. This style works especially well with vintage jewelry, pearl strands, lockets, and warm wood furniture.
Boho
Keep the tray natural or paint it warm terracotta, muted teal, or dusty rose. Add small brass hooks, woven trim, or patterned paper. A boho jewelry organizer looks great with beaded bracelets, layered necklaces, turquoise pieces, and handmade earrings.
Modern Minimalist
Choose matte black, crisp white, pale wood, or soft beige. Use simple hooks in matching finishes. Avoid busy patterns and let the jewelry create the visual interest. This style is ideal for capsule wardrobes and small collections.
Glam
Use glossy paint, metallic accents, velvet lining, and gold or crystal knobs. A glam silverware tray display can feel like a mini boutique wall, especially when paired with a mirror, perfume bottles, and a clean vanity setup.
Common Mistakes to Avoid
This is an easy DIY project, but a few mistakes can make it less functional. First, do not overcrowd the hooks. If necklaces are packed too closely, they will tangle even while hanging. Second, do not skip sanding if the tray is rough. Jewelry can snag on splintery edges, and your favorite chain deserves better treatment.
Third, do not use weak hanging hardware. A jewelry display may seem lightweight, but the weight adds up once you load it. Fourth, avoid storing delicate jewelry in humid places. Silver, brass, copper, and costume jewelry can tarnish or dull faster when exposed to moisture. Finally, do not forget visibility. The whole point is to make your jewelry easy to see and use. If the layout looks cute but hides half your pieces, reorganize it.
Why This Upcycled Jewelry Organizer Is Worth Making
A silverware tray turned jewelry display is not just about storage. It is about making daily life smoother. When your favorite pieces are visible, you wear them more often. When earrings have a home, pairs stay together. When necklaces hang separately, you stop spending ten minutes untangling a knot that seems to have been engineered by a tiny chaos wizard.
It is also a budget-friendly way to add character to a room. A thrifted tray, a few hooks, and leftover paint can create a piece that looks custom. Unlike mass-produced organizers, this one fits your actual collection. You decide where the hooks go, how many earring sections you need, whether rings get a padded area, and which color best suits your space.
Extra Experience: What I Learned From Making and Using a Silverware Tray Jewelry Display
The first thing you learn when turning a silverware tray into a jewelry display is that your jewelry collection has opinions. Strong ones. You may think you own “a few necklaces,” but once you lay everything on the table, you discover categories: everyday necklaces, fancy necklaces, necklaces you forgot existed, necklaces that are technically one necklace but emotionally three, and one chain that has been tangled since the previous presidential administration.
The most useful experience is to sort before you build. I once started a tray project by painting first and planning later. That was a mistake wearing a cute hat. After the paint dried, I realized my longest necklaces needed more vertical space than the tray allowed in the direction I planned to hang it. The fix was simple: rotate the tray and redesign the hook placement. Still, it taught me to place the actual jewelry inside the tray before committing to hardware.
Another lesson is that small hooks are mighty, but spacing matters. In theory, you can fit ten hooks in one long compartment. In real life, ten hooks can create a necklace traffic jam. Five or six well-spaced hooks usually work better than a crowded row. Jewelry needs room to breathe, especially pieces with pendants, beads, or layered chains.
Lining also makes a bigger difference than expected. A painted wooden tray looks nice, but adding felt, velvet, or fabric backing makes it feel finished. Soft lining helps protect jewelry from scratches and adds contrast so the pieces stand out visually. Dark velvet makes gold and silver pop. Light linen gives a softer handmade look. Patterned paper is fun, but I would use it carefully. If the background is too loud, the display can look busy once jewelry is added.
Mounting height is another practical detail. Hang the display where you can reach every section comfortably. Too high, and you will stop using the top hooks. Too low, and long necklaces may brush the dresser or wall trim. The best spot is usually near a mirror or closet, because that is where jewelry decisions actually happen. A beautiful organizer across the room is still useful, but one near your getting-ready zone becomes part of the routine.
I also learned not to put every piece on display. Fine jewelry, fragile heirlooms, and items that need extra security may belong in a closed jewelry box or safe storage pouch. The silverware tray display is perfect for frequently worn pieces, fashion jewelry, statement earrings, bracelets, and items you enjoy seeing. It is not always the best place for everything you own, and that is fine. Good organization is not about displaying every object; it is about making your life easier.
The biggest surprise is how decorative the finished piece becomes. Once jewelry is organized by color, length, or type, the tray starts looking like wall art. A turquoise necklace, brass hoops, pearl bracelet, and vintage brooch can create a layered display that feels personal and collected. It tells a small story about your style without taking up valuable drawer space.
If you are making this project as a gift, personalize it. Paint it in the recipient’s favorite color, line one section with meaningful fabric, add a small framed photo, or include hooks based on the jewelry they wear most. For a Mother’s Day gift, a vintage-style tray with soft lining and a few family keepsakes can feel thoughtful without being overly complicated. For a dorm room or apartment, a lightweight tray with removable hanging strips can offer storage without sacrificing space.
Overall, this project is satisfying because it has a high reward-to-effort ratio. It does not require expert carpentry, expensive materials, or a weekend-long renovation. It takes something ordinary and makes it useful again. And every time you choose earrings without digging through a drawer, you get a tiny reminder that sometimes the best home upgrades are hiding in the kitchen.
Conclusion
A silverware tray turned jewelry display is a smart, stylish, and sustainable way to organize accessories while adding personality to your room. With a simple tray, a few hooks, soft lining, and creative planning, you can build a DIY jewelry organizer that keeps necklaces untangled, earrings paired, bracelets visible, and rings easy to find. It is affordable enough for beginners, flexible enough for any décor style, and practical enough to use every day.
Whether you love farmhouse charm, boho texture, minimalist design, or glam vanity style, this upcycled jewelry display can be customized to match your space. Most importantly, it turns clutter into décor. That is the magic of good DIY: it makes your home prettier, your routine easier, and your junk drawer slightly less powerful.
Note: This original article was created for web publication in standard American English and is based on real DIY, home organization, jewelry-care, and upcycling practices without adding source-link artifacts or citation placeholders.