For years, desktop 3D printing has lived by a simple rule: you can have almost any shape you want, as long as you are happy with the color of the filament currently loaded in the machine. Sure, you can swap spools mid-print, buy a multi-material system, or paint the finished part by hand. But what if you want a low-cost, delightfully hacky way to add color without turning your printer corner into a miniature automotive paint booth?
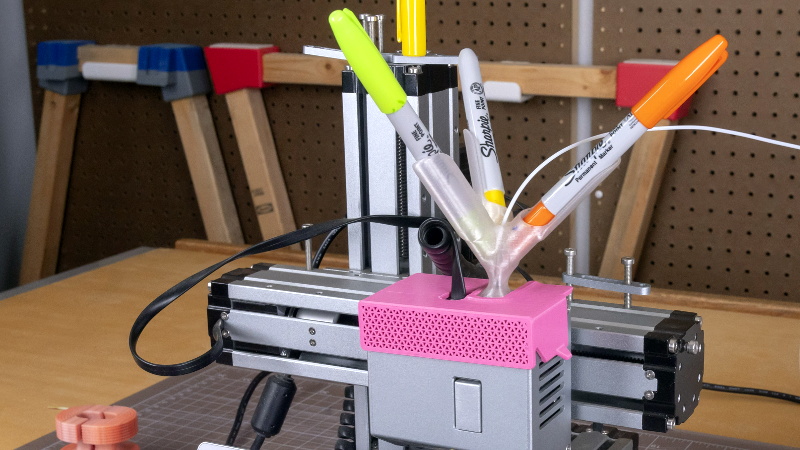
That is where the Sharpie mount enters the room, wearing safety goggles and smelling faintly of permanent marker. A Sharpie mount for 3D printing is a simple printed attachment that holds one or more permanent markers against the filament before it reaches the hot end. As the filament feeds through the mount, the marker tip deposits ink onto the surface. Then the filament melts, extrudes, and becomes a colorful printed object. It is not industrial full-color 3D printing. It is not a replacement for an automatic material system. But it is clever, inexpensive, surprisingly effective, and extremely fun.
The idea became widely discussed after maker Devin Montes, known for the Make Anything channel, shared a 3D printed Sharpie color blender designed to hold multiple markers near the filament path. The mount was originally designed around the Snapmaker Original, but the concept can be adapted to many FDM printers with enough clearance near the extruder. In the best maker tradition, it turns a problem into a printed bracket and a pack of markers.
What Is a Sharpie Mount for 3D Prints?
A Sharpie mount is a small mechanical holder that positions permanent marker tips so they touch the 3D printer filament before the filament enters the extruder or hot end. Most versions are printed in plastic, fastened to the printer frame or toolhead, and sized to hold standard Sharpie-style markers at a useful angle.
The simplest version uses one marker to tint white or translucent filament. More advanced designs hold three or even six markers, allowing users to blend colors, create soft gradients, or produce unpredictable marbled effects. The mount does not change the printer firmware, slicer, nozzle, or filament diameter. It simply adds colorant to the filament before the machine melts it.
That simplicity is the magic. Instead of buying a new multi-color 3D printer, the user prints a tool, inserts markers, and experiments. The result is a very maker-friendly approach: low budget, slightly chaotic, and capable of producing objects that look far more interesting than plain white test prints.
How the Sharpie Coloring Method Works
FDM 3D printers work by pushing thermoplastic filament through a heated nozzle. The filament softens, exits the nozzle as a thin bead, and builds the object layer by layer. A Sharpie mount adds color before the filament reaches that heated zone.
When the marker tip touches the filament, it leaves a thin coating of ink. The amount of color depends on several factors: how firmly the marker presses against the filament, how wet the marker is, how fast the filament is moving, and whether the filament is white, natural, clear, or already colored. White PLA often produces soft pastel tones, while translucent filament can create brighter and deeper effects because light travels through the dyed plastic more easily.
The color is not merely painted on the outside of the finished print. Because the ink-coated filament passes into the hot end, the pigment or dye becomes part of the extruded plastic. This helps the color survive handling better than a quick marker scribble on the outside of a finished model. However, it also means results are more art than laboratory science. Two printers, two marker brands, or two spools of filament may produce slightly different shades.
Why Makers Love This Hack
It Is Cheap
Multi-color 3D printing can become expensive quickly. Automatic material changers, dual-extrusion machines, toolchangers, and full-color systems are wonderful, but they are not always friendly to a hobby budget. A Sharpie mount, by comparison, can be printed from a small amount of filament and used with markers many people already have in a desk drawer.
It Works With Common Materials
The Sharpie mount method is most commonly used with PLA because PLA is easy to print, widely available, and forgiving on consumer FDM printers. PLA prints at relatively low temperatures, does not usually require an enclosure, and is a favorite for decorative models, prototypes, toys, signs, and artistic objects. White PLA is especially useful because it gives the ink a clean base, much like drawing on white paper instead of a brown cardboard box.
It Produces Organic Color Effects
The color patterns from a marker mount are rarely perfectly uniform, and that is part of the charm. Depending on the marker arrangement, the print may show gradients, speckles, swirl patterns, or gentle shifts from one shade to another. For decorative prints, this can be more visually interesting than a perfectly consistent factory-colored filament.
It Encourages Experimentation
3D printing is already a hobby built on tinkering. A Sharpie mount adds one more variable to play with. Users can test different marker colors, pressure levels, filament brands, layer heights, print speeds, and model shapes. The first result may be beautiful. The second may look like a unicorn sneezed into the extruder. Both outcomes are educational.
Sharpie Mount vs. True Multi-Color 3D Printing
It is important to understand what a Sharpie mount can and cannot do. This tool adds color to filament continuously or semi-continuously. It does not create precise color boundaries the way a multi-material slicer can assign one filament to a logo, another to text, and another to a border.
Systems such as Prusa MMU, Bambu Lab AMS, dual extruders, and toolchanger printers are designed to switch between filaments during a print. They can create defined color regions, use different materials, and even combine build material with soluble support. Those systems are more powerful and more predictable, but they also require more hardware, more tuning, and often more waste from purging between filament changes.
A Sharpie mount sits in a different category. It is best understood as a color effect generator, not a precision color management system. If you need a red company logo on a white enclosure, use multi-material printing, filament swaps, decals, or paint. If you want a dragon, vase, pendant, knob, toy, lampshade, or decorative prototype with lively color variation, the marker mount is a fantastic little trick.
Best Filaments for Marker-Based Coloring
White PLA
White PLA is the easiest starting point. It accepts color clearly, creates visible pastel tones, and is common in most filament collections. Because white filament already contains pigment, the result tends to be softer than the marker cap might suggest. A bold red marker may become warm pink. A blue marker may become sky blue. This is not a failure; it is the pastel tax.
Natural or Translucent PLA
Natural and translucent PLA can produce more saturated and jewel-like colors. Because the filament allows more light through, the ink can appear deeper in the finished part. This is especially useful for lamps, ornaments, decorative containers, and prints that benefit from light transmission.
PETG
PETG may also work, but users should expect more trial and error. It prints at higher temperatures than PLA and can be stringier. The marker ink may behave differently during extrusion, and the finished color may be less predictable. PETG is worth testing for decorative objects that need more toughness than PLA, but it is not always the easiest first choice.
Dark or Strongly Colored Filament
Dark filament is usually a poor candidate. A yellow marker on black filament is like whispering at a rock concert. The color may technically be there, but nobody is going to hear it. For best results, start with white, natural, or translucent material.
Design Considerations for a Good Sharpie Mount
A Sharpie mount looks simple, but good design matters. The marker tips must touch the filament firmly enough to transfer ink, but not so firmly that they create feeding resistance. If the markers press too hard, the extruder may struggle, the filament may scrape, or the marker tips may wear quickly. If they barely touch, the color will be weak or inconsistent.
The filament path should remain smooth. Any sharp bend, rough printed edge, or misaligned hole can cause drag. A well-designed mount guides the filament cleanly and gives the marker tips a predictable contact point. For direct-drive printers with open space above the extruder, this is often straightforward. For Bowden printers or machines with tight frames, the mount may need a remote position before the Bowden tube or a modified adapter.
Clearance is another practical concern. A marker sticking upward from a moving print head can crash into the frame, spool holder, enclosure, or cable chain. Before running a long print, move the toolhead manually through its range of motion and make sure the markers do not become tiny battering rams.
How to Use a Sharpie Mount Safely and Successfully
Start With a Small Test Print
Do not begin with a 28-hour articulated dragon unless you enjoy gambling with plastic. Start with a calibration cube, small vase, keychain, or simple figurine. A short print tells you whether the ink transfers well, whether the extruder feeds smoothly, and whether the color looks appealing.
Use Good Ventilation
Permanent markers commonly use alcohol-based solvents. In normal writing use, this is not usually a big deal, but 3D printing adds heat, time, and airflow around the hot end. Use the printer in a well-ventilated area, avoid hovering over the machine for long periods, and do not use this method for objects intended to contact food or the mouth.
Watch for Clogs or Residue
Most users experiment with this technique without disaster, but any foreign material added to filament can theoretically affect the nozzle. If you notice under-extrusion, inconsistent flow, clicking from the extruder, or burned residue, stop and inspect the filament path. A cleaning filament or cold pull may help if residue builds up.
Keep Expectations Realistic
The Sharpie mount method creates color effects, not perfect Pantone matching. It is wonderful for playful decorative results and less ideal for professional color accuracy. Think of it as tie-dye for filament: charming, surprising, and occasionally weird in the best possible way.
Project Ideas for Sharpie-Colored 3D Prints
Some models are especially well suited to marker-colored filament. Vases look excellent because their continuous curves reveal gradual color changes. Low-poly animals pick up interesting streaks along their facets. Spiralized prints can show dramatic vertical blending. Jewelry, earrings, pendants, and charms can become more eye-catching without post-processing.
Functional prints can also benefit, as long as color is decorative rather than critical. Drawer pulls, cable clips, plant labels, tool tags, game tokens, and desk accessories can all receive a little personality. For example, a white PLA plant marker tinted green and yellow looks more cheerful than a plain label. A translucent lampshade touched with blue and purple markers can produce a soft stained-glass effect. A set of game pieces can be tinted in batches without buying six separate spools.
The method is also useful for using up leftover white filament. Many makers end up with partial spools from calibration, prototyping, or bulk purchases. A marker mount gives that plain material a second life. Instead of buying a new spool for one colorful print, you can create small-batch color effects on demand.
Common Problems and Fixes
The Color Is Too Light
Try a fresher marker, increase contact pressure slightly, slow the print, or use translucent filament. Some colors naturally appear weaker than others when diluted into white plastic. Reds, blues, purples, and greens often show better than pale yellow or light gray.
The Extruder Is Clicking
The marker may be pressing too hard against the filament, increasing drag. Reduce pressure, check the filament path, and make sure the mount is not pinching the filament. Also inspect the spool path, because the problem may be unrelated friction elsewhere.
The Color Looks Muddy
Too many marker colors at once can blend into brownish or grayish tones. Try two compatible colors before loading every marker in the drawer. Blue and purple, red and orange, or green and blue usually produce more pleasant blends than random marker chaos.
The Marker Dries Out Quickly
Continuous contact with moving filament can wear and dry marker tips. Cap markers when not in use, avoid leaving them mounted overnight, and rotate the marker slightly if one part of the tip becomes flattened.
Is This Hack Worth Trying?
Yes, especially if you enjoy practical experiments and decorative 3D printing. A Sharpie mount will not replace a full multi-color system, but it does not need to. Its appeal is that it makes color accessible with almost no extra hardware. You can print the mount, grab a few markers, load white PLA, and start learning immediately.
For beginners, it is a friendly introduction to how small changes in the filament path can affect the final print. For experienced makers, it is a reminder that not every upgrade needs a touchscreen, firmware update, or suspiciously expensive proprietary cartridge. Sometimes the best modification is a small printed bracket holding three markers like tiny wizards blessing the filament before it becomes a benchy.
Extra Experience Notes: Lessons From Using a Sharpie Mount
One of the first lessons when experimenting with a Sharpie mount is that the filament color matters more than expected. White PLA gives reliable results, but it rarely creates the same intense color seen on the marker cap. The finished print often has a softer, candy-like finish. This can be beautiful, especially for decorative pieces, but it surprises users who expect deep red and get strawberry milk instead.
Translucent filament is where the technique becomes especially exciting. The same marker that looks gentle on white PLA can appear rich and glowing in natural PLA. Small vases, light covers, holiday ornaments, and geometric sculptures can look fantastic because the color seems to live inside the plastic rather than sitting on top. When placed near a window or LED, these prints can show depth that ordinary opaque filament cannot match.
Another practical lesson is that pressure control is everything. A mount that holds the marker too loosely creates faint, broken color. A mount that presses too hard can drag on the filament and make the extruder work harder. The best setup feels almost boring: the filament moves smoothly, the marker leaves a steady line, and the extruder sounds normal. If the printer starts clicking, grinding, or under-extruding, the mount needs adjustment.
Color choice also rewards restraint. Loading three random markers may sound fun, but the result can become muddy. Better results often come from related colors: blue and purple, red and orange, green and teal, or pink and violet. For a warmer look, orange plus red can make a print look sun-kissed. For a cooler look, blue plus purple gives a cosmic effect. For nature-themed models, green with a little yellow can create organic variation.
Model shape changes the final appearance. Smooth vases and spiral-mode prints show continuous gradients beautifully. Angular models create sharper visual breaks where the filament path changes direction. Small prints may not use enough filament to show a full color transition, while larger prints can reveal slow shifts as markers wear, rotate, or vary in ink flow. That unpredictability is part of the appeal, but it also means users should print samples before committing to a centerpiece model.
Marker freshness makes a noticeable difference. A new marker transfers more ink and gives stronger color. An old marker may still write on paper but barely tint filament. If the result is pale, the problem may not be the mount, slicer, or filament. It may simply be a tired marker that has lived in a junk drawer since the previous presidential administration.
Finally, the Sharpie mount is best treated as a creative tool rather than a production method. It is perfect for gifts, experiments, prototypes, tabletop scenery, cosplay trinkets, ornaments, and playful desktop objects. For color-critical parts, brand products, or engineering components, use proper filament colors, painting, decals, or multi-material printing. But for adding personality to ordinary prints, this hack is hard to beat. It is cheap, printable, reversible, and funthe four sacred words of hobby 3D printing.
Conclusion
The Sharpie mount brings some color to your 3D prints by proving that creativity does not always require expensive hardware. By holding permanent markers against white or translucent filament, this simple 3D printed accessory can produce pastel shades, gradients, streaks, and surprising artistic effects. It is not true full-color 3D printing, and it will not deliver perfect color boundaries, but it gives makers an affordable way to make plain prints more exciting.
For hobbyists, educators, artists, and weekend tinkerers, the Sharpie mount is a reminder of what makes desktop 3D printing so enjoyable. You can modify the machine with parts made by the machine. You can test ideas quickly. You can turn ordinary filament into something more expressive. And if the first attempt looks strange, congratulations: you have created modern art with a nozzle.
Note: This article is based on public maker projects, 3D printing material guides, permanent marker information, and real-world FDM printing practices. Always test on a small print first, use ventilation, and avoid using marker-colored prints for food-contact items.