There is a special kind of joy in plugging a tiny board into a computer and instantly knowing how to reach it. No monitor. No keyboard. No router login. No angry trip through the junk drawer looking for “that one HDMI adapter.” The idea behind Plug Into USB, Read Hostname And IP Address is simple: connect a device by USB, let it appear as a network interface, then discover or display the device’s hostname and IP address so you can log in, configure it, or manage it like a civilized human being.
This concept is especially useful for headless systems such as Raspberry Pi boards, embedded Linux devices, lab controllers, single-board computers, field sensors, and development kits. In plain English, a “headless” device is a computer without a screen or keyboard attached. It may be powerful, but when you do not know its IP address, it becomes a very small, very silent mystery box.
USB networking solves that problem. With the right setup, a board can present itself to your laptop as a virtual Ethernet adapter. Once the connection is active, the host computer and the device communicate over a private network running through the USB cable. From there, you can use SSH, a web interface, ping, mDNS, DHCP leases, or a small status display to read the hostname and IP address. It feels like magic, but fortunately it is mostly networking wearing a USB costume.
What Does “Plug Into USB, Read Hostname And IP Address” Really Mean?
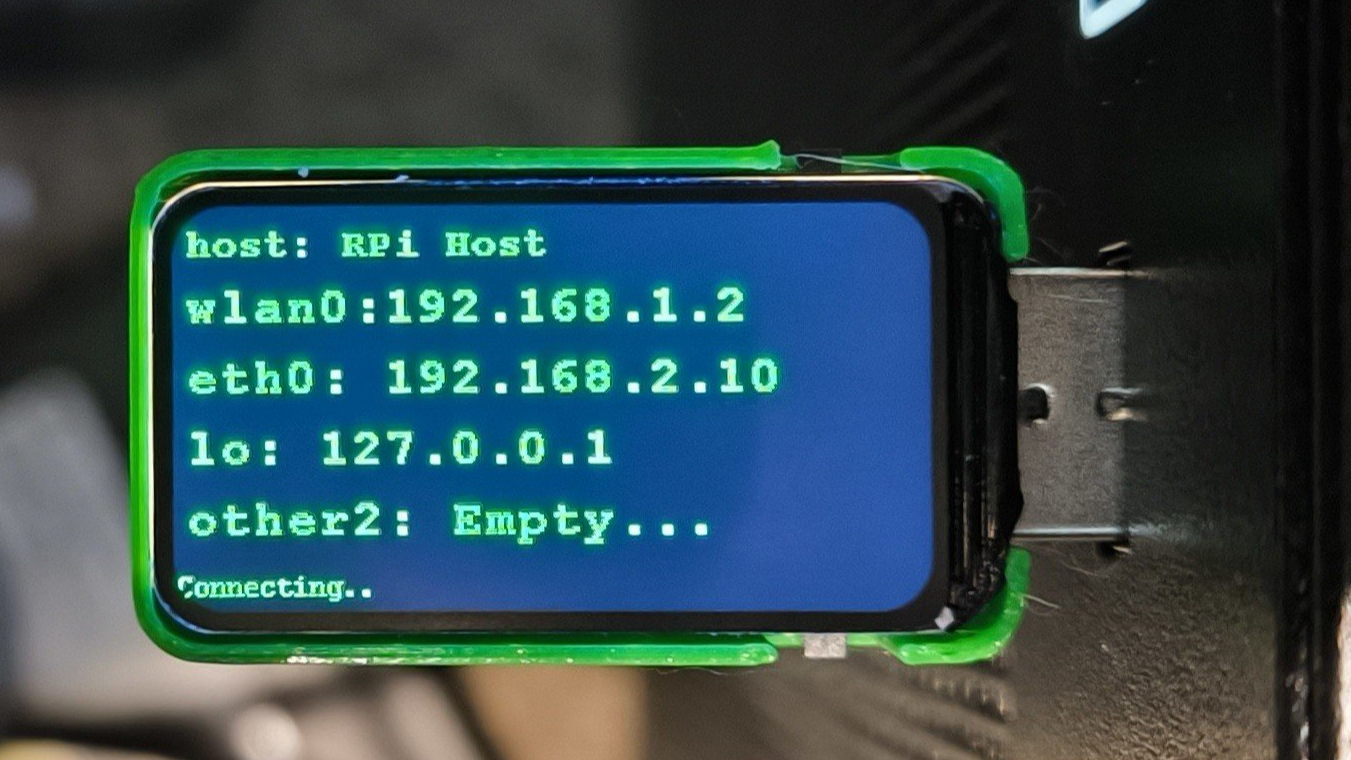
The phrase can mean two related things. First, it may describe a USB-enabled gadget that you plug into a headless board to show the board’s hostname and IP address on a tiny screen. Second, it can describe the broader workflow of connecting a board to a computer over USB Ethernet and finding the address needed to access it.
Here is the important technical detail: a normal USB device does not automatically have a hostname or an IP address. A USB keyboard, flash drive, or webcam does not join a network simply because it is plugged in. To read an IP address over USB, the device must expose a network function, usually through USB gadget mode, USB Ethernet, RNDIS, CDC-ECM, or CDC-NCM.
Once that virtual network link exists, the device and host behave like two computers connected by a short Ethernet cable. The cable just happens to be USB, which is great because USB cables reproduce in drawers faster than actual Ethernet cables.
Why Hostname And IP Address Matter So Much
A hostname is the friendly name of a device, such as raspberrypi, lab-sensor-03, or print-server. An IP address is the numeric address used by the network, such as 192.168.7.2, 10.12.194.1, or a link-local address like 169.254.x.x.
Hostnames are easier for humans. IP addresses are easier for machines. When everything works perfectly, you connect using a name:
When name resolution fails, you connect using the IP address:
The trick is knowing which address belongs to the device. That is where USB networking, discovery tools, and onboard displays become so valuable.
How USB Networking Works Behind The Scenes
USB networking is not ordinary Ethernet, but it behaves similarly after the operating system loads the correct driver. A Linux-based board can act as a USB device instead of a USB host. This is called USB gadget mode. In gadget mode, the board advertises one or more functions to the computer. Those functions might include serial, mass storage, HID, or Ethernet.
USB Host Versus USB Device
In a normal setup, your laptop is the USB host and your keyboard, mouse, or flash drive is the USB device. Some boards, especially those with USB OTG or USB-C device support, can switch roles. They can behave like a device when connected to a laptop. That is the foundation of USB gadget networking.
Common USB Ethernet Modes
Different operating systems prefer different USB Ethernet protocols. Linux and macOS commonly support CDC-ECM. Windows has historically used RNDIS. Newer embedded systems may also use CDC-NCM, which is designed for more efficient network communication.
For the user, the result is usually the same: after plugging in the board, the host operating system shows a new network adapter. It might appear as “USB Ethernet,” “Remote NDIS,” “Raspberry Pi USB Ethernet,” or a similarly charming label that looks like it escaped from a driver engineer’s lunch break.
The Raspberry Pi Example: A Practical Use Case
Raspberry Pi boards are one of the most popular examples of this workflow. A Raspberry Pi Zero, Raspberry Pi Zero W, Raspberry Pi Zero 2 W, and newer supported boards can be configured so that a USB connection creates a direct network link. Recent Raspberry Pi OS tooling has made this easier by supporting USB gadget networking during image setup, including hostname configuration and SSH access.
In a typical setup, you write the operating system image, set a hostname, enable SSH, turn on USB gadget mode, then boot the board while connected to your computer through the correct USB data port. If everything behaves, the board appears as a network adapter. You can then try connecting by hostname:
If that fails, you look for the IP address assigned to the USB network interface. This may come from Internet Connection Sharing, DHCP, a fallback static address, or link-local addressing. The exact behavior depends on the board, operating system, host computer, and network configuration.
How To Find The Hostname And IP Address After Plugging In
There are several reliable ways to discover the hostname and IP address of a USB-networked device. The best method depends on whether you are using Windows, macOS, or Linux.
On Windows
Open Command Prompt or PowerShell and run:
Look for a new Ethernet adapter. It may say “Remote NDIS,” “USB Ethernet,” or something similar. The host computer’s IP address on that adapter tells you the subnet. If the host is 192.168.137.1, the USB device may be nearby, such as 192.168.137.2, depending on DHCP.
You can also inspect the ARP table:
This lists recently discovered devices on local interfaces. It is not a perfect inventory tool, but it often reveals the address of a newly connected board.
On macOS
Open Terminal and run:
Look for a new interface, often named something like en5, en6, or another numbered Ethernet interface. macOS also supports Bonjour, so a device advertising mDNS may be reachable with:
If the hostname is known and mDNS is working, this is the cleanest approach. It is also the approach most likely to make you feel like your desk setup is finally cooperating.
On Linux
On Linux, start with:
or:
The USB gadget connection may appear as usb0, enx..., or another predictable network interface name. To inspect neighbors on the link, run:
If mDNS is installed and running through Avahi, a hostname like mydevice.local may resolve automatically. If it does not, check whether the device is advertising mDNS and whether the host firewall allows multicast DNS traffic.
Using mDNS: The Beauty Of hostname.local
Multicast DNS, commonly shortened to mDNS, lets devices announce names on a local network without a traditional DNS server. This is why many devices can be reached as raspberrypi.local, octopi.local, or printer.local.
On Apple systems, this technology is associated with Bonjour. On many Linux systems, it is handled by Avahi. Windows support has improved over time, but results can vary depending on installed services, firewall rules, and the specific device.
The practical takeaway is simple: when a USB-networked device has a hostname and mDNS is working, you may not need to know the IP address at all. You can just use:
or:
Still, IP addresses remain useful for troubleshooting because names can fail even when the network connection is perfectly alive. mDNS is helpful, not magical. It occasionally needs coffee.
DHCP, Static IP, And Link-Local Addressing
Once USB Ethernet is active, both ends of the connection need IP addresses. There are three common ways this happens.
DHCP
DHCP is the automatic method. One side provides an address to the other. On Windows, Internet Connection Sharing often creates a small private network and gives the attached device an address. On Linux, NetworkManager or a custom DHCP server can do the same.
Static IP
Static IP is the predictable method. You manually set the host to something like 192.168.7.1 and the device to 192.168.7.2. This is excellent for lab benches, classrooms, production fixtures, and any situation where “surprise networking” is not on the wish list.
Link-Local
Link-local addressing is the fallback method. If no DHCP server is available, systems may assign themselves addresses in the 169.254.x.x range. This can work for direct local communication, but it is less predictable. It is useful in emergencies, not always ideal for documentation.
Building A USB IP Display Device
A more polished approach is to use a small microcontroller or single-board computer with a display. The device can plug into a board, query the system, and show the hostname and IP address on an OLED or LCD screen. This is handy for server racks, test labs, education kits, and embedded projects where the main device does not have a display.
The basic design has four parts:
- USB connection: Provides power, data, or both.
- Network or serial discovery: Reads IP information from the host or target device.
- Software logic: Parses hostname, interface name, and assigned address.
- Display: Shows readable information such as
host: lab-piandip: 192.168.7.2.
The cleanest systems avoid guessing. Instead of blindly scanning random subnets, they read data from the operating system, use a known USB Ethernet interface, query mDNS, or consume a small status service running on the device. This makes the display faster, safer, and less likely to accuse your coffee machine of being a Kubernetes node.
Security: Do Not Trust Every USB Cable With A Smile
USB is powerful because it can carry power, storage, serial data, keyboard input, and networking. That is also why security matters. You should only plug unknown USB devices into systems you are authorized to manage. A USB device can present itself as more than one kind of hardware, and a malicious device may behave in unexpected ways.
For legitimate administration, keep the workflow simple and transparent. Use known devices, trusted firmware, documented drivers, and clear labels. If you are building a USB hostname and IP reader for a team, publish exactly what it does: whether it uses USB Ethernet, serial, mDNS, DHCP logs, or a local status API.
Good security is not about being paranoid. It is about preventing “I found this dongle in a drawer and plugged it into production” from becoming the first sentence in a very expensive meeting.
Common Problems And Easy Fixes
The Device Does Not Appear As A Network Adapter
First, check the cable. Some USB cables are charge-only and do not carry data. These cables are responsible for more debugging sadness than many programming languages. Try a known data cable and connect directly to the computer, not through a hub.
The Board Uses The Wrong USB Port
Some boards have separate power and data ports. On small boards, one port may provide power only, while another supports USB OTG or device mode. If you connect to the power-only port, nothing useful will happen except electricity.
The Hostname Does Not Resolve
If hostname.local fails, test the raw IP address. The device may be online even if mDNS is not working. Check that Avahi, Bonjour, or the required name-resolution service is active. Also make sure your firewall is not blocking local multicast traffic.
The IP Address Keeps Changing
Use a static IP or configure DHCP reservations where possible. For classroom labs, repair benches, and repeatable workflows, predictable addressing saves time and reduces mistakes.
Windows Shows A Driver Issue
Windows may need the correct driver for RNDIS or a vendor-provided USB Ethernet gadget driver. Install only trusted drivers from the board maker or project maintainer. Avoid random driver packages from mystery websites, even if the download button is very shiny.
Best Practices For Reliable USB Hostname And IP Discovery
Start by giving each device a clear hostname. Names like pi-zero-01, sensor-west-rack, or camera-testbench are better than twenty devices all called raspberrypi. Duplicate hostnames create confusion, especially when mDNS is involved.
Next, document the expected connection method. Write down whether the device uses USB Ethernet, serial console, static IP, DHCP, or Internet Connection Sharing. Add the expected username, service URL, and fallback address. A one-page quick-start guide can save hours.
Finally, test on all operating systems your users actually use. A setup that works beautifully on Linux may need a driver on Windows. A hostname that resolves on macOS may require extra configuration elsewhere. Cross-platform testing is the difference between “plug and go” and “plug and begin a spiritual journey.”
Specific Example: A Simple USB Gadget Access Workflow
Imagine you have a Raspberry Pi configured for USB gadget networking with the hostname lab-pi.local. You plug it into your laptop using the correct USB data port. After about thirty seconds, your system detects a new network adapter. You try:
If the ping works, you connect:
If the hostname does not resolve, you inspect the USB network interface. On Linux, you run ip address and ip neigh. On Windows, you run ipconfig and arp -a. On macOS, you run ifconfig and check Network settings. Once you identify the device address, you connect with:
After login, you can confirm the board’s own view of its hostname and addresses:
This workflow is practical, repeatable, and much faster than hunting through router client lists with names like unknown-device-47, which sounds less like a network entry and more like the beginning of a science-fiction incident report.
Experience Notes: What I Learned From Using USB To Read Hostname And IP Address
In real projects, the hardest part is rarely the command itself. The hard part is making the process boring in the best possible way. A reliable USB hostname and IP address workflow should be so predictable that a tired technician can use it at 5:30 p.m. on a Friday without developing a new personality.
The first lesson is that cables matter. A charge-only USB cable can waste an embarrassing amount of time. The board powers on, LEDs blink, and everything looks alive, but the host computer never sees a network adapter. Before changing drivers, reinstalling services, or blaming the moon, test the cable. Label known-good data cables. In a lab, this small habit feels almost too simple, but it prevents chaos.
The second lesson is to pick a naming system early. When every board is called raspberrypi.local, discovery becomes a comedy routine with no punchline. Use names that describe purpose and location: demo-pi-01, rack-sensor-a, printer-bridge, or qa-camera-02. A good hostname is short, readable, and unique. It should help a person guess what the device does without opening a spreadsheet titled “final_device_list_v7_really_final.xlsx.”
The third lesson is to keep a fallback IP plan. Hostname-based access is wonderful when mDNS works, but networks have moods. A firewall rule, missing service, driver problem, or operating system update can break name resolution. If the device also has a documented static address or a known DHCP range, the work continues. This is especially useful in classrooms, workshops, and field deployments where the person using the device may not be the person who built it.
The fourth lesson is that a small display can be worth its weight in gold. A tiny OLED showing hostname, USB interface status, and IP address turns a silent black box into a cooperative tool. It reduces support questions, speeds up demos, and makes the project feel finished. For headless devices, visible network information is not decoration; it is user experience.
The fifth lesson is to test the “first boot” experience. Many guides work perfectly after a developer has already logged in, fixed packages, enabled services, and quietly solved four problems. Real users start from zero. They plug in the device, wait, and expect instructions to match reality. Test the exact published workflow on a clean image, a clean computer, and a normal cable. If it works there, it will probably work in the real world.
Finally, remember that USB networking is a bridge between hardware convenience and network discipline. Treat it like a tiny private LAN. Give devices clear names. Use trusted drivers. Document fallback addresses. Avoid random unknown USB hardware. When done well, the experience is beautifully simple: plug in the board, read the hostname and IP address, connect, and get back to building. That is the dream: fewer mystery boxes, fewer router treasure hunts, and fewer moments where a five-dollar cable makes an engineer question reality.
Conclusion
The ability to plug into USB, read hostname and IP address is more than a convenience trick. It is a practical workflow for modern headless computing. Whether you are configuring a Raspberry Pi, deploying embedded Linux hardware, managing test equipment, or building a small display tool, USB Ethernet can turn a frustrating setup process into a clean direct connection.
The key is understanding what is actually happening. USB must expose a network function before IP addressing becomes possible. Hostnames usually depend on system configuration and name-resolution services such as mDNS. IP addresses may come from DHCP, static configuration, Internet Connection Sharing, or link-local fallback. Once those pieces are in place, the process becomes simple: connect the cable, identify the interface, read the hostname or IP address, and access the device.
For developers, educators, technicians, and makers, this workflow saves time and reduces friction. For users, it removes the old ritual of guessing addresses, scanning networks, and borrowing monitors from innocent nearby computers. USB networking is not glamorous, but when it works, it feels like the tiny miracle every headless device deserves.
Note: Use USB hostname and IP discovery only on devices and computers you own or are authorized to manage. For best results, use trusted hardware, official operating system images, documented drivers, and clear network naming practices.