Note: This article is based on real public information about the Pi-lomar miniature observatory project, Raspberry Pi hardware, DIY astrophotography practices, and amateur astronomy guidance, rewritten into original web-ready content.
A Tiny Observatory With Big-Sky Energy
There is something wonderfully dramatic about the word “observatory.” It brings to mind mountaintop domes, expensive telescopes, serious people in warm jackets, and computers that probably have more blinking lights than a spaceship in a 1970s movie. Pi-lomar takes that grand idea, shrinks it down, gives it a Raspberry Pi brain, wraps it in a 3D printed dome, and says, “Here, hold my tiny universe.”
Pi-lomar is a Raspberry Pi-based miniature observatory designed to point a camera at the sky, track targets, and capture images of stars, planets, and other celestial objects. It is not a toy telescope in the plastic-binoculars-at-the-gift-shop sense. It is a real maker project that combines coding, electronics, stepper motors, astronomy math, camera control, and 3D printing into one charmingly ambitious package.
The project shows why DIY astrophotography has become so exciting. You no longer need a mansion, a mountain, or a professional-grade observatory to experiment with sky imaging. With a Raspberry Pi 4, a Raspberry Pi High Quality Camera, a telephoto lens, a microcontroller, motors, gears, and patience measured in “how many failed prints can one person emotionally survive,” Pi-lomar puts an observatory-style experience within reach of hobbyists.
What Is Pi-lomar?
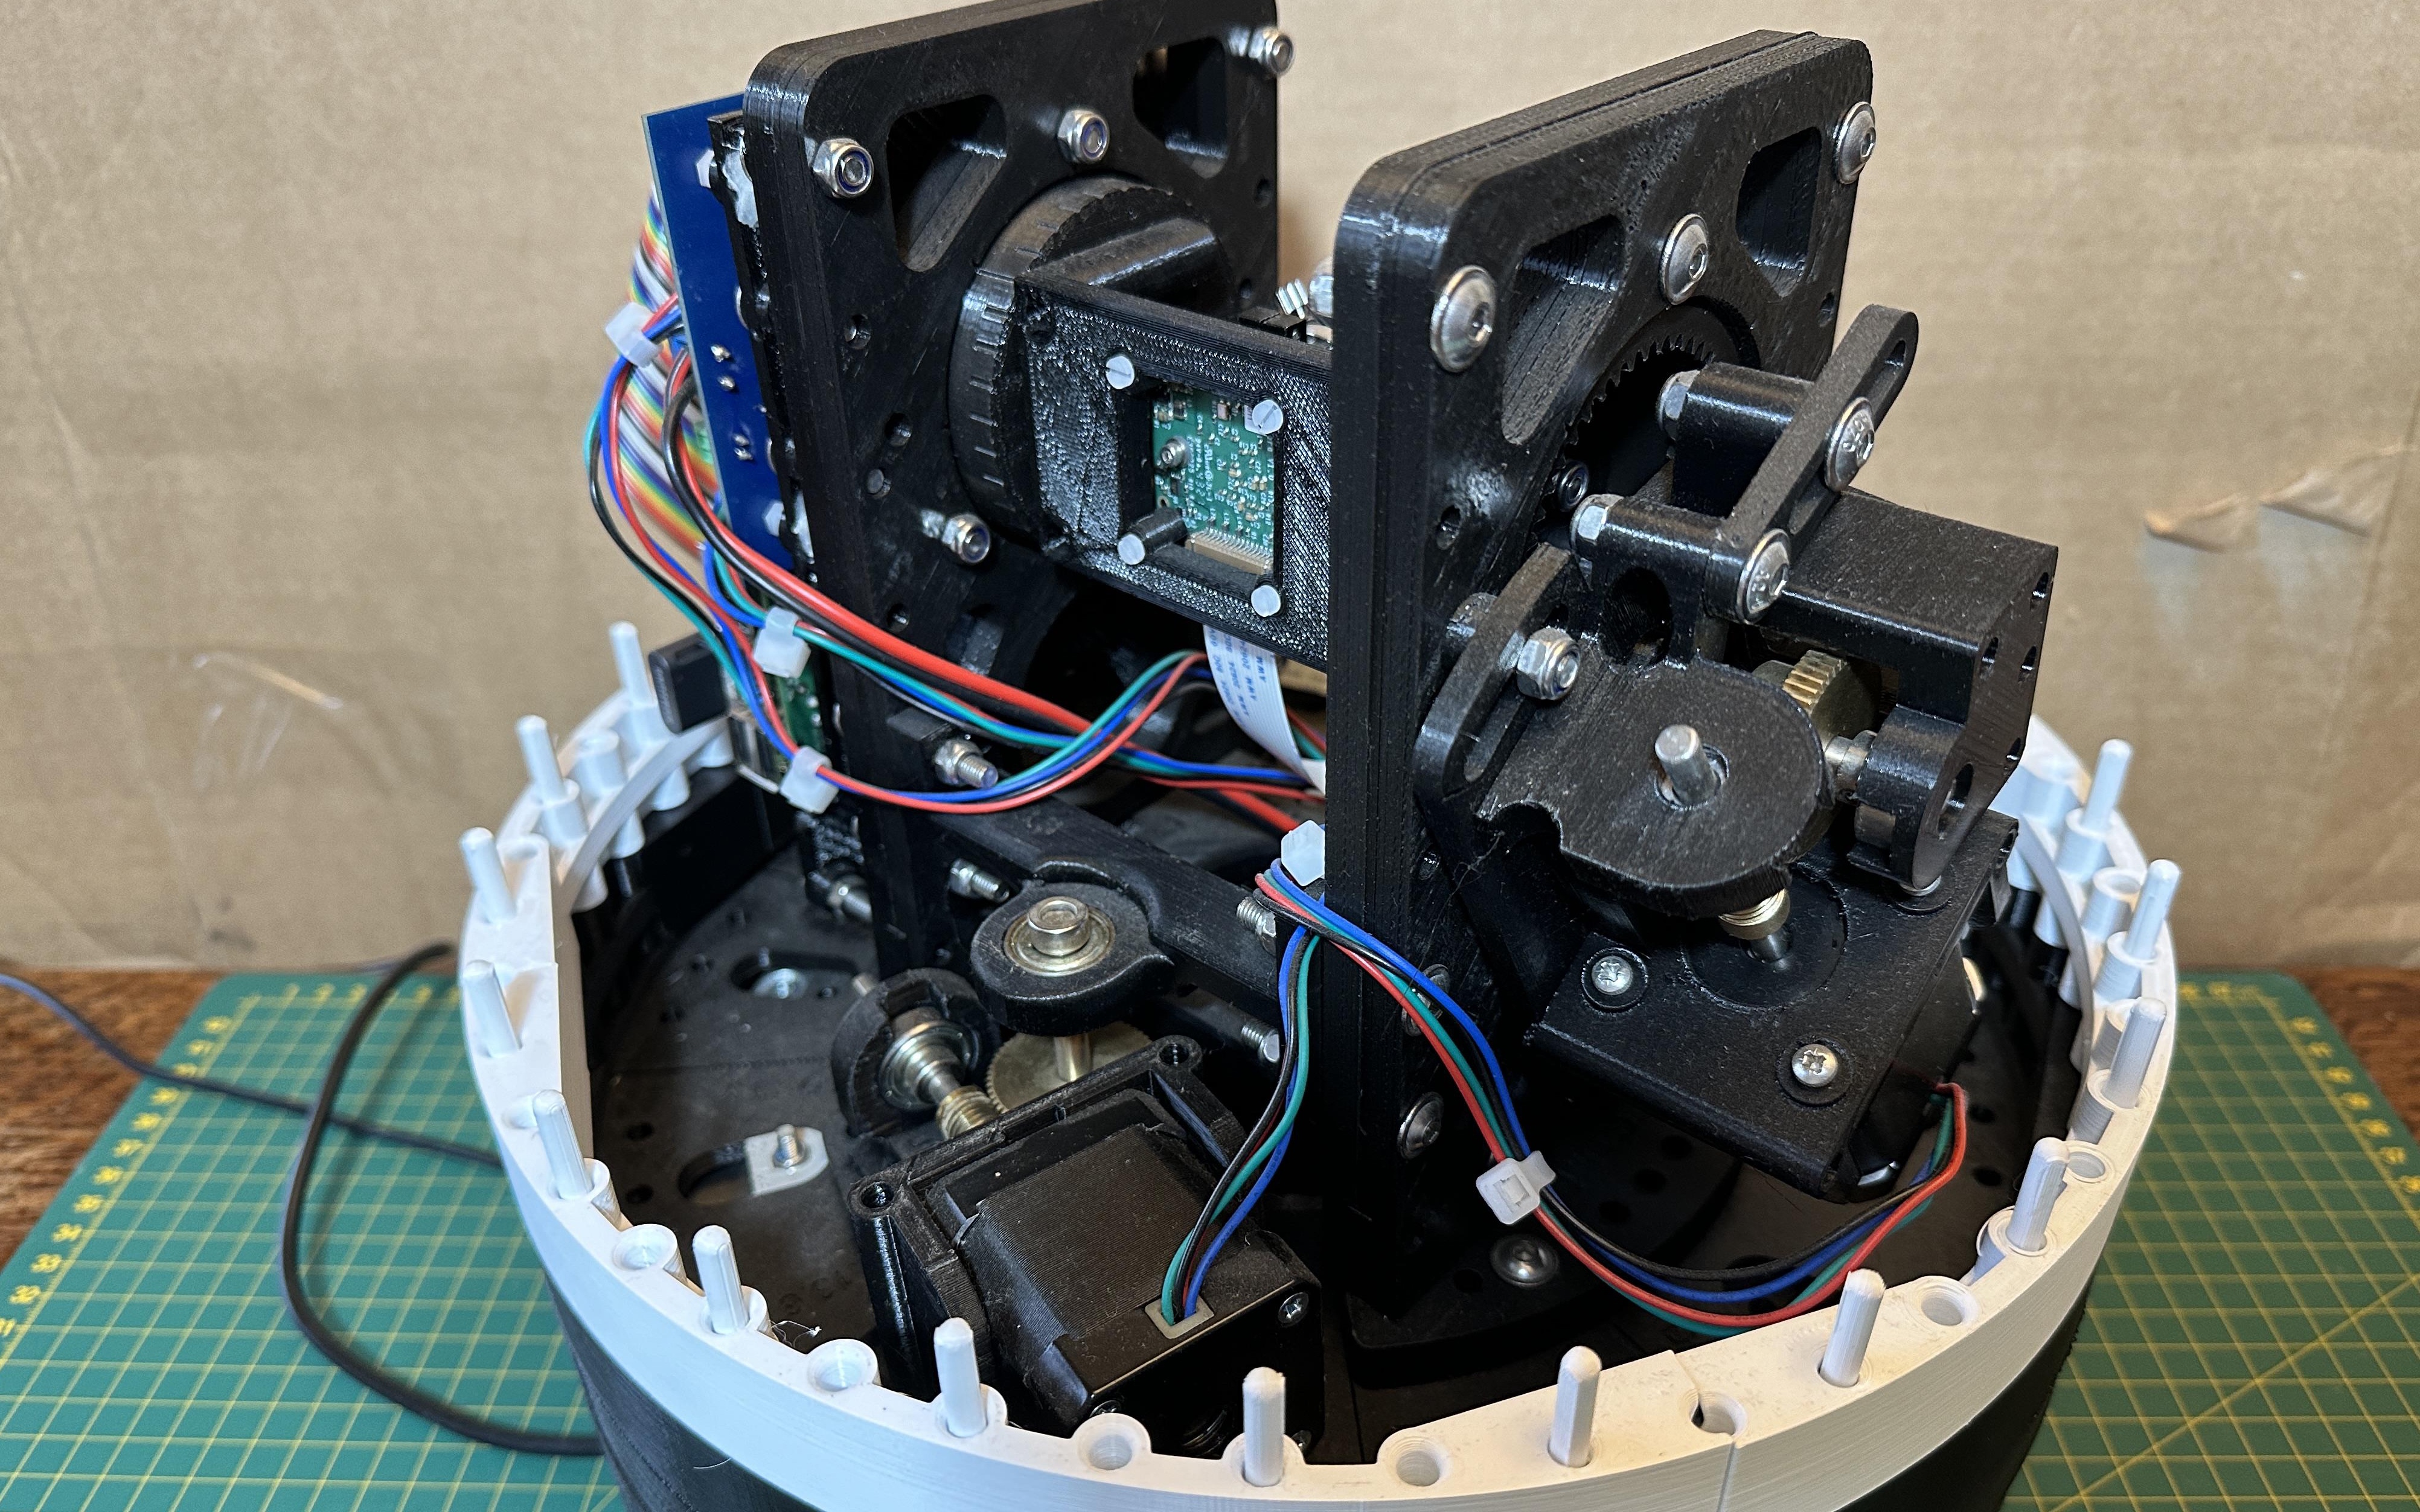
Pi-lomar is a small 3D printed working observatory built around a Raspberry Pi computer. The system uses a camera mounted on motorized axes so it can point toward selected areas of the sky. Instead of simply sitting still and taking a blurry photo while Earth rotates underneath it, the device can move and track targets, helping reduce star trails during longer exposures.
At its heart, Pi-lomar is a “camera pretending to be a telescope,” which is actually a brilliant way to describe many modern beginner astrophotography systems. A telescope gathers light with optics, but a camera-based astronomy setup gathers light over time. When the software can control exposure, direction, and tracking, the result becomes much more powerful than a quick snapshot of the night sky.
The name also gives a playful nod to observatory culture. Pi-lomar sounds like a tiny cousin of Palomar, the famous observatory name associated with serious astronomy. The difference is that this one can be made by a dedicated hobbyist with a 3D printer, open-source software, common electronics, and enough curiosity to keep going when something inevitably squeaks, skips, or points at the neighbor’s chimney instead of Orion.
The Hardware Behind the Mini Observatory
Raspberry Pi 4: The Brain of the Operation
The Raspberry Pi 4 is used as the main computer for Pi-lomar. It runs the Python-based software that coordinates camera activity, target selection, image capture, and communication with the motion-control hardware. The Raspberry Pi 4 is powerful enough for this kind of project because it offers a quad-core processor, camera connectivity, USB ports, networking, and GPIO access in a compact board.
For a home astronomy project, that combination matters. You want a device that can run scripts, save images, communicate with other electronics, and be accessed remotely without requiring a full desktop computer sitting outside in the dark. The Raspberry Pi fits beautifully into that role. It is small, affordable compared with many astronomy control systems, and supported by a massive maker community.
Raspberry Pi High Quality Camera: The Eye
Pi-lomar uses the Raspberry Pi High Quality Camera, a camera module built around a 12.3-megapixel Sony IMX477 sensor. It supports interchangeable lenses, including C-mount and CS-mount options, making it much more flexible than a basic fixed-lens camera module.
In the Pi-lomar setup, a 16mm telephoto lens has been used to provide a relatively wide field of view, roughly around 21 degrees of sky in the commonly described configuration. That is not the same as a giant telescope peering deep into a galaxy cluster, but it is excellent for learning, experimenting, and capturing broad sky targets. Think of it as a smart sky camera with observatory manners.
Pimoroni Tiny2040: The Motion Specialist
The Pimoroni Tiny2040, based on the RP2040 microcontroller, handles motion-control tasks. This division of labor is smart. The Raspberry Pi can focus on higher-level computing and image control, while the microcontroller manages the precise timing needed to drive motors smoothly.
Microcontrollers are excellent at repetitive timing-sensitive jobs. Stepper motors need reliable pulses. A general-purpose Linux computer can do many things well, but real-time motor control is often better handled by a dedicated microcontroller. In Pi-lomar, that makes the observatory feel less like a wobbly science fair contraption and more like a coordinated little machine with a mission.
The 3D Printed Observatory Body
The body of Pi-lomar is one of its most delightful features. Many astrophotography projects look like someone zip-tied a camera to a tripod and then apologized to the laws of design. Pi-lomar, by contrast, looks like a miniature observatory. It has a dome, a tower, a platform, gearboxes, and a foundation. It is charming, recognizable, and deeply unnecessary in the best possible way.
The enclosure is 3D printed, and builders should expect a serious printing project rather than a quick afternoon accessory. Public descriptions of the build mention multiple large assemblies and a significant amount of filament. In plain English: this is not the kind of thing you print while making a sandwich. This is the kind of thing that asks your printer, “Are we still friends?”
The 3D printed structure does more than look cute. It houses the camera, supports the moving parts, protects the inner mechanism from casual bumps, and gives the project a physical identity. However, one important limitation deserves emphasis: Pi-lomar is not a weatherproof outdoor observatory. It should not be left outside in rain, heavy moisture, or harsh conditions. It is portable and practical, but it is not a tiny space bunker.
How Pi-lomar Tracks the Sky
Earth is always rotating, which is rude but scientifically unavoidable. For astrophotography, that rotation creates a challenge. If a camera stays fixed during a long exposure, stars can smear into trails instead of appearing as sharp points. Star trails can be beautiful when intentional, but when you are trying to capture clean astronomical images, they are usually the cosmic equivalent of motion blur.
Pi-lomar addresses this by using motorized movement. With two axes, the device can pan and tilt toward selected coordinates. When properly configured with location data and target information, the software can help the camera follow an object’s apparent motion through the sky. This turns a simple sky camera into a more capable tracking system.
The project has used NEMA 17 stepper motors, gear reduction, and motor drivers to create controlled movement. Gear reduction is especially useful because it increases positional precision. In earlier project documentation, the use of worm gears and stepper motors was described as providing very fine theoretical pointing resolution. In real life, mechanical backlash, alignment, flex, calibration, and build quality all affect results, but the design clearly aims for serious learning rather than casual decoration.
Why Pi-lomar Matters for DIY Astrophotography
It Makes Astronomy More Hands-On
One of the best things about Pi-lomar is that it turns astronomy from a passive activity into a hands-on engineering adventure. Looking up at the night sky is wonderful. Building a device that can find, follow, and photograph parts of that sky adds another layer of satisfaction. You are not only observing the universe; you are debugging your relationship with it.
For students, hobbyists, and makers, Pi-lomar offers a practical introduction to several fields at once. It teaches basic astronomy, camera exposure, motor control, Python programming, 3D modeling, mechanical assembly, electronics wiring, and data processing. That is a lot of learning packed into one small dome.
It Shows the Power of Open Maker Culture
Pi-lomar also reflects the spirit of open maker culture. The project has been documented publicly, with software available through a public code repository and physical build guidance shared for others to follow. That matters because many people learn best by modifying real projects rather than starting with a blank page.
Open projects like this invite experimentation. One builder might focus on improving the mount. Another might upgrade the motor controller. Someone else might work on better image stacking or add a different camera. The original idea becomes a platform, and the community becomes part of the telescope, metaphorically speaking. Please do not physically attach the community to the telescope.
It Bridges Budget Gear and Serious Curiosity
Astrophotography can become expensive very quickly. Dedicated mounts, cooled astronomy cameras, filters, guiding scopes, tripods, and software can turn “I want to photograph the Moon” into “I have accidentally started a second mortgage.” Pi-lomar does not eliminate cost, but it shows how affordable components can create a meaningful learning system.
The Raspberry Pi ecosystem is especially useful here because it is widely supported and well documented. The Raspberry Pi High Quality Camera gives builders access to interchangeable lenses. The Tiny2040 or similar RP2040-based boards provide compact microcontroller control. 3D printing makes custom structures possible. Together, these tools lower the barrier to building a personal observatory-style device.
What Can You Actually Capture With Pi-lomar?
Expectations are important. Pi-lomar is not going to outperform a large professional telescope. It will not reveal every spiral arm of a distant galaxy from a brightly lit downtown balcony while a streetlight glares directly into the lens like an overenthusiastic flashlight. Physics remains undefeated.
However, Pi-lomar can be useful for learning sky imaging and capturing wide-field astronomical scenes. With the right conditions, careful focusing, stable tracking, and image stacking, it can capture stars and brighter sky objects. The key is long exposure photography. Stars are dim, so the camera needs time to collect their light. Multiple exposures can then be processed and stacked to improve the final image.
Stacking is one of the secret sauces of amateur astrophotography. A single raw exposure may look underwhelming, but several images combined can reveal more detail and reduce noise. This is where Pi-lomar becomes more than a cute dome. It becomes a learning tool for the full astrophotography workflow: planning, pointing, capturing, transferring, processing, and improving.
The Role of Light Pollution
Light pollution is one of the biggest challenges for any backyard astronomy project. Bright outdoor lighting, streetlights, illuminated buildings, and skyglow can wash out faint stars and deep-sky objects. NASA’s Night Sky Network and other astronomy education groups regularly emphasize that human-made light pollution affects both professional and amateur sky observation.
For Pi-lomar users, this means location matters. A dark rural sky will usually produce better results than a bright urban balcony. That does not mean city users should give up. It means they should choose targets wisely, avoid nights with heavy haze, shield the camera from direct lights, and learn what their local sky can realistically show.
The good news is that a project like Pi-lomar makes experimentation easy. You can test different exposure lengths, compare nights, try different targets, and learn how moon phase, humidity, clouds, and nearby lighting affect images. In that sense, even imperfect conditions become part of the lesson.
Who Is Pi-lomar For?
Pi-lomar is ideal for curious makers who enjoy learning by building. If you like Raspberry Pi projects, 3D printing, astronomy, coding, or camera experiments, this project sits right at the intersection of all those hobbies. It is especially appealing to people who want to understand how tracking systems work instead of simply buying a finished device.
It is also a strong educational project. Teachers, STEM clubs, astronomy groups, and maker spaces could use the concept to explain coordinate systems, rotation, exposure, optics, embedded systems, and mechanical design. The dome makes it visually engaging, while the electronics make it technically meaningful.
That said, Pi-lomar is not the easiest beginner project in the world. A new maker can learn from it, but should expect challenges. There are printed parts to produce, motors to wire, software to configure, coordinates to understand, and mechanical movement to calibrate. This is less “plug and play” and more “plug, pray, adjust, research, reprint, and proudly announce that it moved two degrees correctly.”
Practical Tips Before Building a Mini Observatory
Start With the Software and Documentation
Before buying parts, study the available documentation and code. Confirm the current hardware recommendations, supported software environment, and any recent upgrades. Maker projects evolve, and Pi-lomar has already gone through multiple iterations and improvements. Reading first can save money, time, and the emotional damage of ordering the wrong motor driver at midnight.
Respect the Mechanical Side
Astrophotography rewards precision. A small amount of wobble, poor alignment, loose bearings, or gear backlash can show up in images. Print carefully, assemble patiently, and test movement before expecting perfect sky tracking. Mechanical reliability is not glamorous, but neither is a star photo that looks like a plate of alphabet soup.
Plan for Power, Storage, and Access
A Raspberry Pi-based observatory needs stable power, enough storage for image files, and a reliable way to access the system. Remote access through a home network can make the experience much more comfortable, especially during cold nights. The dream is simple: the observatory sits outside doing astronomy while you sit inside pretending you are mission control.
Do Not Ignore Weather Protection
Pi-lomar’s small dome shape may look like it belongs outdoors permanently, but builders should treat it as a portable device unless they specifically design a weatherproof housing. Moisture and electronics are not friends. Rain and stepper motors do not have a healthy long-term relationship. Bring the system inside when observing is done.
The Fun Factor: Why This Project Feels Special
There are many Raspberry Pi projects in the world. Some blink LEDs. Some monitor houseplants. Some tell you the weather, which is useful because apparently looking out the window is now too analog. Pi-lomar stands out because it has personality. It combines the romance of astronomy with the practical messiness of making.
The miniature observatory design gives the project a sense of wonder. It looks like something a tiny astronomer would use after climbing a tiny mountain with a tiny thermos of coffee. But behind the cute appearance is a real technical system: camera control, target tracking, motorized motion, image capture, and software coordination.
That blend of charm and engineering is powerful. It invites people into astronomy who might otherwise feel intimidated. A traditional telescope can seem like a mysterious tube with expensive accessories. Pi-lomar says, “Let’s build the whole thing and learn why it works.” That is a much more memorable path into the hobby.
Experiences Related to Pi-lomar Puts An Observatory In Your Hands
The first experience Pi-lomar gives you is humility. Astronomy already has a way of making humans feel small, but DIY astronomy adds another layer: the universe is enormous, and your stepper motor cable is somehow plugged into the wrong pin. That combination can be strangely motivating. Every small success feels earned, whether it is the first clean motor movement, the first correctly saved image, or the first time the camera points somewhere close to the intended target.
A project like Pi-lomar also changes the way you look at the night sky. Before building a tracking camera, you might glance upward and think, “Nice stars.” After working with a miniature observatory, you start noticing moon phase, cloud thickness, sky brightness, humidity, and whether your neighbor’s security light is trying to personally sabotage science. The sky becomes less like wallpaper and more like a changing environment you can study.
Another memorable experience is discovering that astrophotography is not just photography. It is planning, patience, and processing. You may capture a batch of raw images that look disappointing at first. Then, after stacking and adjusting them, faint details begin to appear. That moment feels a little like developing film in an old darkroom, except your darkroom is software and your chemicals are file formats you forgot to organize.
Building Pi-lomar can also make you more comfortable with failure. 3D printed parts may need revision. Motors may skip. The camera may need refocusing. Software dependencies may complain. The dome may look perfect but rub slightly during movement. None of these problems mean the project has failed. They are the project. Each fix teaches something about tolerances, wiring, code, optics, or patience.
For families, classrooms, and maker groups, the experience can be especially rewarding because Pi-lomar is visible and understandable. People can see the dome move. They can see the camera. They can understand that the device is trying to follow the sky. That makes abstract ideas concrete. Earth’s rotation is no longer just a sentence in a science textbook; it becomes the reason the machine has to move.
Perhaps the best experience is the feeling of turning a small corner of your home into a personal observatory. You might set the device outside, connect remotely, choose a target, and watch as the system begins collecting images. Even if the final photo is modest, the process feels magical. A tiny 3D printed structure, a Raspberry Pi, a camera, and some code have worked together to reach toward space.
Pi-lomar reminds us that astronomy is not only for institutions with giant mirrors and polished domes. It is also for tinkerers, students, weekend builders, and anyone who has ever looked up and wondered what they could capture with their own hands. The project is not perfect, and that is part of its charm. It is a learning machine disguised as a miniature observatory, and it makes the night sky feel a little closer.
Conclusion: A Small Dome With a Big Lesson
Pi-lomar puts an observatory in your hands by proving that modern maker tools can shrink big astronomy ideas into a personal, buildable project. It combines Raspberry Pi computing, a high-quality camera module, microcontroller-based motor control, 3D printed mechanics, and open-source experimentation into one compact system.
It will not replace professional observatories, and it is not meant to. Its real value is educational, creative, and wonderfully practical. Pi-lomar teaches how the sky moves, how cameras collect faint light, how motors can track celestial targets, and how engineering becomes more exciting when it points upward.
For anyone interested in Raspberry Pi astronomy, DIY astrophotography, or 3D printed science projects, Pi-lomar is more than a clever build. It is a reminder that curiosity does not need to be full-sized to be powerful. Sometimes the best way to explore the universe is to start with a tiny dome, a small computer, and the stubborn belief that the stars are worth the trouble.