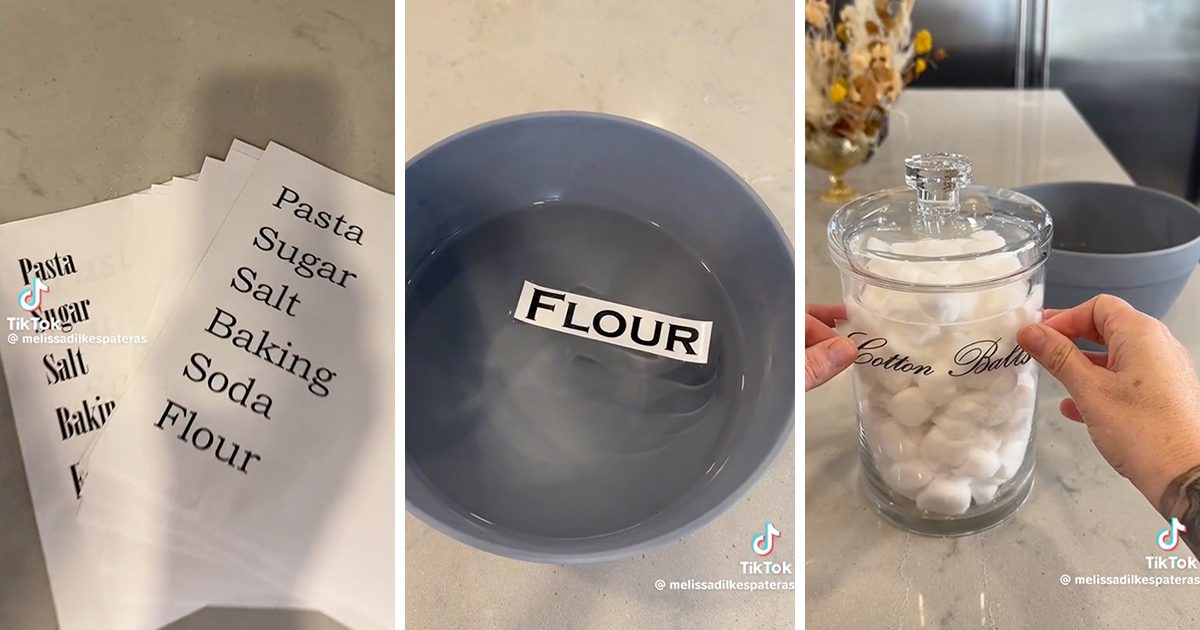
There is a very specific kind of satisfaction that comes from opening a pantry and seeing neat glass jars lined up with clean, minimalist labels. Flour knows where it lives. Baking soda is no longer pretending to be powdered sugar. The mysterious container in the back finally has a name.
Then you look at the price of custom clear labels, specialty sticker paper, cutting machines, and label printers and think, “Perhaps chaos has its charms.”
Good news: you can make your own clear labels with an ordinary household supply that may already be hiding in your junk drawer. The secret is clear packing tape. Combined with a toner-based printed design, warm water, and a little strategic rubbing, packing tape can become a surprisingly attractive transparent label.
The basic image-transfer process is simple: press clear tape firmly over a toner print, soak the taped paper in warm water, remove the softened paper fibers, allow the tape to dry, and apply the transferred design to a smooth surface. Similar packing-tape transfer techniques consistently rely on strong burnishing, warm-water soaking, and thorough paper removal.
It is cheap, customizable, and just crafty enough to make you feel brilliant without requiring a craft room containing seventeen machines named “Joy.”
What Is the Cheap Clear Label Hack?
This DIY clear label hack uses the transparent adhesive surface of packing tape to pick up a toner-based printed image. Once the paper backing is softened with water and rubbed away, the dark text or graphic remains visible on the tape.
Apply the tape to glass, a smooth plastic container, or another compatible clean surface and the transparent background visually disappears. From a short distance, the lettering can resemble professionally printed clear stickers or transferred vinyl.
The technique is especially useful for simple black words and bold graphics. Think COFFEE, RICE, PASTA, COTTON BALLS, or PLEASE STOP PUTTING RANDOM CORDS IN HERE.
Commercial clear printable labels are available for both inkjet and laser printing, and vinyl systems offer another polished labeling route. The packing-tape hack is different: it is an inexpensive image-transfer project intended for casual DIY organization rather than a direct replacement for purpose-made waterproof or commercial labeling materials.
Supplies You Need to Make DIY Clear Labels
The supply list is refreshingly short. No heat press. No cutting machine. No trip to a craft store where you enter for tape and leave holding six baskets and a decorative wooden goose.
Gather These Basic Materials
- Clear packing tape
- A laser printer or toner-based photocopy
- Regular printer paper
- Scissors or a craft knife
- A bowl of warm water
- A spoon, card, ruler, or another smooth burnishing tool
- A clean towel
- Glass jars, smooth containers, bins, or other items to label
- Isopropyl alcohol and a lint-free cloth for final surface cleaning, when appropriate
The printer detail matters. Traditional packing-tape image transfers generally require toner, which is why laser printing or toner-based photocopying is commonly specified for this method. Do not assume an ordinary dye-based inkjet print will transfer the same way. Toner transfer tutorials explicitly call for laser or photocopied output, while printer manufacturers distinguish toner-related print behavior from specialized water- and smudge-resistant ink systems.
No laser printer at home? Print your design to a file and have a toner copy made. One sheet can contain dozens of labels, so this is a perfect excuse to create every label you might need before printing.
How to Make Clear Labels With Packing Tape
Step 1: Design Your Labels
Open your preferred word processor or design program and type the words you want to transfer. For your first attempt, keep the design simple.
Black toner usually provides excellent contrast. Choose a medium or bold font with clean strokes. Delicate hairline lettering may look beautiful on a screen but can become difficult to preserve while rubbing wet paper away.
Measure the width of your packing tape before designing. Many common packing tapes are around 2 inches wide, but you should measure the actual roll in your hand. Keep the complete design narrower than the tape so the adhesive can cover the entire printed area.
For pantry containers, try consistent capitalization and font sizes. Using the same typography on every container is one reason organized shelves look intentional rather than like each jar won a different spelling bee.
Step 2: Print With Toner
Print the labels on regular paper using a laser printer or make a toner-based photocopy. Use clear, dark output and inspect the sheet before proceeding.
If letters look streaky, faded, or spotted, reprint the design. Toner residue and printer-component contamination can cause smudges or defects, so starting with a clean print gives the transfer a much better chance of looking sharp.
You normally do not need to mirror ordinary text for this packing-tape technique because you are viewing the transferred image through the clear tape from the same orientation as the original printed design.
Step 3: Cover the Printed Design With Clear Tape
Cut a section of clear packing tape slightly larger than the printed label. Carefully lower the sticky side onto the front of the printed design.
Try to avoid wrinkles and large air bubbles. Small imperfections may disappear visually on the finished project, but a major crease through the word “FLOUR” will remain a major crease through the word “FLOUR.” The universe is cruel but consistent.
For longer designs, use one continuous strip of tape whenever possible. Overlapping tape creates visible seams and gives moisture additional edges to work around.
Step 4: Burnish the Tape Firmly
This is one of the most important steps.
Use the back of a spoon, an old plastic card, or a smooth ruler edge to rub firmly over the entire design. Work across every letter and graphic. Packing-tape transfer instructions repeatedly emphasize pressing or burnishing the tape thoroughly before soaking.
You are encouraging close contact between the adhesive and the toner. Rub from several directions and pay extra attention to thin letters, punctuation marks, and small decorative details.
You do not need to attack the paper as though it owes you money. Firm, even pressure is the goal.
Step 5: Cut Out Each Label
Trim around the label while the paper is still attached. Leave a small transparent tape border around the design.
Straight rectangular labels are easiest for beginners. Rounded corners can make labels look more finished and may reduce sharp corners that catch during regular handling.
If you are making a full pantry set, cut all the labels now. Batch production makes the process much faster, and soon your kitchen table will resemble a very low-budget sticker factory.
Step 6: Soak the Labels in Warm Water
Place the taped paper pieces in a bowl of warm water. Make sure the paper becomes thoroughly wet.
Several established tape-transfer tutorials recommend warm-water soaking for a few minutes before removing the paper. The exact soaking time can vary with paper thickness and the transfer, so watch the paper rather than worshiping a stopwatch.
When the paper feels saturated and soft, remove one label and test a corner with your fingertip.
Step 7: Gently Rub Away the Paper
With the label wet, rub the paper side gently using your fingertips. The paper fibers should begin rolling away.
Keep rubbing until the clear tape and transferred design are exposed. If the paper starts drying or becomes difficult to remove, dip the label back into the water.
Patience is useful here. Aggressive fingernails can scratch, lift details, or damage the transferred design. Use the soft pad of your finger and work gradually.
A faint cloudy layer may become visible after the first pass. Wet the label again and gently rub a second time. Tiny white paper fibers are often responsible for the haze.
Step 8: Let the Clear Label Dry
Place the label adhesive-side up or on a suitable nonstick surface and let it dry.
Do not panic if the wet label looks odd. Allow the water to evaporate before deciding the project has failed and writing an angry review of your own hands.
Once dry, inspect the lettering. The image should remain visible on the transparent tape.
Step 9: Clean the Container
Labels adhere more reliably to clean, dry, smooth surfaces. Dirt, kitchen grease, and residue from an old sticker can interfere with adhesive contact.
Remove old label residue first. For suitable surfaces, a final cleaning with isopropyl alcohol and a lint-free cloth can help remove contaminants; adhesive manufacturers and label guidance commonly emphasize cleaning and drying a surface before application. Always consider the container material and follow relevant cleaning precautions.
Let the surface dry completely. Try not to touch the cleaned labeling area with greasy fingers afterward.
Step 10: Apply Your Homemade Clear Label
Position the label before pressing the entire piece down. Start at the center and smooth toward the edges to reduce trapped air.
Firmly press the complete label, especially around the lettering and borders.
Step back and admire your work.
Then make seventeen more labels because apparently every container in your house now looks embarrassingly naked.
Why This DIY Label Hack Works So Well Visually
The biggest advantage is the transparent background. Clear jars and storage containers remain visible through the tape, so dark lettering appears to sit directly on the surface.
That minimalist appearance works particularly well with glass. Clear storage containers are frequently recommended in home-organization guidance because their contents and remaining quantities are easier to see, while labels help identify specific ingredients and categories.
The hack also gives you control over typography. Purchased label sets may contain “Quinoa” and “Chia Seeds” but somehow forget the ingredient your family actually buys by the industrial sack. With homemade labels, you can print exactly what you need.
You can also coordinate containers throughout a pantry, bathroom, craft area, office, or utility space. Organization resources routinely use labels for bins, baskets, jars, drawers, and clear storage systems because visible categories make items easier to identify and return to their proper places.
Best Containers and Surfaces for Clear Tape Labels
For the cleanest results, start with smooth, nonporous surfaces.
Glass Jars
Glass is one of my favorite choices because the clear label virtually disappears against it. Use the method on pantry jars, craft-supply containers, bathroom canisters, and decorative storage vessels.
Smooth Plastic Bins
Transparent and solid-color plastic containers can work well, but test a small label first. Plastic formulations and surface textures vary, and adhesive performance may differ.
Metal Containers
Smooth painted or finished metal may accept the tape. Again, test before labeling a valuable or delicate finish.
Surfaces That May Be Less Successful
Rough wood, textured baskets, fabric, dusty cardboard, and heavily curved surfaces can make application difficult. The hack relies on close adhesive contact, so deep texture is the enemy of a smooth invisible-label effect.
Common Clear Label Mistakes and How to Fix Them
The Letters Did Not Transfer Properly
First, check the printing method. A toner-based laser print or photocopy is the safer choice for this specific transfer technique.
Next time, burnish the tape more firmly before soaking. Make sure the tape touches every printed area.
My Label Looks Cloudy
There may still be fine paper fibers on the adhesive. Rewet the label and gently rub the back again.
Do not judge the final clarity while the label is still soaked. Let it dry fully.
The Tape Has Bubbles
Apply slowly from the center outward. A flexible card can help smooth the label.
Cleaning the container also matters. Residue, dust, and oils create an uneven application surface.
My Design Is Too Wide
The design should fit within the usable width of your clear tape. Reduce the font size, shorten the phrase, rotate the design, or buy wider clear packing tape.
Trying to assemble one word from three overlapping strips can be done. Technically, socks can also be worn as gloves. Neither is the first recommendation.
The Label Is Peeling Near Water
Remember that ordinary packaging tape is not automatically a waterproof labeling material. Scotch states that packaging tapes can tolerate a moderate amount of moisture for a short period but are not designed for prolonged weather exposure, while commercial waterproof film labels are specifically engineered for repeated moisture and condensation.
Use this hack primarily for dry indoor organization. For shower products, frequently washed bottles, outdoor containers, or items exposed to heavy refrigerator condensation, choose a purpose-made waterproof label.
Creative Ways to Use Homemade Clear Labels
Create a Matching Pantry
Label flour, sugar, brown sugar, rice, oats, pasta, coffee, tea, and baking ingredients. Add smaller date information where useful.
When decanting food from commercial packaging, preserve important storage, expiration, allergen, and preparation information rather than relying only on a decorative ingredient name. Home-organization experts specifically recommend retaining expiration details when decanting, and USDA explains that package dates carry specific quality and handling context.
Organize a Craft Room
Create transparent labels for buttons, beads, ribbon, paintbrushes, markers, embroidery thread, and those strange metal findings every crafter owns but cannot confidently identify.
Clean Up Bathroom Storage
Label dry bathroom canisters for cotton swabs, cotton rounds, hair ties, and similar supplies. Keep ordinary packing-tape labels away from environments where they will remain wet for long periods.
Sort Small Garage Supplies
Use labeled jars for washers, screws, hooks, wall anchors, and other small pieces. Add sizes to the labels whenever possible. “Screws” is helpful. “#8 x 1-1/4-inch screws” is the kind of organization that makes Future You send Present You a mental thank-you card.
Make Gift and Party Labels
Print names, short messages, monograms, or simple decorative graphics. Apply them to smooth favor containers, jars, or suitable gift packaging.
Label Office Storage
Mark containers for charging cables, adapters, receipts, stamps, pens, and device accessories. A clearly labeled “Mystery Electronics” box is also acceptable. Honesty is part of organization.
Important Note About Food and Household Safety
Note: Treat these packing-tape transfers as decorative exterior organization labels. Do not place ordinary packing tape where it will directly contact unpackaged food, and do not use a handmade label to replace legally required product information or essential safety instructions.
For refrigerated foods, follow proper covered-storage practices and food-safety guidance. FDA recommends keeping refrigerated food in covered containers or sealed storage bags and checking foods for spoilage.
If a container holds cleaning chemicals, medicine, hazardous products, or anything potentially dangerous, retain the original safety information and use an appropriate labeling system. Looking minimal is never more important than knowing whether a bottle contains vinegar or something that requires protective gloves.
My Experience Making DIY Clear Labels: What I Learned After Labeling Everything in Sight
The first time I tried the packing-tape label hack, I approached it with the confidence of someone who had watched a process and therefore assumed physics would personally cooperate.
I designed six labels: flour, sugar, rice, oats, coffee, and pasta. I chose a very thin script font because it looked elegant on my computer. On the screen, my labels belonged in a peaceful kitchen where sunlight always arrives at the perfect angle and nobody leaves a spoon in the sink.
After the transfer, several letters looked weak. The “F” in flour was barely hanging on emotionally.
Lesson one: start with a readable font.
For my second batch, I used a cleaner typeface with thicker strokes. I also increased the space between letters slightly. The difference was immediate. Bold text survived my imperfect rubbing technique much better, and it remained easy to read when the jars were sitting on the shelf rather than six inches from my nose.
I also learned that burnishing is not a ceremonial step. During my first attempt, I pressed the tape onto the print with my palm and thought, “That seems attached.” It was attached, but apparently “attached” and “properly burnished for image transfer” are distant relatives who only meet at weddings.
On the second round, I used the curved back of a spoon and rubbed every label carefully. I changed direction several times and paid attention to the edges of each letter. The transfers came out noticeably more complete.
The water stage taught me another useful lesson: do not rush the paper removal.
One label had been soaking for only a short period when I decided it was ready because patience is apparently a premium subscription I had forgotten to renew. I rubbed aggressively. Paper came off. Unfortunately, parts of the design joined it.
For the next labels, I let the paper soften thoroughly. I used the pad of my thumb and worked in slow circles. When a dry area resisted, I returned the label to the water instead of attempting to defeat cellulose through personal determination.
That simple change made the process much easier.
Cloudiness was my next surprise. After rubbing away the obvious paper, several labels still looked slightly milky. I assumed this was simply the limit of the hack.
Then I wet one again and rubbed gently. Tiny rolls of remaining paper fiber appeared. After a second careful cleaning and complete drying, the tape looked much clearer.
My best results came from repeating three quiet little words in my head: wet, rub, inspect. It sounds like an extremely disappointing spa treatment, but it works as a craft routine.
Surface preparation also made a bigger difference than I expected. One pasta jar had previously worn a grocery-store sticker. I had removed the paper but ignored a faint sticky patch because it seemed harmless. The homemade label adhered unevenly in exactly that spot.
On another jar, I completely removed the old residue, cleaned the exterior, and allowed the glass to dry. That label went on much more smoothly.
I began applying each label by lightly positioning one edge without pressing the entire strip. This gave me a brief chance to check whether the text was level. Once the word looked straight, I smoothed the tape from the middle toward the sides.
Did I get every label perfectly centered? Absolutely not.
Did I rotate one coffee jar so its slightly crooked label faced the wall? I cannot comment on an ongoing investigation.
The greatest practical improvement came when I stopped making labels one at a time. My first six took longer than necessary because I completed the entire process for each individual design. Later, I printed a full page, taped all the designs, burnished everything, cut the labels, and soaked them together.
Working in batches transformed the hack into a genuinely quick project.
I also started keeping the label design file. This proved surprisingly useful. When I added a jar for lentils several weeks later, I simply typed “LENTILS” using the existing font, size, and spacing. The new label matched the original set.
One experiment was less successful: I used the tape labels on containers that were frequently washed and exposed to moisture. They looked fine initially, but I quickly realized that a cheap packing-tape transfer should not be treated like a professionally manufactured waterproof film label.
Now I divide my projects into two categories. Dry pantry jars, craft containers, desk storage, and decorative bins are packing-tape territory. Bottles facing repeated washing, condensation, or extended moisture get purpose-made durable labels.
That distinction saves frustration.
The most unexpected benefit, though, had little to do with appearance. Once containers had clear names, putting things away required less thought. Everyone could see where rice belonged. The container of powdered sugar stopped migrating between shelves. Small hardware became easier to return to the correct jar.
Labels did not magically make the house organize itself. Sadly, the tape has limits. But the visual cues removed tiny moments of uncertainty, and those tiny moments add up.
My final advice is to make three test labels before launching a 60-container pantry transformation. Test your printer output, your tape, and your chosen container surface. Practice soaking and rubbing. Find out how much pressure works for your design.
Then batch-produce the real set.
And print a label that says “LABEL SUPPLIES,” because after this project you are absolutely going to organize the tape, scissors, and leftover paper. There is no going back now.
Conclusion: A Cheap Hack That Looks Surprisingly Polished
Making your own clear labels does not have to require specialty sticker sheets or an expensive craft machine. With clear packing tape, a suitable toner-based print, warm water, and careful burnishing, you can create simple transparent image-transfer labels for many dry indoor organization projects.
The secret is in the details: use bold, readable designs; burnish thoroughly; let the paper soak; rub away fibers gently; clean the final surface; and understand the durability limits of ordinary packing tape.
Once you master the process, everything from pantry jars to craft containers becomes a potential labeling project. It is inexpensive, satisfyingly hands-on, and dangerously good at making you stare around the house while asking, “What else needs a name?”