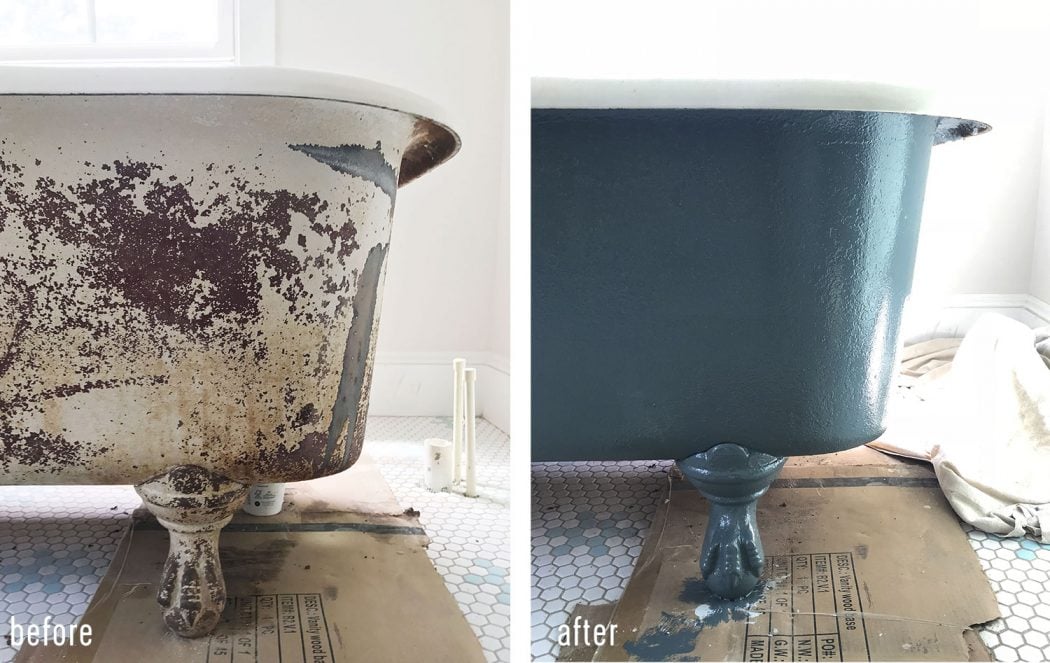
Few bathroom fixtures have the same dramatic charm as an old clawfoot bath tub. It sits there like it owns the room, with curvy feet, a deep soaking basin, and the kind of vintage personality modern drop-in tubs can only dream about. The problem? After decades of soap scum, mineral stains, rust freckles, chipped porcelain, and mystery scratches from previous owners, that once-glorious tub can start looking less “historic centerpiece” and more “crime scene with plumbing.”
The good news is that many old clawfoot tubs can be refinished instead of replaced. Refinishing, also called reglazing or resurfacing, restores the worn surface with careful cleaning, sanding, chip repair, primer, and a durable topcoat. For cast iron clawfoot tubs with porcelain enamel interiors, refinishing is often far less expensive than removing the tub, buying a replacement, changing plumbing, and convincing several strong friends that “just lift with your legs” is a real plan.
This guide explains how to refinish an old clawfoot bath tub safely and effectively, what tools you need, when to call a professional, and how to avoid the mistakes that cause peeling, bubbling, and regret. Think of it as a spa day for your tub, except the cucumber water is replaced by sandpaper, epoxy, and a healthy respect for ventilation.
What Does It Mean To Refinish A Clawfoot Tub?
To refinish a clawfoot bath tub means to restore the visible bathing surface by removing contaminants, dulling or etching the old glossy finish, repairing chips or rust-damaged spots, and applying a new coating system. The goal is not to recreate the original factory-fired porcelain enamel, which was baked onto cast iron at very high temperatures. Instead, refinishing creates a smooth, glossy, water-resistant coating that gives the tub a clean, renewed appearance.
Most old clawfoot tubs are cast iron with a porcelain enamel interior. Cast iron is extremely durable and can last for generations, but the porcelain surface can become stained, scratched, or chipped over time. When the interior looks dull but the tub is structurally sound, refinishing is usually a smart option. If the tub has major cracks, severe rust-through, leaking, or unstable feet, refinishing alone will not solve the problem.
Should You Refinish, Restore, Or Replace?
Before you grab a respirator and start dramatically pointing at the tub like a renovation TV host, inspect it carefully. Refinishing is best when the damage is mostly cosmetic: discoloration, surface scratches, light rust staining, dullness, or small chips. A clawfoot tub with good bones is worth saving, especially because antique tubs have a weight, depth, and silhouette that many new tubs imitate but rarely match.
Replacement makes more sense when the tub has structural damage, badly corroded drain areas, missing or cracked feet, unsafe plumbing, or a shape that simply does not work for the room. Professional refinishing is often the middle path. It costs more than a DIY kit but usually delivers a smoother, longer-lasting finish, especially on a vintage tub with deep chips or heavy staining.
DIY refinishing can work well for patient homeowners who are comfortable with detailed prep work. The coating itself is not magic. The magic is preparation. If the surface is dirty, glossy, damp, or poorly sanded, the new finish may peel faster than wallpaper in a steam room.
Safety First: The Part Nobody Should Skip
Bathtub refinishing involves chemicals, dust, fumes, and coatings that require serious caution. Work only in a well-ventilated area, wear protective gloves, eye protection, and a properly rated respirator, and follow every instruction on the coating product label. If your refinishing method involves strong chemical strippers, be especially careful. Products containing methylene chloride have been linked to severe health hazards in bathtub refinishing, particularly in small bathrooms with poor ventilation. Avoid methylene chloride-based strippers and choose safer preparation methods such as sanding, non-methylene chloride products, or professional service.
Open windows are helpful, but they are not a complete ventilation plan. Use fans to move fumes outdoors, keep children and pets away, and do not sleep in a nearby room while coatings cure. Also, turn off pilot lights if the product label warns about flammable vapors. A beautiful tub is wonderful; an accidental chemistry experiment is not.
Tools And Materials You May Need
Gather everything before you begin. Once the coating is mixed, time suddenly becomes a bossy little project manager.
Basic Supplies
- Painter’s tape and plastic sheeting
- Drop cloths
- Utility knife or caulk removal tool
- Abrasive cleaner or degreaser
- Scrub pads and lint-free rags
- Wet/dry sandpaper, commonly 120-grit for prep and finer grits for smoothing repairs
- Plastic putty knife
- Epoxy filler or porcelain chip repair compound
- Tack cloth or microfiber cloth
- Tub and tile refinishing kit or professional-grade coating system
- High-quality brush, roller, or spray equipment, depending on product instructions
- Respirator, gloves, and safety glasses
Optional Supplies For The Exterior
- Rust-inhibiting metal primer
- Enamel paint for the outside of the tub
- Wire brush for loose exterior rust
- Decorative metallic paint for claw feet
Step 1: Remove Hardware And Old Caulk
Start by removing the faucet hardware, drain trim, overflow plate, and any other parts that touch the refinishing area. If the plumbing is fragile or very old, take photos before removing anything and consider calling a plumber. Vintage plumbing has a special talent for turning “quick removal” into “why is the floor wet?”
Next, remove all old caulk. Do not coat over caulk. Refinishing coatings need to bond to the tub surface, not to old silicone that has spent years collecting soap film and bathroom gossip. Use a utility knife, caulk remover, and patience. Clean the edges thoroughly after removal.
Step 2: Deep Clean The Tub
This step is not glamorous, but it decides whether your finish lasts. Wash the tub with an abrasive cleaner or degreaser to remove soap scum, body oils, wax, bath product residue, and mineral buildup. Scrub around the drain, overflow, and any chipped areas. Rinse well, then clean again if the surface still feels slick.
Old tubs often hold invisible residue. A tub may look clean while still having enough oil or soap film to sabotage adhesion. If water beads up on the surface, keep cleaning. You want a surface that is dull, clean, and ready to accept the next step.
Step 3: Protect The Bathroom
Tub refinishing coatings are not the kind of paint you casually wipe off tile later. Mask the surrounding floor, wall, plumbing, and any nearby fixtures with painter’s tape and plastic sheeting. Cover the entire path where you will walk, mix, and place tools. If you are spraying, be extra careful. Overspray has the social skills of glitter: once released, it tries to live everywhere.
For a freestanding clawfoot tub, protect the exterior if you are refinishing only the inside. If you are restoring both inside and outside, plan the sequence so you do not ruin fresh work while reaching over the tub.
Step 4: Sand Or Etch The Surface
The old glossy surface must be dulled so the new coating can grip. Many DIY refinishing kits include an etching powder or liquid prep solution. Follow the product instructions exactly. If your kit does not include an etching step, sanding becomes even more important.
Use wet/dry sandpaper to roughen the surface evenly. Common DIY guidance often starts around 120-grit for prep, but always follow the refinishing kit directions. Sand every area that will receive coating, including curves, corners, and the area around the drain. Glossy spots are adhesion enemies. If you miss them, they may later become peeling spots that stare at you every time you brush your teeth.
After sanding, rinse thoroughly and dry completely. Moisture trapped under coating can cause failure. Use lint-free towels and allow enough drying time, especially around seams, chips, and drain openings.
Step 5: Repair Chips, Scratches, And Rust Spots
Small chips and scratches should be filled before coating. Use a two-part epoxy filler, porcelain repair compound, or the repair material recommended by your refinishing kit. Apply it smoothly with a plastic putty knife, slightly overfilling deeper chips so you can sand them flush after curing.
If rust is present, remove loose rust with sanding or a wire brush. Rust around the drain deserves special attention because constant water exposure can make that area fail first. For larger rust problems or pitting, a professional refinisher may be the better choice. A new coating can cover minor rust staining, but it cannot cure metal that is actively deteriorating underneath.
Once repairs are fully dry, sand them smooth. Run your hand over the surface with a glove. If you can feel a ridge, you will probably see it under the glossy finish.
Step 6: Remove Dust And Final Contaminants
Vacuum the area if needed, then wipe the tub with a lint-free cloth. Some coating systems call for a solvent wipe before application. Others do not. Follow the product instructions, because using the wrong solvent can create adhesion problems or interfere with curing.
This is also the moment to inspect your masking. Look for loose tape, uncovered floor edges, and dust sitting on ledges. Once the finish goes on, the project becomes less forgiving.
Step 7: Apply Primer Or Bonding Coat
Some tub and tile refinishing systems include a primer; others are two-part epoxy acrylic coatings designed to bond directly after cleaning and sanding. Use only the system recommended by the manufacturer. Do not mix random primers and topcoats unless the product instructions clearly allow it.
Apply primer in a thin, even coat. Avoid heavy application, especially on curved surfaces. Runs and drips are much easier to prevent than to fix. Let the primer dry for the recommended time before applying the finish coat.
Step 8: Apply The New Tub Finish
Mix the coating exactly as directed. Many refinishing kits use two-part formulas with a limited working time. Stir thoroughly, but avoid whipping air bubbles into the mix. Apply thin coats rather than one thick coat. Thick coating may look satisfying for five minutes, then slump, bubble, or cure unevenly like it has a personal grudge.
If rolling, use the roller type recommended by the manufacturer. A high-density foam roller may work for some coatings, while others call for a specific nap. If brushing, use long, smooth strokes and maintain a wet edge. If spraying, use proper equipment, careful masking, and excellent ventilation. Professional refinishers often spray multiple coats for a smooth, porcelain-like finish.
Most products require more than one coat. Respect the recoat window. Applying the second coat too soon or too late can affect bonding. Product instructions may vary widely, so do not assume one kit behaves like another.
Step 9: Remove Tape At The Right Time
Many coatings look best when painter’s tape is removed while the finish is still slightly soft, often at a 45-degree angle. Waiting too long can cause the tape to tear the edge of the coating. Removing it too soon can make a mess. Again, follow the product directions, but be ready before you start coating so you are not hunting for a trash bag with sticky gloves.
Step 10: Let The Tub Cure Completely
Dry time and cure time are not the same thing. A coating may feel dry to the touch in hours but still need days before it can handle water, cleaning, and bathing. Some tub and tile coatings require about 24 hours before use; others require 72 hours or longer before water exposure. Cooler temperatures and high humidity can extend curing time.
Do not rush this step. Using the tub too early is one of the fastest ways to damage the finish. Give the coating the full cure period, even if the tub looks ready and your impatience is wearing a tiny bathrobe.
Refinishing The Outside Of A Clawfoot Tub
The exterior of a clawfoot tub is usually painted cast iron, not porcelain. That means it can often be handled like a metal painting project. Scrape loose paint, sand rough spots, remove rust, clean thoroughly, and apply a rust-inhibiting primer followed by durable enamel paint. This is where you can have fun with color. Classic white is timeless, black is dramatic, navy feels tailored, and soft green or blush can make the tub look like it wandered out of a boutique hotel.
The feet can be cleaned and repainted, polished, or finished in metallic paint. Gold, brass, bronze, chrome, and matte black are popular choices. Just make sure the finish complements the faucet and the rest of the bathroom hardware. A clawfoot tub already has a theatrical personality; the feet are its shoes, and yes, the shoes matter.
Common Mistakes To Avoid
Skipping Surface Prep
Poor cleaning and sanding are the top reasons refinished tubs peel. The coating needs a clean, dull, dry surface. If you shortcut preparation, the finish may look good briefly and then fail where water and cleaning products hit hardest.
Using The Wrong Cleaner Later
After refinishing, avoid abrasive powders, harsh scrub pads, bleach-heavy routines, and bath mats with suction cups unless your coating manufacturer says they are safe. Gentle liquid cleaners and soft cloths help preserve the new finish.
Coating Over Wet Areas
Drain openings, chips, and seams can hold moisture. Dry the tub completely before coating. A hair dryer on a low setting can help remove moisture from tricky areas, but avoid overheating the surface.
Applying Coats Too Thick
Thin, even coats usually cure better than thick coats. Heavy application can create runs, bubbles, soft spots, or uneven gloss.
Ignoring Ventilation
Good airflow is not optional. Refinishing products can produce strong fumes. Use the correct protective equipment, exhaust fumes outdoors, and follow safety directions carefully.
How Long Does A Refinished Clawfoot Tub Last?
A professionally refinished bathtub can often last many years with proper care, while DIY finishes vary depending on the product, surface preparation, application, and daily use. A guest bath tub may stay beautiful longer than a family bath used twice a day by kids, dogs, bath toys, and someone who believes shampoo bottles should be dropped from great heights.
To extend the life of the finish, clean gently, fix leaking faucets quickly, avoid standing water, and do not use abrasive pads. If the finish begins to chip later, repair small areas promptly before water reaches the original surface underneath.
DIY Vs. Hiring A Professional
DIY refinishing is attractive because it costs less and gives homeowners control over the project. It can be a good option for an old clawfoot tub that needs a cosmetic refresh and does not have severe damage. However, professional refinishers usually have stronger coating systems, spray equipment, ventilation setups, and experience repairing chips, rust, and worn porcelain.
Hire a professional if the tub is valuable, heavily damaged, badly rusted, or located in a bathroom with poor ventilation. Also consider a pro if you want a very smooth finish. Brush and roller kits can look nice, but a skilled spray application generally looks more like a factory-style surface.
Real-World Experiences: Lessons From Refinishing An Old Clawfoot Bath Tub
The first experience many homeowners have with a clawfoot tub project is emotional overconfidence. You see the tub, imagine it gleaming under a window, and suddenly you are mentally starring in a charming renovation montage. Then you try to move it. A cast iron clawfoot tub is heavy enough to make everyone in the room reconsider their life choices. Before refinishing, decide whether the tub will stay in place or be moved outdoors or into a workshop. Moving it gives better access and ventilation, but it also requires planning, help, and safe lifting equipment.
Another practical lesson is that old tubs rarely need only one kind of attention. You may begin with the idea of reglazing the inside, then discover the exterior paint is flaking, the feet need tightening, the drain is outdated, and the faucet has the water pressure of a polite apology. Build extra time into the project. A clawfoot tub restoration is not just a coating job; it is often a mini preservation project.
Prep work always takes longer than expected. Cleaning an old tub can feel like negotiating with every bath ever taken in it. Soap scum hides around the drain. Mineral stains cling to worn porcelain. Old caulk may come off in strips, crumbs, or stubborn little fossils. Sanding the curved interior takes patience because the surface changes direction constantly. The best mindset is simple: the finish will only be as good as the surface underneath.
Ventilation is another lesson people tend to learn quickly. Even modern tub refinishing coatings can smell strong. If the bathroom has one tiny window and a fan that sounds like a tired mosquito, rethink the setup. Use fans that exhaust outdoors, keep doors controlled so fumes do not travel through the house, and give the coating room to cure. This is not a project to squeeze in right before guests arrive for the weekend.
Color choice matters more than expected. A bright white interior usually makes the tub look clean and classic, but the exterior can completely change the personality of the bathroom. A black exterior feels crisp and historic. Soft gray looks calm. Deep green, navy, or burgundy can make the tub a statement piece. If the bathroom is small, a lighter exterior may keep the room from feeling crowded. If the floors are patterned, a simpler tub color may prevent visual chaos.
One of the most satisfying moments is reattaching polished or repainted claw feet. The feet are small compared with the basin, but they add a surprising amount of character. Cleaning, priming, and painting them separately can make the whole tub feel intentional rather than merely “old but cleaner.” Matching the feet to the faucet finish creates a pulled-together look.
The final lesson is patience during curing. A refinished tub may look finished long before it is ready for use. Do not test it with water early. Do not set shampoo bottles on the ledge. Do not decide that “just one quick bath” will be fine. Let the finish cure fully. The reward is worth it: a vintage clawfoot bath tub that keeps its old-house soul while looking fresh, glossy, and ready for many more years of soaking.
Conclusion
Refinishing an old clawfoot bath tub is one of the most rewarding bathroom upgrades because it preserves vintage character while solving the practical problem of a stained, chipped, or dull surface. The process is simple in theory: clean, sand, repair, coat, cure, and protect. In practice, success depends on patience, safety, and careful preparation. The tub may be old, but the finish does not have to look tired.
If your clawfoot tub is structurally sound, refinishing can turn it back into the star of the bathroom. Treat the project with respect, use the right products, avoid dangerous strippers, and give the coating enough time to cure. Do that, and your old tub can go from “please ignore this” to “yes, I planned the entire room around it.” Honestly, with claw feet like that, it deserves the attention.
Note: This article synthesizes real-world guidance from reputable U.S. home improvement, coating, safety, and restoration resources, with emphasis on safe preparation, proper ventilation, product-label compliance, and practical refinishing results.