Laser printers and copiers are wonderful until the toner light starts blinking like it has urgent gossip. Suddenly, a perfectly useful machine demands a new cartridge that may cost almost as much as a small weekend grocery run. That is why many home users, small offices, teachers, students, and budget-minded business owners look for a practical answer: can you refill a laser printer or copier toner cartridge yourself?
The answer is yes, in many cases, but with a few important warnings. Refilling toner is not the same as pouring coffee into a mug. Toner is a very fine powder designed to work with static electricity, heat, and a specific cartridge system. Use the wrong toner, overfill the hopper, touch the drum, or ignore the cartridge chip, and your printer may respond with streaks, faded pages, error messages, or the classic office tragedy: black powder everywhere.
This guide explains how to refill a laser printer or copier toner cartridge in seven clear steps. It is written for practical users who want to save money, reduce waste, and avoid turning the desk into a crime scene from a documentary called The Toner Incident.
Note: Always check your printer model, cartridge number, refill kit instructions, and manufacturer safety information before refilling. Some cartridges are easy to refill, while others are sealed, chipped, or designed for replacement rather than reuse.
Before You Begin: Should You Refill Your Toner Cartridge?
Refilling a toner cartridge can be a smart choice when the cartridge is structurally sound, the drum is not scratched, the cartridge is not leaking, and a compatible toner refill kit is available. It is especially useful for high-volume black-and-white laser printers used in home offices, schools, warehouses, invoices, shipping labels, and everyday document printing.
However, not every cartridge is a good candidate. Many modern cartridges include electronic chips that track toner levels or page counts. After refilling, the printer may still say “low toner” unless the chip is reset or replaced. Some cartridges also combine the toner hopper and imaging drum in one unit, which means print quality may still suffer if the drum is worn out. In other words, toner is only one part of the story. A fresh refill cannot magically heal a scratched drum, tired wiper blade, or damaged developer roller. It is toner, not a tiny printer therapist.
What You Need to Refill a Laser Printer or Copier Toner Cartridge
Before opening anything, gather your tools. A little preparation saves a lot of cleanup. You will need a toner refill kit made for your exact printer or cartridge model, disposable gloves, a face mask, paper towels, a small screwdriver, a funnel cap or nozzle, a soft lint-free cloth, and a large sheet of newspaper or disposable table covering. If your cartridge requires it, you may also need a toner reset chip or reset gear.
Do not use random toner from another printer brand just because it “looks the same.” Toner formulas vary by melting temperature, particle size, charge properties, color density, and printer engine design. The wrong toner can cause poor print quality, clumping, background shading, fuser problems, or internal contamination. Matching the cartridge model is the boring part of the job, but it is also the part that keeps your printer from developing expensive opinions.
How to Refill a Laser Printer or Copier Toner Cartridge: 7 Steps
Step 1: Identify the Cartridge Model and Buy the Correct Toner Refill Kit
Remove the toner cartridge from the printer or copier and look for the model number printed on the label. Common examples include cartridge codes from HP, Brother, Canon, Samsung, Xerox, Lexmark, and other laser printer brands. Search for a refill kit that specifically lists your cartridge number, not just your printer model. Some printers use several cartridge versions, including standard-yield and high-yield options.
A good refill kit usually includes the correct toner bottle, a pouring cap or funnel, instructions, gloves, and sometimes a replacement chip. For certain cartridges, the kit may include a hole-making tool or sealing plug. Read the instructions before you begin. Yes, reading instructions is less thrilling than opening the bottle immediately, but it is also how adults avoid decorating the floor with black dust.
Step 2: Prepare a Safe, Clean Work Area
Choose a well-ventilated area away from food, drinks, pets, children, fans, open flames, and anything you love in white fabric. Cover the table with newspaper, cardboard, or a disposable plastic sheet. Wear gloves and a mask to reduce skin contact and avoid breathing toner dust. Toner is not liquid ink; it is a fine powder that can float, cling, and spread if handled carelessly.
Avoid using a regular household vacuum for toner spills. Fine toner particles can pass through some standard filters, and static discharge can create a safety risk. For small spills, use a damp disposable cloth and wipe slowly. If you refill toner often, consider a toner-safe vacuum designed for fine powder cleanup. For most home users, the best strategy is simple: work slowly enough that you do not spill toner in the first place.
Step 3: Open the Toner Fill Port or Create an Access Point
Some toner cartridges have a visible refill plug. If yours does, gently remove the plug with a small flat tool, taking care not to crack the plastic. Other cartridges require you to remove screws and open a side panel. Some sealed cartridges may require a hole-making tool and a sealing plug afterward. Follow the refill kit’s instructions for your exact cartridge design.
Do not drill randomly into the cartridge unless the refill kit specifically instructs you to do so. Inside the cartridge are delicate parts, including the toner hopper, waste toner area, drum, seals, gears, and sometimes an electronic chip. A hole in the wrong place can ruin the cartridge. Think of it like opening a coconut, except the coconut costs money and your printer will judge you afterward.
Step 4: Empty Old Toner or Waste Toner When Required
Some cartridges should be emptied before refilling, especially if the old toner is clumpy, contaminated, or from an unknown refill. Others have separate waste toner compartments that may need cleaning. Never mix incompatible toner types. Even small differences in toner chemistry can affect print quality and fusing.
If your cartridge has a waste toner chamber, handle it carefully. Waste toner is not the same as fresh toner and should not be poured back into the refill bottle. Dispose of used toner and cleaning materials according to local rules. If the cartridge is heavily worn, leaking, cracked, or producing repeated defects even before refilling, replacing it or using a professionally remanufactured cartridge may be the better option.
Step 5: Pour the New Toner Slowly Into the Cartridge
Shake the toner bottle gently according to the refill kit instructions. This helps loosen the powder so it flows smoothly. Attach the funnel cap or nozzle, place it securely into the fill opening, and pour slowly. Do not squeeze aggressively. Do not rush. Do not attempt the dramatic “chef adding salt from a height” technique. Toner is not seasoning, and your printer is not soup.
Use the amount recommended for your cartridge. Overfilling can cause leaks, heavy background shading, internal spills, or poor toner flow. When the correct amount has been added, tap the cartridge lightly to settle the toner. Avoid shaking it violently. Gentle rocking is usually enough to distribute the powder inside the hopper.
Step 6: Seal the Cartridge and Replace the Chip if Needed
After refilling, close the fill plug, reinstall the side panel, or apply the sealing plug supplied with the kit. Make sure the cartridge is tightly sealed. Wipe the outside with a slightly damp cloth to remove loose toner from the shell. Keep the drum covered and avoid touching shiny rollers or green, blue, or metallic drum surfaces. Fingerprints, scratches, and light exposure can all affect print quality.
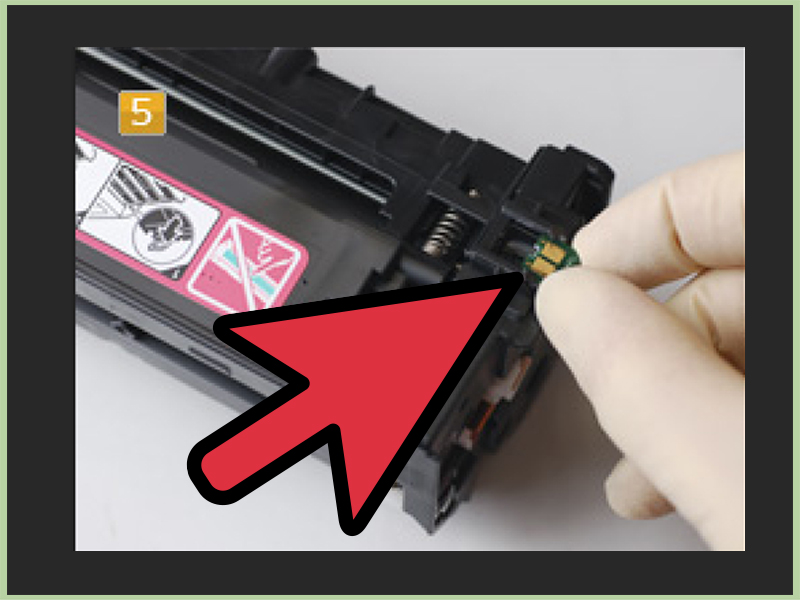
If your cartridge uses a smart chip, replace or reset it as instructed. Without a working chip, the printer may continue displaying low-toner warnings, refuse to print, or incorrectly estimate the remaining toner level. Some printers allow you to ignore toner warnings temporarily, while others are less forgiving. Printer firmware can also change how cartridges are recognized, so chip compatibility matters.
Step 7: Reinstall the Cartridge and Print Test Pages
Gently rock the cartridge from side to side to distribute toner evenly, then reinstall it in the printer or copier. Close all covers and print a test page. Look for clear text, even coverage, and clean margins. If the first page is slightly uneven, print several more pages before making a judgment. Toner may need a few sheets to settle into normal flow.
If pages are faded, remove the cartridge and gently rock it again. If you see streaks, spots, gray background, repeated marks, or toner leaking inside the printer, stop and inspect the cartridge. The issue may be overfilling, a worn drum, damaged wiper blade, contaminated roller, wrong toner type, or an improperly sealed fill hole.
Common Toner Refill Problems and How to Fix Them
Faded Printing
Faded pages usually mean the toner is not distributed evenly, the cartridge is underfilled, the toner is incompatible, or the drum is worn. Remove the cartridge and gently rock it side to side. If the problem continues, check whether the toner refill kit matches your cartridge model.
Black Streaks or Repeating Marks
Streaks and repeating marks often point to a damaged drum, dirty roller, worn cleaning blade, or excess toner. If the mark repeats at regular intervals down the page, the drum or roller may be the culprit. Refilling cannot fix physical damage to imaging components.
Printer Still Says “Low Toner”
This is common with chipped cartridges. The toner hopper may be full, but the printer still relies on a chip, gear, sensor, or page counter. Install the replacement chip included with your refill kit or follow the reset process for your printer model.
Toner Leaks After Refilling
Leaking toner usually means the fill plug is loose, the cartridge was overfilled, the wrong access point was used, or a seal is damaged. Remove the cartridge immediately, clean the outside carefully, inspect the fill hole, and avoid reinstalling it until the leak is fixed.
Is Refilling Toner Worth It?
Refilling a laser toner cartridge can be worth it if you print frequently and use a cartridge that is refill-friendly. The biggest advantage is cost savings. A refill bottle often costs less than a new original cartridge, especially for monochrome laser printers. Refilling also reduces plastic waste by extending the useful life of the cartridge shell.
The trade-off is risk. A poorly done refill can create print defects, mess, printer errors, and possible cartridge failure. For mission-critical business printing, legal documents, client proposals, or high-volume copier fleets, professionally remanufactured cartridges may be a safer middle ground. They are typically cleaned, inspected, refilled, tested, and fitted with replacement components when needed.
For home offices, classrooms, draft printing, shipping labels, invoices, and everyday text documents, a careful DIY toner refill can be a practical money-saver. Just remember: success depends on using the right toner, handling the cartridge gently, avoiding overfilling, and respecting the small but important safety details.
of Practical Experience: What Refilling Toner Teaches You the Hard Way
The first lesson of refilling a laser printer or copier toner cartridge is that confidence should arrive after preparation, not before it. Many people start with the heroic belief that a toner refill is basically “open, pour, close, print.” Sometimes it is that simple. Other times, the cartridge has hidden tabs, a stubborn plug, a reset chip smaller than a cracker crumb, and plastic clips that behave like they were designed by someone who enjoys puzzles a little too much.
A useful habit is to take photos before removing screws or panels. Place the screws in a small cup, not directly on the desk where they can roll into another dimension. If the cartridge has gears on the side, take an extra photo before touching them. One misplaced gear can turn a sensible refill job into a very quiet evening of staring at plastic parts.
Another experience-based tip: do not refill toner when you are in a hurry. Toner senses panic. The faster you pour, the more likely you are to overfill, spill, or forget to reseal the plug properly. Slow pouring gives the powder time to settle and gives you time to notice whether toner is backing up near the opening. A small pause halfway through the pour can prevent a small volcano.
Lighting matters too. Work under bright light so you can see the fill hole, plug, chip, and any loose toner. Dark toner on a dark cartridge shell can hide in corners until you touch it and leave fingerprints on every object within reach. Keep a damp cloth nearby, but do not soak the cartridge. You want to remove loose toner from the outside, not introduce moisture into sensitive areas.
Print testing is another place where experience helps. Do not judge the refill from one page. Print five to ten pages of mixed text and graphics. If the first page looks pale but later pages improve, the toner may simply be settling. If every page shows the same defect in the same location, inspect the drum, roller, or cartridge seal. Repeating defects are often mechanical, not toner-level problems.
It is also wise to keep one spare cartridge available. DIY refilling is great until you need to print tax forms, school papers, invoices, or shipping labels at midnight and your cartridge decides to leak like a tiny black sandstorm. A backup cartridge turns a crisis into a shrug.
Finally, know when to stop. A cartridge can usually survive one or more refills if it is well-built and gently handled, but it will not last forever. If print quality keeps getting worse, if the drum is scratched, or if toner leaks repeatedly, retire the cartridge responsibly. Refilling is about saving money and reducing waste, not forcing a tired cartridge to perform one last Broadway number.
Conclusion
Learning how to refill a laser printer or copier toner cartridge can save money, reduce waste, and keep your printer running when replacement cartridges feel overpriced. The process is not difficult, but it does require patience, the correct toner, a clean workspace, safety precautions, and attention to cartridge design. The seven steps are simple: identify the cartridge, prepare your workspace, open the fill port, remove old or waste toner if needed, pour the new toner slowly, seal and reset the cartridge, then reinstall and test.
For the best results, treat the cartridge like a precision part, not a plastic bottle. Avoid touching the drum, do not overfill, replace the chip if needed, and troubleshoot print defects carefully. Done properly, a toner refill can give your printer a second life and your budget a little breathing room. And if you complete the job without spilling toner on your shirt, congratulationsyou have joined the quiet ranks of practical office heroes.