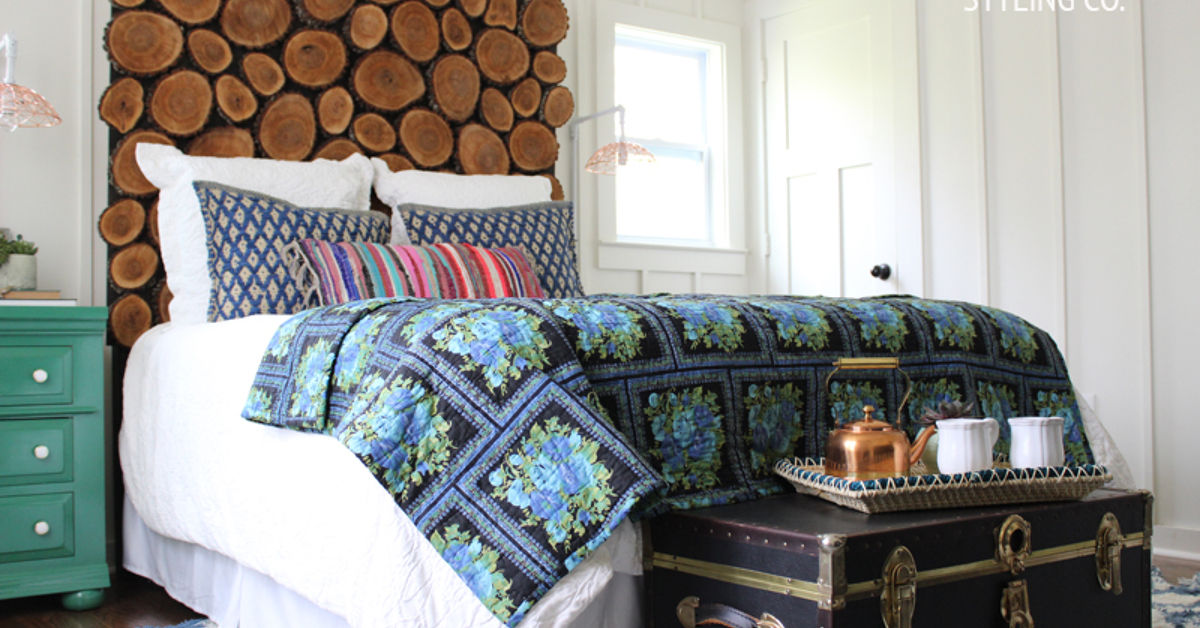
Some bedroom upgrades whisper. A wood slice headboard walks in wearing muddy boots, smelling faintly of cedar, and says, “I was a tree once, and now I’m fabulous.” If your bedroom needs warmth, texture, and a handmade focal point that looks like it belongs in a cozy cabin, a boutique lodge, or the guest room of someone who owns excellent coffee mugs, this DIY wood slice headboard is a satisfying weekend project.
The idea is simple: attach round wood slices, also called wood cookies or wood rounds, to a sturdy backing panel, finish them beautifully, and mount the whole piece behind your bed. The result is a rustic headboard with natural grain, bark edges, and enough personality to make plain drywall feel underdressed.
This guide walks you through the complete process, from choosing wood slices to sealing, arranging, attaching, and safely mounting your headboard. You do not need to be a master carpenter. You do need patience, a good layout plan, and the emotional strength to accept that no two wood slices will behave exactly the same. Wood is charming that way. Also mildly dramatic.
Why a Wood Slice Headboard Works So Well
A DIY wood slice headboard combines several design trends that never seem to fully leave the room: rustic decor, natural materials, handmade furniture, reclaimed wood, and cozy modern farmhouse style. Unlike a basic flat headboard, wood slices create a three-dimensional surface with visible rings, organic edges, color variation, and texture.
That texture is the magic. A wall-mounted wood slice headboard can soften a modern bedroom, add character to a neutral space, or create a natural focal point in a cabin-inspired room. It also pairs well with linen bedding, black metal lamps, woven baskets, jute rugs, vintage nightstands, and plants that are hopefully still alive.
Another advantage is flexibility. You can make a twin headboard for a small room, a queen-size statement piece, or a wide king headboard that stretches past the mattress for a built-in designer look. You can stain it dark and moody, keep it pale and Scandinavian, or seal it clear to celebrate the natural rings.
Materials You Will Need
Before you start, gather everything. This prevents the classic DIY tragedy known as “standing in the garage holding glue while realizing you forgot screws.”
Recommended Materials
- One sheet of plywood, MDF, or cabinet-grade plywood for the backing panel
- Wood slices in assorted diameters, ideally 1/2 inch to 1 inch thick
- Construction adhesive or strong wood glue
- Brad nails, finish nails, or short screws, depending on slice thickness
- Wood stain, clear polyurethane, polycrylic, or another protective topcoat
- Sandpaper in 80, 120, 180, and 220 grit
- French cleat, heavy-duty wall hanger, or mounting hardware
- Wood filler or black-painted backing, optional for visible gaps
- Painter’s tape and drop cloths
Helpful Tools
- Tape measure and pencil
- Circular saw, table saw, or jigsaw for cutting the backing panel
- Random orbital sander or sanding block
- Drill and driver bits
- Brad nailer, optional but very handy
- Level and stud finder
- Clamps or weights
- Dust mask or respirator, eye protection, and gloves
If you do not own a saw, many home improvement stores can cut plywood to size. This is useful if your workshop is actually a balcony, a parking space, or a dining table you promised not to destroy.
Step 1: Decide the Size of Your Headboard
Start by measuring your mattress. A headboard can match the mattress width exactly, but a slightly wider design often looks more polished. For a rustic wood slice headboard, extra width also gives the pattern room to breathe.
Common mattress widths are approximately 38 inches for twin, 54 inches for full, 60 inches for queen, and 76 inches for king. A good headboard height is usually 36 to 48 inches above the mattress support, depending on your room, ceiling height, and how dramatic you want the final look to be.
For example, a queen bed looks balanced with a panel around 64 inches wide and 42 inches tall. If you want a boutique hotel effect, extend the headboard several inches beyond both sides of the mattress. If the room is small, keep it close to mattress width so it feels intentional rather than “forest wall, surprise edition.”
Step 2: Choose the Right Wood Slices
The wood slices are the star of the project, so choose them carefully. You can buy pre-cut wood rounds from craft stores, woodworking suppliers, or online sellers. You can also cut your own from fallen branches or logs, but only use wood that is clean, dry, pest-free, and legal to collect.
Good options include birch, cedar, pine, maple, oak, and poplar. Birch slices are popular because the pale wood and light bark look clean and cozy. Cedar offers a beautiful reddish tone and a pleasant scent. Pine is affordable and easy to work with, though it can dent more easily. Hardwoods such as oak and maple are durable but may be heavier and harder to sand.
For the most natural look, use a mix of diameters. Combine larger rounds with smaller pieces to fill gaps. Try sizes between 2 and 7 inches across. If every slice is identical, the headboard may look too manufactured. If every slice is wildly different, it may look like a beaver opened an art gallery. Aim for controlled chaos.
Step 3: Dry and Inspect the Wood
Moisture is the sneaky villain in many wood slice projects. Fresh-cut wood can shrink, crack, warp, or grow mold as it dries. If you cut your own slices, let them dry thoroughly before attaching them to the backing. Depending on thickness, species, and humidity, this can take weeks or months.
For a bedroom project, kiln-dried or fully seasoned wood is the safest choice. If you use salvaged branches, inspect each slice for insects, soft spots, rot, loose bark, and deep cracks. Small cracks can add character. Large structural splits can become loose pieces later, usually at 2 a.m., because furniture enjoys drama.
If you are unsure whether the slices are dry enough, use a moisture meter. Indoor woodworking projects generally behave better when the wood has acclimated to the room where it will live. Let the slices sit indoors for several days before final assembly.
Step 4: Prepare the Backing Panel
The backing panel gives your headboard strength and makes installation much easier. Plywood is usually the best option because it holds fasteners well and resists splitting. MDF can work, but it is heavier and less friendly to screws near the edges. For a premium build, use cabinet-grade plywood with minimal warping.
Cut the panel to your planned size. Sand the edges smooth. If gaps will show between wood slices, paint or stain the front of the panel before you attach anything. Black paint creates a shadow effect and makes small spaces between slices disappear. A dark brown stain gives a warmer, rustic background.
If you want a framed look, add 1×2 or 1×3 boards around the edges of the panel. A simple frame hides plywood layers and makes the project feel finished. Stain or paint the frame before installing the slices, unless you enjoy taping around dozens of little bark islands later. You do not.
Step 5: Sand Every Wood Slice
Sanding is not glamorous, but it is where your headboard changes from “pile of firewood” to “handcrafted furniture.” Start with 80 or 120 grit if the slices are rough. Then move to 180 and finish with 220 grit for a smooth surface. Sand the front face, back face, and any sharp edges.
Do not sand the bark aggressively unless you want it removed. Loose bark should be taken off or glued down because it can flake over time. Stable bark can stay for that rustic, woodland texture. Wear a dust mask or respirator and eye protection while sanding. Wood dust is not a seasoning, no matter how rustic this project becomes.
After sanding, remove dust with a vacuum, tack cloth, or slightly damp microfiber cloth. Dust left behind can interfere with stain, glue, and finish.
Step 6: Plan the Layout Before Gluing
Do not start gluing wood slices randomly. That path leads to regret, awkward gaps, and one lonely slice that somehow looks like a potato. Lay the backing panel flat on the floor or a worktable. Arrange the largest slices first, then fill around them with medium and small pieces.
There are several layout styles to consider:
- Organic puzzle layout: Different sizes fit together naturally with small gaps.
- Grid-inspired layout: Similar sizes create a cleaner, more modern pattern.
- Centered feature layout: Larger slices cluster in the middle, with smaller slices toward the edges.
- Fade layout: Dense slices near the center gradually loosen toward the sides.
Take a photo of the final arrangement before attaching anything. Then, if your cat, child, or own elbow rearranges the masterpiece, you have evidence of what civilization once looked like.
Step 7: Attach the Wood Slices
Once the layout looks balanced, attach each slice to the backing panel. Apply construction adhesive or wood glue to the back of the slice, press it firmly into place, and secure it with a brad nail or short screw if needed. Use fasteners that will not poke through the front of the wood slice.
If your slices are thin, adhesive alone may be enough, especially when the headboard is wall-mounted and not handled often. For thicker or heavier rounds, combine adhesive with mechanical fastening. Drive fasteners at a slight angle where possible, and avoid splitting small slices.
Work in sections so the layout stays manageable. If glue squeezes out, wipe it quickly with a damp cloth. Dried glue can resist stain and create shiny spots under finish. Give the adhesive plenty of curing time according to the product label before lifting or mounting the headboard.
Step 8: Stain or Keep It Natural
Stain is optional. Many wood slice headboards look best with a clear finish because the natural rings already provide beautiful variation. However, stain can unify mismatched wood tones or make the headboard fit darker furniture.
If you stain, test the color on extra slices first. End-grain wood absorbs stain differently from long-grain boards, often becoming darker faster. Wipe off excess stain evenly and do not let puddles dry on the surface. For blotch-prone woods like pine, a pre-stain wood conditioner can help create a more even result.
Popular rustic stain colors include walnut, early American, weathered oak, driftwood gray, and honey maple. For a modern cabin look, use a medium brown stain with black hardware. For a light farmhouse look, use a clear matte finish or a pale whitewash.
Step 9: Seal the Headboard
A protective topcoat makes the headboard easier to clean and helps stabilize the surface. Use water-based polyurethane, polycrylic, or another clear furniture finish for an indoor bedroom piece. Water-based finishes usually dry clearer and have less ambering than oil-based options. Oil-based finishes can add warmth but may yellow pale wood over time.
Apply thin coats with a brush or foam applicator. Let each coat dry fully, then sand lightly with fine-grit sandpaper if the product instructions recommend it. Remove all dust before the next coat. Two coats are usually fine for a decorative headboard, while three coats provide extra durability.
Because finishes can release odors and volatile compounds while curing, work in a well-ventilated area and follow the product label. Let the headboard cure before placing it in the bedroom. Your room should smell like rest, not like a hardware aisle with commitment issues.
Step 10: Mount the Headboard Securely
A wood slice headboard can be heavy, especially if you use hardwood rounds or a large plywood panel. Secure mounting is not optional. The safest approach is usually a French cleat attached to wall studs. A French cleat uses two angled boards or metal pieces that lock together, allowing the headboard to hang firmly while remaining removable.
Locate wall studs with a stud finder and mark them clearly. Attach one side of the cleat to the studs with appropriate screws. Attach the matching cleat to the back of the headboard. Use a level so the headboard does not lean like it heard bad news.
If you prefer attaching the headboard to a bed frame, confirm that your frame has headboard brackets and that the headboard’s weight is appropriate. Wall mounting is often better for decorative wood slice designs because it distributes weight and prevents wobbling.
Design Ideas for a More Custom Look
Once you understand the basic method, you can customize the headboard to match your room. Try adding LED strip lighting behind the panel for a soft halo effect. Use a live-edge frame for a more organic outline. Mix bark-on and bark-off slices for contrast. Add a narrow shelf along the top for small decor, but avoid heavy items above where you sleep.
You can also combine wood slices with other materials. A black-painted backing panel creates a dramatic modern rustic look. Whitewashed slices feel coastal and airy. A dark walnut finish with brass sconces leans upscale cabin. For a kid’s room, use smoother bark-free slices and round over all edges carefully.
Common Mistakes to Avoid
The biggest mistake is using wet wood. It may look fine during assembly, then shrink and crack after installation. The second mistake is skipping sanding. Rough slices collect dust, snag pillows, and make the whole piece look unfinished. The third mistake is relying only on weak glue for heavy rounds. Gravity is patient, and it always wins eventually.
Also avoid placing untreated outdoor wood directly in a bedroom. Bugs are not part of the design plan. Clean, dry, inspect, and seal every slice. Finally, do not mount the headboard with small picture hangers unless the entire piece is very lightweight. A rustic headboard should look rugged, not fall off the wall like a woodland avalanche.
Estimated Cost and Time
The cost depends on whether you buy pre-cut wood slices or make your own. A small twin headboard may cost under $100 if you use salvaged wood and basic plywood. A queen or king version with purchased slices, premium plywood, stain, finish, and a French cleat may cost $150 to $350 or more.
Time also varies. If the wood is already dry and cut, you can complete the project over a weekend: one day for sanding, layout, and attachment, and another for finishing. If you need to dry freshly cut wood, the timeline becomes much longer. Wood does not care about your weekend plans.
Care and Maintenance
Dust the headboard regularly with a soft cloth or vacuum brush attachment. Avoid soaking the surface with water. If the finish becomes dull, clean it gently and apply a compatible maintenance coat according to the finish manufacturer’s instructions. Check the mounting hardware once or twice a year, especially if the headboard is large.
If a slice loosens, remove it carefully, clean off old adhesive, and reattach it with fresh glue and a small fastener if possible. Small cracks are normal and often add charm. Large loose pieces should be repaired quickly so they do not catch bedding or fall.
Real-World Experience: What This Project Teaches You
Making a rustic wood slice headboard is one of those projects that looks simple on paper and then quietly teaches you several life lessons. The first lesson is that nature does not believe in perfect circles. Even when wood slices are cut from the same branch, each one has its own shape, grain, color, and personality. Some are smooth and cooperative. Others have knots, cracks, bark gaps, and the energy of a tiny wooden diva.
The best experience comes from slowing down during the layout stage. At first, it is tempting to cover the panel quickly, especially when the pile of slices looks endless. But once you step back, patterns appear. A cluster of large rounds can feel too heavy on one side. Too many tiny pieces in one area can look busy. Leaving narrow gaps between slices can create depth, especially if the backing is painted dark. The layout becomes less like construction and more like arranging a natural mosaic.
Another lesson is that sanding matters more than expected. Many beginners think rustic means rough. It does not. Rustic should feel natural, not unfinished. A well-sanded wood slice still keeps its bark, rings, and organic charm, but it feels intentional. Run your hand across the surface before finishing. If it feels like it might snag a sweater, keep sanding. Your future pillows will thank you.
Finishing is also where patience pays off. A clear coat can make the grain pop beautifully, but thick coats may pool around bark edges or dry unevenly. Thin coats are better. Let each layer dry properly. Rushing the finish is like frosting a cake while it is still in the oven: technically enthusiastic, visually questionable.
Mounting the headboard is the moment when the project becomes furniture instead of a very attractive wooden pancake collection. This is where accuracy counts. Use studs, use a level, and get help lifting the panel. Even a medium-size wood slice headboard can be awkward to hold. One person balancing it while the other gives directions is normal. One person trying to do everything while muttering at the wall is also normal, but less recommended.
The most satisfying part is seeing how the headboard changes the room. A plain bed suddenly has presence. Neutral bedding looks richer. Lamps feel cozier. The whole bedroom gains a handmade story. Guests may ask where you bought it, which is your cue to smile casually and say, “Oh, I made that,” as if you did not spend an entire afternoon negotiating with bark.
Over time, the headboard may develop small changes. Wood can move slightly with humidity, and minor cracks can appear. Instead of seeing this as failure, think of it as part of the natural character. The goal is not plastic perfection. The goal is warmth, texture, and a piece that feels connected to the outdoors without requiring you to sleep in a tent.
If you are new to woodworking, this project is a confidence builder. It teaches measuring, layout, sanding, staining, finishing, adhesive use, and wall mounting without requiring complex joinery. If you are experienced, it offers room for artistry. You can play with species, slice thickness, pattern density, color, lighting, and frame design. Either way, the finished headboard feels personal because every decision is visible.
In the end, a deliciously rustic wood slice headboard is not just bedroom decor. It is a functional art piece made from natural material, a weekend story, and a reminder that home projects do not have to be perfect to be beautiful. They just need planning, care, and perhaps a little forgiveness when one wood slice refuses to fit anywhere except exactly where you did not want it.
Conclusion
A DIY wood slice headboard is a beautiful way to bring rustic charm, natural texture, and handmade character into your bedroom. The process is approachable: choose dry wood slices, prepare a sturdy backing panel, sand everything smooth, plan the pattern carefully, glue and fasten the slices securely, seal the surface, and mount the finished piece safely to the wall.
The finished headboard can be cozy, modern, farmhouse, cabin-style, or eclectic depending on your stain, layout, and room decor. Best of all, no two versions will ever be exactly alike. That is the point. You are not building a factory-perfect rectangle. You are creating a warm, nature-inspired focal point with grain rings, bark edges, and enough rustic attitude to make your bedroom feel instantly more inviting.