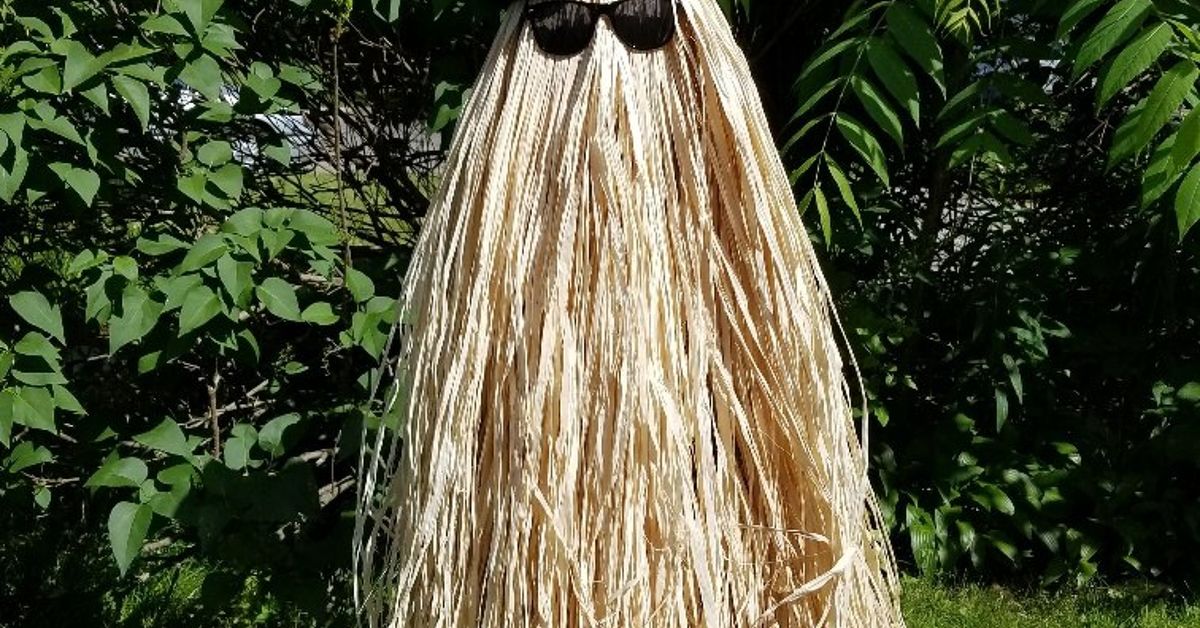
Some Halloween decorations whisper, “Welcome, dear guest.” Others scream, “A haunted Victorian widow lives here and she definitely owns a crow.” Then there is the Cousin IT DIY: a glorious, hairy, sunglasses-wearing mystery who stands on your porch like he knows your Wi-Fi password but refuses to share it.
Whether you call him Cousin IT, Cousin It, or Cousin Itt, this classic Addams Family-inspired Halloween prop is one of the easiest ways to make your home look spooky, funny, and strangely fashionable. The best part? You do not need advanced carpentry skills, a Hollywood prop budget, or a secret basement laboratory. With a tomato cage, grass skirts, sunglasses, a hat, and a little patience, you can build a charming DIY Cousin IT decoration that looks fantastic on a porch, in a yard, beside a candy bowl, or lurking politely in a hallway.
This guide walks you through the full process, including materials, step-by-step instructions, costume variations, outdoor display tips, troubleshooting, and real-life experience from making and displaying this quirky Halloween favorite.
What Is a Cousin IT DIY?
A Cousin IT DIY is a homemade Halloween prop or costume inspired by the long-haired Addams Family character known for his floor-length hair, dark sunglasses, bowler-style hat, and unforgettable mysterious personality. The DIY version is usually made with straw hula skirts, raffia table skirts, faux hair, or grass skirts layered around a simple frame.
The frame can be a tomato cage, camera tripod, laundry basket, wire cone, collapsible hamper, or even a person if you are making a wearable costume. The “hair” is layered from bottom to top, the sunglasses are attached at face height, and the hat finishes the look. In other words, it is basically a fashionable haystack with celebrity confidence.
Why This DIY Halloween Decoration Works So Well
The Cousin IT Halloween prop is popular because it checks every box: it is recognizable, affordable, family-friendly, easy to customize, and funny without being too scary for younger trick-or-treaters. It works with creepy mansions, cute front porches, gothic party themes, and even minimalist Halloween setups where one weird hairy guest is all the drama you need.
It is also a great beginner craft. Many DIY Halloween decorations require cutting wood, painting foam, wiring lights, or pretending you understand engineering. This one mostly requires layering, tying, trimming, and occasionally telling a grass skirt to behave itself.
Supplies You Need to Make a Cousin IT DIY
Basic Materials
- 1 large tomato cage, camera tripod, or collapsible frame
- 4 to 8 natural raffia grass skirts or grass table skirts
- 1 black bowler hat, derby hat, or felt costume hat
- 1 pair of oversized black sunglasses
- Zip ties, floral wire, twist ties, or strong string
- Hot glue gun and glue sticks
- Scissors
- Tan, brown, or black fabric, plastic tablecloth, or trash bag for lining
- Heavy base, paver, sandbag, planter, or bricks for stability
Optional Upgrades
- Battery-operated LED fairy lights
- Small treat bucket
- Mini sign that says “Cousin IT says hi”
- Faux mustache or eyebrows for extra silliness
- Weather-resistant spray for outdoor display
- Command hooks or outdoor clips for securing accessories
For the most authentic look, choose natural-colored raffia or straw skirts. Blonde, tan, wheat, or light brown tones work beautifully. If your Halloween style is more gothic, try dark brown or black faux hair. Just remember: the goal is “mysterious cousin,” not “escaped mop from the utility closet,” unless that is your theme, in which case carry on bravely.
Choosing the Best Frame
Tomato Cage Frame
A tomato cage is the most common choice for a DIY Cousin IT prop. It already has a tapered shape, stands upright, and gives you plenty of places to attach grass skirts. Turn it upside down so the wider ring becomes the base and the narrow legs point upward. Bend the top wires inward to create a rounded head shape, then tape or zip-tie them together.
Tripod Frame
A tripod works well if you want a taller, life-size Cousin IT. It is adjustable, lightweight, and easy to collapse for storage. The downside is that it may need extra weight at the bottom if you display it outdoors.
Laundry Basket or Hamper Frame
A tall laundry hamper can work if you want a wider, chunkier Cousin IT. This version is great for indoor party decor. It is also ideal if your design philosophy is “more hair, more personality.”
Step-by-Step: How to Make a Cousin IT DIY Prop
Step 1: Build and Stabilize the Frame
Place your tomato cage upside down on a flat surface. If the top wires are sticking up, bend them toward the center to form a rounded dome. Secure the wires with zip ties or duct tape. If using a tripod, extend it to your preferred height and lock all legs firmly.
Next, add weight to the base. A paver, planter, sandbag, or a few bricks can prevent your Cousin IT from doing an unplanned wind-powered cartwheel down the driveway. If you live in a breezy area, use stronger anchoring than you think you need. Halloween decorations love drama; gravity does not.
Step 2: Add a Liner
Before adding the hair, wrap the frame with a tan or brown plastic tablecloth, trash bag, or lightweight fabric. Secure it with zip ties or tape. This liner helps keep the raffia from blowing into the frame and getting tangled. It also gives the decoration a fuller look, especially if your grass skirts are thin.
A liner is especially useful for outdoor Cousin IT displays. Without it, wind can push the strands inward, leaving your character looking less like an Addams Family icon and more like a nervous birdcage wearing extensions.
Step 3: Attach the First Layer of Hair
Start at the bottom. Wrap the first grass skirt or table skirt around the lower part of the frame. Let the strands hang down so they cover the base. Attach the waistband to the frame with zip ties, floral wire, staples, or hot glue.
Do not worry if the first layer looks sparse. Cousin IT is built like a good lasagna: the magic is in the layers.
Step 4: Add More Layers
Move upward and add the second skirt, overlapping the first layer by several inches. Continue layering until the frame is fully covered. The top layer should begin near the rounded head area and fall naturally over the sunglasses zone.
If using grass table skirts, cut them into manageable sections and wrap them around the frame. If using hula skirts, open the waistband and attach it in a circle. Make sure each layer covers the attachment points of the layer below it.
Step 5: Shape the Hair
Once the frame is covered, gently fluff and separate the strands. Trim only where necessary. Keep the bottom slightly uneven for a natural look. A perfectly straight haircut can make Cousin IT look like he just left a luxury salon, which is impressive but perhaps not spooky enough.
At the front, part the strands slightly where the sunglasses will sit. You want the glasses visible but still partly buried in hair. That is the classic Cousin IT mood: “I can see you, but legally you cannot see me.”
Step 6: Attach the Sunglasses
Place oversized black sunglasses near the upper third of the prop. Use floral wire, zip ties, or hot glue to secure them to the frame behind the hair. If the sunglasses keep sliding, wrap a small piece of wire through the hinges and tie it directly to the tomato cage or tripod.
Do not place the glasses too high. Cousin IT should look short, mysterious, and stylish, not like a haystack pretending to be a giraffe.
Step 7: Add the Hat
Top the prop with a black bowler hat, derby hat, or round costume hat. Hot glue works for indoor displays, but for outdoor decor, add floral wire or a zip tie through the hat brim and attach it to the frame. Wind has no respect for your art.
If you want a more polished look, stuff the inside of the hat with newspaper or tissue paper so it sits proudly on top instead of collapsing like it just heard bad news.
Step 8: Final Fluffing and Styling
Step back and inspect the silhouette. Fill gaps with extra raffia strands. Trim any wildly long pieces. Adjust the sunglasses so they sit level. If your Cousin IT looks like he is judging your porch decor, congratulations: you nailed it.
How to Make a Wearable Cousin IT Costume
If you want to turn this DIY project into a costume, the concept is similar but the structure changes. Instead of a tomato cage, use a lightweight base such as a tan sheet, poncho, or loose hoodie. Attach rows of grass skirts or raffia around the garment, beginning at the bottom and working upward.
Keep visibility and breathing space in mind. Leave a hidden opening near the face, and do not let heavy material cover the mouth and nose. Attach sunglasses to a headband or hat rather than directly to your face. The hat can be sewn, clipped, or glued onto the top layer.
A costume version is hilarious for parties, but it can be warm and slightly chaotic. Practice walking before wearing it in public. Stairs, pets, and snack tables become more complicated when you are dressed as a stylish hay bale.
Outdoor Display Tips
Protect It From Weather
Raffia and straw materials can droop or tangle in rain. If your Cousin IT will live outside for more than one evening, place it under a covered porch or use synthetic grass skirts that handle moisture better. Avoid leaving paper or untreated cardboard parts exposed.
Use Safe Lighting
If you add lights, choose battery-operated LED lights. Avoid open flames near raffia, fabric, plastic, or faux hair. Cousin IT should be mysterious, not a small seasonal wildfire.
Anchor the Base
Outdoor Halloween props should be secured so they do not block walkways, tip over, or surprise the mail carrier in a lawsuit-adjacent way. Place the prop where guests can see it clearly but still move safely.
Budget-Friendly Cousin IT DIY Ideas
This project can be very affordable if you shop smart. Look for grass skirts at dollar stores, party supply stores, thrift shops, or end-of-summer clearance sections. Old sunglasses and costume hats are easy thrift-store finds. A tomato cage from the garden shed can become the entire frame.
If you already have a tripod, laundry hamper, or collapsible storage bin, use it. DIY is not about buying everything new; it is about looking at a tomato cage and saying, “You, my friend, have Addams Family potential.”
Creative Variations
Mini Cousin IT Treat Bucket
Use a small bucket as the base, wrap it with raffia, glue on sunglasses, and add a tiny hat. This makes an adorable candy holder or party centerpiece.
Glam Cousin IT
Add gold sunglasses, a velvet ribbon around the hat, or a mini pearl necklace. Suddenly, Cousin IT is not just attending the party; he is hosting it.
Spooky Yard Cousin IT
Use darker raffia, add subtle LED lighting from below, and place the prop beside pumpkins, ravens, or a fog machine. Keep the face mostly hidden for a moodier effect.
Family of Cousin ITs
Make several in different sizes using tomato cages, buckets, and small wire cones. A group display looks fantastic on porch steps and gives the impression that Cousin IT invited his entire extended family without asking.
Common Mistakes to Avoid
Using Too Little Hair
Thin coverage is the most common issue. Buy more grass skirts than you think you need. You can always return extras or use them for a mini version.
Skipping the Liner
A liner keeps the strands on the outside of the frame and prevents tangling. It also helps the prop look fuller from every angle.
Forgetting Wind
A lightweight prop can tip over easily. Add weight to the bottom and secure the hat and sunglasses firmly.
Placing Accessories Too High
The sunglasses should sit around the upper-middle area, not at the very top. The hat should rest naturally on the rounded head shape.
Cleaning and Storage
After Halloween, gently shake out leaves, dust, and porch debris. If the raffia is synthetic, wipe accessories with a damp cloth. Avoid soaking natural straw. Let everything dry completely before storage.
Store your Cousin IT in a large trash bag, garment bag, or plastic storage bin. If possible, keep the hat and sunglasses attached to avoid rebuilding the face next year. Label the container clearly so nobody opens it in June and screams at the mysterious hairy thing in the garage.
Experience Notes: What I Learned Making a Cousin IT DIY
The first thing you learn when making a Cousin IT DIY is that grass skirts have opinions. They cling to everything, shed slightly, twist when you are not looking, and somehow find a way to attach themselves to your socks. But once you accept that the project will be a little messy, it becomes one of the most satisfying Halloween decorations you can make in an afternoon.
The tomato cage version is my favorite because it gives the best shape with the least effort. A tomato cage already has the cone-like body you need, and when you flip it upside down, it naturally creates a stable base. The only tricky part is the top. Those metal prongs can look awkward if you leave them sticking up, so bending them inward and tying them together makes a huge difference. It gives the prop a rounded head instead of a “garden equipment in disguise” silhouette.
The liner is another detail that sounds optional until you skip it once. Without a liner, the raffia tends to blow inward and wrap around the metal frame. From the outside, this creates bald spots. From the inside, it creates a tiny haunted nest. A simple tan plastic tablecloth or trash bag solves the problem. It gives the hair something to rest against and makes the final prop look much fuller.
Layering from the bottom up is also important. When I tried attaching the top layer first, I spent the rest of the project fighting the strands while trying to reach the lower rings. Starting at the bottom lets each new layer hide the waistband above the previous one. It is the same principle as shingles on a roof, except the roof wears sunglasses and may silently judge your candy selection.
For outdoor use, the biggest lesson is weight. A finished Cousin IT looks substantial, but it can still be light enough to tip in the wind. A paver, bricks, or a heavy planter inside the base keeps it steady. If you put it on a porch, place it near a wall or railing and secure it with clear fishing line or discreet zip ties. Nobody will notice the support, but everyone will notice if Cousin IT tumbles into the mums.
The sunglasses are where the personality appears. Oversized sunglasses look funniest and most recognizable. Smaller glasses can disappear into the hair. Attach them to the actual frame, not just the raffia, because grass strands will not hold them securely. The same goes for the hat. Hot glue is fine indoors, but wire or zip ties are better outdoors.
Finally, do not over-trim the hair. Uneven strands make the prop look more natural and playful. A few wild pieces add charm. The finished Cousin IT should look polished enough to be intentional but shaggy enough to remain mysterious. When guests laugh before they even ring the doorbell, you know the project worked.
Conclusion
Making a Cousin IT DIY is one of the easiest ways to add humor, nostalgia, and spooky charm to your Halloween decor. With a simple frame, layered grass skirts, sunglasses, and a hat, you can create a porch prop that looks impressive without requiring complicated tools or expensive supplies.
The key is to build a stable frame, use enough hair, add a liner, secure the accessories, and anchor the finished decoration if it will be displayed outdoors. Once you understand the basic structure, you can create mini versions, life-size props, treat buckets, costumes, or an entire Cousin IT family. It is budget-friendly, beginner-friendly, and guaranteed to make guests pause, laugh, and maybe ask, “Why does your porch decoration have better style than I do?”
So grab a tomato cage, unleash the raffia, and give your Halloween setup the mysterious hairy icon it deserves.