If you have ever looked at the Origins perk limit and thought, “Four perks? That feels emotionally restrictive,” good news: the map absolutely lets you go bigger. A lot bigger. In the original Call of Duty: Black Ops II version of Origins, you can work your way to every perk on the map if you follow the right order, avoid one very specific mistake, and treat your shovel like it is a family heirloom.
This guide breaks down exactly how to get all perks in Call of Duty: Origins in 11 practical steps. It is built for players who want a clear route, not a foggy lecture full of “just vibe with the map” energy. Whether you are playing solo or with friends, the method is the same: build your setup, unlock extra perk slots, use Der Wunderfizz smartly, and save Double Tap for last like the final slice of pizza you are protecting from your own teammates.
What “All Perks” Means on Origins
On the original BO2 version of Origins, getting all perks means ending with these nine perks in one match: Quick Revive, Juggernog, Speed Cola, Stamin-Up, Mule Kick, Double Tap II, Deadshot Daiquiri, Electric Cherry, and PhD Flopper. The reason this is possible is that Origins lets you expand your normal perk limit by earning extra perk slots through special dig spots while using the Golden Shovel and Zombie Blood.
The catch is simple but brutal: if you pull Double Tap too early from Der Wunderfizz, you can lock yourself out of the clean nine-perk setup. That is why the order matters almost as much as the perks themselves.
Step-by-Step Guide: How to Get All Perks in Origins
Step 1: Know the route before you start buying perks
The first step is mental, not mechanical. Origins is a map that punishes freestyle chaos. The full-perk route works best when you already know your plan: build points early, power generators, dig constantly, get the Golden Shovel, hunt extra perk slots, then claim Double Tap from the challenge chest at the very end.
If you go in blind and buy random perks the second you can afford them, you are basically inviting the map to laugh at you. Have a route, have patience, and accept that this is less of a sprint and more of an undead tax return.
Step 2: Turn on Generator 1 and stabilize the opening rounds
Your opening job is survival and efficiency. Activate Generator 1, grab the points you can, and avoid spending too aggressively. In solo, Quick Revive is a smart early purchase because it is cheap and gives you breathing room. In co-op, you can delay it a little if your team is organized and not made of people who vanish the second a zombie touches them.
The main goal here is to get through the early rounds cleanly while stacking points for doors, generators, and your first core perk purchases.
Step 3: Power the map and build toward your core perk setup
Origins uses six generators instead of one power switch, so turning on the map is a gradual process. As you expand, build toward your reliable core perks first. For most players, that means Juggernog as priority number one, then Speed Cola, Stamin-Up, and Mule Kick depending on your playstyle and whether you are running a staff-heavy or bullet-heavy loadout.
The classic machine perks are spread around the map, and getting access to them naturally helps you learn the layout: spawn, workshop side, excavation routes, No Man’s Land, and the church end. Even if your endgame goal is “all perks,” your midgame goal should still be “don’t get flattened by robots while broke and underpowered.”
Step 4: Dig everything you safely can
This is the part many players underestimate. You need the Golden Shovel for the all-perks method, and that means you should be digging throughout the match instead of treating the shovel like decorative landscaping equipment. Regular dig spots can reward points, power-ups, weapons, and other useful drops, but your long-term target is the shovel upgrade.
The more you dig, the faster you reach Golden Shovel territory. Do it while moving through the map naturally. Do not suicide sprint into bad positions for one dirt pile, but absolutely train yourself to scoop up safe digs whenever they are on your route.
Step 5: Upgrade to the Golden Shovel as early as possible
Once you have dug enough spots, your shovel upgrades into the Golden Shovel. This is the item that makes the extra perk-slot hunt possible. Without it, you can still survive. With it, you can start breaking the map’s normal perk limit wide open.
Community walkthroughs consistently point players toward early and frequent digging because the Golden Shovel does more than help with perk slots. It also improves the quality of what you can pull from the ground later, which makes the whole run smoother. In other words, this is not a side quest. This is the quest.
Step 6: Do not take Double Tap from Der Wunderfizz
This step deserves its own headline because it is the mistake that ruins beautiful runs. Der Wunderfizz can hand out a random perk, including perks that do not have their own machine on the map. That sounds great, and it mostly is. The problem is Double Tap.
If you get Double Tap from Wunderfizz too early, it fills one of your limited perk slots. Later, when you complete the 30,000-point challenge reward, the chest will not give you Double Tap because you already have it. That means no free bonus perk at the end, which means no true all-perks run. So yes, this is one of those moments where you have to turn down free candy because you are playing the long game.
Step 7: Use Zombie Blood to hunt the special glowing dig spots
Once you have the Golden Shovel, start watching for Zombie Blood. While Zombie Blood is active, a special glowing dig spot appears somewhere on the map. Digging it up rewards an Empty Perk Bottle, which does not give you a perk directly. Instead, it gives you an extra perk slot. That is the real magic.
This is the mechanic that lets Origins stretch past the normal four-perk cap. The good news is that if a special dig spot appears and you do not reach it before Zombie Blood ends, it does not immediately relocate. You can return for it. The bad news is that finding it can still feel like trying to remember where you left your phone while holding your phone.
Step 8: Repeat the Empty Perk Bottle process four times
You can earn up to four extra perk slots this way. Since the normal limit is four perks, those four bonus slots bring you to eight total perk slots. That is the milestone you are really chasing.
Each bottle pushes your cap higher, and once the next round starts, another special dig spot can appear later. This means the process takes time. It is not a one-round miracle. It is a patient grind, and that is why map knowledge helps so much. If you know your routes, generator lanes, excavation cut-throughs, and tank paths, hunting for these spots becomes much less painful.
A nice bonus here is that your extra perk slots stay with you even if you go down. You may lose the actual perks, but not the expanded capacity. So if the run goes sideways for a moment, you are not completely reset to square one. Origins can be cruel, but every now and then it lets you keep a receipt.
Step 9: Use Der Wunderfizz to fill the off-map perks
After you start stacking extra slots, Der Wunderfizz becomes your best friend with extremely unreliable timing. On Origins, it can award perks that are not sitting in regular machines, including Deadshot Daiquiri, Electric Cherry, and, in BO2, PhD Flopper. That means Wunderfizz is essential if you want a genuine all-perks run.
Watch for its active location and keep enough points ready to roll it when needed. Because it gives random perks, you may need patience and more than one attempt. This is another reason it helps to have your essential machine perks already secured. If Wunderfizz gives you something weird before something useful, the run is still alive as long as it does not give you Double Tap too soon.
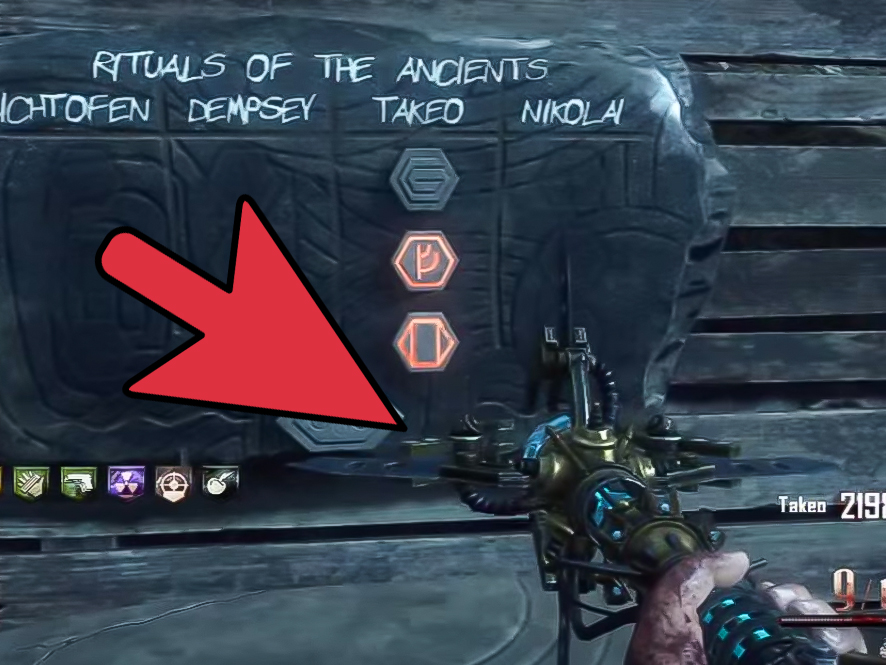
Step 10: Complete the 30,000-point challenge from Rituals of the Ancients
Origins has a challenge system called Rituals of the Ancients. One of the rewards is tied to spending 30,000 total points in the match, and that reward is exactly what makes the nine-perk route work: a free Double Tap II reward from the chest.
This is why point management matters. Spend naturally on doors, generators, perks, ammo, and setup, and you will reach 30,000 over the course of a solid match. Once the challenge is complete, head to the reward chest at Generator 1 or Generator 6 to claim it. Just make sure you do not already have Double Tap from Wunderfizz, or this grand finale turns into a polite little shrug.
Step 11: Claim Double Tap last and lock in the full set
Here is the payoff. Once you have your eight slots and the 30,000-point reward ready, claim Double Tap last. That puts you at all perks on the original BO2 version of Origins. At that point, you are no longer just surviving. You are fully caffeinated, heavily armed, weirdly aerodynamic, and basically one bad decision away from thinking you are invincible.
You are not invincible, to be clear. A Panzer can still ruin your day. But you are about as prepared as Origins allows, and that is a beautiful thing.
Best Order for Buying Perks on Origins
If you want a practical sequence, a strong all-purpose order looks like this:
Quick Revive first in solo if you want safety. Then Juggernog. Then Speed Cola or Stamin-Up depending on whether you are reloading often or moving constantly. Mule Kick is a great midgame pick once your weapons stabilize. After that, let your extra perk slots and Wunderfizz do the rest. Save Double Tap for the challenge chest reward at the end.
That order is not the only way to do it, but it is one of the cleanest. Juggernog gives you survivability, Speed Cola smooths weapon handling, Stamin-Up makes the giant map less annoying, and Mule Kick helps if you want a staff plus two firearms. Origins is huge, busy, and occasionally rude, so mobility and durability matter more than flashy theorycrafting.
Common Mistakes That Ruin an All-Perks Run
The biggest mistake is taking Double Tap from Der Wunderfizz too early. The second biggest is ignoring dig spots and getting your Golden Shovel way too late. The third is trying to chase special glowing dig spots without enough map control, which usually ends with you getting cornered near some mud while questioning your life choices.
Another common problem is overspending on the Mystery Box before your economy is ready. If you burn points chasing a miracle weapon too early, your generator progress, perk setup, and challenge timing all slow down. Origins rewards disciplined players more than lucky gamblers.
Is This Easier in Solo or Co-op?
Solo is cleaner because you control the pace, the perk choices, and the routing. Co-op is faster in some ways because generators can be activated more safely and points can accumulate rapidly across the team, but co-op also adds the classic problem of human beings. One teammate buys the wrong perk, another starts the tank at the worst possible time, and a third person disappears into a robot footstep like a magic trick nobody asked for.
If your team is coordinated, co-op can make the all-perks route feel easier. If your team is chaos in matching uniforms, solo may be more efficient.
Final Thoughts
Learning how to get all perks in Call of Duty: Origins is less about one secret exploit and more about disciplined sequencing. The map gives you the tools, but it expects you to use them correctly: dig often, earn the Golden Shovel, hunt the Empty Perk Bottles in Zombie Blood, use Der Wunderfizz intelligently, and claim Double Tap from the 30,000-point reward chest at the very end.
That is what makes the route so satisfying. It does not feel handed to you. It feels earned. And on a map as wild, muddy, and gloriously overdesigned as Origins, earning something always feels better than stumbling into it by accident.
Player Experience: What an All-Perks Run on Origins Actually Feels Like
The funny thing about trying to get all perks on Origins is that the run changes personality halfway through. Early on, it feels like regular Zombies. You are opening the map, scraping together points, getting your favorite weapon, and trying not to get slapped in the back by a zombie while ankle-deep in mud. It is familiar, manageable, and only mildly stressful in that “I should probably not die in round five” sort of way.
Then the Golden Shovel enters the picture, and suddenly the whole match becomes a treasure hunt run by an overly dramatic museum curator. You stop seeing the map as a set of lanes and start seeing it as a network of opportunities. Every Zombie Blood drop becomes exciting. Every route through No Man’s Land becomes a quick scan for that special glowing dig spot. Even the quiet moments feel important because you know one smart decision now can set up two extra perks ten minutes later.
There is also a strange satisfaction in the pacing. Origins does not let you brute-force this method instantly. You build toward it. You feel your setup getting stronger in layers. First comes safety. Then mobility. Then damage. Then the bizarre joy of watching your perk icons stack higher and higher like you are collecting little trophies for excellent undead decision-making.
One of the best parts is the psychological shift once you have seven or eight perks. You start moving differently. You take routes you would not normally risk. You reload with less panic. You stop looking at the map like it is trying to kill you and start looking at it like it is finally acknowledging your effort. That confidence can absolutely get you killed, of course, because Origins loves punishing arrogance, but for a few rounds it feels glorious.
There is also the comedy factor. No matter how serious your plan is, Origins always finds a way to humble you. Maybe the robot foot lands exactly where you were about to cut through. Maybe Zombie Blood expires when the glowing dig spot is practically waving at you from the other side of the mud. Maybe Der Wunderfizz gives you everything except what you want, like a vending machine that has decided to develop a personality disorder. Those moments are frustrating, but they are also why the run stays memorable.
For experienced players, the all-perks route adds purpose to a map they may already know well. For newer players, it teaches the structure of Origins better than almost anything else. You learn where to move, when to save points, which perks matter most, and how the map’s systems connect. It is not just a gimmick challenge. It is a crash course in how Origins wants to be played.
And when you finally claim that last perk and see the full stack completed, there is a real payoff. It feels less like “I bought some sodas” and more like “I solved the map’s mood swings and won.” That is why this challenge still gets talked about years later. It is practical, yes. But it is also fun in that classic Zombies way where success feels half strategy, half improvisation, and half surviving your own terrible instincts. Yes, that is three halves. Origins is a big map. It can handle the extra math.