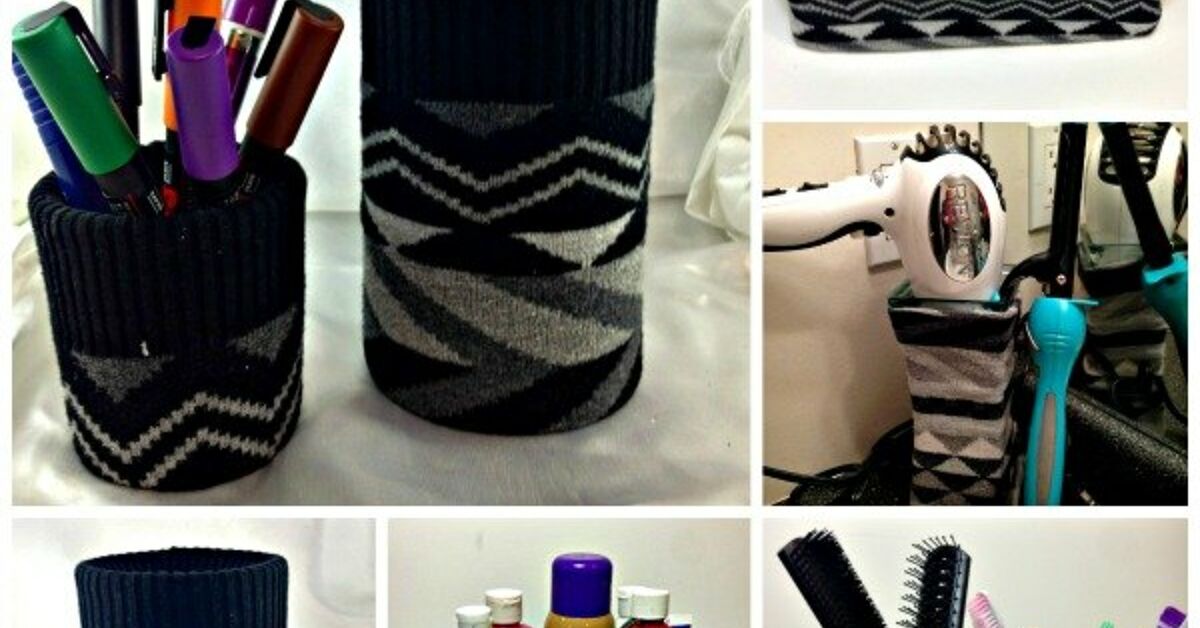
Some old sweaters retire gracefully. Others shrink, pill, snag, or develop that mysterious elbow situation no one wants to discuss at family dinner. But before you send a tired knit to the trash pile, give it one more starring role: turn it into a cozy, charming, DIY upcycled sweater holder.
What exactly is an upcycled sweater holder? Think of a plain jar, vase, candle container, planter, pencil cup, utensil crock, or storage can wrapped in soft sweater fabric and decorated with buttons, twine, ribbon, felt, beads, embroidery, or seasonal accents. It is part home decor, part recycling win, and part “Look what I made with a sweater that used to make me look like a confused marshmallow.”
This project is beginner-friendly, budget-friendly, and wonderfully flexible. You can make rustic farmhouse jars, elegant winter vases, cozy candle holders, boho plant sleeves, holiday table decorations, or desk organizers with personality. Best of all, DIY upcycled sweater holders are useful. They are not just pretty objects that sit around judging your dusting habits. They can hold flowers, greenery, paintbrushes, makeup brushes, kitchen utensils, craft supplies, LED candles, or small potted plants.
Below, you will learn how to choose the right sweater, prepare containers, attach the fabric neatly, decorate your holders, avoid common mistakes, and style them around your home. Grab your scissors. Somewhere in the back of your closet, a sweater is waiting for its redemption arc.
What Are DIY Upcycled Sweater Holders?
DIY upcycled sweater holders are decorative containers covered or embellished with fabric taken from old sweaters. The “holder” can be almost anything with a stable shape: a mason jar, recycled food jar, tin can, glass vase, terra-cotta pot, plastic planter, coffee can, oatmeal container, or even a thrifted ceramic piece that needs a glow-up.
The sweater acts like a soft sleeve. It adds texture, warmth, color, and handmade character. Cable-knit sweaters create a chunky winter look. Ribbed sweaters look clean and modern. Fair Isle patterns feel festive. Cashmere or fine wool gives a more elevated, boutique-style finish. Even acrylic sweaters work well because they are easy to cut and usually less fussy than delicate natural fibers.
The beauty of this craft is that it does not require perfect sewing skills. You can sew, glue, tie, fold, or tuck the fabric depending on your comfort level. A no-sew version works beautifully for beginners, while a stitched version gives a more tailored, long-lasting result.
Why Upcycle Old Sweaters Into Home Decor?
Upcycling turns unwanted materials into something more useful or beautiful. In this case, an old sweater becomes a decorative home accessory instead of taking up closet space or heading straight to the waste stream. It is a small project, but small projects add up, especially when they help us rethink what “old” really means.
Old sweaters are ideal for upcycling because they already come with built-in texture. You do not have to buy expensive fabric or fancy trims to make them look interesting. A cable-knit sleeve wrapped around a jar instantly feels like winter cabin decor. A cream sweater around a vase looks soft and elegant. A bright striped sweater around a pencil cup adds cheerful color to a desk. Basically, the sweater does half the decorating work for you.
DIY sweater holders also let you decorate seasonally without buying a whole new box of decor every year. Use rust, mustard, olive, and cream sweaters for fall. Choose white, gray, red, forest green, or metallic accents for winter and Christmas. Pick pastel knits for spring. For everyday decor, stick with neutrals and natural details like jute, wood buttons, dried flowers, and linen ribbon.
Supplies You Will Need
You can keep this project simple or go full craft-table tornado. Start with the basics, then add embellishments depending on the look you want.
Basic Materials
- Old sweaters, preferably clean and dry
- Glass jars, vases, tin cans, planters, or other containers
- Sharp fabric scissors
- Measuring tape or ruler
- Hot glue gun, fabric glue, or needle and thread
- Clothespins or clips to hold fabric while glue dries
- Cardboard or felt for lining, if needed
Decorative Add-Ons
- Wood buttons, vintage buttons, or pearl buttons
- Jute twine, cotton cord, lace, velvet ribbon, or grosgrain ribbon
- Felt leaves, felt flowers, or small fabric appliques
- Embroidery floss or yarn for simple stitched details
- Mini pinecones, faux berries, dried orange slices, or small ornaments
- Wood tags, chalkboard labels, or stamped paper labels
- Beads, charms, tassels, or pom-poms
Choose the Best Sweater for the Project
Not every sweater behaves the same way once you cut it. Some knits stay neat. Others unravel like they just received dramatic news. Choosing the right sweater makes the entire project easier.
Best Sweater Types
Cable-knit sweaters are perfect for cozy winter holders because the raised pattern adds instant dimension. Ribbed sweaters stretch nicely around jars and planters. Felted wool sweaters are excellent because the fibers are more compact and less likely to fray. Acrylic sweaters are easy to find, affordable, and beginner-friendly. Patterned sweaters work well when you want the design itself to be the decoration.
Sweaters to Use Carefully
Loose open-weave sweaters can snag and stretch out of shape. Very thin knits may show glue marks or container edges underneath. Highly sentimental sweaters should be used only if you are comfortable cutting them. If the sweater belonged to someone special, consider making one small holder first, such as a memory vase or keepsake pencil cup, rather than slicing the entire garment immediately. Scissors are powerful. So are regrets.
Prepare the Sweater Before Decorating
Wash or freshen the sweater before cutting. If it is wool, cashmere, or another delicate fiber, handle it gently and dry it flat so it does not stretch. For crafting, the sweater does not need to look wearable, but it should be clean, odor-free, and fully dry.
Lay the sweater flat and study it before cutting. The sleeves are usually the easiest pieces to use because they already have a tube shape. The cuffs can become neat finished edges at the top or bottom of a holder. The body of the sweater works well for larger containers, wide planters, storage baskets, or multiple smaller projects.
Before you cut, decide which part of the knit pattern you want visible. If the sweater has a cable design down the center, line that feature up with the front of your holder. If it has stripes, decide whether you want horizontal stripes, vertical strips, or a patchwork look.
Pick the Right Container
The best containers are sturdy, clean, and simple in shape. Straight-sided jars are easiest for beginners. Slightly tapered containers also work, but you may need to stretch, fold, or trim the sweater fabric so it fits smoothly.
Great Holder Ideas
- Mason jars: Use them for flowers, craft tools, desk supplies, or LED tea lights.
- Recycled food jars: Pickle jars, pasta sauce jars, and jam jars make excellent budget-friendly bases.
- Tin cans: Cover sharp edges first, then turn them into pencil cups or utensil holders.
- Glass vases: Give plain florist vases a cozy seasonal makeover.
- Planters: Use sweater sleeves as removable covers for indoor plant pots.
- Old candle jars: Clean them thoroughly and reuse them as decorative storage or flameless candle holders.
If you are making a candle holder, use flameless LED candles for the safest result. Knit fabric and open flames are not a friendship we need to encourage. If you use a real candle, keep fabric away from the rim, never leave it unattended, and use only a heat-safe container.
How to Make a Basic Upcycled Sweater Holder
This simple method works for jars, vases, pencil cups, and small planters.
Step 1: Measure the Container
Measure the height and circumference of your container. Add about one inch to the height so you can fold the sweater fabric over the top or bottom. If your sweater is stretchy, you can cut it slightly smaller around the circumference for a snug fit.
Step 2: Cut the Sweater
For small jars, cut a section from the sleeve. Slide the container into the sleeve to test the fit before trimming. For larger holders, cut a rectangle from the body of the sweater. Make sure the pattern is centered if you want a polished look.
Step 3: Wrap or Slide the Fabric
If you are using a sleeve, slide it over the container like a cozy little sweater vest. If you are using a flat piece, wrap it around the container and overlap the back seam slightly. Pull the fabric snug, but do not stretch it so much that the pattern warps.
Step 4: Secure the Back Seam
Use hot glue, fabric glue, or a simple hand stitch to secure the back seam. If using glue, apply it in small sections and press gently. Too much glue can seep through thinner knits and create stiff spots. Nobody wants a crunchy sweater vase.
Step 5: Finish the Top and Bottom
Fold extra fabric inside the top rim and secure it with glue or stitches. At the bottom, trim excess fabric so the container sits flat. For a jar or vase, you can fold the fabric underneath only if it does not make the base wobbly. For planters, keep the bottom open so water drainage is not blocked.
Step 6: Add Decorations
Now comes the fun part. Add buttons, ribbon, twine, labels, charms, embroidery, or seasonal accents. Keep the decorations balanced so the holder looks intentional rather than attacked by a craft drawer.
Decorating Ideas for DIY Upcycled Sweater Holders
The sweater gives you the cozy foundation. The decorations create the personality. Here are some stylish, practical ideas to inspire your design.
1. Rustic Farmhouse Sweater Holders
Use cream, oatmeal, gray, or taupe sweaters with chunky texture. Wrap jute twine around the center and tie it in a simple bow. Add a wood button, small kraft paper tag, or dried lavender sprig. These holders look beautiful on open shelves, console tables, kitchen counters, or entryway benches.
2. Elegant Winter White Holders
Choose a white or ivory sweater and pair it with pearl buttons, satin ribbon, or silver cord. Use clear glass vases or jars underneath for a clean finish. Fill them with faux eucalyptus, white berry stems, dried baby’s breath, or bare branches. The result feels calm, snowy, and sophisticated without requiring you to own a chalet.
3. Cozy Candle Holders
Cut sweater sleeves to fit around small jars, then add a narrow ribbon or button detail. Place LED tea lights inside the jars for a warm glow. Group three holders of different heights on a tray with pinecones or greenery. This is one of the easiest ways to create a cozy fall or winter centerpiece.
4. Sweater Plant Pot Covers
Slide sweater fabric over a plain nursery pot or decorative planter. For indoor plants, make the sweater sleeve removable so you can water the plant without soaking the fabric. This idea works especially well for pothos, snake plants, mini evergreens, herbs, and seasonal mums.
5. Desk and Craft Supply Holders
Cover clean tin cans or jars with sweater pieces and use them to organize pens, markers, scissors, paintbrushes, crochet hooks, knitting needles, or makeup brushes. Add a small label if you love organization, or skip the label if you prefer the “creative but mysterious” desk aesthetic.
6. Holiday Gift Holders
Turn small sweater-covered jars into gift containers. Fill them with candy, tea bags, homemade bath salts, mini ornaments, or stationery. Tie on a tag and add a tiny sprig of faux greenery. The holder becomes part of the gift, which is both thoughtful and practical.
7. Patchwork Sweater Holders
If you have several sweater scraps, create a patchwork design by gluing or stitching strips around a container. Mix cable knit, ribbing, cuffs, and patterned sections. Keep the color palette limited to three or four colors so the finished piece looks charming instead of chaotic.
How to Make Your Sweater Holders Look Expensive
Handmade does not have to mean messy. A few small details can make DIY upcycled sweater holders look boutique-worthy.
Use a Limited Color Palette
Choose two or three colors and repeat them across a group of holders. For example, cream sweater fabric, tan twine, and wood buttons create a cohesive natural look. Gray knit, black ribbon, and silver charms feel modern. Burgundy, forest green, and gold accents feel festive.
Hide the Seam
Place the seam at the back. If the seam is bulky, cover it with a vertical strip of ribbon, lace, felt, or faux leather. This trick makes the holder look more finished and hides any “I glued this while drinking coffee” evidence.
Vary the Heights
A group of three holders usually looks better when each one is a different height. Try one short jar, one medium vase, and one tall cylinder. This creates visual movement and makes the arrangement feel styled rather than randomly parked on a table.
Add One Statement Detail
Choose one focal point: a large button, a stitched monogram, a velvet bow, a wood tag, or a small charm. Avoid adding every decoration you own. Restraint is the secret ingredient that separates “chic handmade decor” from “craft store sneeze.”
Seasonal Styling Ideas
DIY upcycled sweater holders can shift easily from season to season. You only need to change the accents and filler.
Fall
Use warm sweater colors like rust, mustard, camel, cream, olive, and burgundy. Fill holders with dried wheat, faux mums, mini branches, or LED candles. Add twine, wood beads, cinnamon sticks, or small faux leaves.
Winter and Christmas
Choose white, gray, red, green, navy, or Fair Isle sweater patterns. Decorate with velvet ribbon, bells, faux snow-dusted greenery, pinecones, mini ornaments, or metallic cord. These holders make beautiful mantel accents and holiday table centerpieces.
Spring
Use pastel sweaters or lightweight knits. Add lace ribbon, small fabric flowers, soft green stems, or fresh tulips in a glass jar inside the sleeve. Keep the look airy and gentle.
Everyday Decor
For year-round use, stick with neutral sweater fabric and simple trims. Cream ribbed knit around a pencil cup, gray cable knit around a planter, or black sweater fabric around a vase can blend into modern, farmhouse, cottage, or Scandinavian-style rooms.
Common Mistakes to Avoid
Even easy crafts can go sideways. Here are the mistakes most likely to make your sweater holder look less polished.
Cutting Before Measuring
Always test the fit before making the final cut. Sweater fabric stretches, curls, and behaves differently depending on the knit. Measure twice, cut once, and keep snacks away from the scissors.
Using Too Much Glue
A little glue goes a long way. Thick lines of hot glue can create bumps under the fabric. Use small dots or thin lines, especially near visible edges.
Blocking Drainage
If you are covering a plant pot, do not block the drainage hole. Water and sweater fabric are not best friends. Use the sweater cover as a removable sleeve or place a waterproof saucer inside.
Ignoring Fire Safety
Do not let knit fabric touch an open flame. Flameless candles are the safest choice for sweater-covered candle holders. They give you the cozy glow without the exciting possibility of turning your centerpiece into a campfire.
Skipping the Finish
Raw edges can curl or fray. Fold edges inward, use cuffs as finished borders, add trim, or secure edges with a simple stitch. These tiny finishing touches make the project look intentional.
Creative Ways to Use Leftover Sweater Scraps
After making your holders, you may have leftover sweater pieces. Do not toss them yet. Small scraps can become gift tags, mini bows, jar labels, ornaments, coasters, bookmarks, doll scarves, pet bandana accents, or stuffing for soft crafts. Cuffs can become mug cozies. Buttons can be reused as decorative accents. Even tiny pieces can add texture to handmade cards or seasonal garlands.
If your sweater has a pretty hem, save it. Hem sections are useful because they already look finished. Wrap them around small jars, napkin rings, wreath forms, or gift boxes. The more you use, the less you waste, and the more you feel like a crafting genius with excellent resource management skills.
Experience Notes: What Decorating DIY Upcycled Sweater Holders Teaches You
After making a few DIY upcycled sweater holders, one thing becomes clear: the best projects rarely begin with perfect supplies. They begin with what you already have. A stretched-out cardigan, a chipped jar, a lonely button, and a bit of ribbon can come together in a way that feels surprisingly stylish. That is the quiet magic of upcycling. It asks you to look twice before throwing something away.
One useful experience is learning that texture matters more than perfection. A sweater holder does not need ruler-straight seams to look beautiful. In fact, the soft, slightly imperfect quality is part of the charm. A cable-knit jar with a handmade twine bow can look warmer and more inviting than a store-bought container that came wrapped in plastic and cost three times as much. The goal is not factory precision. The goal is character.
Another lesson is that simple designs often work best. When you first start decorating, it is tempting to add buttons, ribbon, lace, beads, charms, pinecones, tiny bells, and possibly a small decorative bird wearing a hat. Resist the urge. Choose one main detail and let the sweater texture shine. A single oversized wood button on a cream knit sleeve can look more elegant than five competing embellishments.
You also learn quickly that containers have personalities. A tall vase wants a long, smooth sweater sleeve. A short mason jar looks adorable with a cuff folded over the rim. A tin can becomes a sturdy pencil holder when wrapped in ribbed knit. A planter looks best when the sweater cover can be removed for watering. Once you understand the shape, decorating becomes much easier.
There is also a practical satisfaction in making decor that solves small household problems. Need a prettier way to store paintbrushes? Sweater holder. Need a last-minute centerpiece? Three sweater-wrapped jars with LED candles. Need a thoughtful handmade gift? Fill a cozy jar with tea, candy, or winter greenery. These projects are not just cute; they are useful, and usefulness gives handmade decor staying power.
The biggest surprise is how personal these holders can become. A sweater from a thrift store is simply material. But a sweater from your own closet, or from someone you love, can become a memory piece. A sleeve from a favorite old cardigan can wrap a vase on your desk. A button from a worn-out coat can become the focal point on a jar. These details make the project feel less like decoration and more like storytelling.
Finally, decorating DIY upcycled sweater holders teaches patience without making you suffer for it. The project is quick enough for a weekend afternoon, but it still rewards careful choices. Measure before cutting. Test before gluing. Let the fabric guide the design. If something looks awkward, turn it around, add a ribbon, hide the seam, or call it rustic and move forward with confidence. Crafting has always had a generous loophole: sometimes the “mistake” becomes the best part.
Conclusion
DIY upcycled sweater holders are a simple, affordable, and creative way to decorate your home while giving old clothing a second life. With a clean sweater, a sturdy container, sharp scissors, and a few embellishments, you can make cozy vases, planters, candle holders, desk organizers, gift jars, and seasonal centerpieces that look warm, personal, and stylish.
The key is to choose the right sweater texture, fit the fabric neatly, keep decorations balanced, and use each holder in a practical way. Whether your style is farmhouse, cottage, modern, rustic, holiday, or “I found this in my closet and made it fabulous,” this project gives you room to experiment. It is low-cost, beginner-friendly, and forgiving enough that even imperfect results can look charming.
So the next time a sweater is too worn to wear but too interesting to toss, do not say goodbye. Say, “Congratulations, you are a vase now.”