Changing your DNS server settings on Windows 11 sounds like the kind of task that requires a hoodie, three monitors, and a suspicious amount of coffee. Good news: it does not. In most cases, it takes only a few minutes, and you do not need to be a network engineer to do it safely.
DNS, short for Domain Name System, is the internet’s address book. When you type a website name such as example.com into your browser, DNS helps your computer find the correct numerical IP address behind that name. Without DNS, browsing the web would feel like trying to call friends by memorizing everyone’s phone number. Technically possible? Sure. Fun? Absolutely not.
Windows 11 usually receives DNS server information automatically from your router or internet service provider. That default setup works for many people. However, changing DNS servers can sometimes improve browsing reliability, support stronger privacy features, help block malicious domains, or fix connection issues caused by a slow or unreliable DNS resolver.
This guide explains how to change DNS settings on Windows 11 using the Settings app, Control Panel, Windows Terminal, and router-level configuration. You will also learn which DNS servers to consider, how to enable DNS over HTTPS when available, and how to troubleshoot problems if the internet decides to act like a dramatic houseplant.
What Is a DNS Server?
A DNS server translates domain names into IP addresses. For example, when you enter a website address, your computer asks a DNS resolver where that site lives. The resolver replies with the IP address, and your browser connects to the right server.
Most people use DNS servers assigned automatically by their internet service provider. This is convenient, but it is not always the best option. Some ISP DNS servers are fast and reliable. Others are slower, less private, or more prone to outages. A public DNS provider, such as Cloudflare, Google Public DNS, Quad9, or OpenDNS, may offer better speed, stronger security features, malware blocking, or encrypted DNS support.
Why Change DNS Server Settings on Windows 11?
There are several practical reasons to change DNS server settings on Windows 11. The first is performance. A faster resolver can reduce the delay between entering a web address and loading the site. DNS speed will not magically turn a slow internet plan into fiber-optic lightning, but it can make browsing feel more responsive.
The second reason is reliability. If your ISP’s DNS server is having issues, websites may fail to load even though your internet connection is technically working. Switching to a stable public DNS service can solve that problem quickly.
The third reason is security. Some DNS providers block known malware, phishing, and suspicious domains before your computer connects to them. This is not a replacement for antivirus software or smart browsing habits, but it adds another useful layer of protection.
The fourth reason is privacy. Traditional DNS queries are often unencrypted. DNS over HTTPS, also called DoH, helps protect DNS traffic by sending queries through an encrypted HTTPS connection. Windows 11 supports encrypted DNS with compatible providers, which can reduce passive monitoring and tampering on untrusted networks.
Before You Change DNS Settings
Before editing anything, write down your current DNS settings if they are already customized. If your DNS assignment is set to automatic, you can simply switch back to automatic later. If you are on a work, school, or managed device, check with your IT department first. Corporate networks may rely on internal DNS servers for printers, file shares, VPN access, or private company apps.
You should also decide whether you want to change DNS for one Windows 11 device or every device on your network. Changing DNS in Windows affects only that PC. Changing DNS on your router can affect phones, tablets, smart TVs, consoles, and other connected devices. Router-level DNS is convenient, but Windows-level DNS is safer for testing because it is easy to undo.
Popular DNS Server Addresses
Here are several commonly used public DNS options. Use two addresses when possible: one preferred DNS server and one alternate DNS server. The alternate server acts as a backup if the first one cannot respond.
| Provider | IPv4 Preferred | IPv4 Alternate | Best For |
|---|---|---|---|
| Cloudflare | 1.1.1.1 | 1.0.0.1 | Speed, privacy, general browsing |
| Google Public DNS | 8.8.8.8 | 8.8.4.4 | Reliability and global availability |
| Quad9 | 9.9.9.9 | 149.112.112.112 | Security-focused malware blocking |
| OpenDNS | 208.67.222.222 | 208.67.220.220 | General use and optional filtering |
| OpenDNS FamilyShield | 208.67.222.123 | 208.67.220.123 | Family-friendly filtering |
If your network uses IPv6, you may also configure IPv6 DNS servers. Cloudflare uses 2606:4700:4700::1111 and 2606:4700:4700::1001. Google Public DNS uses 2001:4860:4860::8888 and 2001:4860:4860::8844. Quad9 uses 2620:fe::fe and 2620:fe::9. You do not always need to configure IPv6, but if your connection uses it heavily, adding IPv6 DNS can prevent Windows from falling back to your default provider for IPv6 lookups.
Method 1: Change DNS Settings in the Windows 11 Settings App
The Settings app is the easiest method for most users. It is clean, modern, and less likely to make you feel like you accidentally entered a museum exhibit about Windows XP.
For Wi-Fi Connections
- Click the Start button.
- Open Settings.
- Select Network & internet.
- Click Wi-Fi.
- Select your connected Wi-Fi network or open its network properties.
- Find DNS server assignment.
- Click Edit.
- Change the setting from Automatic (DHCP) to Manual.
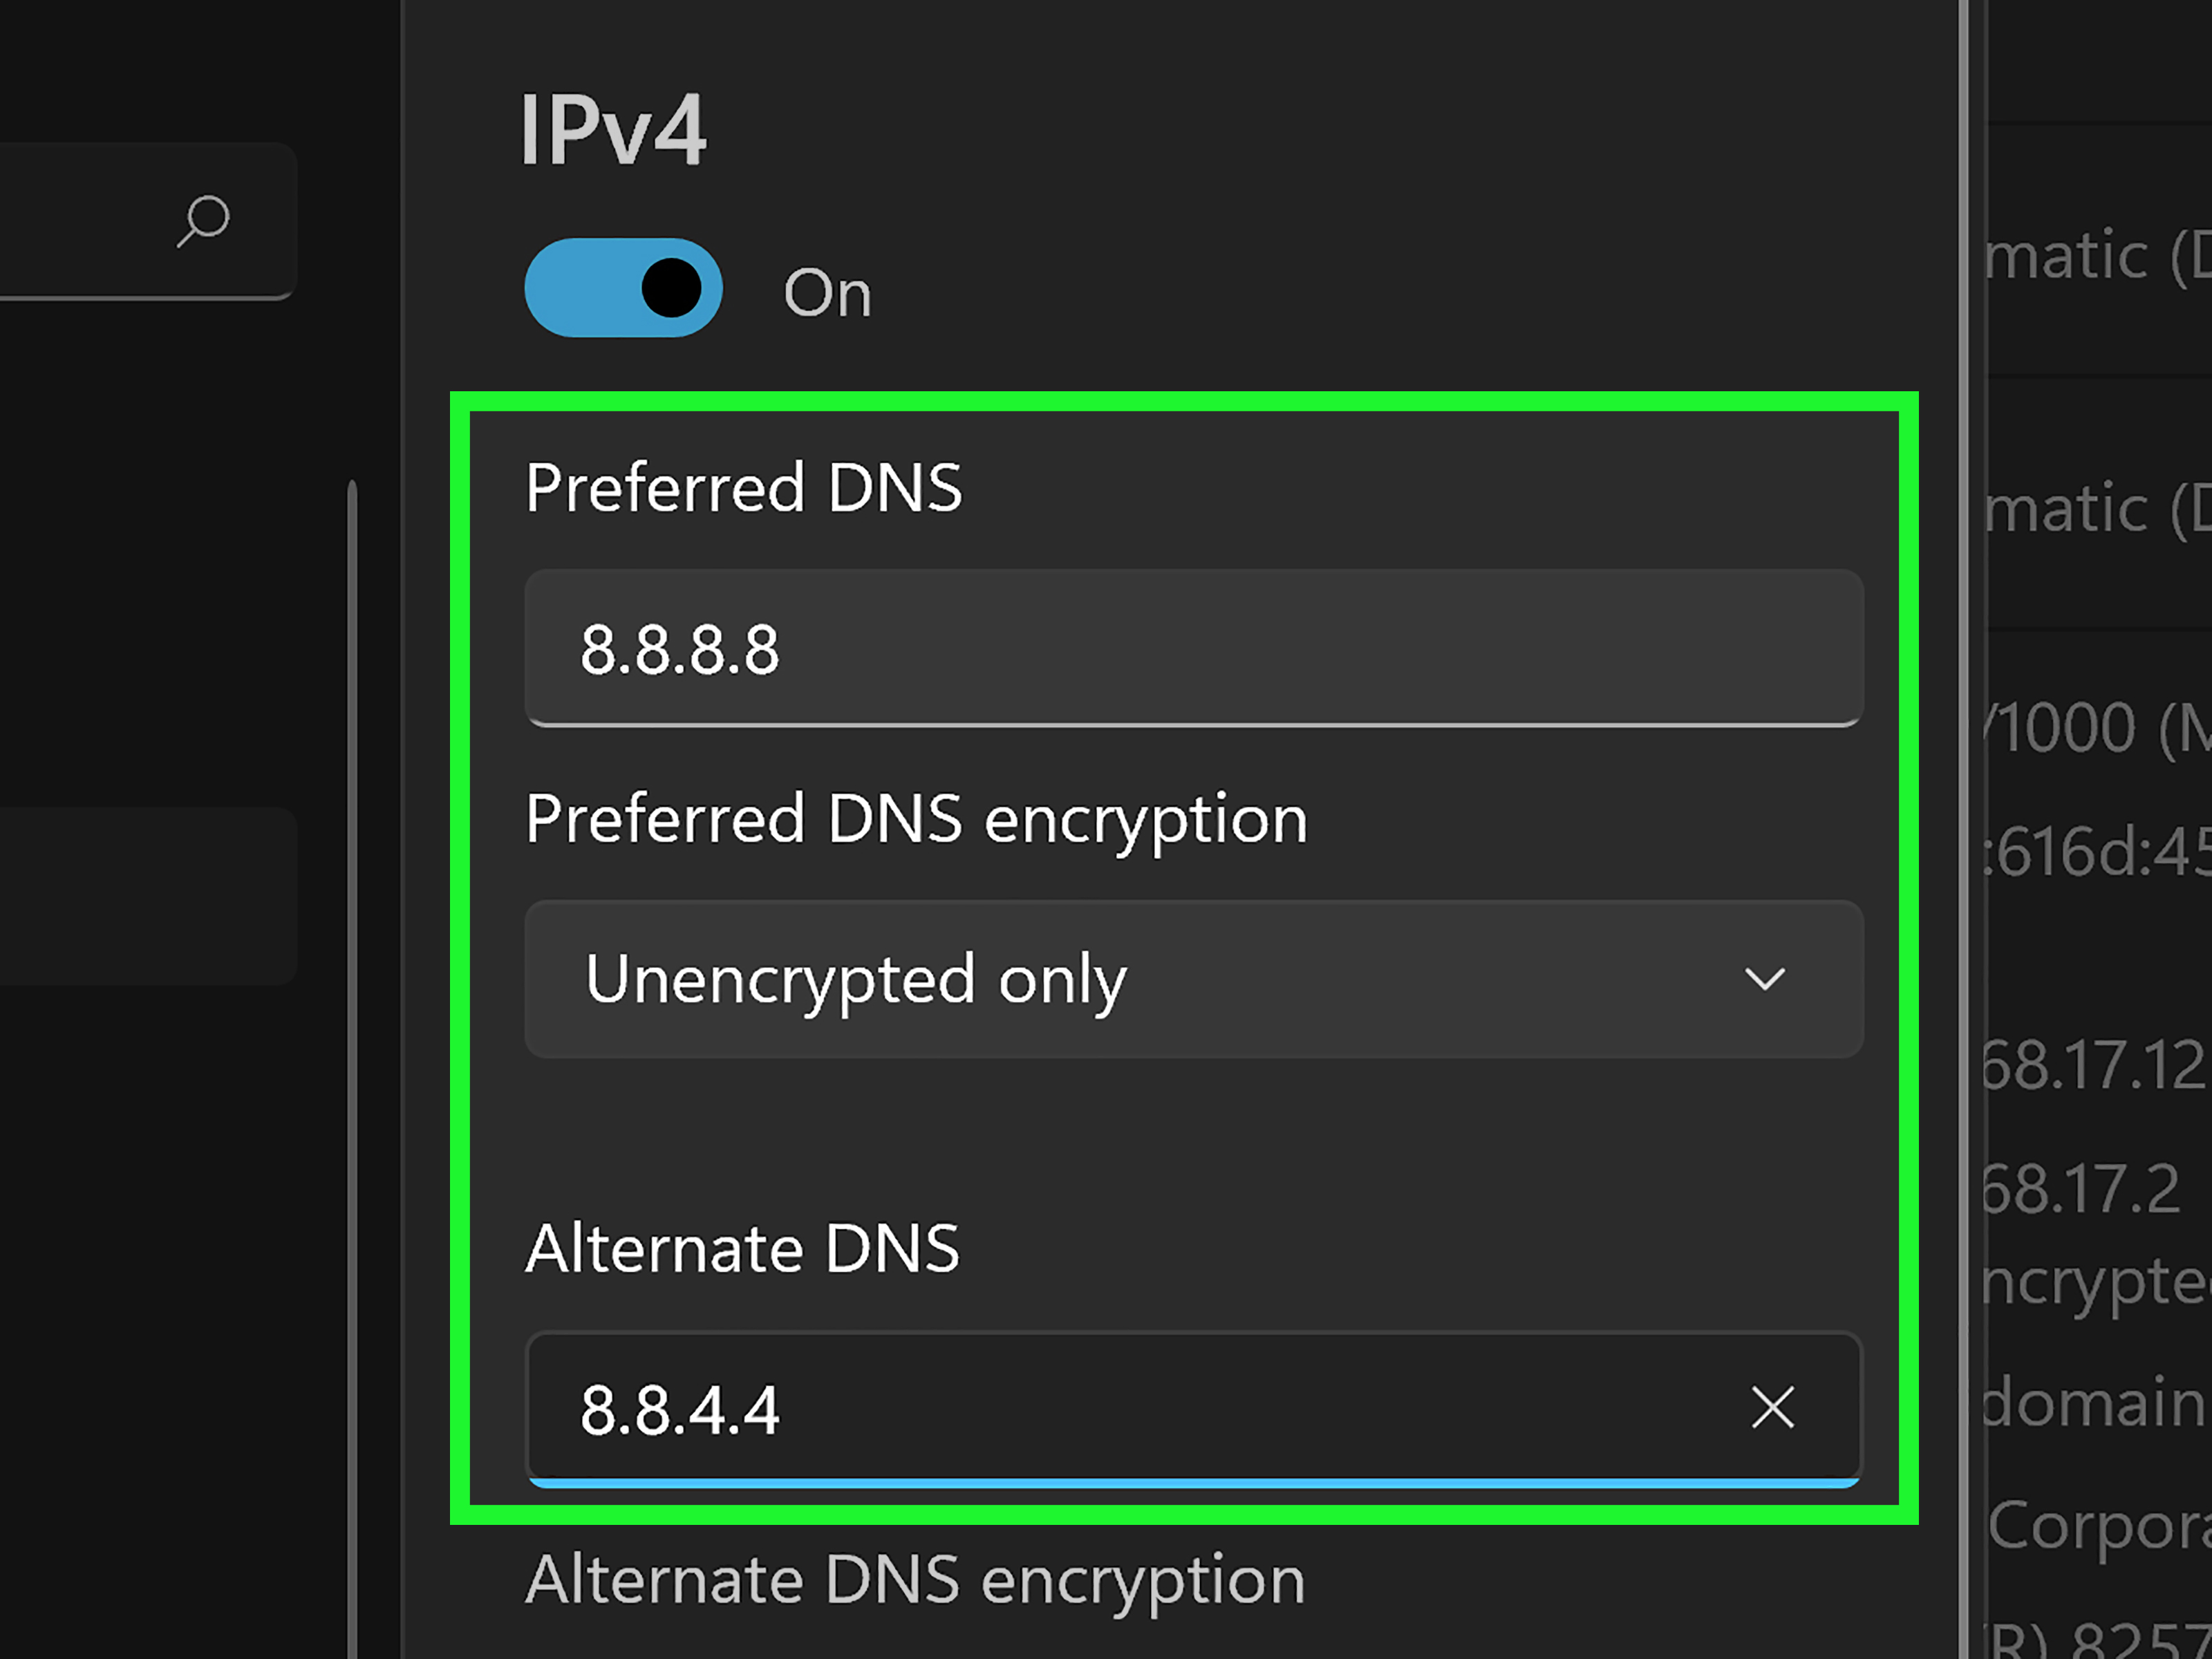
- Turn on IPv4.
- Enter your preferred DNS address, such as 1.1.1.1.
- Enter your alternate DNS address, such as 1.0.0.1.
- If available, set DNS over HTTPS to On or Automatic for compatible providers.
- Click Save.
For Ethernet Connections
- Open Settings.
- Go to Network & internet.
- Select Ethernet.
- Look for DNS server assignment.
- Click Edit.
- Choose Manual.
- Enable IPv4.
- Enter your preferred and alternate DNS servers.
- Enable encrypted DNS if Windows shows DNS over HTTPS options for your chosen provider.
- Select Save.
After saving, open your browser and visit a few websites. If everything loads normally, congratulations: you have successfully changed your DNS server settings on Windows 11 without summoning the IT department.
Method 2: Change DNS Settings Using Control Panel
Control Panel still exists in Windows 11, quietly waiting like a wise old wizard in the basement. It is useful because it gives you direct access to classic adapter properties.
- Press Windows + R to open the Run dialog.
- Type ncpa.cpl and press Enter.
- Right-click your active connection, such as Wi-Fi or Ethernet.
- Select Properties.
- Choose Internet Protocol Version 4 (TCP/IPv4).
- Click Properties.
- Select Use the following DNS server addresses.
- Enter your preferred and alternate DNS server addresses.
- Click OK, then close the remaining windows.
To configure IPv6 DNS, repeat the process with Internet Protocol Version 6 (TCP/IPv6). Enter the provider’s IPv6 DNS addresses, then save your changes.
One important note: Control Panel is excellent for basic DNS changes, but the modern Settings app is usually better if you want to manage DNS over HTTPS options. If encrypted DNS is your main goal, start with Settings.
Method 3: Change DNS Settings with Windows Terminal or PowerShell
If you prefer commands, Windows Terminal gives you a fast way to configure DNS. This method is especially helpful if you manage multiple PCs, document your setup, or simply enjoy feeling like the computer is finally listening.
First, open Windows Terminal or PowerShell as administrator. Then run:
This command shows your network interfaces and current DNS settings. Look for the interface alias, such as Wi-Fi or Ethernet.
To set Cloudflare DNS for a Wi-Fi adapter, use:
To set Google Public DNS for an Ethernet adapter, use:
To return an adapter to automatic DNS settings, use:
If your adapter name is different, replace Wi-Fi with the exact interface alias shown by the first command.
Method 4: Change DNS Settings on Your Router
Changing DNS on your router applies the setting to many devices at once. This can be ideal for families, small offices, or anyone who does not want to configure every laptop, phone, and streaming box individually.
The exact steps vary by router brand, but the general process looks like this:
- Open a browser and sign in to your router’s admin page.
- Look for settings named Internet, WAN, LAN, DHCP, or DNS.
- Enter your preferred and alternate DNS addresses.
- Save the settings.
- Restart the router if required.
Router-level DNS is powerful, but use it carefully. If you accidentally enter an invalid DNS address, every device on the network may have trouble loading websites. Keep a copy of the original settings so you can restore them quickly.
How to Enable DNS over HTTPS on Windows 11
DNS over HTTPS encrypts DNS queries by sending them through HTTPS. This helps protect DNS traffic from passive monitoring and tampering, especially on public Wi-Fi networks. Windows 11 supports DoH for compatible DNS providers.
To use DNS over HTTPS in Windows 11, open the DNS settings for your Wi-Fi or Ethernet connection in the Settings app. After selecting manual DNS and entering a compatible DNS provider, look for the DNS over HTTPS dropdown or toggle. Set it to On or Automatic when available.
Not every DNS address supports DoH in Windows 11, and not every network allows encrypted DNS traffic. If you do not see the option, your chosen resolver may not be recognized by Windows, or your version of Windows may display the setting differently. Use a well-known DoH-compatible provider if encrypted DNS is important to you.
How to Check If Your New DNS Settings Work
After changing DNS settings, test your connection. First, open a browser and load several websites. Try a search engine, a news site, and a site you have not visited recently. If pages load normally, your configuration is probably working.
You can also use Command Prompt:
The result should show which DNS server answered the request. If it shows your new DNS server, the change is active.
If websites still behave strangely, clear the DNS cache:
This command clears stored DNS lookup results so Windows can request fresh information from the newly configured DNS server.
How to Fix DNS Problems After Changing Settings
If your internet stops working after changing DNS settings, do not panic. DNS problems are usually easy to reverse.
Check for Typing Mistakes
DNS addresses must be entered exactly. For example, 1.1.1.1 is valid, but 1.1.1 is not. A tiny typo can make your browser look like it forgot how the internet works.
Use Two DNS Servers
Always enter a preferred and alternate DNS server when possible. If the first server is unreachable, Windows can use the second one.
Flush the DNS Cache
Run ipconfig /flushdns from Command Prompt. This forces Windows to discard old cached results and request new ones.
Restart the Network Adapter
Turn Wi-Fi off and on again, unplug and reconnect Ethernet, or restart the PC. It is not glamorous, but neither is tripping over a power cable, and both can change your day.
Return to Automatic DNS
If nothing works, go back to DNS server assignment and select Automatic (DHCP). Windows will again receive DNS settings from your router or access point.
Which DNS Server Should You Choose?
The best DNS server depends on your priorities. If you want a simple, fast option, Cloudflare is a popular choice. If you want a long-established resolver with global infrastructure, Google Public DNS is widely used. If you want security-focused blocking of malicious domains, Quad9 is worth considering. If you want family-friendly filtering, OpenDNS FamilyShield may be a good fit.
There is no single DNS provider that is perfect for everyone. Performance can vary by location, ISP, network congestion, and routing. The most practical approach is to test one provider for a few days. If browsing feels snappy and reliable, keep it. If streaming apps, work tools, or certain websites behave oddly, try another provider or return to automatic DNS.
Should You Change DNS on Windows 11 or on Your Router?
Change DNS on Windows 11 if you only want to affect one computer. This is best for testing, travel laptops, gaming PCs, or personal devices on a shared network.
Change DNS on your router if you want every device on your home network to use the same resolver. This is useful for parental filtering, household-wide malware protection, or consistent DNS performance. However, router menus vary widely, and some ISP-provided routers limit DNS customization.
If you are not sure, start with Windows 11. Once you are happy with the DNS provider, you can decide whether to apply it network-wide.
Common Mistakes to Avoid
One common mistake is mixing DNS providers. For example, using Cloudflare as the preferred DNS and Google as the alternate DNS may work, but it can make troubleshooting harder. If one provider has filtering and the other does not, results may feel inconsistent. For most users, it is better to use both addresses from the same provider.
Another mistake is changing IPv4 DNS while forgetting IPv6. If your network uses IPv6 and you only set IPv4 DNS, some lookups may still use the automatically assigned IPv6 resolver. If you want consistent behavior, configure both IPv4 and IPv6 DNS.
A third mistake is assuming DNS fixes every internet problem. DNS can help with lookup speed, privacy, and reliability, but it will not fix a weak Wi-Fi signal, an overloaded router, a poor broadband plan, or a website that is down for everyone.
Real-World Experience: What Changing DNS on Windows 11 Actually Feels Like
In real use, changing DNS server settings on Windows 11 is one of those small tweaks that can feel surprisingly satisfying. It is not flashy. Your desktop will not sparkle. A tiny wizard will not appear and award you a certificate in Advanced Internet Sorcery. But when DNS is the source of the problem, the improvement can be immediate.
For example, imagine opening your laptop at a coffee shop. The Wi-Fi connects, the signal looks strong, and yet websites load slowly or fail with vague browser errors. You try refreshing. You try a different browser. You stare at the screen with the ancient expression of every person betrayed by technology. In cases like this, switching to a reliable public DNS provider can sometimes make pages resolve properly again. Public Wi-Fi networks often have messy DNS setups, and manually choosing a known resolver may help avoid local hiccups.
At home, the experience is usually more subtle. If your ISP’s DNS servers are already fast, you may not notice a dramatic speed boost. But you might notice fewer random “site cannot be reached” errors. You may also appreciate the extra control. Choosing Quad9 for security-focused blocking or OpenDNS FamilyShield for basic family filtering gives DNS a practical purpose beyond simple name lookup.
For remote workers, DNS settings can be a little more complicated. Some VPNs override your system DNS while connected. That means you may set Cloudflare or Google DNS in Windows 11, connect to a company VPN, and then see your DNS traffic routed through the company’s internal servers instead. This is normal. Businesses often need internal DNS so private tools, dashboards, and file shares can resolve correctly. If your work apps break after changing DNS, restore automatic settings or ask IT before experimenting further.
Gamers sometimes change DNS hoping for lower ping. This is where expectations matter. DNS can help your system find game servers or login services more reliably, but it does not usually reduce in-game latency after the connection is established. If your ping is high because your Wi-Fi is weak or the server is far away, DNS is not the magic trampoline that bounces your packets faster across the planet. Still, if game launchers are slow to open, store pages fail to load, or matchmaking services behave inconsistently, a better DNS resolver may help.
The best experience comes from testing calmly. Pick one provider, use both its preferred and alternate addresses, flush the DNS cache, and browse normally for a day or two. Do not change five settings at once, because then you will not know which change helped. If everything works, keep it. If something breaks, return to automatic DNS. Windows 11 makes that reversal simple, which is exactly what you want from a network setting: enough power to fix problems, but not so much drama that your laptop becomes a weekend project.
Conclusion
Changing DNS server settings on Windows 11 is a simple way to take more control over how your PC connects to the web. Whether you use the Settings app, Control Panel, PowerShell, or your router, the basic idea is the same: replace automatically assigned DNS servers with trusted resolver addresses that better match your needs.
If you want speed and privacy, Cloudflare is a strong everyday choice. If you want broad reliability, Google Public DNS is easy to remember and widely supported. If you want extra protection from malicious domains, Quad9 is designed with security in mind. If you want simple family filtering, OpenDNS FamilyShield is worth a look.
Start with one Windows 11 device, save your old settings, and test carefully. If the new DNS provider improves your browsing, you can keep it or apply similar settings to your router. If not, switching back to automatic DNS takes only a few clicks. That is the beauty of this tweak: it is useful, reversible, and far less intimidating than it sounds.