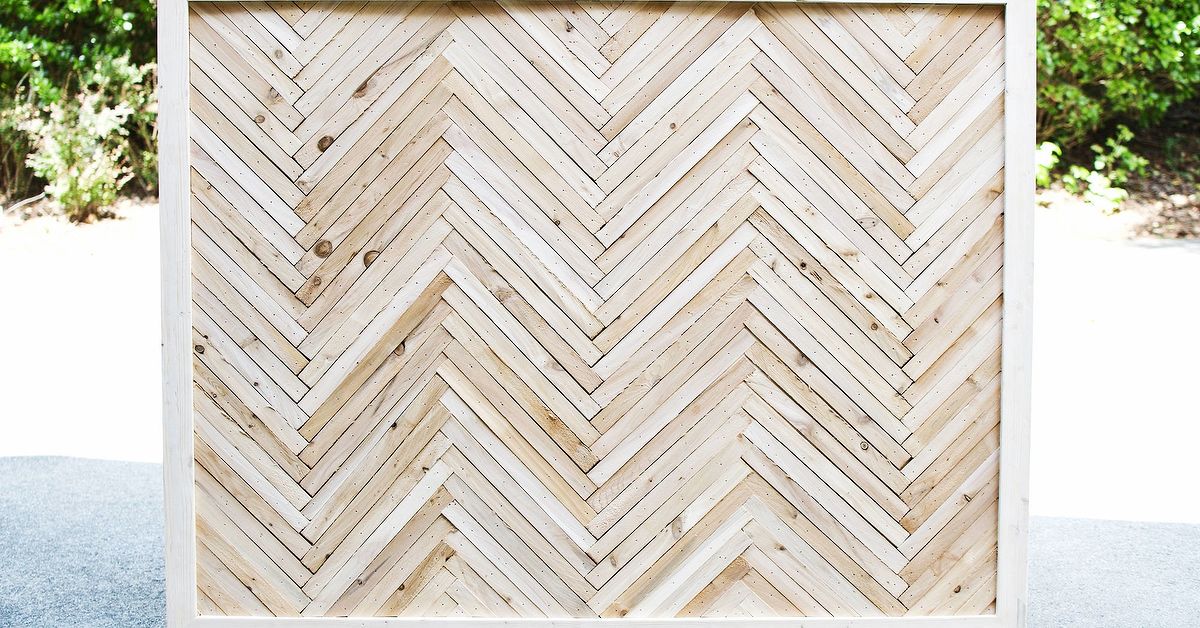
A DIY herringbone headboard with wood shims is one of those projects that looks wildly expensive but quietly shops in the bargain aisle. From across the room, it says “custom boutique hotel.” Up close, it whispers, “I used tiny wedges of wood and only cried once.” That is the magic of wood shims: they are cheap, easy to find, lightweight, naturally textured, and surprisingly dramatic when arranged in a clean herringbone pattern.
This project is perfect if your bedroom needs a focal point but your budget has politely left the chat. Instead of buying a high-end rustic headboard, you can build one using plywood, trim boards, wood glue, brad nails, stain, and bundles of tapered shims. The result is a warm, dimensional, handmade piece that works with farmhouse, modern rustic, coastal, boho, industrial, or “I just want my bed to stop looking like it lives in a college dorm” style.
Below, you will learn how to plan, cut, assemble, finish, and mount a wood shim herringbone headboard. The process is beginner-friendly, but it rewards patience. The herringbone pattern is basically a puzzle, except the puzzle pieces smell like lumber and occasionally give you splinters if you get too confident.
Why Use Wood Shims for a Herringbone Headboard?
Wood shims are thin, tapered pieces of wood typically used to level doors, windows, cabinets, and other construction elements. For DIY decor, that taper becomes a design feature. When the shims are placed side by side, they create subtle depth and shadow. That texture is exactly what makes a wood shim headboard more interesting than a flat board headboard.
A herringbone pattern adds movement without making the room feel chaotic. The repeated V-shaped layout draws the eye upward and outward, helping the bed look wider and more intentional. If your bedroom has plain walls, basic bedding, or minimal furniture, a herringbone wood headboard can become the main design moment without needing loud colors or oversized art.
Another advantage is flexibility. You can stain the shims for a rustic cabin feel, paint them white for a cottage look, whitewash them for coastal softness, or use several stain tones for a reclaimed wood effect. Because wood shims are small, natural variations in grain and color make the final project feel layered and custom.
Materials and Tools You Will Need
Materials
- Plywood panel, usually 1/2-inch or 3/4-inch thick
- Wood shims, enough to cover the front surface
- 1×2 boards for the frame and side trim
- Wood glue or construction adhesive
- Brad nails or pin nails
- Wood filler
- Sandpaper in medium and fine grits
- Stain, paint, whitewash, or clear finish
- Polyurethane or water-based topcoat
- French cleat, wall-mounting hardware, or headboard legs
- Screws suitable for wall studs or bed-frame attachment
Tools
- Tape measure
- Pencil
- Carpenter square or speed square
- Miter saw, circular saw, jigsaw, or hand saw with miter box
- Brad nailer or hammer and small finish nails
- Orbital sander or sanding block
- Clamps
- Level
- Stud finder
- Safety glasses, hearing protection, and dust mask
If you are new to power tools, choose the simplest safe setup possible. Many home centers can cut plywood to size, and a basic miter box can handle small shim cuts. The fanciest tool in the room does not automatically make the straightest line. Sometimes it just makes a louder mistake.
Step 1: Measure Your Bed and Decide the Final Size
Start by measuring your mattress width. A twin mattress is usually about 38 inches wide, a full is about 54 inches, a queen is about 60 inches, and a king is about 76 inches. For a polished look, make the headboard a few inches wider than the mattress. Adding 2 to 4 inches per side gives the bed a balanced, designer-style frame.
For example, a queen-size DIY herringbone headboard might finish around 64 to 66 inches wide. The height depends on your room, bedding, and taste. A common range is 36 to 48 inches above the mattress, though taller headboards can look dramatic in rooms with high ceilings. If you use lots of pillows, make the headboard tall enough that the pattern still shows above them. Otherwise, you will build a masterpiece and then hide it behind a pillow mountain.
Once you choose the final outside dimensions, remember that trim boards add width and height. If you are framing the plywood with 1×2 boards, subtract the trim thickness from your plywood size so the finished headboard lands at your desired measurement.
Step 2: Cut the Plywood Backer
The plywood backer is the foundation of the entire headboard. It needs to be flat, square, and strong enough to hold the shims. A 3/4-inch plywood panel gives excellent stiffness and makes nailing easier, but 1/2-inch plywood can work if the headboard is properly framed and supported.
Mark your measurements carefully before cutting. Use a straightedge or chalk line to guide long cuts. If your plywood is being cut at the store, double-check the measurements before leaving. A quarter-inch error may not sound like much until you try to attach a perfectly mitered frame and discover geometry has become your enemy.
After cutting, lightly sand the plywood face and edges. You do not need furniture-grade perfection because the shims will cover the front, but removing rough spots helps glue adhere better and keeps splinters from joining the project committee.
Step 3: Build the Outer Frame
A simple 1×2 frame gives the headboard a finished edge and hides the layered plywood-and-shim construction from the side. Cut the top, bottom, and side trim pieces to fit your plywood. For a clean picture-frame look, cut 45-degree mitered corners. For an easier beginner version, use straight butt joints. Both methods can look good if the cuts are neat and the gaps are filled carefully.
Dry-fit every trim piece before adding glue. This means placing the boards where they will go, checking alignment, and marking exact cuts directly from the workpiece. Dry fitting prevents one of the most common DIY mistakes: cutting everything from a list, then discovering your real-world boards are not living in a math textbook.
Apply wood glue to the trim, clamp it if possible, and secure it with brad nails. Fill nail holes and small corner gaps with wood filler. Once dry, sand the frame smooth. Slightly rounding the sharp outer edges will make the finished headboard feel more comfortable and professional.
Step 4: Draw a Center Line and Herringbone Guide
The secret to a good herringbone pattern is not bravery. It is layout. Find the vertical center of your plywood panel and draw a straight line from top to bottom. This line will guide the first row of shims and keep the pattern from drifting.
Next, use a speed square or carpenter square to draw a 45-degree guide at the top center. Your first two shims will form a V shape, with their angled direction mirrored on each side of the center line. Once the first pair is correct, the rest of the herringbone pattern follows more easily.
Before gluing anything, lay out several rows of shims. This helps you understand how the pattern will land at the edges. Some pieces will hang over the plywood and get trimmed later. Others may need to be cut into smaller triangles or short pieces to fill gaps near the frame.
Step 5: Attach the First Shims
Begin at the top center of the panel. Place the first shim along your 45-degree guide, then place the second shim in the opposite direction to create a V. Make sure the thick and thin ends alternate in a way that looks balanced. Wood shims are tapered, so flipping direction can change the shadow line. That is part of the charm, but too much randomness can make the pattern look dizzy.
Once you like the position, apply a thin layer of wood glue to the back of each shim and press it into place. Add one or two brad nails to hold it while the glue dries. Do not drown the shims in glue. Excess adhesive will squeeze out between pieces and create shiny spots that resist stain later. Glue should be helpful, not emotionally overwhelming.
Continue building outward from the center. Work in small sections, checking the angle often. Every few rows, step back and look at the pattern from a distance. Small alignment errors are easier to fix early than after you have nailed down half a forest.
Step 6: Fill the Entire Panel
As you move across the plywood, let the shims overhang the edges slightly. This is easier than trying to cut every edge piece perfectly before installation. When the panel is fully covered and the glue has dried, flip the headboard over or carefully trim from the front using the plywood edge as a guide.
A jigsaw, oscillating tool, or fine-tooth hand saw can trim overhanging shims. Work slowly so the pieces do not pop loose. If one does, do not panic. Re-glue it, add a nail, and continue. DIY projects are not ruined by small repairs; they are made of small repairs wearing a confident outfit.
For tiny gaps near the frame, cut small shim pieces to fit. These filler pieces matter because the eye notices empty corners. However, do not obsess over microscopic gaps. Once stained or painted, minor imperfections often disappear into the texture.
Step 7: Sand Without Erasing the Texture
After all shims are attached, sand the surface lightly. The goal is to remove splinters and rough edges, not flatten the entire design. Use 120-grit sandpaper for rough spots and 180- or 220-grit for final smoothing. Hand sanding may be better than aggressive machine sanding because shims are thin and textured.
Pay special attention to the outer frame, corners, and any places where hands might touch the headboard. If the bed sits against the headboard, make sure there are no sharp points or raised nails. A headboard should support cozy reading, not launch a surprise splinter attack during chapter three.
Step 8: Choose a Finish
Finishing determines the personality of your DIY wood shim headboard. A medium brown stain creates a warm rustic look. A dark walnut stain feels dramatic and modern. A gray wash gives a weathered farmhouse mood. White paint can make the texture more subtle and cottage-like. A clear matte finish keeps the natural color variation of the shims.
Test your finish on extra shims before applying it to the headboard. Wood shims can absorb stain unevenly, which may be exactly the rustic look you want, or it may look like a leopard got involved. Testing helps you decide whether to use wood conditioner, dilute the stain, or switch to paint.
Apply stain or paint in thin coats. Wipe excess stain away according to product directions, and let everything dry fully. If painting, use a brush to reach the grooves between shims. For a distressed look, stain first, paint over it, then lightly sand raised edges so the darker tone peeks through.
Step 9: Seal the Headboard
A protective topcoat helps the headboard resist dust, moisture, and everyday wear. Water-based polyurethane is a good choice if you want a clear finish with less ambering. Oil-based finishes can add warmth but may deepen the color more than expected. Matte or satin sheens usually look more natural on rustic wood than high gloss.
Apply the topcoat in thin layers and follow the drying time on the product label. Lightly sand between coats if recommended. Two coats are usually enough for a decorative headboard, but a third coat can add durability if the headboard will be touched often.
Step 10: Mount the Headboard Safely
You have several mounting options. A French cleat is one of the cleanest methods for a wall-mounted headboard because it spreads weight across the wall and allows the headboard to hang securely. Another option is attaching sturdy legs to the back and bolting the headboard to a metal bed frame. You can also use wall anchors, but fastening into studs is stronger whenever possible.
Use a stud finder to locate wall studs, then mark level mounting points. If the headboard is heavy, ask another person to help lift it. Bedrooms are peaceful places; they do not need the sudden drama of a falling plywood rectangle.
Make sure the bottom of the headboard sits low enough that the mattress hides any gap, but high enough that the design remains visible above pillows. After installation, gently test the headboard for wobble. Tighten hardware as needed.
Design Ideas for a Custom Look
Use Mixed Stain Tones
Staining shims in two or three related tones creates a reclaimed wood effect. Keep the palette controlled so the headboard looks intentional rather than patchy. Light oak, honey, and walnut tones work well together.
Paint the Frame a Contrasting Color
A black or white frame can make the herringbone pattern pop. Black trim feels modern and graphic, while white trim softens the look for farmhouse or coastal bedrooms.
Go Wall-to-Wall
For a more dramatic feature wall, extend the headboard beyond the bed and nightstands. This turns the herringbone pattern into an architectural backdrop. Just remember that larger projects require more shims, more glue, and more patience snacks.
Add Reading Lights
Wall-mounted sconces or plug-in reading lights can be installed around the headboard area. Keep wiring safe and separate from the wood structure. If electrical work is involved beyond plug-in fixtures, hire a qualified professional.
Common Mistakes and How to Avoid Them
The first mistake is skipping the center line. Without a guide, the pattern can slowly drift, and by the time you notice, the headboard may look like it is gently sliding into another dimension. Always start with a straight reference line.
The second mistake is using too much glue. Excess glue creates cleanup problems and can block stain absorption. Apply just enough to bond the shim to the plywood.
The third mistake is ignoring safety. Wear eye protection when cutting or nailing, use hearing protection with loud tools, and sand in a ventilated area. Clamp small pieces instead of holding them too close to a blade. A beautiful bedroom upgrade is not worth a preventable injury.
The fourth mistake is rushing the finish. Stain, paint, and topcoat need drying time. If you seal too soon, the finish can turn cloudy or tacky. Let each coat cure properly before moving to the next step.
Real-World Experience Notes: What This Project Teaches You
Building a DIY herringbone headboard with wood shims teaches one lesson immediately: small pieces create big visual impact, but they also demand patience. At first, the project feels almost too easy. You place two shims in a V, add glue, pop in a nail, and think, “I am clearly a woodworking legend.” Then you reach the edges, where tiny triangular gaps appear, and the project politely reminds you to stay humble.
The best experience-based advice is to sort your shims before installation. Open every bundle and separate pieces by color, straightness, and thickness. Some shims are smooth and golden; others look like they had a difficult childhood. Use the nicest pieces in the most visible center area and save imperfect ones for edges where they can be trimmed. This simple sorting step makes the finished headboard look much more intentional.
Another useful lesson is that dry fitting is not wasted time. Laying out several rows before gluing helps you see the rhythm of the herringbone pattern. It also helps you avoid placing too many dark or light pieces in one area. Think of it like arranging a charcuterie board, but with lumber and fewer crackers.
When attaching shims, work from the center outward rather than from one side to the other. The center is where the eye naturally lands, so it should be the cleanest part of the pattern. If your outer edges require odd little cuts, that is fine. The frame will visually contain them, and bedding will soften the lower area.
Finishing is where the project becomes personal. A dark stain can make inexpensive shims look rich and moody. A whitewash can make the headboard feel airy and relaxed. Clear coat preserves the natural handmade texture. The only wrong move is choosing a finish without testing it first. Shims absorb product quickly, and one stain can look completely different on two pieces from the same pack.
Mounting also deserves more attention than most people expect. A headboard may be decorative, but it still needs to be secure. If you lean against it to read, scroll, or pretend you are going to sleep early, it should not shift. A French cleat or stud-mounted support gives the most confidence. If using legs, attach them firmly and connect them to the bed frame when possible.
Finally, expect small imperfections. A tiny gap, a slightly darker shim, or a not-quite-perfect miter does not ruin the project. In fact, those details are part of why a wood shim headboard feels warm instead of factory-made. The finished piece should look crafted, textured, and inviting. And when someone asks where you bought it, you get the best DIY reward of all: casually saying, “Oh, I made it,” while trying not to grin like a raccoon who found an unlocked pantry.
Conclusion
A DIY herringbone headboard with wood shims is an affordable way to turn basic materials into a bedroom centerpiece. With plywood as the base, simple trim for the frame, and carefully arranged shims for texture, you can create a custom wood headboard that looks far more expensive than it is. The project does not require expert woodworking skills, but it does reward careful measuring, patient layout, safe cutting, and thoughtful finishing.
Whether you stain it deep brown, paint it soft white, or leave the wood natural, the herringbone pattern adds movement and craftsmanship to the room. Best of all, this project proves that great design does not always come from buying something new. Sometimes it comes from lining up a hundred little pieces of wood, trusting the process, and accepting that your floor will temporarily look like a very organized beaver moved in.