Note: This article is for educational web-publishing purposes. Brake work affects vehicle safety, so readers should always follow the exact service manual for their vehicle and get help from a qualified technician when unsure.
Why Brake Bleeding Matters More Than Most Drivers Think
Bleeding your brake system is one of those maintenance jobs that sounds dramatic, as if your car is starring in a medical TV show. Thankfully, no tiny automotive surgeon is required. In plain English, brake bleeding means removing trapped air and old fluid from the hydraulic brake system so the brake pedal feels firm and the vehicle stops the way it should.
Your brakes depend on hydraulic pressure. When you press the brake pedal, the master cylinder pushes brake fluid through lines and hoses toward the calipers or wheel cylinders. That fluid pressure squeezes the brake pads or shoes against the rotors or drums. The system works beautifully because brake fluid does not compress much. Air, however, compresses like a couch cushion. If air sneaks into the system, the pedal can feel soft, spongy, or inconsistent. That is your car’s way of saying, “Excuse me, something is not right down here.”
Brake bleeding is often needed after replacing calipers, wheel cylinders, brake hoses, brake lines, a master cylinder, or sometimes after a full brake fluid flush. It may also be necessary if the brake pedal feels soft, if the fluid is badly contaminated, or if a brake component has leaked. The goal is simple: move clean brake fluid through the system while pushing trapped air out through the bleeder screws.
What Is Brake Fluid and Why Does It Need Attention?
Brake fluid is not just “some oily stuff in a reservoir.” It is a specialized hydraulic fluid designed to handle high heat, resist corrosion, and transmit pedal force reliably. Most passenger vehicles use DOT 3, DOT 4, or sometimes DOT 5.1 brake fluid. These fluids are commonly glycol-based and hygroscopic, meaning they absorb moisture over time. Moisture lowers the fluid’s boiling point and can contribute to corrosion inside brake lines, calipers, wheel cylinders, and the master cylinder.
That is why old brake fluid can become dark, murky, and less effective. It is also why you should never use a random bottle that has been open on a garage shelf since the flip-phone era. Fresh, sealed brake fluid is your friend. Mystery fluid is not.
DOT 3, DOT 4, DOT 5, and DOT 5.1: Do Not Guess
The correct brake fluid type depends on the vehicle manufacturer’s specifications. DOT 3 and DOT 4 are common in many cars and trucks, while DOT 5 is silicone-based and not interchangeable with most systems designed for glycol-based fluid. DOT 5.1 is also glycol-based despite the confusing name. The safest rule is boring but important: read the cap on the master cylinder reservoir and check the owner’s manual or service manual.
Mixing the wrong brake fluid can damage seals, affect braking performance, and turn a weekend maintenance job into an expensive lesson with greasy fingerprints. When in doubt, stop and verify.
Common Signs Your Brake System May Need Bleeding
A brake system does not always send a polite calendar invitation before it needs service. Instead, it gives clues. Some are subtle. Some are about as subtle as a drum set falling down the stairs.
- Spongy brake pedal: The pedal feels soft, springy, or sinks farther than normal.
- Inconsistent pedal feel: The pedal feels firm one moment and mushy the next.
- Recent brake repair: You replaced calipers, hoses, lines, wheel cylinders, or the master cylinder.
- Brake fluid leak: Any leak can allow air to enter the system.
- Old or dirty brake fluid: Fluid that looks dark, cloudy, or contaminated may need flushing.
- Longer stopping distance: If the car does not stop as confidently as usual, have the brake system inspected immediately.
Important: bleeding brakes will not fix worn brake pads, warped rotors, seized calipers, failing hoses, or a bad master cylinder. If the brake pedal still feels wrong after proper bleeding, the system needs deeper inspection.
Tools and Supplies You Need Before Starting
Preparation makes brake bleeding much easier. It also prevents the classic garage disaster where one person is under the car yelling, “Hand me the wrench,” while the other person is holding a sandwich and no wrench.
Basic Brake Bleeding Tools
- Fresh brake fluid that matches the vehicle specification
- Correct-size box wrench or flare-nut wrench for the bleeder screws
- Clear vinyl tubing that fits snugly over the bleeder screw
- Catch bottle or drain container
- Jack and jack stands rated for the vehicle
- Wheel chocks
- Gloves and safety glasses
- Shop towels or rags
- Brake cleaner for external cleanup, used carefully
- A helper, unless using a one-person bleeder tool
Never rely on a jack alone. A jack lifts; jack stands support. That difference matters. Also, brake fluid can damage painted surfaces quickly, so wipe spills immediately and avoid letting fluid sit on body panels.
Safety First: The Non-Negotiable Rules
Brake work is not the place for shortcuts. Your brakes are not decorative. They are the system standing between “normal commute” and “unexpected physics lesson.” Before bleeding brakes, park on a flat surface, engage the parking brake when appropriate, chock the wheels, and lift the vehicle only at manufacturer-approved points.
Wear eye protection. Brake fluid is not something you want in your eyes, on your skin for long periods, or all over your driveway. Keep the reservoir cap area clean so dirt does not fall into the system. Use only fresh fluid from a sealed container. Dispose of used brake fluid according to local rules, because it should not be poured onto the ground, into a drain, or into the trash like an empty snack wrapper.
The Standard Two-Person Brake Bleeding Method
The two-person method is the classic approach. One person presses the brake pedal while the other opens and closes the bleeder screw. It is simple, effective, and a great test of whether two people can follow directions without turning the garage into a sitcom.
Step 1: Check the Brake Fluid Reservoir
Open the hood and locate the master cylinder reservoir. Clean the area around the cap before opening it. Fill the reservoir with the correct brake fluid up to the recommended level. During the entire bleeding process, keep checking the reservoir. If it runs dry, air can enter the system, and you may have to start over. That is the brake bleeding equivalent of stepping on a rake.
Step 2: Confirm the Correct Bleeding Order
Many vehicles are bled starting with the wheel farthest from the master cylinder, often the right rear, then left rear, right front, and left front. However, this is not universal. Some vehicles, especially those with diagonal split hydraulic systems or special ABS procedures, may use a different order. Always confirm the correct sequence in the service manual.
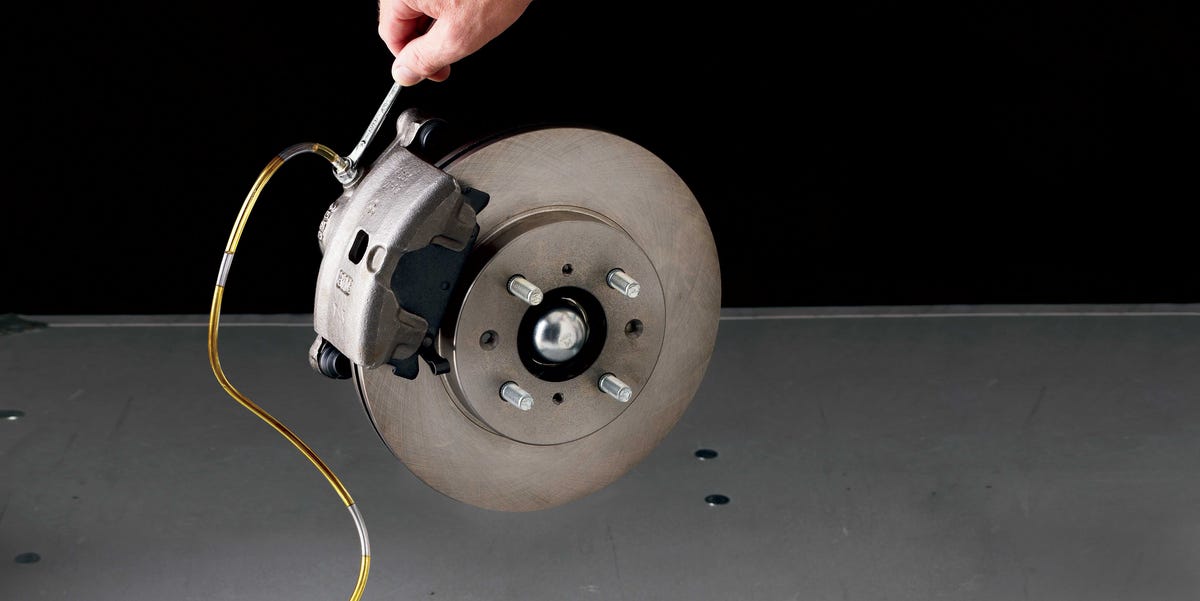
Step 3: Attach Clear Tubing to the Bleeder Screw
Place one end of the clear tubing over the bleeder screw and the other end into a catch bottle. Putting a small amount of clean brake fluid in the bottle can help keep the tube end submerged, which reduces the chance of air being drawn backward.
Step 4: Pump, Hold, Open, Close, Release
Ask your helper to press the brake pedal slowly several times, then hold steady pressure. While the pedal is held down, open the bleeder screw slightly. Fluid and air bubbles should travel through the tube. Before your helper releases the pedal, close the bleeder screw. Then tell your helper to release. The order matters: hold, open, close, release. Releasing the pedal while the bleeder is open can pull air back into the system.
Step 5: Repeat Until the Fluid Is Clear and Bubble-Free
Repeat the process until no bubbles appear and the fluid looks clean. Check and refill the master cylinder reservoir frequently. Then move to the next wheel in the correct bleeding order. When finished, tighten each bleeder screw carefully. Do not overtighten it, because snapping a bleeder screw is a quick way to ruin your mood.
One-Person Brake Bleeding Options
If you do not have a helper, you still have options. A one-way check valve bleeder hose can let fluid and air escape while preventing air from returning. A vacuum bleeder pulls fluid through the system from the bleeder screw. A pressure bleeder pushes fluid from the master cylinder reservoir through the brake lines. Each method can work well when used correctly.
Pressure bleeders are popular with experienced DIY mechanics because they keep consistent pressure on the system and can make the job faster. Vacuum bleeders are convenient but can sometimes pull air around the bleeder screw threads, making it look like bubbles are still in the line. A little grease around the bleeder screw threads can help reduce false bubbles, but keep grease away from brake components and friction surfaces.
Special Considerations for ABS Brake Systems
Anti-lock braking systems can make brake bleeding more complicated. Some ABS hydraulic control units trap air in internal passages. On certain vehicles, a scan tool is needed to cycle the ABS pump and valves during the bleeding process. Without that step, the brake pedal may remain soft even after a standard bleed.
This does not mean every ABS vehicle is impossible to bleed at home. Many can be bled normally if air has not entered the ABS module. But if the master cylinder ran dry, a major hydraulic component was replaced, or the ABS module was opened, the service manual may call for a scan-tool bleeding procedure. That is the moment to respect the manual, not challenge it to a duel.
Brake Bleeding vs. Brake Fluid Flush: What Is the Difference?
Brake bleeding focuses on removing air from the hydraulic system. A brake fluid flush replaces old fluid throughout the system with fresh fluid. The two jobs overlap because flushing usually involves bleeding each wheel until clean new fluid appears. However, the purpose is slightly different. Bleeding solves an air problem. Flushing addresses old, moisture-contaminated, or degraded fluid.
Many manufacturers recommend periodic brake fluid replacement, but the interval varies. Some vehicles specify a time-based schedule, such as every two or three years, while others recommend inspection-based service. Driving conditions also matter. Heavy towing, mountain driving, track use, humid climates, and frequent stop-and-go driving can all put more stress on the brake system.
Common Brake Bleeding Mistakes to Avoid
Letting the Reservoir Run Dry
This is the big one. If the reservoir empties, air enters the master cylinder and lines. Keep fresh fluid nearby and check the level after every few bleeding cycles.
Using the Wrong Brake Fluid
The wrong fluid can damage seals or change system performance. Match the specification exactly. “Close enough” is not a brake maintenance strategy.
Opening the Bleeder Too Far
A quarter turn is often enough. Opening the screw too far can make a mess or allow air to sneak around the threads.
Releasing the Pedal While the Bleeder Is Open
This can pull air back into the system. Communication between the helper and the person at the bleeder screw is essential.
Ignoring Rusty or Damaged Bleeder Screws
Old bleeder screws can seize, round off, or snap. Use the correct wrench and be patient. If a bleeder screw looks badly corroded, consider professional help before forcing it.
Skipping the Test Pedal Check
After bleeding, the brake pedal should feel firm with the engine off and behave normally with the engine running. If the pedal sinks, feels spongy, or does not inspire confidence, do not drive the vehicle until the problem is fixed.
After Bleeding: Final Inspection and Road Test
Once all four corners are bled, top off the reservoir to the proper level and reinstall the cap. Clean any spilled fluid. Check every bleeder screw, hose connection, caliper, wheel cylinder, and brake line for leaks. Reinstall the wheels and torque the lug nuts to the manufacturer’s specification.
Before driving, press the brake pedal several times. It should feel firm and consistent. Start the engine and press the pedal again. With power assist, the pedal may drop slightly, but it should not sink to the floor. Perform a slow-speed test in a safe area before returning to normal traffic. If the vehicle pulls, the pedal feels soft, the brake warning light stays on, or braking performance feels weak, stop and inspect the system immediately.
When You Should Call a Professional
DIY brake bleeding is possible for many careful car owners, but there are times when a professional technician is the smarter choice. Call a pro if the ABS system needs scan-tool bleeding, if a bleeder screw breaks, if brake lines are heavily rusted, if the master cylinder may be failing, or if the pedal remains soft after repeated bleeding. Also get help if you are not comfortable lifting the vehicle safely.
A good technician can pressure bleed the system, activate ABS valves when required, inspect for leaks, measure brake fluid condition, and identify deeper hydraulic problems. Paying for professional brake service is much cheaper than guessing with the system that stops the car.
Expert Experience Notes: What Real Brake Bleeding Teaches You
The first experience many DIY mechanics have with brake bleeding is surprise. The job looks simple on paper: open screw, push pedal, close screw, repeat. In practice, the small details matter. A tiny bubble in the clear hose can make you question reality. A bleeder screw that has not moved in ten years can make a grown adult negotiate with a piece of metal. And the brake fluid reservoir always seems to get low exactly when you look away.
One common real-world lesson is that communication beats speed. In the two-person method, the helper and the person at the bleeder screw need a simple rhythm. “Pump.” “Hold.” “Opening.” “Closing.” “Release.” That rhythm prevents air from being pulled back into the system. When people rush, the pedal gets released at the wrong time, bubbles reappear, and everyone starts blaming the hose, the wrench, the moon, or the family dog.
Another lesson is that old fluid tells a story. Clean brake fluid is usually light amber or nearly clear depending on the type. Old fluid may look brown, cloudy, or dirty. When flushing a neglected system, the first fluid out of the bleeder can look like weak coffee from a gas station that gave up on life. As fresh fluid moves through the line, the color improves. That visual change is satisfying because you can literally see maintenance happening.
Experienced technicians also know that a soft pedal is not always caused by air. Sometimes a flexible brake hose expands under pressure. Sometimes a caliper slide is stuck. Sometimes rear drum brakes are out of adjustment. Sometimes the master cylinder has an internal leak. Bleeding is important, but it is not magic. If the pedal remains soft after a careful bleed, the next step is diagnosis, not repeating the same process forever while muttering motivational quotes.
Rust is another teacher. In dry climates, bleeder screws may open politely. In snowy areas where road salt attacks undercarriage parts, bleeder screws can become stubborn. A line wrench, penetrating oil, patience, and gentle technique can save parts from damage. For badly corroded hardware, professional service is often cheaper than breaking a screw and needing a caliper replacement.
ABS systems add one more reality check. Many older brake bleeding habits came from simpler hydraulic systems. Modern vehicles can include ABS modules, electronic stability control, brake-by-wire features, and manufacturer-specific procedures. The smartest “expert” move is not pretending every car is the same. It is checking the service information before opening the first bleeder.
Finally, the best brake bleeding experience ends quietly. No drama. No warning lights. No leaks. The pedal feels firm. The vehicle stops smoothly in a slow test. The tools are cleaned, the used fluid is stored for proper disposal, and the owner gets that small but wonderful feeling of having done the job correctly. Brake bleeding may not be glamorous, but neither is stopping safely at a red lightand that is exactly why it matters.
Conclusion
Bleeding your brake system is a practical maintenance skill built on patience, cleanliness, and respect for safety. The process removes trapped air, helps restore a firm brake pedal, and supports reliable hydraulic braking performance. The most important rules are simple: use the correct brake fluid, follow the vehicle-specific bleeding order, keep the reservoir full, close the bleeder before releasing the pedal, and inspect everything before driving.
Whether you use the classic two-person method, a vacuum bleeder, or a pressure bleeder, the job should never be treated casually. Brakes are one of the most important safety systems on any vehicle. If something feels wrong, stop and get expert help. A properly bled brake system should feel confident, consistent, and ready for the roadnot mysterious, mushy, or dramatic.