Halloween has a way of turning perfectly normal adults into porch engineers. One minute you are buying candy “for the kids,” and the next you are standing in the craft aisle comparing LED tea lights like you are choosing a tiny sun for a vegetable. That is the magic of DIY pumpkin lights: they are simple, affordable, wildly customizable, and forgiving enough that even a slightly crooked grin can be called “haunted character.”
The charm of pumpkin lighting is that it blends three things people already love about October: cozy fall decor, spooky Halloween atmosphere, and the satisfying feeling of making something with your own hands. Whether you want a classic jack-o’-lantern, a modern drilled pumpkin lantern, a glowing pathway, or a no-carve pumpkin that looks stylish instead of sticky, this guide walks through practical ideas inspired by real craft, home, and fire-safety advice.
Although the title says Halloween Projects 2022, the best ideas from that season still glow beautifully today. LED lights are safer than open flames, faux pumpkins can be reused year after year, and simple carving techniques can turn an ordinary porch into a neighborhood photo stop. So grab a pumpkin, clear the kitchen table, and prepare to make Halloween decor that says, “I tried,” but in a charmingly spooky way.
Why DIY Pumpkin Lights Still Win Halloween
Store-bought Halloween decorations are fun, but they can feel a little too perfect. DIY pumpkin lights bring personality. A handmade pumpkin lantern can be cute, creepy, elegant, silly, rustic, or dramatic depending on your design. Better yet, you do not need advanced craft skills. A pumpkin, a light source, a basic pattern, and a little patience can do most of the work.
DIY pumpkin lights are also flexible. You can use real pumpkins for that classic Halloween smell and texture, or faux pumpkins if you want decorations that survive more than one spooky season. You can carve faces, drill star patterns, paint silhouettes, use stencils, add house numbers, or line a walkway with mini glowing gourds. Halloween does not require perfection. In fact, a slightly lopsided pumpkin usually looks more authenticlike it has seen things.
Best Lights for Pumpkins: Safe, Bright, and Easy
LED Tea Lights
Battery-operated LED tea lights are the easiest choice for most pumpkin projects. They mimic the warm flicker of a candle without the open flame, smoke, or heat. They are especially useful for family projects, porches with trick-or-treaters, and pumpkins placed near dry leaves, costumes, paper decorations, or other flammable materials.
Mini String Lights
Mini battery-powered string lights create a fuller glow inside larger pumpkins. They work especially well for drilled pumpkins because each small hole becomes a bright dot of light. Warm white lights give a cozy autumn look, while purple, orange, green, or red lights create a more theatrical haunted-house effect.
Color-Changing Puck Lights
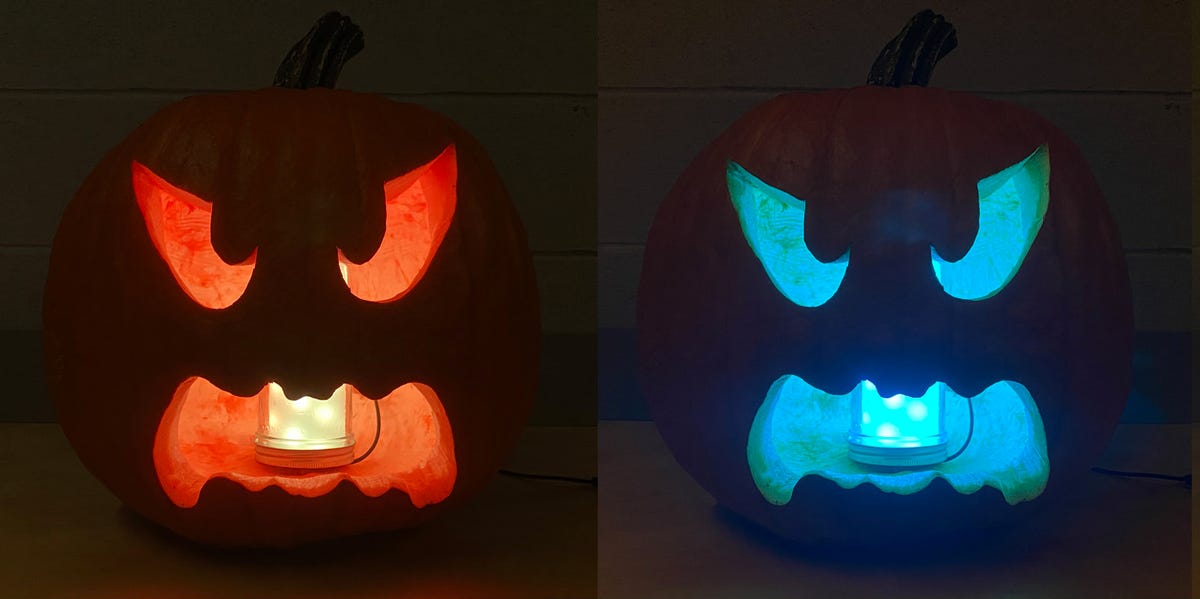
For a dramatic Halloween display, try a small color-changing LED puck light. These lights can make one pumpkin shift from eerie green to ghostly blue to vampire red. They are great for carved monster faces, skull patterns, and pumpkins used as centerpieces at Halloween parties.
Glow Sticks
Glow sticks are an easy option for temporary displays. They do not need batteries, and they are lightweight enough for mini pumpkins or party table decor. The downside is that they fade, so they are best for one-night events rather than decorations you want to run all week.
Choosing the Right Pumpkin
A good pumpkin light begins before the first cut. Choose a pumpkin that feels firm, has no soft spots, and sits flat without wobbling. A strong stem is a good sign, but avoid carrying the pumpkin by the stem because it can snap. For carving, medium to large pumpkins are easier to work with because they provide more surface area for designs. For pathway lights, smaller pumpkins can look adorable in groups.
White pumpkins, orange pumpkins, and green-gray heirloom pumpkins all create different effects. Orange pumpkins give the classic jack-o’-lantern glow. White pumpkins look modern and help painted details stand out. Deep green or blue-gray pumpkins can look moody and elegant, especially with warm LED lights tucked inside.
Project 1: Classic LED Jack-o’-Lantern
The classic jack-o’-lantern remains popular because it works. A triangle-eyed pumpkin with a toothy grin is instantly recognizable, and it looks good from the sidewalk. To make it safer and longer-lasting, use a battery-operated LED tea light instead of a real candle.
What You Need
You need one fresh pumpkin, a washable marker, a scoop, paper towels, a simple stencil if desired, and LED tea lights. Adults should handle carving tools, especially when children are participating. Kids can draw the face, scoop seeds, choose the light color, and proudly announce that they are now “creative directors.”
How to Make It
Draw the design first. Keep the shapes large and simple if this is your first pumpkin. A wide mouth, round eyes, crescent moons, stars, bats, or ghost shapes are easier than tiny details. Open the pumpkin from the bottom or back if you want a cleaner top and better structure. Remove the pulp thoroughly, dry the inside, carve the design, and place an LED light inside. When the sun goes down, your pumpkin gets its big Broadway debut.
Project 2: Drilled Pumpkin Lights
Drilled pumpkins are one of the most beautiful DIY pumpkin light ideas because they look impressive but are surprisingly beginner-friendly when handled safely by an adult. Instead of carving large shapes, the design is made from small holes. Once lit from the inside, the pumpkin glows like a Halloween lantern covered in stars.
Design Ideas
Try polka dots, spirals, constellations, flowers, spiderwebs, crescent moons, or a simple “BOO” pattern. You can sketch the design with a washable marker before drilling. For a more polished look, vary the size of the holes. Small dots create delicate sparkle, while larger holes release more light.
Lighting Tip
Use a strand of battery-powered LED lights inside the pumpkin rather than a single tea light. String lights spread brightness throughout the interior, so every drilled hole glows evenly. The result is cozy, magical, and just fancy enough to make neighbors suspect you own a label maker.
Project 3: Pumpkin Path Lights
Pumpkin path lights are perfect for porches, garden paths, driveways, and Halloween party entrances. The goal is to guide visitors with a row of glowing pumpkins. You can use real pumpkins for a rustic look or faux pumpkins for a reusable display.
Paint each pumpkin black, white, metallic copper, or classic orange. Add holes, carved stars, house numbers, or simple faces. Place an LED tea light inside each one and arrange them along the walkway. Make sure they are stable and not positioned where guests might trip. Halloween should be spooky, not an accidental obstacle course.
Project 4: No-Carve Glow Pumpkins
No-carve pumpkins are ideal for kids, apartments, classrooms, dorm rooms, and anyone who wants Halloween decor without the pumpkin-gut situation. They also last longer because the pumpkin skin remains intact.
Easy No-Carve Lighting Ideas
Wrap a pumpkin with battery-powered fairy lights. Paint a silhouette, such as a black cat or haunted house, and place the pumpkin near a light source. Use glow-in-the-dark paint for stars, ghosts, or funny monster eyes. Stick-on gems, washi tape, paper bats, and vinyl decals can also create designs without carving.
For a clever tabletop display, place small pumpkins around a glass hurricane vase filled with orange string lights. It gives the look of glowing pumpkins without cutting anything open. This is the kind of project that makes guests say, “That’s cute,” which is adult language for “I might copy this.”
Project 5: Mini Pumpkin Lanterns
Mini pumpkin lanterns are charming because they look like tiny Halloween cottages for very dramatic fairies. They work well on mantels, dining tables, porch steps, and party buffets. Since mini pumpkins are small, keep designs simple: dots, small stars, tiny windows, or painted faces.
Use small LED tea lights or glow sticks. If a mini pumpkin is too small to hollow safely, choose a faux mini pumpkin designed for crafting. Faux pumpkins are easier to modify, lighter to display, and reusable. They also do not collapse into sadness after a few warm days.
Project 6: Elegant Etched Pumpkin Lights
Etched pumpkins are a more artistic option. Instead of cutting all the way through the pumpkin wall, you scrape away the outer skin so light shines softly through the thinner surface. This technique creates a gentle, sophisticated glow. It is perfect for leaf patterns, monograms, vines, haunted windows, or vintage-inspired designs.
Etching takes more patience than basic carving, but the result can look expensive. Use a printed stencil or draw the design by hand. Adults should handle sharp tools or rotary tools. Once the design is etched, place a warm LED light inside. The pumpkin will glow softly rather than blaze brightly, which makes it excellent for indoor displays and dinner tables.
How to Make Pumpkin Lights Last Longer
Real pumpkins are living decorations, which means they eventually retire from public life. To keep them looking fresh, carve close to Halloween rather than weeks ahead. In cooler weather, carved pumpkins can last longer, but in warm or humid climates they may soften quickly. If you want decor for the whole month, use no-carve pumpkins early and save carved pumpkin lights for the final Halloween week.
Clean the pumpkin thoroughly before decorating. Remove as much pulp as possible because stringy pumpkin guts hold moisture and encourage decay. Dry the inside before adding lights. Keep pumpkins out of direct sun when possible, and bring them indoors during extreme heat, heavy rain, or frost. LED lights are helpful because they do not add heat inside the pumpkin the way candles do.
Some decorators seal cut edges with petroleum jelly or use a light disinfecting solution to slow mold. If you try preservation tricks, keep safety in mind and avoid placing treated pumpkins where pets or wildlife may chew them. For food-safe simplicity, the best strategy is still timing: decorate early with whole pumpkins, then carve just before Halloween night.
Pumpkin Light Safety Tips
Halloween decorating should be fun, not a fire drill with candy corn. Use LED lights whenever possible, especially outdoors or around children. Keep pumpkins away from dry leaves, paper decorations, curtains, costumes, and other flammable items. If using extension cords for larger displays, choose outdoor-rated products and keep cords out of walking paths.
For family projects, let kids design, paint, scoop, and place stickers, but leave cutting, drilling, and electrical setup to adults. Set pumpkins on stable surfaces where they will not roll, tip, or block walkways. If you are lighting a porch for trick-or-treaters, remember that visibility matters. A well-lit path helps guests see steps, decorations, and the candy bowl you are pretending not to refill from your emergency stash.
Design Themes for DIY Pumpkin Lights
Cozy Cottage Halloween
Use warm white LED lights, soft orange pumpkins, leaf patterns, and simple carved windows. Add mums, hay bales, and plaid blankets nearby for a friendly fall look.
Haunted Mansion
Choose black-painted pumpkins, purple lights, bat silhouettes, skull patterns, and dramatic shadows. Place pumpkins at different heights to create depth.
Kid-Friendly Monster Parade
Create a row of silly faces with different expressions. Use colorful LED lights and painted details like eyebrows, freckles, and goofy teeth.
Modern Minimalist
Try white pumpkins with drilled dots, gold stems, and warm fairy lights. This style looks polished and seasonal without screaming “plastic skeleton army.”
Budget-Friendly Materials
You do not need an expensive craft haul to make beautiful DIY pumpkin lights. Many supplies are inexpensive or already at home: washable markers, painter’s tape, battery lights, pushpins, stickers, acrylic paint, old jars, ribbon, and paper templates. A basic pumpkin can become a lantern, a centerpiece, or a porch marker with only a few additions.
If you want to save money, buy lights you can reuse. Battery-operated tea lights, fairy lights, and puck lights can move from Halloween pumpkins to Thanksgiving centerpieces, winter lanterns, and birthday party decor. Faux pumpkins cost more at first but can be reused for years, making them a smart choice for people who decorate every season.
Common Mistakes to Avoid
The first mistake is carving too early. A pumpkin carved three weeks before Halloween is not “prepared”; it is compost with ambition. The second mistake is making designs too tiny. Small details are harder to carve and may not show well at night. The third mistake is using too little light. If the design looks dull, add more LEDs or switch to string lights.
Another common issue is forgetting the viewing distance. A detailed design may look amazing up close but disappear from the sidewalk. For porch pumpkins, bold shapes work best. For table pumpkins, smaller details are fine because guests will see them nearby. Always test the pumpkin in the dark before declaring victory. Daylight lies. Halloween lighting tells the truth.
Extra Experience: What Actually Works When Making DIY Pumpkin Lights
After trying different pumpkin light projects, one lesson stands out: the simplest designs often look the best. A pumpkin covered in clean drilled dots can look more magical than a complicated haunted castle that took hours and caused emotional damage. If you are decorating for a party or trick-or-treat night, choose projects that are easy to repeat. Three matching glowing pumpkins usually create a stronger display than one overworked pumpkin masterpiece sitting alone like it needs a vacation.
Another useful experience is to test your lights before placing them inside the pumpkin. This sounds obvious, but many people have proudly finished carving, placed the pumpkin outside, waited for sunset, and then discovered the batteries were dead. That is not Halloween magic; that is a tiny administrative failure. Turn on every LED tea light, puck light, or string light before decorating. Keep spare batteries nearby, especially if your pumpkins will glow for several evenings.
For real pumpkins, moisture control matters more than most beginners expect. The inside of a pumpkin can stay wet and stringy, which makes lights slide around and encourages the pumpkin to soften. After scooping, scrape the walls clean and pat the interior dry with paper towels. If you are using string lights, coil them loosely instead of stuffing them into one bright clump. A loose coil spreads the glow and prevents one side from looking like it swallowed a flashlight.
Placement also changes everything. A pumpkin light on a dark porch looks brighter than the same pumpkin under a strong porch lamp. If you want dramatic shadows, dim nearby lights or place pumpkins slightly away from competing light sources. For pathways, keep the glow practical. Guests should see where they are walking. A spooky mood is good; surprise ankle gymnastics are not.
When decorating with kids, no-carve projects are often the happiest choice. Painting, stickers, glow paint, and fairy lights let children participate without waiting for adults to finish the tricky parts. The finished pumpkins may not match a magazine photo, but they will have personality. A pumpkin with six eyes, glitter eyebrows, and a crooked smile is not a mistake. It is a limited-edition monster.
Faux pumpkins are worth considering if you love Halloween decorating and hate cleanup. They can be drilled, painted, wrapped with lights, and stored for next year. The first year may cost a little more, but the reuse value is excellent. Real pumpkins, however, still win for tradition. There is something satisfying about picking one out, scooping it, lighting it, and watching it glow on a chilly October night.
The best overall approach is to mix both. Use faux pumpkin lights for early-season decor and real carved pumpkins close to Halloween. That way your porch looks festive all month, but your jack-o’-lanterns are still fresh when trick-or-treaters arrive. It is the decorating version of pacing yourself, which is wise because Halloween candy will not do that for you.
Conclusion
DIY Pumpkin Lights – Halloween Projects 2022 proves that classic Halloween decorating never really goes out of style. With a few pumpkins, safe LED lights, simple tools, and a little imagination, you can create glowing porch decor, party centerpieces, walkway lanterns, or kid-friendly crafts without spending a fortune. The best pumpkin lights are not necessarily the most complicated. They are the ones that make people smile, pause, and maybe take a picture before reaching for the candy bowl.
For the safest and most practical display, choose battery-operated lights, carve close to Halloween, keep pumpkins stable, and match your design to your skill level. Classic faces, drilled patterns, no-carve glow pumpkins, mini lanterns, and etched designs all bring a different mood. Whether your style is spooky, elegant, funny, or “I made this at midnight,” your pumpkin lights can become the warm, glowing heart of your Halloween decor.
Note: This article is written as original web-ready content and synthesized from practical DIY, home decor, pumpkin preservation, and Halloween fire-safety guidance. No external source links or citation placeholders are included in the HTML body.