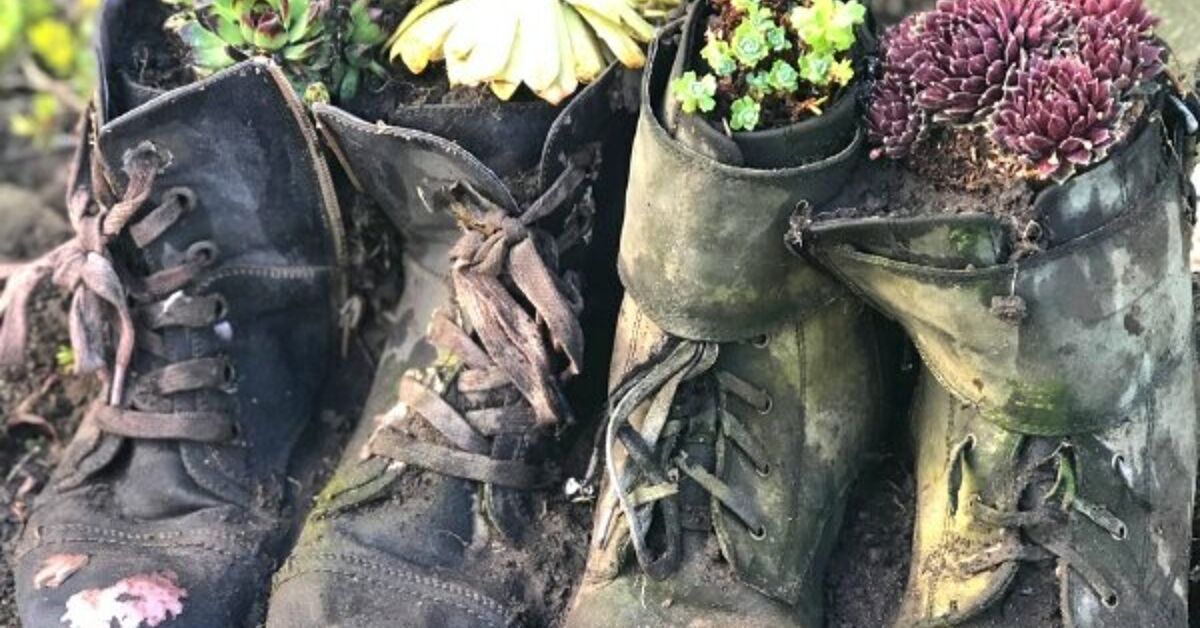
An old boot may be finished with puddles, hiking trails, muddy jobsites, and questionable dance moves, but it can still enjoy a respectable second career. With a few drainage holes, lightweight potting mix, and the right plant, worn-out footwear becomes a cheerful DIY boot planter that adds personality to a porch, patio, garden path, or backyard fence.
This upcycled garden project is inexpensive, beginner-friendly, and flexible enough to suit almost any decorating style. Cowboy boots create Western charm, rubber rain boots deliver bright cottage color, and scuffed work boots bring rustic character that no factory-made flowerpot can convincingly imitate. Best of all, the project can usually be completed in less than an afternoon.
However, a boot is not automatically a healthy plant container merely because soil fits inside it. Successful boot planters need drainage, appropriate growing media, suitable plants, and regular moisture checks. Get those basics right, and your retired footwear can remain surprisingly productive long after its walking days are over.
Container-gardening fundamentals synthesized from Better Homes & Gardens, HGTV, Penn State Extension, Iowa State University Extension, and Illinois Extension.
Why Make a Planter From an Old Boot?
A boot planter combines gardening, recycling, and outdoor decorating in one manageable project. Instead of buying another generic plastic pot, you can reuse something that already has shape, texture, and a story.
It Keeps Usable Materials Out of the Trash
A leaking rain boot or cracked work boot may no longer protect a foot, yet its upper and sole can often hold potting mix for another season or two. Repurposing old footwear will not solve the world’s waste problems single-handedly, but it is a practical way to extend the life of an item before disposal.
It Adds Instant Personality
Traditional planters are attractive, but few of them make visitors stop and say, “Is that a petunia growing out of a cowboy boot?” A boot planter naturally becomes a conversation piece. It works especially well in cottage gardens, farmhouse landscapes, children’s garden areas, and casual outdoor spaces where a little humor is welcome.
It Fits Into Small Spaces
Boots have a relatively narrow footprint, making them useful on apartment balconies, porch steps, narrow ledges, and small patios. A pair can frame a doorway, while several mismatched boots can form a playful display along a fence or garden path.
It Is Easy to Customize
You can paint the boot, preserve its weathered finish, add stenciled designs, tie twine around the ankle, or attach a small plant label. One boot can look whimsical; a coordinated row can become a deliberate landscape feature.
Choosing the Best Boot
Almost any sturdy boot can become an upcycled planter, although some materials and shapes perform better than others.
Rubber Rain Boots
Rubber boots are colorful, water-resistant, and easy to drill. Their tall shafts also provide visual height. Because rubber does not breathe like porous clay, drainage holes are essential. Dark-colored rubber can become hot in direct afternoon sun, so consider placing black or navy boots where they receive morning light and some later shade.
Leather Work Boots
Leather boots produce a handsome rustic planter. Scratches, creases, and worn toes usually improve the appearance rather than spoil it. Leather will gradually weather outdoors, especially in rainy climates, so treat this type of boot planter as evolving garden art rather than a permanent monument.
Cowboy Boots
The tall, decorative shaft of a cowboy boot makes it an excellent container for trailing flowers or ornamental grasses. Because the toe can create an awkward empty pocket, use lightweight filler only when necessary and keep the main root zone within the shaft and upper foot area.
Children’s Boots
Small boots are adorable but contain limited soil, which means they dry out quickly. They are best for compact succulents, small sedums, miniature annuals, or temporary seasonal displays. A row of children’s rain boots can also become a charming herb or flower installation, provided each plant has enough root space.
Boots to Avoid
Do not use footwear contaminated with motor oil, pesticides, solvents, sewage, or unknown chemicals. Clean ordinary dirt and debris thoroughly before planting. It is also wise to grow ornamental plants rather than edible crops in old footwear, particularly when the boot’s dyes, adhesives, coatings, or treatment history are unknown.
Materials and Tools
- One clean, worn-out boot
- Electric drill with an appropriate bit
- Awl, hammer, and large nail as a drill alternative
- Work gloves and safety glasses
- Commercial container potting mix
- A small piece of mesh, landscape fabric, or coffee filter
- Compact plant or starter plant
- Hand trowel or soil scoop
- Watering can with a narrow spout
- Optional exterior paint, sealer, twine, stencil, or plant marker
Use potting mix labeled for containers rather than ordinary yard soil. Soil dug from the garden can become dense inside a confined container, limiting drainage and reducing the air available to roots. Commercial potting media are generally lighter and more porous while still retaining useful moisture.
Potting-media guidance synthesized from Better Homes & Gardens, Penn State Extension, Iowa State University Extension, Illinois Extension, Southern Living, and Old Farmer’s Almanac.
How to Make a DIY Boot Planter
Step 1: Clean and Inspect the Boot
Remove the laces and shake out loose dirt. Scrub the exterior and interior with warm, soapy water, then rinse and allow the boot to dry. Check for sharp metal, protruding nails, broken eyelets, or loose pieces that could cause an injury.
Existing cracks are not necessarily a problem. In fact, holes in the sole may already provide some drainage. Still, inspect the bottom carefully rather than trusting one mysterious split near the heel to manage every summer thunderstorm.
Step 2: Add Drainage Holes
Place the boot on a stable work surface and wear safety glasses. Drill several holes through the sole, distributing them beneath the heel, arch, and forefoot. For a narrow children’s boot, three or four holes may be sufficient. A large work boot or cowboy boot may need five to eight.
If you do not have a drill, carefully drive a large nail through the sole with a hammer. Support the boot so it does not roll or collapse while you work. Thick work-boot soles can be surprisingly stubborn; apparently, they remain committed to workplace safety even after retirement.
Drainage is the most important construction detail. Water must be able to leave the container so the root zone receives oxygen. A layer of gravel cannot compensate for a boot with no outlet holes, and filling the toe with stones may make the planter unnecessarily heavy.
Drainage recommendations synthesized from Penn State Extension, Illinois Extension, Iowa State University Extension, HGTV, Better Homes & Gardens, The Spruce, Southern Living, and Miracle-Gro.
Step 3: Decorate the Exterior
Decoration is optional. A naturally weathered boot often looks best without intervention, but a plain rubber boot can be transformed with exterior paint. Wash it thoroughly, let it dry, and use a coating intended to adhere to flexible outdoor surfaces.
Possible designs include polka dots, flowers, house numbers, patriotic patterns, garden insects, or a contrasting painted toe. You can also wrap jute twine around the ankle, attach a waterproof tag, or loosely tie the original laces into a bow.
Let paint and sealer cure completely before adding soil. Do not coat the interior drainage area or plug the newly drilled holes.
Step 4: Cover the Holes Lightly
Place a small piece of mesh, landscape fabric, or an unbleached coffee filter over the drainage holes. This helps prevent potting mix from escaping while allowing water to flow. Use only enough material to cover the openings; wrapping the entire interior in plastic would recreate the drainage problem you just worked so heroically to solve.
Step 5: Add Potting Mix
Moisten the potting mix lightly before filling the boot if the material is extremely dry and dusty. Spoon the mix into the toe and heel, pressing gently to remove large air pockets without compacting it into a brick.
Continue filling until the mix reaches a few inches below the top of the shaft. Leave enough room for the plant’s root ball and a watering space below the rim.
Very tall boots can become top-heavy. To improve stability, set the boot inside a wider saucer, fasten a pair together, lean it securely against a fence, or attach the sole to a weather-resistant wooden base. Avoid adding excessive rocks inside because the weight makes the planter harder to move and does not improve drainage.
Step 6: Position the Plant
Remove the plant from its nursery pot and loosen tightly circling roots with your fingers. Create a planting hole, place the root ball at approximately the same depth at which it previously grew, and fill around it with fresh potting mix.
Do not bury the crown or pile soil high against soft stems. Press the mix gently around the roots, leaving a little space below the boot’s opening so water does not immediately run over the sides.
Step 7: Water Thoroughly
Water slowly until moisture begins dripping from the drainage holes. This settles the potting mix around the roots and confirms that the holes function properly. If no water appears, check whether the holes are blocked or the mix has become tightly packed.
Step 8: Choose the Right Location
Match the location to the plant rather than choosing a flower first and hoping it develops an appreciation for deep shade. Full-sun plants generally need at least several hours of direct light, while shade-tolerant plants are better choices for covered porches and north-facing spaces.
When combining multiple plants in a large boot, select varieties with similar light and moisture requirements. A drought-tolerant succulent and a thirsty impatiens may look charming together for three days, after which their relationship becomes horticulturally complicated.
Light and compatible-plant guidance synthesized from Iowa State University Extension, University of Minnesota Extension, Southern Living, and Miracle-Gro.
Best Plants for a Boot Planter
Succulents and Sedums
Succulents are strong choices for shallow or small boot planters because many remain compact and tolerate occasional dryness. Try hens-and-chicks, small echeverias, stonecrop, or trailing sedum. Use a fast-draining succulent mix and place the planter where rain will not constantly soak it.
Trailing Annuals
Trailing lobelia, calibrachoa, sweet alyssum, creeping Jenny, and small petunias can spill over the shaft dramatically. These plants soften the shape of a heavy work boot and make the display look lush rather than merely unusual.
Compact Upright Flowers
Dwarf marigolds, violas, pansies, dianthus, wax begonias, and compact coleus can perform well when their light requirements match the location. Select one healthy plant for a small boot instead of crowding several roots into limited soil.
Ornamental Grasses
A tuft of compact ornamental grass gives a cowboy boot height and movement. Choose a small variety that will not rapidly outgrow the available root space. Grass-like plants can also create the amusing impression that the boot has developed a remarkably fashionable green sock.
Seasonal Displays
Use pansies in cool spring weather, heat-tolerant annuals in summer, ornamental peppers or miniature mums in fall, and cut evergreen branches for a temporary winter arrangement. Seasonal planting keeps the project interesting without requiring one plant to survive every condition.
How to Care for a Boot Planter
Check Moisture Frequently
Boot planters contain less potting mix than standard garden containers, so they can dry quickly. Insert a finger about an inch into the mix. Water when it feels dry at that depth rather than following a rigid calendar.
During hot, windy weather, a small boot may require daily watering. In cool or cloudy conditions, it may remain moist much longer. Water thoroughly and let the excess drain instead of giving the plant frequent, tiny sips that wet only the surface.
Watering guidance synthesized from University of Minnesota Extension, Iowa State University Extension, Illinois Extension, and The Spruce.
Feed Lightly
Nutrients wash out of small containers over time. Apply a balanced liquid fertilizer at the label-recommended rate or use a suitable slow-release product. Avoid overfeeding, which can burn roots and encourage weak, excessive growth.
Rotate the Planter
If light comes primarily from one direction, rotate the boot every week or two. This encourages balanced growth and keeps the plant from leaning so far toward the sun that it appears to be escaping.
Remove Faded Growth
Pinch off spent blooms and trim dead or damaged foliage. Routine grooming improves appearance and may encourage flowering annuals to produce additional blooms.
Protect the Boot From Extreme Weather
Move lightweight planters to a sheltered location before severe storms. In freezing climates, empty and store decorative boots when the growing season ends, especially if water can collect in cracks and expand as it freezes. Leather, fabric, adhesives, and painted surfaces will generally last longer under a roof than in year-round exposure.
Common DIY Boot Planter Problems
The Plant Is Wilting Even Though the Soil Is Wet
Constantly wet mix may indicate blocked or inadequate drainage. Confirm that water can escape through the sole. If the mix smells sour or the roots are brown and mushy, remove damaged roots and repot the plant in fresh, airy media.
The Soil Dries Out Too Quickly
Move the planter away from intense afternoon sun, water more deeply, or choose a plant with lower moisture demands. A small amount of fine bark or suitable organic mulch on the surface may slow evaporation, but do not pile it against the plant’s crown.
The Boot Keeps Falling Over
Fasten two boots together with weather-resistant ties, place the boot in a weighted tray, secure the sole to a wooden board, or position it against a stable structure. A tall plant can act like a sail, so choose compact growth for exposed locations.
The Boot Is Breaking Down
Outdoor exposure eventually damages leather, fabric, thread, foam, and adhesives. Move the planter under cover during heavy rain, or place a small nursery pot inside the boot as a removable liner. The liner method reduces direct contact with wet mix and makes seasonal plant replacement easier.
Creative Boot Planter Display Ideas
- Arrange two matching cowboy boots on either side of a porch step.
- Mount lightweight rain boots securely on a fence for a vertical garden.
- Paint children’s boots in coordinating colors and plant each with a different succulent.
- Create a memorial planter from a loved one’s old gardening or work boot.
- Place house numbers on tall rubber boots near the front entrance.
- Use mismatched boots to mark the beginning of a garden path.
- Combine a boot planter with galvanized containers, wooden crates, and other upcycled garden décor.
When displaying several boot planters, repetition creates cohesion. Repeat one flower color, plant type, paint pattern, or boot style so the collection looks intentional rather than like a shoe rack lost an argument with the lawn.
A Realistic DIY Boot Planter Experience: What Usually Works
A typical boot-planter project begins with optimism and a boot that looks larger on the outside than it truly is. The first surprise usually occurs while filling the toe. Potting mix disappears into the front of the boot, yet the shaft remains stubbornly empty. Using a narrow scoop or a homemade funnel made from rolled cardboard makes the job much cleaner.
The next lesson is that drainage should be tested before planting. It is tempting to drill two holes, declare victory, and introduce a flower. During the first thorough watering, however, a heavy work boot may release only one reluctant drip. Adding holes beneath both the heel and forefoot usually produces a more even flow. Testing with plain water before adding the plant prevents an emergency repotting five minutes later.
Stability is another issue that becomes obvious only after the planter is complete. Moist soil adds weight, but a tall cowboy boot with flowers at the top can still tip in wind. Pairing two boots, placing them against a porch post, or fastening them to a discreet wooden base makes the arrangement far more dependable. A few decorative stones can be positioned around the outside of the sole, where they provide support without occupying root space.
Plant choice has the greatest effect on long-term success. A compact sedum or small trailing annual usually adapts better than a fast-growing plant with a large root system. One healthy starter often outperforms three crowded plants. The boot may look slightly sparse on planting day, but foliage soon fills the opening and begins trailing down the side.
Watering becomes the main routine. Because the container is narrow, the top may feel dry while the toe remains moist. Watering slowly allows moisture to spread through the potting mix instead of racing down one side. Lifting or gently tipping the boot after watering can also reveal whether it feels unusually heavy, a possible sign that water is collecting inside.
Appearance changes with weathering, particularly when using leather. The color may darken, stitching may fade, and the surface may develop additional cracks. This is not necessarily failure. In a rustic garden, the aging process often makes the planter more attractive. Gardeners who prefer a cleaner appearance can place a removable plastic nursery pot inside the shaft and move the boot under cover during prolonged rain.
The project also tends to attract attention. Visitors notice an old boot faster than they notice an ordinary flowerpot, especially when the plant trails from the top or the footwear has a recognizable history. A child’s outgrown rain boot can become a family garden keepsake, while a retired work boot can add personal character to a shed or workshop entrance.
At the end of the season, removing the plant and shaking out the potting mix reveals how well the system worked. Healthy roots should spread through the media without sitting in a foul, soggy mass. The boot can then be cleaned, dried, and stored for another planting. Even when it lasts only a few seasons, the project provides more use, color, and entertainment than sending the boot directly to the trash.
Conclusion
A DIY boot planter turns worn footwear into practical garden art with very little expense. The process is straightforward: clean the boot, create several drainage holes, use lightweight potting mix, select a compact plant, and monitor moisture carefully. Rubber boots provide color, leather boots offer rustic texture, and cowboy boots create dramatic height.
The most successful designs respect the same requirements as any container garden. Roots need drainage, air, suitable moisture, adequate space, and the correct amount of light. Once those essentials are handled, creativity can take over. Paint the boot, preserve its scuffs, display a matching pair, or build an entire lineup of horticultural footwear. Your old boots may never walk again, but at least they can spend retirement looking fabulous beside the petunias.
Note: Use clean footwear for this project and grow ornamental plants when the boot’s dyes, adhesives, coatings, or chemical history are unknown. Wear eye protection and secure the boot firmly when drilling or puncturing drainage holes.