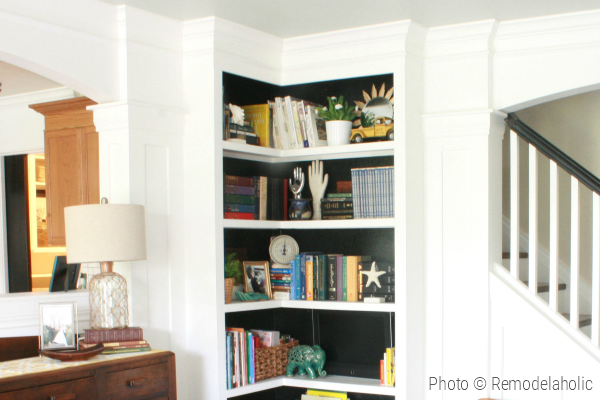
A blank corner may not look especially ambitious, but give it a few sturdy shelves and it can become a compact library, a display wall, or the home office storage you have been pretending you do not need. Building your own corner bookshelves lets you use awkward space efficiently while controlling the height, depth, finish, shelf spacing, and overall style.
This project can be adapted as a freestanding L-shaped bookcase, a wall-mounted corner shelf system, or a built-in unit trimmed to look original to the room. The following guide focuses on a sturdy floor-standing design with plywood shelves, vertical side panels, and wall anchoring. It is approachable for an intermediate DIYer, yet flexible enough for experienced woodworkers to add dado joints, adjustable shelves, lighting, decorative molding, or secret compartments for snacks.
Why Build Corner Bookshelves?
Traditional bookcases usually occupy a long, flat wall. Corner bookshelves use two walls at once, making them especially useful in apartments, bedrooms, reading rooms, home offices, and living rooms where every square foot has already been assigned three jobs.
A custom corner bookcase also solves problems that ready-made furniture cannot. Walls may be slightly out of square, baseboards may interfere with the back edges, outlets may sit in inconvenient locations, and ceilings may vary in height. Building the unit yourself allows you to work around those conditions instead of wedging a generic bookcase into the corner and hoping nobody notices the two-inch canyon behind it.
Common Corner Bookshelf Styles
Before buying lumber, decide which type best suits the room:
- Freestanding L-shaped bookcase: Two bookcase sections meet at a right angle. This is sturdy, spacious, and relatively easy to build.
- Triangular corner shelves: Individual shelves span directly across the corner. They are compact but provide less usable space for large books.
- Floating corner shelves: Hidden cleats or brackets create a clean, modern appearance. They work best for lighter collections unless heavily reinforced.
- Built-in corner bookshelves: Floor-to-ceiling shelving is secured to the walls and finished with trim, filler strips, and molding.
- Wraparound shelving: Long shelves continue around the corner, producing a seamless library look.
Plan the Bookshelves Before Cutting Anything
Successful DIY corner bookshelves begin with careful measurements. Corners have a reputation for appearing square while quietly being 88 or 92 degrees. That small difference becomes obvious when rigid shelves meet both walls.
Measure the Corner in Several Places
Measure the available width along both walls at the floor, middle, and planned top of the unit. Record the ceiling height and note baseboards, crown molding, vents, switches, outlets, windows, and doors. Use a framing square or angle finder to check the corner angle.
Do not assume the floor is level. Place a long level along both walls and across the corner. Minor floor variations can be corrected later with shims, but identifying them now prevents a mysterious leaning-bookcase situation during installation.
Choose Practical Dimensions
A bookshelf depth of approximately 10 to 12 inches accommodates most novels, cookbooks, and standard hardcovers. Oversized art books and binders may need 13 to 15 inches. A shelf that is too deep can make ordinary books look lost, while a shelf that is too shallow turns large books into tiny diving boards.
For fixed shelves, vertical openings of 10 to 12 inches suit paperbacks and many hardcovers. Openings of 13 to 15 inches are more versatile for binders and large-format books. Consider leaving one taller opening for artwork, baskets, speakers, or plants.
Control Shelf Sag
Books are dense, surprisingly heavy roommates. Long shelves can bow over time, particularly when made from particleboard or MDF. Three-quarter-inch furniture-grade plywood is a reliable choice, but shelf spans should still be kept reasonable.
For heavily loaded book storage, aim for unsupported spans of roughly 24 to 30 inches. Longer shelves should receive additional support from a center divider, wall cleat, rear rail, metal bracket, or hardwood strip attached vertically to the front edge. A 1-by-2 hardwood nosing improves stiffness while also hiding the plywood layers.
Materials and Tools
Recommended Materials
- Three-quarter-inch cabinet-grade plywood for sides and shelves
- One-quarter-inch plywood for optional back panels
- 1-by-2 lumber for face frames, cleats, and shelf edging
- Wood glue
- 1 1/4-inch and 2-inch wood screws
- 2 1/2-inch or longer structural screws for fastening into studs
- Finish nails or brad nails
- Wood filler and paintable caulk
- Primer and furniture-grade paint, or stain and a clear protective finish
- Anti-tip brackets or furniture anchors
- Shims
Useful Tools
- Tape measure, pencil, and combination square
- Four-foot level or laser level
- Stud finder
- Circular saw with a straightedge guide or a table saw
- Miter saw for trim and cleats
- Drill/driver and drill bits
- Pocket-hole jig, optional
- Router with a straight bit, optional for dadoes
- Clamps
- Random-orbit sander
- Safety glasses, hearing protection, and a dust mask or respirator
An Example Corner Bookshelf Plan
For a practical starting point, imagine an 84-inch-tall corner unit with one 30-inch-wide wing and one 42-inch-wide wing. Both sections are 11 1/2 inches deep. The shorter wing contains fixed shelves, while the longer wing includes a vertical divider to reduce the shelf span.
The two sections meet in the corner, with one bookcase side overlapping the end of the other. This creates a clean intersection without requiring complicated angled cuts. The exact overlap depends on which wall provides the best viewing angle and where the wall studs are located.
A typical cut list might include four tall side panels, one narrow divider, two bottom panels, two top panels, and enough shelves for the desired layout. Because every room is different, treat these dimensions as a planning example rather than a universal cut list.
How to Build Your Own Corner Bookshelves
Step 1: Create a Full Layout
Use painter’s tape to outline the proposed bookcase on both walls. Mark its height, width, shelf positions, and depth. Place a few books inside the taped outline to evaluate scale. This simple preview may reveal that the shelves interfere with a light switch or make the room feel as though it is slowly being eaten by a library.
Mark wall-stud locations while the walls remain accessible. Whenever possible, plan the unit so its top rails, cleats, or anti-tip brackets can be screwed directly into studs.
Step 2: Break Down the Plywood
Cut the plywood into manageable strips before making the final crosscuts. A table saw is convenient, but a circular saw guided by a clamped straightedge can produce excellent results. Support the full sheet on rigid foam insulation or sawhorses so the offcut cannot fall and tear the veneer.
Apply painter’s tape over visible cut lines to reduce splintering. Use a sharp, fine-tooth blade and cut with the best face oriented correctly for your saw. Label every panel immediately. Six nearly identical plywood rectangles can become surprisingly philosophical after lunch.
Step 3: Prepare the Shelf Supports
Fixed shelves can be joined with pocket screws, screws through the side panels, cleats, or dadoes. Dado joints are especially strong because a shallow groove supports the shelf and helps align the case during assembly. A dado approximately one-quarter inch deep is usually enough for plywood case construction.
For a beginner-friendly design, attach 1-by-2 cleats beneath each shelf. Glue and screw the cleats to the side panels, keeping them level and square. Position screws where they will be hidden or covered by trim.
Adjustable shelves are another option. Drill evenly spaced shelf-pin holes with a jig so corresponding holes remain perfectly aligned. Fixed shelves should still be included near the top, middle, and bottom to prevent the case from racking.
Step 4: Assemble the First Bookcase Section
Lay one side panel on a padded work surface. Attach the bottom, top, and fixed shelves using glue and the chosen joinery method. Add the second side panel, check the diagonals for square, and clamp the case before driving the final screws.
If the bookcase includes a back, attach it only after confirming the case is square. A plywood back dramatically improves rigidity. If you prefer an open-backed appearance, install horizontal rails near the top and bottom instead.
Step 5: Assemble the Second Section
Build the second bookcase using the same procedure. Add a vertical divider under any long shelf spans. A divider not only controls sag but also creates smaller compartments that are easier to style.
Dry-fit both sections in the room before adding decorative trim. Verify that they meet cleanly in the corner and that the front edges appear aligned from normal viewing positions.
Step 6: Reinforce the Shelf Edges
Glue 1-by-2 hardwood strips to the front edges of long shelves. Orient each strip vertically, with its narrow edge attached to the shelf. This configuration adds much more stiffness than simply applying a thin decorative band.
Clamp the strips until the glue cures. Fill tiny gaps with wood filler for a painted finish, or carefully match the hardwood species if the shelves will be stained.
Step 7: Sand and Finish the Parts
Sand visible surfaces before final installation because working inside a completed corner bookcase is approximately as enjoyable as sanding a mailbox from the inside. Begin with 120-grit paper and finish with 180- or 220-grit paper, depending on the coating system.
For paint, fill holes and imperfections, remove all sanding dust, and prime bare wood and exposed plywood edges. Apply two thin finish coats with a quality brush, foam roller, or sprayer. A durable satin or semi-gloss enamel is easier to clean than flat wall paint.
For stain, test the complete finishing schedule on scrap from the same plywood sheet. Some woods absorb stain unevenly and benefit from a pre-stain conditioner. After the stain dries, apply a compatible clear protective finish according to the manufacturer’s instructions.
Step 8: Install and Level the Units
Position the first section in the corner and use shims beneath it until it is level and plumb. Place shims over structural floor areas whenever possible rather than under thin unsupported edges.
Set the second section in place and clamp the adjoining panels together. Drill pilot holes, then connect the two cases with screws from the less visible side. Do not force the units to follow a crooked wall; keep the cases square and conceal uneven wall gaps with scribed filler strips.
Step 9: Anchor the Bookshelves
Tall bookcases must be anchored securely. Drive structural screws through upper rails or heavy-duty anti-tip brackets and into wall studs. Do not rely on finish trim, thin back panels, or light-duty plastic anchors to restrain a fully loaded bookcase.
Where a stud is unavailable, use a wall anchor specifically rated for the wall material, expected load, and application. Follow the anchor manufacturer’s instructions exactly. Store heavier books on lower shelves, and never place tempting toys or frequently used objects high on a unit where children may try to climb.
Step 10: Add Trim for a Built-In Appearance
Install face-frame strips over exposed plywood edges. Add base trim that coordinates with the room, then conceal gaps along the walls with scribed filler strips or narrow molding. Crown molding can bridge the top of a floor-to-ceiling installation.
Fill nail holes, caulk small paint-grade seams, sand repaired areas, and apply the final coat. Caulk is useful for slim stationary gaps, but it should not be expected to hide a half-inch measuring adventure.
Design Ideas That Make Corner Shelves More Useful
Add Integrated Lighting
Low-voltage LED strips or small puck lights can turn the corner unit into a focal point. Plan wiring routes before installing the back panels. Use listed lighting components, keep power supplies accessible, and consult an electrician when adding or relocating permanent electrical wiring.
Create a Reading Nook
Pair the shelves with a compact chair, floor lamp, and small table. Leaving the lower corner open can provide space for a chair, while shelving continues above it. This layout gives the room a custom-library feeling without requiring a rolling ladder or a mysterious inheritance.
Mix Open and Closed Storage
Add cabinet doors to the bottom section for games, cables, paperwork, and objects that do not contribute to the visual peace of the room. Open shelves above can hold books and decorative pieces, while the closed base provides additional stability.
Use Adjustable Shelves
Adjustable shelf pins let the bookcase accommodate changing collections. Maintain at least two or three fixed structural shelves in each section, then use adjustable shelves between them.
Mistakes to Avoid
- Cutting every part before checking the room: Dry-fit templates or taped layouts first.
- Assuming the corner is square: Measure the angle and plan for filler strips.
- Using long unsupported MDF shelves: Shorten the span or add stiffening.
- Skipping pilot holes: Pilot holes reduce splitting and make screw placement more accurate.
- Painting over dust: Dust becomes permanent texture under the finish.
- Forgetting baseboards: Remove them locally, notch the case, or create a recessed toe-kick.
- Relying on drywall alone: Attach structural elements to studs whenever possible.
- Failing to anchor the finished unit: A stable-looking bookcase can still tip when climbed or pulled.
Practical Experiences From Building Corner Bookshelves
The most valuable lesson from a corner bookshelf project is that walls are rarely as cooperative as the drawing suggests. On paper, two straight bookcases meet at a perfect 90-degree angle. In an actual house, the corner may flare outward near the ceiling, the drywall compound may create a rounded inside joint, and the baseboard may be thicker on one wall than the other.
A cardboard or hardboard template can save hours of corrective work. Before cutting expensive plywood, trace the corner shape onto scrap material and test the fit at several heights. The template does not need to touch every bump. Its purpose is to identify whether the angle changes enough to affect the final installation.
Another useful experience is to finish as many parts as possible before moving the unit into the room. Sanding the interior of a tall, narrow case is tiring, and painting the back corner after installation requires the flexibility of a circus performer. Applying primer and the first finish coat in the workshop produces cleaner results. Save the final coat for after filling fastener holes and caulking installation seams.
Large bookcases should also be assembled in sections. A single floor-to-ceiling L-shaped unit may look elegant in a drawing but can become impossible to carry through a doorway or rotate upright beneath the ceiling. Two separate cases are easier to build, finish, transport, level, and connect. Once face trim covers the joint, the sections appear to be one continuous built-in.
Shelf spacing deserves more attention than it usually receives. Perfectly equal openings look orderly, but they may waste space if most of the collection consists of short paperbacks. Measure a representative group of books before choosing shelf positions. In one practical layout, several 10-inch openings handled novels, two 13-inch openings accommodated hardcovers, and one 16-inch opening held albums and decorative objects. The varied spacing looked intentional and stored more than a symmetrical layout would have.
It is also wise to load-test one shelf before finishing the entire unit. Place a realistic row of heavy books on the longest shelf and leave it for a few days. If the shelf shows early deflection, add a hardwood front edge, rear cleat, center divider, or concealed steel reinforcement. Fixing the structure during construction is far easier than explaining later why the history section has developed a gentle smile.
During installation, shims are not evidence of failure. They are normal tools for fitting square cabinetry into an imperfect building. Insert them carefully beneath the base and behind attachment points, then trim the excess after the unit is secure. Pulling a crooked cabinet tightly against a crooked wall can twist the case and cause adjustable shelves or doors to bind.
Finally, plan the shelf display while building. A corner bookcase looks best when it contains some visual breathing room. Books can be arranged vertically and horizontally, with small objects used as accents rather than filling every remaining inch. Heavier volumes belong near the bottom, both for stability and because lifting an enormous encyclopedia over your head is an outdated form of exercise.
The result of careful planning is more than storage. A well-built corner bookshelf changes how the room is used. It gathers scattered books, creates a visual destination, and turns an ignored architectural leftover into one of the most useful parts of the home.
Final Thoughts
Building your own corner bookshelves is a manageable custom-furniture project when it is divided into clear stages: measure the room, select a suitable design, control shelf spans, assemble square cases, finish the surfaces, and anchor everything securely.
The design does not need complicated joinery to succeed. Accurate cuts, dependable shelf supports, plywood backs or structural rails, reinforced front edges, and solid wall attachments matter more than decorative complexity. Add trim, lighting, adjustable shelves, or lower cabinets only after the basic structure is strong.
Measure the actual books, respect the weight they create, and allow for the charming imperfections of real walls. Your formerly empty corner will become useful storageand may even make it appear that you have read every book on the shelves. That part is between you and the dust jackets.