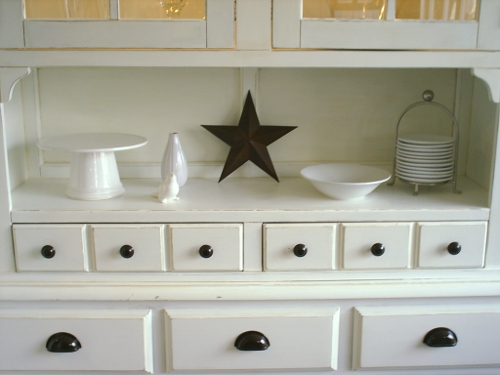
A beautiful buffet makeover is one of those home projects that feels suspiciously magical. One day, you have a tired old dining room buffet sulking in the corner like it has been personally offended by modern decor. A weekend later, it is glowing with fresh paint, pretty hardware, smooth drawers, and enough personality to make guests ask, “Where did you buy that?” That is when you get to smile mysteriously and say, “Oh, this old thing?”
Buffets, sideboards, and dining room cabinets are makeover gold because they are practical, sturdy, and highly visible. They store dishes, linens, candles, board games, serving trays, holiday chaos, and sometimes the “I’ll deal with this later” pile. With the right prep, paint, finish, and styling, an outdated buffet can become a statement piece for a dining room, entryway, living room, breakfast nook, or even a home bar setup.
This guide walks through a complete buffet makeover from planning to polishing. You will learn how to choose a design direction, prep the surface properly, paint for durability, refresh hardware, style the finished piece, and avoid the little mistakes that turn a dream project into a sanding-based therapy session.
Why a Buffet Makeover Is Worth the Effort
A buffet is usually bigger than a nightstand but less complicated than a full kitchen cabinet project. That makes it a perfect middle-ground DIY: large enough to transform a room, small enough to finish without needing a renovation permit, three cousins, and emotional support snacks.
The biggest benefit is cost. A quality new sideboard can be expensive, especially if you want solid wood, storage drawers, cabinet doors, and stylish details. A secondhand buffet, inherited piece, or older cabinet may already have the bones you need. Paint, primer, new pulls, wood filler, sandpaper, and a protective topcoat can create a high-end look at a fraction of the price.
Another advantage is customization. Store-bought furniture comes in whatever finish the manufacturer decided was “neutral farmhouse espresso walnut gray beige.” A DIY buffet makeover lets you choose the exact mood: elegant black, creamy white, deep green, dusty blue, warm oak, cheerful coral, or a two-tone finish with natural wood on top and painted cabinets below.
Most importantly, a buffet makeover saves a usable piece from the landfill. Upcycling old furniture is both budget-friendly and environmentally sensible. Instead of replacing a sturdy cabinet because the finish looks dated, you can revive it and give it a new job in your home.
Start With a Clear Makeover Plan
Before opening a paint can, pause and decide what the buffet needs to become. A beautiful buffet makeover begins with purpose, not just color. Ask yourself where the piece will live, what it needs to store, and what style will look natural in the room.
Decide Where the Buffet Will Go
In a dining room, a buffet can hold serving dishes, table linens, wine glasses, candles, and seasonal decor. In an entryway, it can become a landing zone for keys, baskets, mail, and shoes. In a living room, it can work as media storage. In a kitchen, it can become a coffee station, baking cabinet, or extra pantry zone. The location affects everything: color, finish, hardware, durability, and styling.
Choose a Style Direction
Here are several popular buffet makeover ideas that work beautifully:
- Classic black buffet: Sophisticated, timeless, and dramatic without being fussy.
- Warm white or cream buffet: Bright, fresh, and ideal for cottage, coastal, or traditional spaces.
- Sage green buffet: Soft, earthy, and friendly to wood tones, brass, and woven decor.
- Navy blue sideboard: Rich, polished, and perfect with gold hardware.
- Two-tone makeover: Natural wood top with painted base for a custom furniture look.
- Modern fluted buffet: Added trim or pole-wrap on the doors for texture and designer energy.
- Vintage chalk-style finish: Soft matte paint with subtle distressing for an aged, collected feel.
If the buffet has gorgeous wood grain, consider keeping part of it natural. If the finish is damaged, orange-toned, or patchy, paint may be the better path. The goal is not to force the piece into a trend. The goal is to make it look like it was always meant to be in your home.
Tools and Supplies for a Buffet Makeover
You do not need a professional workshop to refresh a buffet, but you do need the right basics. Good tools make the difference between a smooth, durable finish and a project that whispers, “I was painted during a panic spiral.”
Basic Supplies
- Drop cloth or plastic sheeting
- Screwdriver or drill for removing hardware
- Painter’s tape
- Degreasing cleaner or mild soap
- Microfiber cloths or tack cloth
- Wood filler for dents and holes
- Putty knife
- Sandpaper or sanding sponges in medium and fine grits
- Primer suited to wood, laminate, MDF, or previously finished surfaces
- Furniture paint, cabinet paint, enamel, chalk-style paint, or acrylic paint
- Quality angled brush
- Mini foam or microfiber roller
- Protective topcoat, wax, or furniture-safe sealer
- New knobs, pulls, hinges, or backplates if desired
- Respirator or dust mask, gloves, and eye protection
If the buffet may have old paint, especially from before 1978, be careful. Disturbing lead-based paint can create hazardous dust. In that case, testing and lead-safe work practices are essential before sanding or stripping.
Step-by-Step: How to Create a Beautiful Buffet Makeover
1. Remove Drawers, Doors, and Hardware
Start by taking off knobs, pulls, hinges, doors, and drawers. Label hinges and doors if they are not perfectly interchangeable. Older furniture has a charming habit of being slightly uneven, which is another way of saying “the left door may only love the left side.” Place screws and small parts in labeled bags so reassembly does not become a treasure hunt.
2. Clean the Buffet Thoroughly
Cleaning is not glamorous, but it is the foundation of a durable furniture makeover. Buffets collect cooking residue, furniture polish, hand oils, dust, wax, and mystery grime from decades of family dinners. Paint does not bond well to a dirty or greasy surface. Wash every exterior and interior surface, then let the piece dry fully.
3. Repair Dents, Scratches, and Old Hardware Holes
Use wood filler to patch dents, gouges, chipped veneer, and unwanted hardware holes. Let the filler dry according to the product instructions, then sand it smooth. If you are changing from two-hole pulls to single knobs, or replacing old hardware with larger modern pulls, this step helps create a clean, custom result.
4. Sand or Degloss the Surface
Sanding gives primer and paint something to grip. You usually do not need to sand down to raw wood unless the old finish is failing, flaking, or uneven. For many buffet makeovers, a light scuff sanding is enough to dull the shine. Use a sanding sponge for curves, trim, and decorative grooves. After sanding, remove dust with a vacuum, microfiber cloth, or tack cloth.
For laminate, veneer, or glossy factory finishes, do not skip this step. Slick surfaces need extra help, and a bonding primer is often the secret weapon. If you oversand thin veneer, however, you can damage it, so use gentle pressure and patience.
5. Prime for Better Adhesion and Coverage
Primer is the handshake between the old buffet and the new paint. It helps block stains, improves adhesion, reduces uneven coverage, and creates a smoother base. Use a primer that matches the material. Raw wood, laminate, MDF, particleboard, and previously painted furniture may need different formulas.
Apply primer in thin, even coats. Brush corners and trim first, then roll flat areas. After the primer dries, lightly sand with fine-grit sandpaper to remove tiny bumps. Wipe away dust before painting. That little sanding step is where many DIY projects quietly level up from “cute” to “wait, did you buy this from a boutique?”
6. Paint in Thin, Patient Coats
Thin coats are better than thick coats. Thick paint can drip, sag, stay tacky, show brush marks, or peel later. Use an angled brush for edges and a mini roller for flat surfaces. Work with the grain when possible and avoid overworking the paint once it starts to set.
Most buffet makeovers need two coats of paint, sometimes three if you are covering a dark finish with a light color. Allow proper drying time between coats. Lightly sanding between coats can create an extra-smooth finish, especially on the top, drawer fronts, and doors.
7. Seal the Finish
A buffet is a working piece of furniture. It may hold serving platters, lamps, vases, keys, trays, coffee supplies, or holiday decorations. A protective topcoat helps guard against scratches and stains. Choose a water-based polyurethane, polycrylic, wax, or built-in durable furniture enamel depending on your paint type and desired sheen.
For a modern look, satin is a reliable choice. Matte looks soft and elegant but may show marks more easily. Semi-gloss is easier to wipe clean but can highlight imperfections. Let the finish cure before loading the buffet with heavy decor. Dry is not always the same as fully cured.
8. Upgrade the Hardware
Hardware is jewelry for furniture. A simple buffet can look expensive with the right knobs or pulls. Brass adds warmth, matte black feels modern, antique bronze looks traditional, glass knobs feel vintage, and leather pulls bring a relaxed handmade touch.
If the original hardware is beautiful, clean it before replacing it. Sometimes old brass pulls just need polish and appreciation. If the old hardware looks like it has survived three garage sales and a haunted attic, new pieces can instantly modernize the buffet.
Beautiful Buffet Makeover Ideas to Try
Two-Tone Wood and Paint
One of the most attractive buffet makeover ideas is a stained wood top with a painted base. This approach keeps natural warmth while refreshing the body. Try a walnut top with a black base, oak with cream, or natural pine with sage green. It feels custom without being overly trendy.
Inside Surprise
Paint the inside of the cabinets a contrasting color or add peel-and-stick wallpaper to the back panel. This is a small detail that makes opening the doors delightful. It is like giving the buffet a secret personality, but one that stores napkin rings.
Fluted Door Detail
For a modern designer look, add wood trim, half-round molding, or fluted panels to flat cabinet doors. Paint everything the same color for a built-in texture effect. This works especially well on plain thrifted buffets that have good storage but no architectural detail.
Bar Cabinet Conversion
Turn the buffet into a home bar by adding stemware racks, bottle storage, a mirrored tray, and warm lighting. Deep green, navy, charcoal, or black paint gives this makeover a grown-up lounge feeling. Add brass hardware and suddenly your dining room has entered its jazz era.
Coffee Station Buffet
A buffet can become a charming coffee bar with mugs inside, beans in jars, syrups on a tray, and baskets for filters or tea. Paint it warm white, soft blue, or natural wood for a cozy kitchen corner. This is especially useful if counter space is limited.
Common Buffet Makeover Mistakes to Avoid
Skipping Prep Work
Prep is where the project succeeds or fails. Cleaning, sanding, filling, and priming may feel slow, but they help the finish last. If paint peels after a few weeks, the problem usually began before the first coat went on.
Using the Wrong Primer
A regular wall primer may not bond well to glossy laminate or slick factory finishes. Use a bonding primer when the surface is shiny, synthetic, or difficult. Use stain-blocking primer if old wood tannins, knots, or stains might bleed through light paint.
Painting Hardware Without Thinking
Painting knobs and pulls can work for low-touch decorative pieces, but buffet hardware gets handled often. Painted hardware may chip over time. Replacing or cleaning hardware is usually more durable than coating it with leftover paint and optimism.
Rushing Reassembly
Paint can feel dry before it has cured. Reinstalling doors, stacking dishes, or dragging trays across the top too soon can create scratches and dents. Give the finish time to harden. Your patience will be rewarded with fewer sad little paint scars.
Ignoring Safety
If your buffet is tall, heavy, or placed where children may climb, consider anchoring it securely. Keep heavy objects low and avoid placing tempting items where kids might try to reach them. A beautiful buffet should be stylish, useful, and safe.
Budget and Timeline for a Buffet Makeover
A buffet makeover can be budget-friendly, but costs vary depending on what you already own. A basic refresh with leftover paint and existing hardware may cost very little. A full transformation with primer, premium paint, topcoat, new pulls, wallpaper, trim, and tools can cost more, but still usually less than buying a comparable new furniture piece.
A realistic timeline is two to four days, mostly because of drying and curing time. Day one can include cleaning, repairs, sanding, and primer. Day two can include paint coats. Day three can include sealing. Day four can be for reassembly and styling. Yes, technically you might do it faster. No, the paint gods do not always appreciate that kind of confidence.
How to Style the Finished Buffet
Once the makeover is complete, styling makes the buffet feel intentional. Start with a large anchor piece above it, such as a mirror, framed art, or wall sconce arrangement. Add height with a lamp, branches, tall vase, or candlesticks. Use a tray to group smaller objects. Mix textures like ceramic, glass, wood, metal, linen, and woven baskets.
Try not to overcrowd the top. A buffet should look useful, not like every decorative object in the house held a meeting there. Leave some breathing room so the makeover itself can shine.
Experience Notes: What a Beautiful Buffet Makeover Teaches You
Every beautiful buffet makeover comes with lessons, and most of them arrive wearing paint dust. The first lesson is that the “before” stage always looks worse than expected. Once the drawers are out, the hardware is off, and the sanding begins, the buffet may look like it has made several questionable life choices. This is normal. In fact, the messy middle is usually proof that the transformation is working.
One useful experience is to test your color before committing. Paint can look completely different on furniture than it does on a tiny card at the store. A creamy white may turn yellow beside cool walls. A soft gray may look blue in morning light. A bold green may look elegant at noon and like a vegetable drawer at night. Paint a sample on the back or inside of a door and check it throughout the day.
Another practical lesson is to take photos before removing hardware and doors. Even if you think you will remember where everything goes, future you may be standing in a room full of screws, muttering like a detective in a hardware-based mystery. Photos make reassembly easier and help you compare the final result with the original piece.
Good brushes matter more than beginners expect. A cheap brush can shed bristles into wet paint, which is a tiny tragedy with surprisingly large emotional consequences. A quality angled brush gives cleaner lines around trim, while a small roller helps flat sections look smooth. If your buffet has carved details, keep a small artist brush nearby for corners and grooves.
Do not panic after the first coat of paint. First coats often look streaky, uneven, and deeply disappointing. This does not mean the project has failed. It means the first coat is doing first-coat things. The second coat usually brings coverage, richness, and relief. The third coat, when needed, is where the piece starts acting expensive.
The top surface deserves extra respect. Buffets are hardworking pieces, and the top receives the most abuse. If you plan to use the buffet for serving food, drinks, keys, decor, or a coffee maker, protect it well. Use a durable topcoat and allow enough cure time. Later, add felt pads under lamps, trays, and decorative objects to prevent scratches.
Finally, styling should match real life. If the buffet stores table linens, keep them organized in baskets. If it becomes an entryway cabinet, create a drawer for keys and sunglasses. If it becomes a bar, store bottles securely and keep delicate glassware practical. The most successful makeover is not just the one that photographs beautifully. It is the one that makes daily life easier while looking charming enough to make you casually walk past it more than necessary.
Conclusion
A beautiful buffet makeover is more than a coat of paint. It is planning, cleaning, repairing, sanding, priming, painting, sealing, and styling with intention. Whether you are rescuing a thrift-store sideboard, updating an inherited dining room buffet, or giving an old cabinet a new life as a coffee station, the process rewards patience.
The secret is to respect the prep work and choose finishes that match how the piece will be used. Clean thoroughly, sand lightly, prime wisely, paint in thin coats, protect the surface, and finish with hardware that makes the buffet feel complete. Done well, your makeover can look custom, function beautifully, and become one of the most admired pieces in the room. Not bad for furniture that once looked like it was waiting for someone to apologize to it.