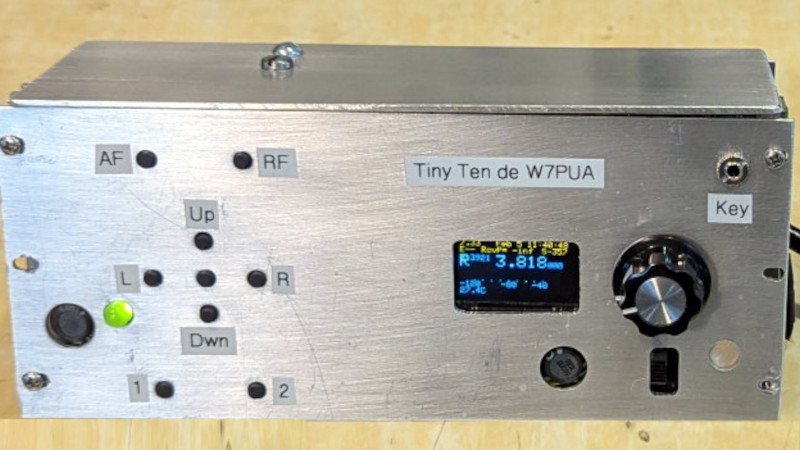
There is a special kind of joy in amateur radio that begins with the sentence, “I could probably build that.” Sometimes this sentence leads to a tidy weekend project. Other times it leads to burned fingertips, mysterious oscillations, a bench covered in coax scraps, and the discovery that your coffee mug has become a temporary parts tray. A ten band SDR transceiver for homebrewers lives proudly in that second categoryand that is exactly why it is so exciting.
For decades, building a serious multi-band HF transceiver was a heroic undertaking. Covering several amateur bands meant switching filters, taming local oscillators, managing mixers, fighting unwanted harmonics, and creating a usable front panel without turning the enclosure into a NASA launch console. Add multiple operating modesSSB, CW, AM, FM, and digitaland the project could quickly feel like asking a toaster to become a communications satellite.
Software defined radio, or SDR, changed the rules. Instead of forcing every function into analog hardware, SDR moves much of the signal processing into software. Filtering, demodulation, audio shaping, sideband selection, gain control, and digital-mode support can be handled by code running on a fast processor. The result is not magic, although it sometimes feels suspiciously close. It is math, timing, RF discipline, and careful designall packed into a box small enough to make old boat-anchor radios feel personally attacked.
What Is a Ten Band SDR Transceiver?
A ten band SDR transceiver is a radio that can transmit and receive across ten amateur HF bands, typically from 160 meters through 10 meters. These bands include 160, 80, 60, 40, 30, 20, 17, 15, 12, and 10 meters, depending on the design goals and regulatory privileges of the operator. For homebrewers, the attraction is obvious: one compact radio that can explore local evening ragchews, long-distance DX, digital weak-signal work, portable field operation, and weekend tinkering without needing a separate rig for every slice of spectrum.
The “transceiver” part matters. A receiver only listens. A transmitter only talks. A transceiver does both, and that means the designer must think carefully about signal flow in both directions. On receive, the radio must protect weak signals from noise, overload, and poor filtering. On transmit, it must generate a clean signal, control power output, suppress harmonics, and avoid splattering across the band like a toddler with a paintbrush.
The “SDR” part means the radio uses digital signal processing to perform jobs that older radios handled with analog filters, oscillators, mixers, detector circuits, and audio stages. A modern homebrew SDR may use a direct-conversion I/Q architecture, a high-speed microcontroller such as a Teensy 4.1, a codec for audio conversion, and software blocks for filters, demodulators, automatic gain control, equalization, and transmit audio processing.
Why Homebrewers Love the SDR Approach
Homebrewers love SDR because it turns radio design into a playground where hardware and software meet in the middle. Instead of soldering a new crystal filter every time you want a different bandwidth, you can adjust filter parameters in code. Instead of building a large audio processing board, you can use floating-point DSP blocks. Instead of stacking knobs like a 1970s stereo receiver, you can create menus, soft keys, and display pages.
This does not mean SDR is easy. It simply moves some of the difficulty from coils and capacitors into sampling rates, quadrature balance, processor load, latency, and firmware design. The soldering iron gets a partner: the compiler. Together, they will make you proud, humbled, and occasionally suspicious of semicolons.
For a ten band SDR transceiver, the software approach is especially powerful because each band has its own personality. The 160-meter band is atmospheric and moody. The 40-meter band can feel like a busy neighborhood diner. The 20-meter band is the classic DX highway. The 10-meter band can be quiet one minute and wide open the next, as if the ionosphere suddenly remembered it had a job. SDR lets a single radio adapt to those personalities with selectable filters, modes, tuning steps, gain settings, and display behavior.
The Tiny Ten Idea: Small Radio, Big Ambition
One real-world inspiration for this topic is Bob Larkin W7PUA’s “Tiny Ten,” a compact ten band amateur transceiver project built around a Teensy 4.1 and floating-point DSP. The design goal is wonderfully homebrewer-ish: a small, backpack-friendly radio with meaningful HF capability, not just a toy receiver in a fancy box. The project emphasizes ten watts, ten bands, multiple modes, a built-in battery, compact controls, and careful construction to manage digital noise.
The Tiny Ten concept shows what makes modern homebrew radio fascinating. It is not merely a commercial transceiver copied in a garage. It is a design experiment. It asks: How much real radio can fit in a small enclosure? How much work can be moved into software? Can a minimal display and a simple control layout still feel usable? Can a portable SDR transceiver deliver clean SSB, CW, and digital performance without needing a desk full of accessories?
That is the heart of the homebrew spirit. The point is not only to save money. In many cases, buying a commercial radio is cheaper than the total cost of parts, tools, revisions, replacement parts, and emotional recovery snacks. The point is understanding. When you build the radio, every signal path becomes a story. Every filter has a reason. Every connector placement is a tiny negotiation with physics.
Core Architecture of a Homebrew Ten Band SDR
1. RF Front End
The RF front end is the gatekeeper. It decides what signals enter the receiver and how gracefully the radio handles strong nearby signals. In a ten band design, the front end usually needs band-specific filtering or switchable networks. Without proper filtering, strong broadcast signals, local transmitters, or out-of-band energy can wander into the receiver and create images, overload, or strange noises that make you question your life choices.
Some homebrew designs use plug-in filter or coil boards. This old-school idea pairs beautifully with modern SDR. Plug-in networks reduce weight and allow band-optimized performance, especially for portable use. If you are heading out for 40 and 20 meters, why carry filters for every band? It is the radio version of packing only the socks you need, except the socks have inductance.
2. Local Oscillator and I/Q Conversion
Many SDR transceivers use quadrature signalscalled I and Qto preserve amplitude and phase information. A synthesizer such as the Si5351 can generate a stable clock, often followed by divider circuitry to produce accurate quadrature signals. The radio then converts RF signals down to audio or low intermediate frequencies where the DSP can take over.
I/Q balance is critical. If the amplitude or phase relationship between I and Q is off, the receiver may suffer from poor opposite-sideband rejection. On transmit, imbalance can produce unwanted sideband energy. Software correction can help, but good analog layout still matters. SDR is powerful, but it is not a magical forgiveness machine. Bad grounding, noisy clocks, and careless routing will still send you a bill.
3. Digital Signal Processing
DSP is where an SDR transceiver becomes flexible. A fast processor can run FIR filters, Hilbert transforms, demodulators, audio equalizers, AGC routines, transmit shaping, and mode-specific processing. The Teensy 4.1, for example, offers enough performance for serious real-time audio work in a compact board. Floating-point audio libraries make experimentation friendlier because they simplify the handling of signal levels and math-heavy processing blocks.
For SSB, DSP can generate and receive upper or lower sideband signals. For CW, it can shape keying envelopes to reduce clicks and filter received signals tightly enough to pull a tone out of the mud. For AM and FM, software demodulators can provide additional listening options. For digital modes such as FT8, stable frequency control and clean signal generation become especially important.
4. Transmit Chain and Power Amplifier
The transmit chain separates a nice receiver from a real transceiver. Generating a clean RF signal takes discipline. A homebrew SDR must control drive levels, maintain linearity for SSB, shape CW transitions, and filter harmonics before the signal reaches the antenna. Power amplifiers in compact rigs often use MOSFET devices, followed by band-specific matching and low-pass filter networks.
Ten watts is a sweet spot for portable HF. It is more forgiving than ultra-low-power QRP, yet still friendly to small batteries, lightweight heat sinking, and field antennas. With efficient antennas and good operating technique, ten watts can work surprising distances. It will not bulldoze a pileup like a legal-limit amplifier, but it will teach you patience, timing, and humility. Amateur radio has always been excellent at teaching humility, usually right after you call CQ for eight minutes and the only reply is static.
Why Ten Bands Are Harder Than They Sound
At first, ten bands sounds like a menu option. Just add more bands, right? Unfortunately, RF engineering is not a buffet where everything stays neatly separated. A transceiver that works beautifully on 80 meters may show noise issues on 10 meters. A filter layout that behaves at 3.8 MHz may reveal parasitic problems at 28 MHz. A power amplifier that delivers clean output on one band may need different matching to remain efficient and legal on another.
Lower HF bands are often dominated by external noise, so receiver noise figure may be less noticeable. On higher bands, receiver sensitivity becomes more critical. The radio must also maintain oscillator cleanliness, switching reliability, and stable calibration across a wide frequency range. The wider the coverage, the more the design becomes a balancing act between convenience, performance, cost, weight, and sanity.
This is why modular band networks make sense. They let the builder optimize matching and filtering per band instead of forcing one broadband solution to do everything. Broadband designs are convenient, but they can involve compromises in efficiency and harmonic suppression. Plug-in networks feel charmingly retro, yet they solve a very modern problem: how to get excellent performance without carrying unnecessary hardware.
Modes That Matter: SSB, CW, AM, FM, and Digital
A ten band SDR transceiver becomes much more useful when it supports multiple modes. SSB is the daily driver for voice communication on HF. CW remains beloved because it is efficient, narrow, and oddly addictive once the rhythm gets into your brain. AM has vintage charm and can be useful for monitoring. FM is less common on most HF bands but can be relevant around 10 meters. Digital modes such as FT8 reward stability, timing, and clean audio paths.
In SDR, these modes are often software personalities. The same hardware can behave differently depending on which DSP blocks are active. Change the mode, and the radio changes filters, demodulation, audio routing, transmit shaping, and display information. That flexibility is a major SEO keyword in human form: useful, practical, and likely to make homebrewers click “build log” at 1:00 a.m.
Practical Design Lessons for Builders
Keep Digital Noise on a Short Leash
Digital circuitry is convenient, but it is noisy. Fast processors, displays, switching regulators, USB connections, and clock lines can inject hash into sensitive receiver stages. A serious homebrew SDR needs shielding, filtering, careful grounding, short signal paths, and thoughtful board layout. The best time to think about digital noise is before the PCB arrives. The second-best time is after you hear a mysterious buzz every 12 kHz and begin bargaining with the universe.
Respect the Power Budget
Portable SDR transceivers live or die by current consumption. A bright display, active processor, audio codec, synthesizer, relays, and power amplifier all want energy. On receive, low current draw means longer field operation. On transmit, battery voltage sag can affect output power and signal quality. Builders should measure current in each mode and avoid assuming that “small board” means “small appetite.” Some tiny devices eat electrons like popcorn.
Design the User Interface Early
Homebrew radios often fail not because they cannot transmit, but because they are annoying to use. A one-knob, few-button interface can work beautifully if the menu structure is logical. It can also become a tiny escape room with RF output. Decide early how the operator will change bands, modes, tuning steps, gain, filters, memories, and calibration settings. A readable display matters, especially outdoors.
Test One Band at a Time
Trying to debug all ten bands at once is a quick path to confusion. Start with one band, prove the receive chain, then prove transmit at low power into a dummy load. Measure harmonics, output power, stability, and audio quality. Add bands gradually. Every band teaches a different lesson, and some of those lessons arrive wearing boots.
Specific Examples of Smart Homebrew Choices
A smart ten band SDR design may use a high-accuracy TCXO reference so frequency drift does not sabotage digital modes or narrow CW work. It may use a latching antenna relay to save current. It may regulate a higher voltage rail only during transmit to improve power amplifier performance while conserving receive-mode battery life. It may store settings in nonvolatile memory so the radio wakes up exactly where the operator left it.
Another clever choice is controlled-envelope SSB processing, which can increase average talk power while keeping the signal clean. In plain English, it helps your voice sound louder and more effective without turning your signal into a splatter festival. Good transmit audio is not just vanity. It improves readability and makes contacts easier, especially when power is limited.
For CW, Gaussian or otherwise carefully shaped keying can reduce clicks. That is neighborly engineering. A clean signal is a form of politeness. Nobody wants to be the person whose homebrew rig sounds like a zipper fighting a thunderstorm.
Legal and Operating Considerations
In the United States, amateur radio operation falls under FCC Part 97. Homebrewing is not only allowed; it is part of the amateur service’s purpose of advancing technical skill and experimentation. However, transmitting still requires the correct license privileges, proper station identification, operation within authorized bands, and attention to signal quality. Building your own radio is freedom with responsibilities attached.
Before transmitting with any homebrew SDR transceiver, test into a dummy load. Verify output power, harmonic suppression, carrier suppression, opposite-sideband suppression, frequency accuracy, and audio quality. Use an oscilloscope, spectrum analyzer, RF power meter, or calibrated SDR receiver if available. If you do not have every instrument, local radio clubs can be gold mines of equipment and wisdom. Also, someone there has probably made the exact mistake you are about to make and will save you three evenings.
Why This Project Matters
A ten band SDR transceiver for homebrewers matters because it proves that advanced radio design is no longer locked behind commercial labs. With accessible microcontrollers, open-source libraries, affordable PCB fabrication, shared build notes, and a strong amateur-radio community, individual builders can experiment with ideas that once required large teams and expensive equipment.
It also bridges generations of radio design. Plug-in coils and band-specific networks nod to classic homebrew practice. Digital signal processing, floating-point libraries, and compact processors represent the modern frontier. Put them together, and the result is not old versus new. It is old shaking hands with new while both agree that RF grounding is still annoying.
Experience Notes: Living With a Ten Band SDR Transceiver Project
Building or studying a ten band SDR transceiver changes the way you think about radio. At first, the project looks like a collection of blocks: synthesizer, mixer, codec, processor, display, amplifier, filters, battery, enclosure. After a while, you stop seeing blocks and start seeing relationships. The local oscillator affects the mixer. The mixer balance affects opposite-sideband rejection. The codec input level affects dynamic range. The display wiring affects receiver noise. The battery affects transmit power. The enclosure affects heat. The operator affects everything, usually by pressing the wrong button at the wrong time.
One of the most valuable experiences is learning to test patiently. A homebrewer quickly discovers that “it works” is not one result. It works on receive. It works on transmit. It works on 80 meters. It works on 10 meters. It works into a dummy load. It works with an antenna. It works on the bench. It works outside when the sun is bright and the display suddenly looks like a postage stamp at the bottom of a swimming pool. Each condition reveals something new.
Another experience is learning the importance of ergonomics. A tiny radio is delightful until the menu system becomes a puzzle. The best compact rigs make common actions fast: tune, change band, adjust volume, select mode, narrow the filter, check battery voltage, and transmit confidently. A homebrewer may begin by obsessing over dynamic range and end by redesigning the button labels. This is normal. The radio must serve the operator, not the other way around.
Field operation adds its own education. A ten watt SDR transceiver with a light battery and wire antenna can be deeply satisfying. You carry it to a park, toss a line into a tree, connect a simple dipole or end-fed wire, and suddenly the small box on the picnic table becomes a doorway into the world. You hear stations rising and fading. You adjust filters. You answer a CQ. Maybe your first contact is only a few hundred miles away. Maybe it crosses an ocean. Either way, the thrill is different when the radio is something you understand from the inside.
There is also a humbling side. Homebrew SDR projects expose every weak assumption. A switching regulator that seemed harmless becomes a noise source. A filter that simulated nicely behaves differently after soldering. A connector adds just enough inductance to spoil harmonic suppression. Firmware that looked elegant on the screen becomes clumsy when operated with cold fingers. These are not failures. They are the tuition payments of real learning.
The most rewarding experience is the moment the project becomes a radio instead of a circuit. You hear a signal, tune it in, adjust the filter, and realize the chain is alive from antenna to speaker. Later, when you transmit and receive a good report, the satisfaction is hard to beat. A commercial radio can give you contacts. A homebrew ten band SDR transceiver gives you contacts plus a story. And in amateur radio, the story is half the signal.
Conclusion
A ten band SDR transceiver for homebrewers is more than a technical project. It is a compact classroom for RF design, digital signal processing, portable power, user-interface design, and practical operating skill. It blends classic amateur-radio craftsmanship with modern software-defined flexibility. The result is a radio that can cover multiple HF bands, support several modes, and invite endless experimentation.
For builders, the lesson is clear: start small, test carefully, document everything, and respect both the analog and digital sides of the design. SDR gives homebrewers incredible tools, but RF still plays by its own rules. When the two worlds cooperate, the reward is a transceiver that feels personal, capable, and wonderfully alive.
Note: This article is intended for educational and editorial use. Anyone building or operating an amateur radio transmitter should follow applicable licensing rules, band privileges, and clean-signal practices.