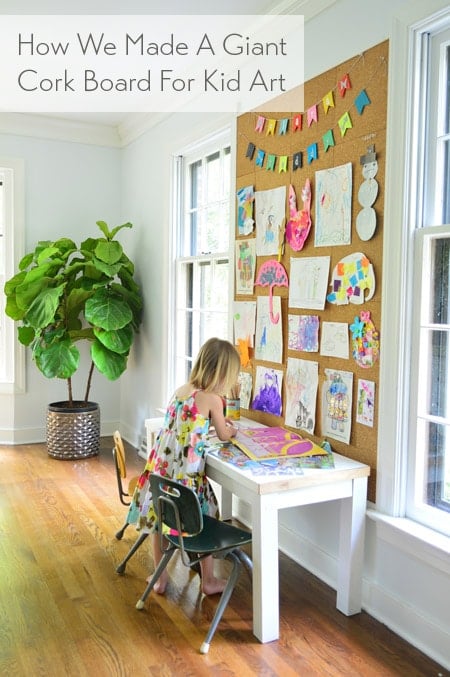
Children make art faster than most homes can display it. One afternoon can produce a watercolor octopus, three marker portraits, a paper-plate planet, and something described only as “a machine that feeds pancakes to dragons.” The refrigerator handles the first wave, but eventually the magnets surrender.
A DIY cork wall for kid art turns that cheerful paper avalanche into a rotating family gallery. It gives drawings a proper home, clears counters and cabinet doors, and shows children that their creative work matters. Unlike fixed frames, a cork board wall can change in seconds as paintings, school awards, photos, and birthday cards come and go.
The project is beginner-friendly, but good planning matters. Cork thickness, wall condition, adhesive choice, display height, and child-safe fasteners determine whether the result becomes a useful gallery or an office bulletin board that wandered into the playroom.
Why a Cork Wall Is a Smart Kids’ Art Display
Cork is warm, lightweight, easy to cut, and visually forgiving. Its natural texture softens a room, while its pin-ready surface allows artwork to be added, grouped, labeled, and rotated without measuring for new nails every Tuesday.
A defined display area also creates a healthy limit. When the cork is full, the family can choose what stays, what enters an archive, and what gets photographed before recycling. Children gain a visible place of pride, while adults avoid turning every scrap of construction paper into a permanent resident.
Choose the Best Location
Find a Wall People Actually See
Good locations include a playroom, breakfast nook, homework area, hallway, mudroom, or family room. A visible wall encourages regular use; a hidden wall behind a door usually becomes a dusty museum of last year’s calendar.
Avoid damp walls, loose paint, grease, and frequent splashes. Cork and adhesive need a dry, smooth, stable surface. Direct sunlight can lighten natural cork and fade paper, so use blinds or rotate the artwork if the wall receives strong sun.
Plan for Children’s Height and Safety
Place much of the display between a school-age child’s shoulder height and an adult’s eye level. Younger children can choose and position art while an adult manages the fasteners.
In homes with toddlers, keep loose pins completely out of reach. Use fixed clothespins, large wall-mounted clips, ribbon bands, or an adult-only pinning zone. Pushpins and other small sharp objects do not belong on the floor, in an open cup, or anywhere a young child can grab them.
Choose Cork Tiles, Cork Roll, or Framed Panels
Cork Tiles
Tiles are easy to handle, replace, and arrange in a grid or geometric pattern. The challenge is alignment: a tiny error in the first row can become a visible staircase later. Open several packages and mix the tiles before installation because natural cork varies in color and pattern.
Cork Roll
Roll cork creates fewer seams and gives a large wall a calm, unified look. Large sheets can curl or trap air, so installation is easier with two adults. One person guides the material while the other smooths it.
Thin craft cork is mostly decorative. For a functional kids’ art display, select cork around 3/8 to 1/2 inch thick, or mount thinner cork over a suitable pin-friendly backing. Otherwise, a standard pushpin may immediately hit drywall and fail to hold the art securely.
Framed Panels
Renters or anyone nervous about permanent adhesive can cover stable backing panels with cork, add wood trim, and secure the panels to studs or appropriate wall anchors. This still makes holes, but it limits adhesive damage and allows the gallery to move later.
Do not rely on a few removable picture strips for a large panel unless the mounting product specifically supports its size, weight, surface, and location. Anything installed in a child’s space should be firmly secured.
Materials and Tools
- Wall-rated cork tiles, roll, or sheets
- Manufacturer-approved adhesive or supplied self-adhesive backing
- Tape measure, pencil, level, square, and straightedge
- Sharp utility knife with extra blades
- Hand roller or laminate roller
- Painter’s tape, drop cloth, and optional primer
- Optional wood trim and suitable fasteners
- Fixed clips, clothespins, or adult-controlled pushpins
Buy 5 to 10 percent more cork than the measured area. Extra material covers edge cuts, damage, color selection, and the inevitable practice piece created after someone says, “I can cut this without marking it.”
How to Build a DIY Cork Wall for Kid Art
Step 1: Measure and Plan the Layout
Measure the wall and calculate the square footage. Draw a simple plan that includes outlets, switches, vents, shelves, baseboards, and furniture. Decide whether the cork will cover the full wall, create a horizontal band, or sit inside a framed rectangle.
A full wall makes a bold playroom feature, but a 4- to 6-foot-wide gallery above a desk or bench may provide enough room with less material. Lay tiles on the floor or mark the outline with painter’s tape before committing.
Step 2: Acclimate and Inspect the Cork
Cork can respond to changes in temperature and humidity. Follow the product instructions; many wall materials should rest in the installation room for at least 48 to 72 hours. Inspect every piece before gluing, reserve damaged tiles for edge cuts, and mix pieces from different cartons for balanced color variation.
Step 3: Prepare the Wall
Remove hooks, tape, dust, grease, and loose paint. Fill holes, sand high spots, and let repairs dry completely. The finished surface should be flat, firm, clean, and dry. Glossy paint may need light scuffing, and porous repairs may need primer, depending on the adhesive instructions.
Test the system in an inconspicuous area. Use only an adhesive approved for both the cork and the wall. Choose a lower-emission product when practical, ventilate the room, keep children away during installation and curing, and follow the label. Contact adhesive can bond almost instantly, so it is not the moment for improvisational choreography.
Step 4: Mark Level Reference Lines
Ceilings and floors are rarely perfectly straight. Draw a true horizontal baseline and vertical reference line with a level. Dry-fit the first row and adjust the starting point so the final layout does not end with a tiny sliver at one edge.
Some manufacturers recommend starting near the center and working outward; others use a corner-based layout. Follow the product directions, but check level frequently. Hope is uplifting, yet still not a measuring tool.
Step 5: Cut Cleanly
Place cork on a protected surface. Hold a metal straightedge firmly and make several light passes with a fresh utility blade. One aggressive cut can tear the edge or send the knife wandering.
Measure carefully around outlets and switches. Turn off power before removing cover plates, and never cover the electrical box. Work beyond simple cover-plate removal should be handled by a qualified professional.
Step 6: Apply Adhesive and Install
Peel-and-stick tiles, contact adhesive, and other wall systems have different requirements. Respect the specified coverage, open time, working time, and ventilation instructions. Too little adhesive can create lifting edges; too much may squeeze through seams or leave bumps.
Install one manageable section at a time. Align the first piece with the reference lines, press from the center outward, and roll the surface to improve contact and remove air. Butt seams closely without crushing the cork. Clean stray adhesive immediately using the manufacturer’s approved method.
Step 7: Finish the Edges and Let It Cure
Exposed cork edges can look modern, but narrow wood trim gives the wall a furniture-like finish and hides minor cutting differences. Paint or seal trim before installation so the finish stays off the cork.
Wait for the full curing period before pinning artwork. Keep the room ventilated and prevent children from pulling at corners while the bond develops. This is the least exciting part of the project and one of the most important.
Turn the Surface Into a Family Gallery
Create Simple Zones
Divide the cork loosely into areas such as “New This Week,” “Family Favorites,” or one section per child. Small labels create order without making the wall feel formal. They also prevent one enormous painting from slowly annexing the entire gallery.
Repeat a Few Display Elements
Use two or three fastening styles throughout the wall, such as fixed wooden clothespins, black clips, and a small set of decorative pins controlled by adults. Empty glass-free frames mounted over selected areas can stay in place while the artwork inside changes.
Leave Open Space
Do not cover every inch on the first day. Negative space makes bright artwork easier to see and lets the cork texture become part of the room. A little breathing room is the difference between a gallery and a very determined lost-and-found board.
Add Separate Captions
Label artwork with the child’s name, age, date, and comments on a separate card rather than writing across the original. Ask the artist what is happening in the picture. “Our house during a jellybean storm” is the kind of detail future adults will be glad someone recorded.
Rotate, Archive, and Release
Choose a regular gallery reset: every Sunday, once a month, or whenever the wall reaches capacity. Let children select some of the pieces that remain. Adults may prefer the tidy rainbow collage, while the child considers a wrinkled garbage-truck drawing the undisputed masterpiece.
- Archive: Store meaningful originals flat in a labeled portfolio or box.
- Photograph: Capture bulky, fragile, or temporary projects in even natural light.
- Release: Recycle ordinary practice pages after the child has had a chance to discuss them.
A yearly photo book can preserve dozens of creations without requiring a climate-controlled warehouse.
Cleaning and Maintenance
Dust cork with a soft brush vacuum attachment. Blot small marks with a barely damp cloth, and avoid soaking the material or using abrasive cleaners and strong solvents. Rotate pin locations, remove loose fasteners, and save spare tiles in a dry closet for future repairs.
Common Mistakes to Avoid
- Buying decorative cork that is too thin to hold pins
- Installing over dust, grease, loose paint, or damp repairs
- Skipping the manufacturer’s acclimation instructions
- Starting without level reference lines
- Using an adhesive not approved for the materials
- Leaving loose pushpins within a toddler’s reach
- Filling the entire wall before the gallery has room to grow
Experience Notes: What Living With a Kid Art Cork Wall Is Really Like
The first noticeable change is not decorative; it is behavioral. Before a dedicated display exists, children’s art usually lands in a transition zone: the kitchen counter, dining table, shoe cabinet, or a parent’s work bag. Once the cork wall is ready, everyone knows where new work belongs. The decision becomes immediate, and paper clutter drops without anyone announcing a complicated household system.
Children also become surprisingly interested in curation. At first, a young artist may want to hang everything, including a page with one purple line and a sticker attached sideways. After several gallery rotations, many children begin comparing pieces and choosing favorites. They notice size, color, subject, and available space. The wall quietly becomes an exercise in editing, arranging, and storytelling.
Families often learn that the installation does not need to be flawless to feel special. Natural cork disguises tiny gaps, and children’s artwork is remarkably effective at covering the seam that caused fifteen minutes of adult debate. The details that matter are a level overall shape, firmly bonded edges, enough thickness for the fasteners, and hardware appropriate for the children’s ages.
Another practical lesson is to install more clips than expected. Pushpins are fast, but fixed clips work better for art that changes often, rippled watercolor paper, and homes with younger siblings. Clothespins can also let school-age children swap lightweight drawings independently. For a featured piece, a glass-free frame mounted over the cork provides a focal point without adding a breakable surface.
The wall can create meaningful conversations. Children notice when adults make room for their work. They may lead visitors directly to the gallery, explain details that grown-ups missed, or compare a recent drawing with an older one. Instead of asking only, “What is it?” adults can ask about color choices, favorite parts, difficult steps, or what the child might add next.
Sibling households may need one additional rule: equal territory is not always equal attention. Give each child a reliable section, then reserve a shared feature area for the week’s selected work. Rotate who chooses the feature piece. This prevents the oldest child’s detailed projects from crowding out a preschooler’s smaller drawings and turns gallery management into a cooperative family job rather than a quiet competition for cork.
There are less poetic lessons. Glitter travels. Thick blobs of school glue can stick to cork. Oversize paper curls forward as though trying to escape. A monthly reset helps: remove everything, vacuum gently, sort the art, replace damaged labels, and reinstall a smaller selection. Five minutes of maintenance prevents the gallery from becoming a bulletin-board version of an overfilled junk drawer.
The most successful displays evolve as children grow. Preschool paintings may give way to comic strips, science projects, team photos, concert tickets, and handwritten goals. The cork wall can shift from a kids’ art display into a family inspiration board without another renovation. That flexibility is why the project often earns its wall space long after the first finger paintings come down.
Conclusion
A DIY cork wall for kid art organizes a steady stream of paper while giving children’s ideas a meaningful place in the home. Choose pin-ready cork, prepare the wall carefully, use an approved adhesive, build from accurate reference lines, and match the fastening system to the children’s ages.
Keep the layout simple, leave room to breathe, and rotate the display regularly. The gallery will never look exactly the same from month to monthand that is the point. It becomes more personal every time a new masterpiece arrives.
Note: Always follow the cork and adhesive manufacturers’ surface, ventilation, installation, and curing instructions. Keep loose pushpins and other small sharp fasteners away from toddlers and young children.
SEO Tags
Research note: This article synthesizes practical guidance from WE Cork, AmCork, the U.S. EPA, the U.S. CPSC, This Old House, HGTV, NAEYC, PBS Parents, Scholastic, Real Simple, Architectural Digest, Apartment Therapy, The Home Depot, 3M, and The Spruce.