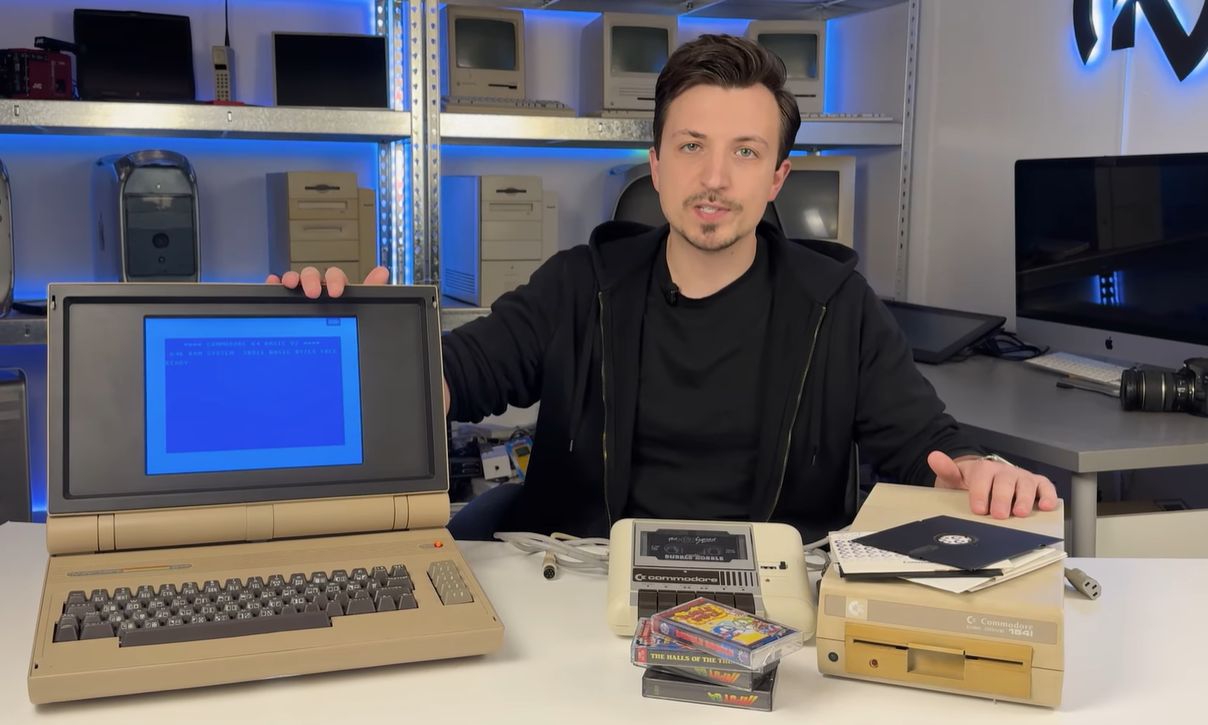
Building a Commodore 64 laptop is the kind of project that sounds unreasonable until you remember the entire retro-computing hobby is built on unreasonable joy. The original Commodore 64 was never meant to be portable. It was a beige, keyboard-shaped home computer that expected to sit near a television, hum politely, and load games from a cassette or floppy drive while you questioned the meaning of patience. Turning that legendary machine into a laptop means combining 1980s charm with modern maker tools, careful electronics planning, and just enough stubbornness to make a multimeter nervous.
The good news? A Commodore 64 laptop is absolutely possible. Builders have done it with original C64C motherboards, FPGA recreations, Raspberry Pi-based emulation, custom keyboards, 3D-printed cases, compact LCD panels, and battery systems. The less-good news? There is no single “drop these parts into a box and enjoy” recipe. Every build forces you to make decisions about authenticity, portability, power, display output, keyboard feel, heat, weight, and whether your finished machine should behave like museum hardware or like a modern tribute wearing vintage sunglasses.
This guide walks through the practical thinking behind building a Commodore 64 laptop: what makes the original computer special, which hardware path to choose, how to plan the case and screen, what to consider for power, and how to avoid building a beautiful plastic brick. It is written for makers, collectors, retro gamers, and anyone who has ever looked at a 40-year-old computer and thought, “Nice, but what if it had a handle?”
Why Build a Commodore 64 Laptop?
The Commodore 64 is one of the most beloved computers ever made. Introduced in 1982, it used the MOS 6510 processor, featured 64 KB of RAM, and became famous for its VIC-II graphics chip and SID sound chip. Those details matter because the C64 was not just another early home computer. It had personality. It could run games, teach programming, power music experiments, and turn a television into a portal to pixelated adventure.
Building a laptop version is not only about convenience. It is about reimagining what Commodore might have made if portable computers had been cheaper, lighter, and less likely to require the upper-body strength of a furniture mover. A C64 laptop can become a functional daily retro machine, a showpiece for a maker event, a portable coding station for BASIC, or a conversation starter that makes ordinary laptops look emotionally underdeveloped.
There is also a preservation angle. Original Commodore 64 systems are aging. Power supplies fail, plastic yellows, chips run hot, and working peripherals become harder to find. A laptop build can protect original parts by giving them a new enclosure, or it can avoid vintage hardware entirely by using FPGA or emulation. Either way, the goal is the same: keep the C64 experience alive without needing a dedicated corner of the house and a CRT that weighs as much as a small moon.
Start With the Big Decision: Real Hardware, FPGA, or Emulation?
Before you cut plastic, order parts, or whisper encouraging words to a soldering iron, choose the brain of your Commodore 64 laptop. This decision affects almost everything: size, power consumption, compatibility, cost, repairability, and how “real” the final machine feels.
Option 1: Original Commodore 64 Hardware
The purist route is to use an actual Commodore 64 motherboard, often from a later C64C because its board revisions can be slimmer and easier to fit into a custom case. This approach gives you genuine silicon, real timing quirks, authentic keyboard scanning, and the satisfaction of knowing there is a true 1980s computer inside. It is the retro equivalent of putting a carbureted engine into a custom roadster: charming, mechanical, and occasionally dramatic.
The challenge is size and reliability. Original boards were not designed for laptop enclosures. They need stable power, careful mounting, video conversion, and protection from flexing. The original power requirements are also less convenient than modern single-voltage systems, because classic C64 hardware uses both 5V DC and 9V AC. That makes battery design more complicated. If you go this route, expect more electrical planning and more troubleshooting.
Option 2: FPGA-Based C64
An FPGA board recreates the behavior of a Commodore 64 in modern hardware. Products and projects in this category can offer excellent compatibility while adding conveniences like HDMI output, USB storage, Ethernet, Wi-Fi, lower power use, and compact layouts. For a laptop, that is very attractive. HDMI makes display selection easier, USB simplifies input and storage, and modern power requirements are much friendlier to batteries.
FPGA is a strong middle ground. It is not original silicon, but it can feel far closer to real hardware than a casual software emulator. For many builders, an FPGA-based C64 laptop is the sweet spot: authentic enough to satisfy retro instincts, modern enough to avoid turning the project into a wiring opera.
Option 3: Raspberry Pi and C64 Emulation
The most flexible route is to use a Raspberry Pi running a Commodore 64 emulator such as VICE or a bare-metal option like BMC64. This approach can be compact, affordable, and easy to power from modern USB-C battery systems. It also gives you software flexibility, save states, disk image management, HDMI output, and quick setup.
The trade-off is authenticity. Emulation can be excellent, but some users notice differences in latency, display timing, or SID sound behavior. For casual gaming, BASIC programming, demos, and a portable retro experience, a Raspberry Pi build is often more than enough. For hardcore demo-scene accuracy, original hardware or FPGA may be more satisfying.
Designing the Laptop Case
The case is where the project becomes visible, and it is also where many builds quietly go to cry. A Commodore 64 laptop should look intentional, not like a keyboard fell into a lunchbox during a thunderstorm. Good case design starts with layout.
Most successful builds follow a clamshell layout: keyboard on the bottom, screen on the top, electronics underneath or behind the keyboard, and ports along the sides or rear. A 10-inch to 12-inch display works well because it preserves the retro feel without making the machine too bulky. A 4:3 screen is especially attractive because it matches the era better than a wide panel. C64 software was designed for old televisions and monitors, not cinematic spreadsheets.
For fabrication, builders usually choose one of three paths: 3D printing, CNC-cut panels, or modifying an existing laptop or portable terminal shell. 3D printing offers the most creative freedom, especially for breadbox-inspired curves, custom key spacing, and decorative vents. CNC acrylic or aluminum panels can look clean and professional. Reusing an existing shell can save time but often requires awkward compromises, because old laptops were designed around very different components.
Do not design the case around looks alone. Plan internal supports, screw posts, cooling space, cable paths, battery access, and serviceability. A laptop that cannot be opened without snapping three hidden clips and inventing new swear words is not a finished project; it is a future problem wearing a nice outfit.
The Keyboard: The Soul of the Build
A Commodore 64 laptop lives or dies by its keyboard. The original C64 keyboard has unique legends, special keys, function keys, and a layout that is not quite modern. You can use an original keyboard, build a custom mechanical replacement, or map a modern compact keyboard through a controller.
Using an original keyboard gives the best nostalgia. The keycaps, legends, and feel immediately say “Commodore.” However, original keyboards are large, old, and may need cleaning or repair. Custom mechanical keyboard projects, including C64-inspired layouts, can provide a satisfying typing experience while making the build thinner and easier to wire. A microcontroller such as a Raspberry Pi Pico or similar board can translate key presses to USB or matrix signals depending on the chosen computer platform.
For authenticity, preserve the special keys: RUN/STOP, RESTORE, the Commodore key, function keys, and cursor behavior. Those are not decorative details. They are part of how C64 software works. Leaving them out is like restoring a classic car and replacing the steering wheel with a TV remote.
Choosing the Display
The original Commodore 64 output video for televisions and monitors, not modern laptop panels. Your display plan depends on your hardware path. A Raspberry Pi or FPGA system with HDMI is easiest: choose a compact HDMI LCD, mount it in the lid, and tune scaling to avoid ugly stretching. A 4:3 LCD is ideal, but harder to find than widescreen panels. If you use a widescreen display, configure the image with side borders so circles remain circles and sprites do not look like they discovered pancakes.
Original hardware needs more care. You may need a composite-compatible LCD, an S-video solution, or a video converter. The C64’s video signal has quirks, and cheap converters can introduce lag, poor color, or shimmering artifacts. A display that looks fine with a modern HDMI device may treat vintage composite video like a mysterious swamp creature. Test before final mounting.
Brightness controls, viewing angles, and lid hinge strength also matter. Retro games often use high-contrast graphics, but BASIC text must remain readable. If the screen washes out whenever you tilt it by three degrees, your laptop will be portable only in the technical sense.
Power and Battery Planning
Power is the part of the project where optimism should put on safety goggles. A portable C64 needs stable voltage, enough current, charging protection, and safe battery management. Modern Raspberry Pi and FPGA builds are simpler because they can often run from USB-C power banks or dedicated lithium battery modules with regulated output. Raspberry Pi 5 systems, for example, are happiest with a strong 5V USB-C supply capable of high current.
Original C64 hardware is trickier because it expects both 5V DC and 9V AC. Recreating that from batteries is possible, but it requires a proper power design, not a “close enough” adapter arrangement. Poor power can damage vintage chips, and replacement parts are not getting younger. If you are not comfortable designing safe power circuits, use a known-good modern C64 power solution or consult someone experienced with electronics.
Always include a main power switch, fuse protection where appropriate, ventilation, and access to the battery. Do not permanently seal lithium cells inside a case. Batteries age, swell, and eventually need replacement. A trapdoor or removable battery bay is not only practical; it is future-you sending present-you a thank-you card.
Storage: From Floppies to SD Cards
A laptop Commodore 64 should not depend on carrying a stack of floppy disks unless your goal is historical fitness training. Modern storage options make the experience much easier. SD2IEC-style devices, Ultimate-style cartridges, USB storage on FPGA systems, or disk image files in emulators can provide fast access to games, demos, utilities, and BASIC programs.
If authenticity matters, consider adding external ports for real Commodore peripherals such as joysticks, serial devices, or even a 1541 floppy drive. A laptop with working joystick ports feels far more complete than one that forces every game through awkward keyboard mapping. For emulation builds, USB joystick adapters or DB9-to-USB interfaces can preserve the feel of original controllers.
The best storage setup is one that matches how you will actually use the machine. If you want to program in BASIC, quick file saving matters. If you want to play games, easy disk image selection matters. If you want to run demos, timing and compatibility matter. Choose convenience where it helps and authenticity where it counts.
Cooling, Ports, and Everyday Usability
Commodore 64 laptop builds can look simple from the outside, but internal heat and cable clutter can ruin reliability. Original chips can run warm. Raspberry Pi boards can throttle without cooling. FPGA systems still need airflow. Plan vents, heat sinks, and internal spacing early. Do not wait until the final assembly to discover your machine is basically a toaster with sprites.
Ports should be reachable but protected. HDMI, USB, power input, cartridge access, joystick ports, audio output, and SD card slots all need thoughtful placement. Rear ports look clean but can be annoying on a small desk. Side ports are convenient but can interfere with hands or controllers. A removable panel can help if you want a smooth exterior without sacrificing access.
Usability also includes boot behavior. A great C64 laptop should turn on and land quickly at a familiar BASIC prompt or launcher. Long boot sequences break the illusion. One reason bare-metal emulation and FPGA systems are attractive is that they can feel more appliance-like than a full desktop operating system. The closer the machine feels to “switch on, start computing,” the more magical it becomes.
Software Setup and Testing
Once the hardware is assembled, the software experience needs polish. For emulation, configure video scaling, joystick mapping, keyboard layout, SID model, drive behavior, and autostart settings. VICE is powerful, but power brings menus, and menus bring the possibility of spending an entire evening adjusting settings instead of playing anything. Start with a stable preset, then tune slowly.
For BMC64 or similar bare-metal setups, the goal is low-latency, fast-booting C64 behavior on Raspberry Pi hardware. That can make the laptop feel more like a dedicated retro computer and less like a modern computer pretending to be one. For FPGA builds, update firmware carefully, back up configurations, and document what version works with your setup.
Testing should happen in stages. First test the board outside the case. Then test the display. Then test the keyboard. Then test power. Then test everything together before closing the enclosure. Finally, run a mix of BASIC programs, games, demos, joystick input, sound tests, and storage operations. A build that survives ten minutes of one game is not fully tested. It is merely flirting with functionality.
Common Mistakes to Avoid
The first mistake is designing the case too small. Thin is nice, but serviceable is better. Leave room for cables, connectors, airflow, and human fingers. The second mistake is ignoring the keyboard until late in the project. The keyboard determines case width, controller wiring, and the entire feel of the machine.
The third mistake is underestimating power. A weak supply can cause crashes, display flicker, audio noise, corrupted storage, or worse. The fourth mistake is using a poor display scaler and accepting ugly lag. Retro games depend on quick response. If joystick input feels delayed, the laptop will look great and play like it is thinking about your request.
The final mistake is chasing perfect authenticity at the expense of finishing. A Commodore 64 laptop is already a compromise between eras. Decide what must be authentic and what can be modern. Maybe the keyboard feel matters more than original chips. Maybe real joystick ports matter more than a real SID. Maybe portability matters more than period-correct weight. The best build is the one you actually complete and enjoy.
Real-World Inspiration
Several well-known projects show what is possible. Ben Heck’s original-hardware Commodore 64 laptop proved that a real C64 board could be transformed into a portable computer with a custom enclosure, screen, and modern storage approach. More recent portable C64-inspired builds have used Raspberry Pi hardware, 3D-printed cases, custom keyboards, and VICE-based software to create machines that look like alternate-history products from the 1980s.
Modern retro hardware also changes the equation. FPGA-based C64 recreations bring HDMI, USB, network features, and compatibility improvements that make portable builds more practical. Meanwhile, Raspberry Pi systems offer a flexible and budget-friendly path for makers who want to focus on industrial design, keyboard layout, battery packaging, and usability rather than vintage chip survival.
The important lesson from these projects is not that one method is “correct.” It is that every successful Commodore 64 laptop has a clear philosophy. Some are preservation projects. Some are functional art. Some are portable game machines. Some are engineering exercises with a beige accent. Decide your philosophy first, and the parts list becomes much easier.
Extra Experiences From Building A Commodore 64 Laptop
The most surprising experience in building a Commodore 64 laptop is how quickly the project stops being just a computer build and becomes a negotiation with nostalgia. On paper, the job looks straightforward: choose a board, add a screen, connect a keyboard, power it safely, and put everything in a case. In practice, every decision asks a tiny emotional question. Should the keys feel exactly like the original? Should the screen have scanline effects? Should the case be beige, brown, gray, or some deliciously odd color that looks like it came from an office supply catalog in 1984?
One practical lesson is to prototype with cardboard before committing to plastic or metal. A rough cardboard mockup can reveal problems that CAD drawings hide. You may discover that the screen angle is wrong, your wrists land on a sharp edge, the joystick port is exactly where your hand wants to be, or the machine is too deep to fit comfortably in a backpack. Cardboard has no ego. It tells the truth cheaply.
Another experience is learning that cable management deserves more respect than it gets. Inside a compact retro laptop, every ribbon cable, USB lead, display cable, power wire, and audio line competes for space. A beautiful internal layout can become spaghetti after one display hinge is added. It helps to plan cable channels, strain relief, and connector access from the beginning. Label wires during testing, even if you think you will remember them. You will not. The future arrives quickly, and it brings confusion.
The keyboard phase is usually the emotional high point. When you press RUN/STOP or type a simple BASIC command and see it appear on the screen, the project suddenly feels alive. It is not just a collection of parts anymore. It becomes a tiny time machine with a battery indicator. Even an emulated build can feel special if the keyboard layout, boot experience, and display settings are tuned with care.
Testing brings humility. A machine may boot perfectly on the workbench and then fail after being closed because one cable bends too tightly. Audio may buzz when the screen brightness changes. A battery module may fit until screws are installed. A hinge may work beautifully until the display cable resists movement like a tiny plastic protester. These issues are normal. The trick is to treat the first assembly as a test fit, not a final victory parade.
There is also a unique joy in using the finished laptop in public. Open a modern laptop and nobody cares. Open a Commodore 64 laptop and people appear from nowhere. Someone will remember typing BASIC. Someone will mention a favorite game. Someone will ask whether it runs Doom, because apparently every device must face that question eventually. The machine becomes a bridge between generations of computing, from slow-loading floppies to instant-on emulation and custom firmware.
In the end, building a Commodore 64 laptop teaches patience, planning, electronics, design, and restraint. It also teaches that old computers still have new stories left in them. The finished machine may not be the thinnest, fastest, or most practical laptop in the room. But it will have something better: character. And character, unlike USB-C adapters, never goes out of stock.
Conclusion
Building a Commodore 64 laptop is a rewarding blend of retro computing, hardware design, electronics, and personal taste. Whether you choose original C64 hardware, an FPGA recreation, or Raspberry Pi emulation, the project succeeds when the final machine feels coherent. It should boot reliably, display cleanly, type comfortably, run classic software, and make you smile every time that familiar blue screen appears.
The best approach is to start with a clear goal. If authenticity is your priority, consider original hardware or FPGA. If portability and ease of construction matter most, emulation may be the better path. Plan the case around the keyboard and screen, give power design the seriousness it deserves, and test every subsystem before final assembly. A Commodore 64 laptop is not just a mod. It is a love letter to one of the most influential home computers ever made, only now it closes like a laptop and looks ready to confuse airport security in the friendliest possible way.