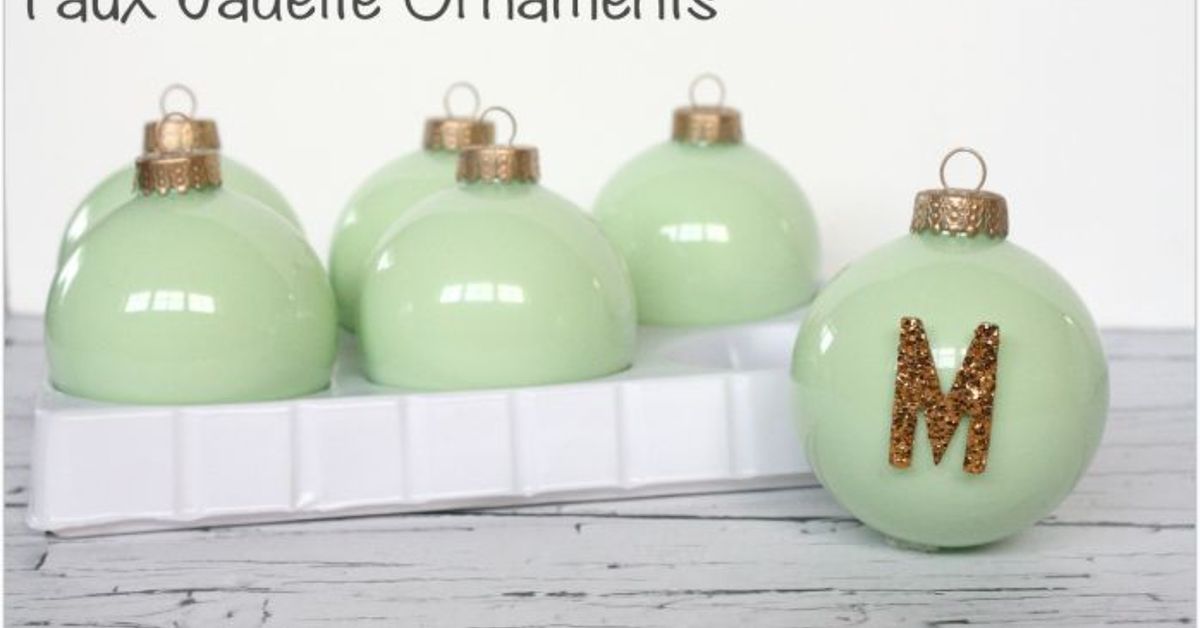
Jadeite glass has a special talent: it looks cheerful, nostalgic, and slightly fancy without behaving as though it owns a yacht. Its milky mint-green color recalls vintage American kitchens, flea-market treasures, and holiday decorations that somehow survived three generations, two attic floods, and at least one highly motivated cat.
“`
Authentic jadeite kitchenware is collectible, so transforming real vintage pieces into Christmas ornaments would be expensive and mildly horrifying. The smarter option is to recreate the look with clear glass or shatterproof plastic ornaments, acrylic paint, and a few finishing tricks.
The result is a set of DIY jadeite ornaments with the soft opacity, luminous color, and midcentury charm of vintage green glasswithout sacrificing Grandma’s mixing bowl.
“`
What Makes an Ornament Look Like Jadeite?
“`
Despite the name, jadeite kitchenware is not carved from jade. In American collecting, jadeite generally refers to opaque or semi-opaque green milk glass that became especially popular during the early and middle decades of the 20th century.
Vintage examples range from pale celadon to deeper mint and apple green. The most recognizable pieces have a creamy body, a softly luminous surface, and enough variation to prevent the color from looking flat.
That distinction matters for this project. A coat of bright green paint may produce a perfectly respectable green ornament, but it will not create the jadeite effect. To imitate vintage jadeite glass, focus on three characteristics:
- A softened green: Think mint blended with warm white rather than neon lime.
- Controlled opacity: The finish should look milky, not dry or chalky.
- Subtle depth: Gentle tonal variation makes the color resemble molded glass instead of painted plastic.
A Simple Jadeite Color Recipe
Start with approximately four parts warm white acrylic paint and one part mint or light green. Add the tiniest touch of pale yellow if the mixture looks too blue or icy.
For a deeper restaurant-ware green, add another half-part of green rather than black. Black can quickly turn the mixture gray and gloomy, which is not the festive mood we are chasing.
Test the color on a clear disposable spoon or scrap of transparent packaging. Paint usually appears darker while wet and lighter after drying, because apparently it enjoys suspense.
“`
Supplies for DIY Jadeite Ornaments
“`
- Clear glass or shatterproof plastic ornaments
- Multi-surface acrylic paint suitable for glass or plastic
- Warm white, mint green, and optional pale yellow paint
- Small disposable cups and wooden craft sticks
- A miniature funnel, squeeze bottle, or folded paper funnel
- Soft brushes and a small foam pouncer
- Rubbing alcohol and lint-free cloths
- Wooden skewers, an egg carton, or another drying rack
- Compatible clear satin or gloss craft sealer
- Ribbon, velvet cord, baker’s twine, or replacement caps
- Optional metallic paint, paint markers, transfers, or fine glitter
Glass ornaments provide the richest and most convincing glow, particularly when painted from the inside. Plastic ornaments are lighter, safer around children and pets, and less likely to turn craft night into an emergency meeting with the vacuum cleaner.
Both materials work well when properly cleaned and paired with compatible paint.
“`
How to Make Classic Jadeite Christmas Ornaments
“`
Step 1: Clean the Ornament
Remove the metal cap and hanger. Wipe the ornament with rubbing alcohol and a lint-free cloth to remove fingerprints, dust, grease, and manufacturing residue.
If you plan to coat the inside, make sure it is completely dry. Avoid touching cleaned surfaces with your fingers because skin oils may interfere with paint adhesion.
Step 2: Mix the Jadeite Paint
Combine your selected green and warm white in a disposable cup. Mix slowly to avoid whipping air bubbles into the paint.
For interior coating, the paint should flow steadily but remain thick enough to cover the surface. Use only a thinning medium approved by the paint manufacturer. Too much water can create weak coverage, streaking, or a finish that peels like a sunburned tourist.
Step 3: Pour and Rotate
Pour a small amount of paint into the ornament. Rotate it slowly so the mixture travels across the entire inner surface.
Do not shake the ornament aggressively. Shaking may trap air bubbles that dry into tiny craters. Add more paint only when necessary, then pour the excess into a disposable container once the inside is covered.
Step 4: Add Subtle Color Variation
For a more realistic jadeite appearance, add two or three tiny streaks of a lighter version of the green before the base coat settles. Rotate the ornament once or twice so the shades blend gently.
The goal is not dramatic marbling. The finished ornament should appear to be one unified color with soft movement beneath the surface.
Step 5: Drain and Dry
Place the ornament upside down over a skewer, rack, or egg carton opening so excess paint can drain. Protect the surface underneath with paper or a disposable tray.
Once the main drips stop, turn the ornament upright to prevent a heavy ridge from collecting around the neck. Follow the paint manufacturer’s curing instructions. “Dry to the touch” does not always mean “ready to survive holiday storage.”
Step 6: Finish the Cap
A standard silver cap works, but antique brass, soft gold, or aged copper looks particularly attractive against jadeite green.
Paint inexpensive caps with a compatible craft paint or stipple two metallic shades over them for an aged effect. Reattach the cap only after the ornament has completely cured.
“`
Alternative Jadeite Ornament Finishes
“`
Matte Pottery-Style Jadeite
Paint the outside of an ornament with two thin coats of jadeite green. For a soft vintage texture, add a small amount of baking soda to acrylic paint or stipple the second coat with a foam pouncer.
This method produces a ceramic or pottery-like finish instead of luminous glass, making it ideal for farmhouse, cottage, and Scandinavian-inspired Christmas trees.
Ribbed Depression-Glass Effect
Choose ornaments with fluting, diamonds, ribs, or molded panels. Paint them from the inside so the textured exterior remains glossy and reflects the tree lights.
The raised design creates natural highlights and shadows, producing a surprisingly convincing vintage-glass appearance with very little artistic skill.
Faux Collector’s Edition
After the green paint cures, add a small white or gold motif to the outside. Good options include a starburst, snowflake, holly sprig, monogram, or simple geometric stripe.
Use a fine brush or paint marker and keep the decoration restrained. Jadeite’s appeal comes primarily from its color and shape. An ornament covered with four fonts, glitter antlers, and a motivational slogan may be experiencing an identity crisis.
“`
Ideas for a Coordinated Ornament Collection
“`
A jadeite ornament set looks strongest when the pieces share a color family but vary in shape and texture. Combine smooth balls with ribbed drops, bells, discs, molded stars, or miniature finials.
Use one main paint formula for most of the collection. Create a pale variation by adding white and a deeper version by adding a little more green. This controlled range gives the display visual depth without making it look random.
Color Palettes That Work With Jadeite Green
For a midcentury Christmas palette, combine jadeite with cherry red, blush pink, cream, and restrained gold. For a relaxed cottage look, pair it with natural wood, linen ribbon, dried orange slices, and white ornaments.
A more glamorous tree can include mercury-glass silver, champagne gold, and velvet bows. Jadeite is surprisingly adaptable. It can behave like a neutral while remaining far more interesting than beige.
Personalized Jadeite Ornaments
Add names, dates, initials, or short messages to flat ornaments with a fine paint marker. Wait until the base layer is fully cured and seal the lettering only when the chosen products are compatible.
You can also tie a small paper tag beneath the cap. This preserves the painted surface and allows the message to be changed latera useful feature when a family nickname evolves from “Sweet Pea” to “The Person Who Broke the Wi-Fi.”
“`
Common Problems and Easy Fixes
“`
The Paint Looks Streaky
Streaks often result from insufficient paint, excessive thinning, or uneven rotation. For interior painting, add a modest amount of paint and slowly turn the ornament until bare areas are covered. For exterior painting, apply several thin coats rather than one heavy layer.
The Green Looks Too Blue
Add a tiny amount of pale yellow or warm cream. Work in very small increments. One enthusiastic squeeze of yellow can move the project from jadeite to avocado refrigerator surprisingly fast.
The Finish Is Peeling
Peeling usually indicates poor surface preparation, incompatible paint, or insufficient curing time. Clean future ornaments thoroughly, use paint intended for the material, and avoid excessive handling during drying.
Paint Has Pooled Near the Neck
Drain the ornament upside down only until the excess stops running, then return it to an upright position. If a ridge has already dried, disguise it with a wider cap, narrow ribbon, or decorative collar. This is not cheating. It is design strategy wearing comfortable shoes.
“`
Safety, Storage, and Long-Term Care
“`
Follow all product-label instructions and work in a well-ventilated area, particularly when using spray finishes or solvent-based products. Keep wet paint, ornament hooks, caps, and broken glass away from children and pets.
Handle glass ornaments over a padded surface and hang them from sturdy branches. Shatterproof ornaments are a practical choice for lower sections of the tree or busy households.
Allow each ornament to cure fully before wrapping or stacking it. Store pieces individually in acid-free tissue, soft cotton, or divided ornament boxes. Avoid pressing plastic wrapping directly against painted exteriors because some finishes can become tacky over time.
Keep the storage box in a cool, dry indoor area rather than a hot attic or damp basement. Large temperature changes may stress coatings, loosen caps, or warp plastic blanks.
These handmade pieces are decorative objects, not toys or food-safe containers. The resemblance to vintage kitchen glass is purely visual. Please do not serve cranberry sauce from an ornament, no matter how ambitious the holiday menu becomes.
“`
My Experience Making DIY Jadeite Ornaments
“`
My first attempt at DIY jadeite ornaments began with the dangerous confidence created by a five-minute craft video. The person on-screen poured paint into a glass ball, rotated it twice, and revealed an heirloom.
I poured in approximately enough paint to renovate a bathroom. The ornament looked beautiful for six minutes, then developed a thick puddle at the bottom that moved with the speed and dignity of cold gravy.
That mistake taught me the most valuable lesson in this project: less paint usually creates a better finish. On the second ornament, I added only a small amount, rolled the ball slowly between my hands, and drained the excess immediately.
The coating was lighter, smoother, and much closer to the translucent milk-glass effect I wanted. It also dried in a reasonable period instead of entering a long-term relationship with the drying rack.
Color mixing produced the next surprise. Straight mint paint looked pleasant in the bottle but became almost fluorescent beneath warm Christmas lights. Mixing it with warm white changed everything. The white softened the shade, while one tiny drop of yellow removed the icy undertone.
I eventually created three related colors: pale celadon, classic mint, and a deeper restaurant-ware green. Hanging them together gave the tree more depth than a perfectly matched commercial set.
I also compared glass and plastic blanks. Glass created the richer finish because light reflected through the clear shell and bounced off the paint inside. Ribbed glass ornaments were especially effective. Their molded texture produced highlights that made the green appear to be part of the material.
Plastic was less luminous but far more forgiving. I could hand a plastic ornament to a younger helper without mentally calculating the distance to the broom closet. It was also easier to use on low branches where pets, children, and swinging vacuum cords occasionally conduct independent experiments.
The exterior-painted ornaments required more patience. My first coat showed brush marks, and my instinct was to keep brushing until they disappeared. That only disturbed the drying surface.
The better method was to stop, let the coat dry, and apply another thin layer. A foam pouncer produced a subtle stippled texture that resembled vintage pottery. A satin sealer preserved the aged appearance better than a very glossy finish.
One of my favorite experiments involved the metal caps. Bright silver looked too new beside the muted green, so I dabbed each cap with soft gold and a touch of brown acrylic paint. The irregular metallic finish immediately gave the ornaments an antique-store personality.
Cream and dusty-rose velvet ribbon completed the look. At that point, the ornaments stopped resembling craft-store blanks and began looking like objects with a history, even though that history had started on my dining table the previous evening.
Making an entire set also revealed the value of repetition without perfect uniformity. I used the same color recipe, but every ornament dried with slightly different swirls and shadows. Rather than correcting those differences, I kept them.
Vintage glass is attractive partly because it carries subtle changes in color, mold patterns, and wear. A handmade collection benefits from the same visual rhythm. Consistency makes a set coordinated; variation makes it feel alive.
My final lesson was embarrassingly practical: label leftover paint accurately. I saved my custom jadeite mixture in a small jar but wrote only “green” on the lid. Several weeks later, I opened three nearly identical jars and began an unnecessary detective story.
A useful label should include the project name, approximate mixing ratio, and date. Future-you deserves that courtesy.
Now I display these ornaments beyond the Christmas tree. Several hang from a kitchen wreath, a few sit in a milk-glass bowl, and the smallest are tied onto wrapped gifts. Their soft green works throughout winter and even transitions nicely into spring décor.
Most importantly, the project delivers the charm of collectible jadeite in a form that feels personal, affordable, and pleasantly low-risk. No rare casserole dishes were harmed, and the dining table eventually returned to civilian use.
“`
Conclusion
“`
DIY jadeite ornaments combine vintage inspiration with a flexible, beginner-friendly painting technique. The secret is not complicated equipment. It is thoughtful color mixing, careful surface preparation, thin layers, patient drying, and just enough variation to imitate old molded glass.
Whether you choose a glossy interior coating, a matte pottery finish, or a decorative collector-style design, the finished ornaments add a distinctive mint-green glow to holiday décor.
Make a few as accent pieces or create an entire coordinated collection. Either way, these ornaments provide the nostalgic beauty of jadeite without the collector’s price tagand without asking a valuable vintage bowl to dangle from a pine branch.
“`