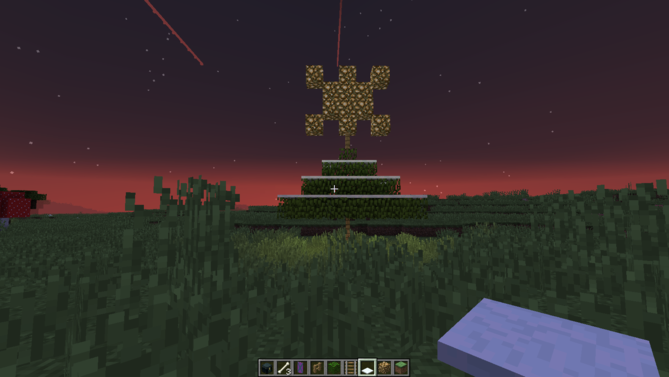
If your Minecraft house is looking a little too “survival bunker” and not nearly enough “holiday magic,” a Christmas tree is the quickest fix. It adds color, height, light, and that cozy festive vibe that says, “Yes, I do fight creepers, but I also decorate seasonally.” The best part is that you do not need to be a redstone wizard or a professional builder to make one look great.
This guide walks you through exactly how to make a Christmas tree on Minecraft in six practical steps, with design tips for both small indoor builds and giant outdoor showpieces. Along the way, you will also get ideas for ornaments, lighting, presents, snow effects, and common mistakes to avoid. Whether you play in Creative or Survival, Java or Bedrock, this build is simple, flexible, and surprisingly fun to customize.
So grab your spruce blocks, pretend your inventory is Santa’s workshop, and let’s build a tree that looks merry, bright, and only slightly blocky.
Why a Minecraft Christmas Tree Is Such a Great Build
A Minecraft Christmas tree works because it is both decorative and practical. It can become the centerpiece of a winter village, a cozy addition to a cabin, or the star of a holiday-themed server event. Unlike some complicated builds, it is easy to scale up or down. A tiny tree can fit in a starter house. A giant tree can dominate a town square like it pays property taxes.
It is also one of the best seasonal builds because it naturally encourages creativity. You can go classic with spruce logs, spruce leaves, lanterns, and red wool ornaments. You can go elegant with white candles and gold details. You can even go totally over the top and make a massive glowing tree wrapped in banners, hanging lights, and presents big enough to make your villagers suspicious.
What You Need Before You Start
The beauty of this Minecraft Christmas tree build is that the core materials are simple. You can build a good-looking version with just a few blocks, then upgrade it with decorations once the basic shape is done.
Basic materials
- Spruce log or stripped spruce log for the trunk
- Spruce leaves for the body of the tree
- Dirt or scaffolding for temporary support while building
Decoration materials
- Lanterns or candles for lights
- Redstone torches for tiny twinkle-light effects
- Wool blocks in red, white, yellow, blue, or green for ornaments and garland
- Item frames, banners, or buttons for extra detail
- A star topper made from yellow wool, glowstone, or a small custom design
- Presents made from colorful wool, concrete, or terracotta
- Snow layers or white carpet around the base
If you are in Survival mode, keep it modest at first. A five- to seven-block tree is easier to finish and still looks festive. If you are in Creative mode, go bigger and let your inner holiday architect take the wheel.
How to Make a Christmas Tree on Minecraft: 6 Steps
Step 1: Choose the Tree Size and Clear Your Build Area
Before placing a single block, decide whether your tree is going indoors or outdoors. This matters more than people think. Nothing humbles a builder faster than making a gorgeous nine-block tree and realizing the ceiling is six blocks high.
For a small indoor tree, clear an area about 5×5 and at least 6 blocks tall. For a medium tree, use a 7×7 area and around 9 to 11 blocks in height. For a giant outdoor Christmas tree, you can go 11×11 or bigger and build as tall as your festive heart desires.
As a rule of thumb, taller trees should have a wider base and a stronger taper. If the base is too skinny, the tree looks less “Christmas centerpiece” and more “green pencil with commitment issues.”
Step 2: Build the Trunk
Start with a spruce log trunk in the center of your chosen area. For a small tree, make the trunk 2 to 3 blocks high. For a medium tree, go 4 to 5 blocks high. If you are building a giant outdoor tree, you can make the trunk much taller and even use a 2×2 trunk for extra realism.
Spruce is the obvious winner here because it has that classic evergreen feeling. It is darker, moodier, and much more Christmas-coded than lighter woods. You can also strip the logs if you want a cleaner, more polished look.
Do not overbuild the trunk. Many beginner trees end up looking like someone stuck a bush on top of a telephone pole. The trunk should support the shape, not steal the show.
Step 3: Create the Bottom Layer of Leaves
Now build the widest part of the tree using spruce leaves. This is your foundation layer, and it determines whether the tree feels full and balanced or oddly flat.
For a small tree, make a 3×3 or 5×5 leaf layer around the trunk, depending on the size of the room. For a medium or large tree, widen the lowest layer more aggressively. You want the bottom to feel generous and slightly heavy, because real Christmas trees carry more visual weight near the base.
A good trick is to leave a little breathing room right at the very bottom so the trunk is not completely buried. That keeps the tree from looking like a green cube that accidentally became seasonal. If you want a more natural silhouette, avoid making every side perfectly flat.
Step 4: Taper the Tree Upward in Layers
This is where the magic happens. Build upward by stacking smaller and smaller layers of spruce leaves as you rise. Each layer should pull inward slightly so the tree forms a cone shape.
Think in tiers. Start with the largest base, then create a slightly smaller layer above it, then another smaller one, and so on until you reach the top. A simple pattern for a medium tree might be wide, wide, medium, medium, small, tiny. If you are making a very polished tree, vary the thickness so it feels less mechanical.
Do not be afraid to place a few leaves unevenly or add extra leaf blocks here and there. Perfect symmetry often makes Minecraft trees look stiff. Slight irregularity makes them feel fuller and more believable. In other words, the tree should look handcrafted, not mass-produced by a holiday robot.
If you want a super-fast beginner version, you can also use a tiny six-step concept: a short trunk, a 3×3 base of leaves, a cross shape above it, then a single top block. It is simple, compact, and great for small interiors.
Step 5: Add the Star, Lights, and Ornaments
Once the tree shape is finished, it is time to decorate. This is the part where your build stops looking like “spruce with ambition” and starts looking like a Christmas tree.
At the top, place a star or topper. You can keep it simple with a single glowstone block, a lantern, or yellow wool. If you want more detail, build a tiny custom star from yellow and black wool, especially on larger trees.
For lights, lanterns create a warm, bright look and work beautifully on bigger trees. Candles are great for cozy indoor trees, especially if you want a softer effect. Redstone torches can act like small fairy lights. You can also wrap colored wool around the tree in a spiral to mimic garland or tinsel.
For ornaments, use buttons, wool blocks, item frames, banners, or little accent blocks placed carefully across the leaves. Try not to cluster all the decorations in one area. Spread them around the tree so every side has visual interest. A good Christmas tree should reward you for walking around it.
Step 6: Finish the Base with Snow, Presents, and Final Touches
The base is where good builds become memorable ones. Place snow layers, white carpet, or white wool around the bottom to create a winter scene. Then add presents using red, green, blue, or yellow wool blocks with contrasting “ribbon” colors.
You can make simple presents as 1×1 cubes or go larger with 2×2 or 3×3 gift boxes for giant outdoor trees. A few lanterns, candles, or jack-o’-lantern-style light sources near the base can make the whole area glow at night.
Once everything is in place, step back and look at the tree from several angles. This is the moment to fix awkward gaps, move overdone decorations, or add an extra leaf block where the tree looks too bare. Tiny changes make a big difference. Minecraft building often looks best after one last round of “fiddle with it until it stops bothering you.”
Best Minecraft Christmas Tree Styles to Try
1. Cozy Cabin Tree
This is a small indoor tree with a 2-block trunk, a compact leaf shape, a lantern topper, and a few red and gold accents. It works perfectly next to a fireplace, a window seat, or a chest that you are pretending is full of gifts and not cobblestone.
2. Town Square Holiday Tree
Go large with a thicker trunk, broader leaf layers, bright lanterns, garland wrapping, and oversized presents. This works well in a snowy village or on a server where you want a communal festive landmark.
3. Survival-Friendly Tree
If resources are tight, keep the design simple. Use spruce logs, spruce leaves, torches or redstone torches, and basic wool for decorations. Even a modest tree can look charming when placed thoughtfully and lit well.
4. Elegant White-and-Gold Tree
Use white candles, yellow wool or gold-colored accents, and clean spacing. This style feels more polished and less chaotic. It is the Minecraft version of the friend whose holiday photos always look suspiciously expensive.
Common Mistakes That Make a Minecraft Christmas Tree Look Weird
- Making the trunk too tall: This throws off the proportions and makes the tree look top-heavy.
- Using a flat leaf shape: Trees need taper and depth, not a stack of green squares.
- Overdecorating one side: Walk around your build and check all angles.
- Forgetting the base: Snow, presents, and lighting make the scene feel complete.
- Building too perfectly: Slight randomness often looks more natural and more festive.
If your first attempt looks awkward, good. That means you are building instead of overthinking. Tweak the shape, move a few blocks, and keep going. Holiday magic is sometimes just revision with better lighting.
Quick Tips for an Even Better Minecraft Christmas Build
- Use spruce leaves for the most classic evergreen look.
- Mix lanterns and smaller light sources instead of using one type everywhere.
- Wrap colored wool diagonally around the tree for a tinsel effect.
- Place a few extra leaves randomly after the main shape is done to soften hard edges.
- Match the tree to the setting. A giant tree looks best outdoors, while smaller trees shine indoors.
- Build at night or test the tree at night to see how the lighting really feels.
My Experience Building a Minecraft Christmas Tree
The first time I built a Christmas tree in Minecraft, I was wildly confident for someone with no real plan. I had spruce leaves, a vague sense of holiday spirit, and the belief that “How hard can a tree be?” Reader, the answer was: harder than expected, but funny enough to be worth it.
I started in a tiny survival cabin and immediately made the classic mistake of building too big. The trunk alone looked promising, but once I added the leaf layers, the tree basically swallowed half the room. My bed was trapped behind it. My crafting table disappeared into a green wall. If a real estate listing had described the house at that point, it would have said “open concept, strong seasonal energy, no visible floor.”
So I scaled it down. That was my first useful lesson: a good Minecraft Christmas tree is not just about making something tall. It is about making something that fits the space. Once I shrank the build and gave it cleaner layers, the whole room felt warmer. Suddenly the tree looked intentional instead of invasive.
Then came the decorations, which was when the build became genuinely fun. I tested lanterns first and loved the glow, but they looked a little heavy on such a small tree. Candles felt cozier. Redstone torches added a tiny twinkle effect that made the whole thing feel alive. I ended up mixing a few different light sources, and that gave the tree more character than using the same block over and over.
The next thing I learned was that symmetry is helpful right until it is not. At first I tried to make every side identical, but the tree looked stiff, almost like a diagram instead of a decoration. When I added a few extra leaves here and there and moved some ornaments around, it finally looked natural. Minecraft is funny that way. The game is built out of square blocks, but your builds usually look better when they are not too square in spirit.
One of my favorite versions was on a multiplayer world with friends. We built a larger tree in the center of a snowy village and each person decorated one side. That was chaos in the best possible way. One side looked elegant and color-coordinated. Another side looked like a toy store exploded. Someone added absurdly large presents at the bottom, and someone else put a dramatic glowing topper on the tree that could probably be seen from low orbit. It should not have worked, but somehow it did. That tree felt alive because it reflected different personalities.
That experience changed the way I think about holiday builds in Minecraft. A Christmas tree is more than a decoration. It becomes a little landmark. It gives a base personality. It makes a world feel lived in. Even if the rest of your house is just storage chests, furnaces, and a suspicious amount of cobblestone, a tree says, “A human with taste lives here.”
Now, whenever I build one, I always leave room for improvisation. I start with a clear shape, but I let the details evolve. Maybe I add snow around the base. Maybe I build gift boxes. Maybe I turn the whole area into a holiday corner with a fireplace and hot-cocoa vibes, despite the obvious lack of actual cocoa in block form. The point is that the tree gives me a reason to slow down and make the world feel festive instead of purely functional.
And honestly, that is why I keep coming back to this build. It is easy, it is customizable, and it instantly changes the mood of a base. It is one of those rare Minecraft projects that can be simple enough for beginners, satisfying enough for experienced builders, and charming enough to make you smile when you walk past it. In a game full of giant castles, secret bunkers, and impossible redstone contraptions, there is something delightful about a humble Christmas tree quietly stealing the show.
Final Thoughts
If you want a build that is festive, beginner-friendly, and endlessly customizable, a Minecraft Christmas tree is a perfect choice. Start with a simple trunk, build the leaves in tapered layers, decorate with lights and ornaments, and finish the base with snow and presents. That is the core formula. After that, it is all style.
You can keep it tiny and cozy, or go big enough to make your whole server stop and stare. Either way, the charm comes from the details: the glow at night, the color balance, the slightly imperfect shape, and the little seasonal touches that make the world feel special. Build one once, and odds are good you will end up making another. Holiday mission accomplished.