Note: This HTML body is written for web publishing, with SEO tags placed at the end in JSON format as requested.
A shirt knot is the tiny styling trick with main-character energy. It can take a basic tee from “I found this on the chair” to “yes, I planned this outfit,” and it works with T-shirts, button-downs, flannels, oversized shirts, beach cover-ups, and even that one old concert tee you refuse to retire. Learning how to tie a shirt knot is also wonderfully low-risk: no scissors, no sewing, no complicated fashion degree, and no need to ask your closet for emotional support.
The magic of a knotted shirt is proportion. By gathering extra fabric and placing the knot at the front, side, back, or waist, you can define your shape, crop a long shirt, balance wide-leg jeans, make a dress feel more casual, or give a plain outfit texture. The best part? You can undo it in two seconds if the mirror says, “Not today.”
Below are 10 simple ways to tie a shirt knot, plus styling tips, fabric advice, outfit examples, and real-life experience notes to help you make each version look intentional instead of accidental laundry behavior.
Why Shirt Knots Work So Well
A shirt knot changes three things at once: length, shape, and attitude. A long tee becomes cropped. A boxy button-down suddenly has a waist. A loose outfit gains a focal point. This is why the trick works especially well with oversized shirts, high-waisted jeans, skirts, shorts, linen pants, and slip dresses.
Before you start, choose the right shirt. Soft cotton tees are easiest for beginners because they twist smoothly. Oversized T-shirts give you more fabric to work with. Button-down shirts create cleaner knots because the front tails are already separated. Thin fabrics make smaller knots, while thick sweatshirts can create a knot the size of a dinner roll. Cute? Maybe. Practical? Depends on how much you enjoy carrying a fabric potato at your waist.
How to Tie a Shirt Knot: 10 Simple Ways
1. The Classic Front Knot
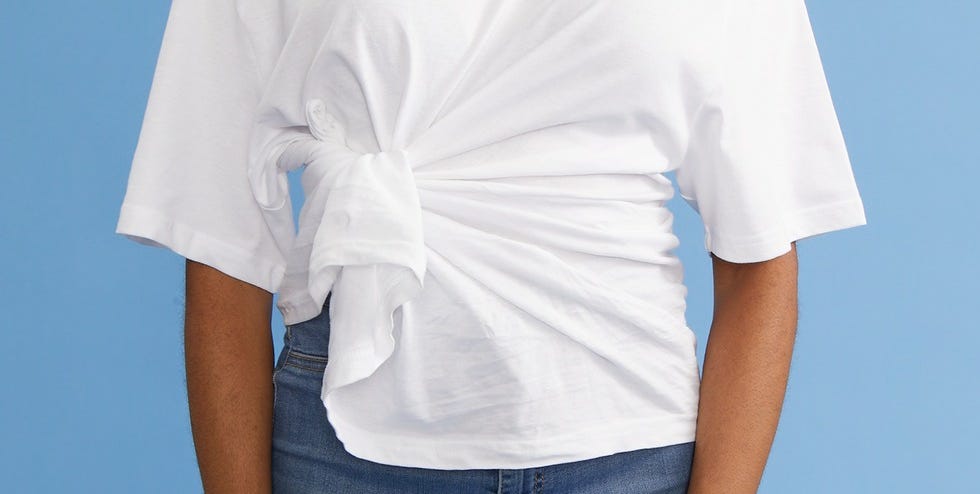
The classic front knot is the starter pack of shirt tying. It works best with an oversized tee, graphic T-shirt, or casual button-down. Put the shirt on, gather the extra fabric at the center front, twist it into a rope, wrap it around itself, and pull the end through the loop. Adjust the knot so it sits at your natural waist or slightly above the waistband of your bottoms.
This style looks great with high-waisted jeans, denim shorts, midi skirts, joggers, or wide-leg pants. It creates a balanced silhouette by shortening the top and highlighting the waist. For a cleaner look, tuck the loose tail underneath the knot. For a more relaxed weekend look, let the little tail peek out. Fashion has room for both neat people and chaos goblins.
2. The Side Knot
The side knot is slightly softer and more casual than the front knot. Instead of gathering fabric in the middle, pull the extra fabric toward one hip. Twist, loop, and pull the end through. Place it just above the waistband or slightly lower for a slouchier effect.
This knot is excellent for asymmetrical styling. It works well with maxi skirts, flowy linen pants, leggings, biker shorts, and relaxed jeans. If your outfit feels too straight up and down, a side knot adds movement. It is also helpful when the front of your shirt has a graphic you do not want to completely distort. Your band tee deserves dignity, even if the drummer’s face gets slightly folded.
3. The Back Knot
The back knot is perfect when you want a clean front. Put the shirt on, pull the extra fabric behind you, gather it at the lower back, twist it, and tie it into a small knot. This creates a fitted look from the front while keeping the styling detail at the back.
Use this with plain T-shirts, workout tees, oversized tanks, or lightweight button-downs worn open over a tank top. A back knot works especially well when you are wearing a statement belt, printed pants, or a skirt with front details. It removes bulk from the front and gives the shirt shape without stealing the spotlight.
4. The Hidden Knot
The hidden knot is for anyone who wants the cropped effect without showing the knot. Gather the front fabric as if you are making a classic front knot, twist it tightly, secure it with a small elastic if needed, then tuck the knot under the hem of the shirt. Smooth the fabric over it so the shirt looks naturally cropped.
This method is ideal for polished outfits, casual office looks, or minimalist styling. Try it with trousers, a satin skirt, straight-leg jeans, or a blazer. It gives you the shape of a cropped top without the “I tied my shirt in a parking lot” energy. Very useful. Very sneaky. Basically the fashion version of hiding snacks in your desk drawer.
5. The Rubber Band Knot
If your shirt is too short or too slippery to hold a real knot, use a small elastic. Gather the fabric at the front, side, or back, wrap the elastic around the gathered section, then tuck the bundle inward. This creates the look of a knot without requiring enough fabric to tie one.
This trick works beautifully with thin T-shirts, silky blouses, lightweight knits, and stretchy tops. It is also useful when you want to avoid pulling too hard on delicate fabric. For best results, use a clear or color-matched elastic and hide it inside the shirt. Nobody needs to know your outfit is being held together by a tiny hair tie and optimism.
6. The Button-Down Waist Knot
A button-down shirt is practically begging to be knotted. Button the shirt from the chest to the midsection, leave the bottom buttons undone, then tie the two front tails together at your waist. You can make one simple knot or double knot it if the fabric is slippery.
This style works with white shirts, striped button-downs, linen shirts, chambray tops, and flannels. Wear it with high-waisted jeans for a classic casual look, over a slip dress for contrast, or with tailored trousers for a relaxed-but-still-adult outfit. The key is to keep the knot flat and avoid pulling so tightly that the buttons gape. A shirt should look styled, not like it is losing a wrestling match.
7. The Cropped Twist Knot
The cropped twist knot sits higher than the classic front knot. Gather the fabric around the lower ribs, twist it into a tight spiral, wrap it around itself, and pull the end through. Then tuck the end underneath to make the knot compact.
This look pairs best with high-rise bottoms because it creates a shorter top line. Try it with wide-leg jeans, cargo pants, denim skirts, or flowy trousers. It is a good option for oversized tees that feel too long or boxy. Keep the rest of the outfit balanced: if the shirt is very loose, choose structured bottoms; if the bottoms are loose, keep shoes and accessories clean.
8. The Pretzel Knot
The pretzel knot sounds dramatic, but it is simply a more decorative twist. Gather fabric at the front or side, split it into two small sections if the shirt allows, cross one section over the other, loop it through, and tighten gently. The result looks more textured than a basic knot.
This works best with soft, oversized cotton shirts or thin button-downs. It is a fun choice for summer outfits, festival looks, beach cover-ups, or casual brunch styling. Because the knot is more visible, keep the rest of the outfit simple. Let the knot be the little outfit garnish. Not the whole salad.
9. The Shirt-Over-Dress Knot
This method turns a shirt into a casual layering piece. Put on a dress first, then layer a button-down or T-shirt over it. Gather the shirt at the front or side and tie it at the waist. This creates the illusion of a skirt-and-top combination while letting you get more use from your dresses.
Try a white button-down over a slip dress, a graphic tee over a fitted tank dress, or a chambray shirt over a floral midi. The knot should hit near your natural waist to create shape. This is also a smart travel trick because one dress can become several outfits. Your suitcase will not applaud, but it will be grateful.
10. The Waist-Wrap Shirt Knot
This final option is not a knot in the shirt you are wearing, but it is still a classic shirt-knot styling move. Tie a flannel, denim shirt, or lightweight button-down around your waist. Place the shirt behind you, wrap the sleeves around your waist, and tie the sleeves in a knot at the front or side.
This adds texture, color, and casual edge to basic outfits. It works well with leggings, jeans, fitted dresses, biker shorts, and simple tees. Choose a shirt with enough structure to look intentional but not so much bulk that it feels heavy. A plaid flannel gives a casual fall feel; a denim shirt looks classic; a linen shirt feels beachy and relaxed.
Best Shirts for Knotting
Not every shirt wants to be knotted. Some cooperate like best friends; others behave like they have legal representation. For beginners, cotton T-shirts are the easiest. They stretch slightly, hold shape, and create casual knots without slipping. Oversized tees are especially forgiving because they provide enough extra fabric.
Button-down shirts are also excellent because the two front panels can be tied together neatly. Linen and chambray create effortless warm-weather knots, while crisp cotton gives a cleaner, more structured finish. Flannel works well for waist knots and casual front knots, especially with denim.
Be careful with satin, silk, rayon, very thin knits, or delicate fabrics. These can wrinkle, stretch, or slip out of place. Use the rubber band method or a loose knot instead of pulling tightly. For graphic tees, avoid twisting directly across an important design unless you are comfortable turning a logo into modern art.
How to Style a Knotted Shirt for Different Occasions
Casual Day Out
Pair a front-knotted graphic tee with straight-leg jeans and sneakers. Add sunglasses, small hoops, and a crossbody bag. This is the “I look put together but still know where the best fries are” outfit.
Beach or Vacation
Wear a loose linen button-down over a tank, swimsuit, or slip dress and tie it at the waist. Choose breathable fabrics and keep the knot relaxed. Add sandals and a woven tote for an easy vacation look.
Work-Friendly Casual
Use the hidden knot with a plain tee or lightweight blouse under a blazer. Pair it with high-waisted trousers or a midi skirt. The knot gives shape without looking too playful for a casual office.
Date Night
Try a silky button-down tied at the waist with a satin skirt, tailored pants, or dark denim. Keep the knot soft and slightly off-center. Add simple jewelry and clean shoes. The goal is effortless, not “I watched 14 tutorials and now my shirt has a personality disorder.”
Weekend Errands
A side-knotted tee with leggings, biker shorts, or relaxed jeans is comfortable but not sloppy. Layer a denim jacket or flannel if needed. This outfit says, “I may be buying toothpaste, but I still respect the mirror.”
Common Shirt Knot Mistakes to Avoid
The first mistake is tying the knot too tight. A tight knot can stretch fabric, distort graphics, create wrinkles, or make the shirt pull awkwardly across the chest. Tighten enough to hold the shape, then stop. Your shirt is not a jar of pickles.
The second mistake is placing the knot too low. A knot that sits at the widest part of the hips can make the outfit look bulky. Try placing it at the natural waist, slightly above the waistband, or to one side for better proportion.
The third mistake is ignoring fabric weight. Thick shirts create thick knots. Thin shirts can slip. Slippery fabrics may need an elastic. Cotton is easy, linen is charming, satin is dramatic, and heavy fleece is a commitment.
The fourth mistake is forgetting the rest of the outfit. A knotted oversized shirt usually looks best with high-waisted or structured bottoms. If everything is oversized, add definition with shoes, a belt, jewelry, or a cleaner bag.
Care Tips for Shirts You Knot Often
If you knot the same shirts regularly, treat them kindly. Avoid yanking the fabric when you untie the knot. Loosen it slowly to reduce stretching. Wash cotton and graphic tees in cool or warm water according to the care label, and avoid excessive heat when drying if you want to preserve shape and print quality.
Fold T-shirts instead of hanging them by the neckline, especially if they are soft or heavy. Hanging can stretch collars over time. For delicate fabrics, steam wrinkles instead of ironing directly over knot creases. A little care helps your favorite knot-friendly shirts last longer, which is great because replacing the perfect tee is weirdly harder than buying furniture.
of Real-Life Experience: What Actually Works When Tying Shirt Knots
After experimenting with shirt knots in real outfits, the biggest lesson is simple: the best knot is the one that solves the outfit problem in front of you. A shirt knot is not just decorative. It fixes length, removes bulk, creates waist definition, and helps older pieces feel new again. The first time you knot an oversized tee with high-waisted jeans, you immediately understand why this trick refuses to disappear. The shirt goes from shapeless rectangle to casual-cool top in less than a minute.
The classic front knot is the most reliable for everyday wear, but it is not always the most flattering on every outfit. With loose pants or wide-leg jeans, a higher front knot usually works better because it lifts the visual waistline. With fitted skirts or leggings, a side knot often feels more relaxed and balanced. A back knot is surprisingly useful when you want to wear a loose tee but still show the shape of your jeans or skirt from the front.
One practical discovery: mirror-check the knot while standing naturally, not while posing like you just heard your name on a red carpet. Some knots look perfect when one hip is popped but strange when you are walking, sitting, reaching, or living a normal human life. Sit down before leaving the house. If the knot pokes, pulls, or creates a fabric mountain, adjust it lower, loosen it, or switch to a hidden knot.
Another useful tip is to match the knot style to the shirt’s personality. A soft vintage tee looks great with a messy front or side knot. A crisp white button-down looks better with a clean waist knot. A linen shirt can be loose and beachy. A flannel tied around the waist should feel casual, not bulky. Delicate blouses usually look better with a rubber band tuck because it avoids stretching the fabric.
Shirt knots are also fantastic for travel. One plain tee can work with shorts during the day, a skirt at night, and layered over a dress the next morning. A button-down can be worn open, tucked, knotted, or tied around the waist. This means fewer clothes in your bag and more outfit options. That is not packing; that is strategy.
The final experience-based rule: do not overthink it. A shirt knot should look easy. If you spend ten minutes wrestling fabric into a sculpture, the outfit may start feeling forced. Tie it, adjust it, smooth the hem, and move on. The charm of a knotted shirt is that it looks relaxed, confident, and slightly playful. It is the fashion equivalent of saying, “This old thing?” while secretly knowing the outfit is doing exactly what it needs to do.
Conclusion
Learning how to tie a shirt knot gives you a fast, free, and surprisingly powerful way to transform your wardrobe. From the classic front knot to the hidden knot, side knot, back knot, button-down waist knot, and shirt-over-dress trick, each method changes the shape and mood of an outfit. Start with soft cotton tees and oversized shirts, then experiment with button-downs, linen layers, flannels, and lightweight blouses.
The best shirt knot is not about perfection. It is about proportion, comfort, and confidence. Place the knot where it flatters your outfit, keep fabric care in mind, and do not be afraid to retry. Your closet probably already has everything you need. Your shirt just needed a plot twist.