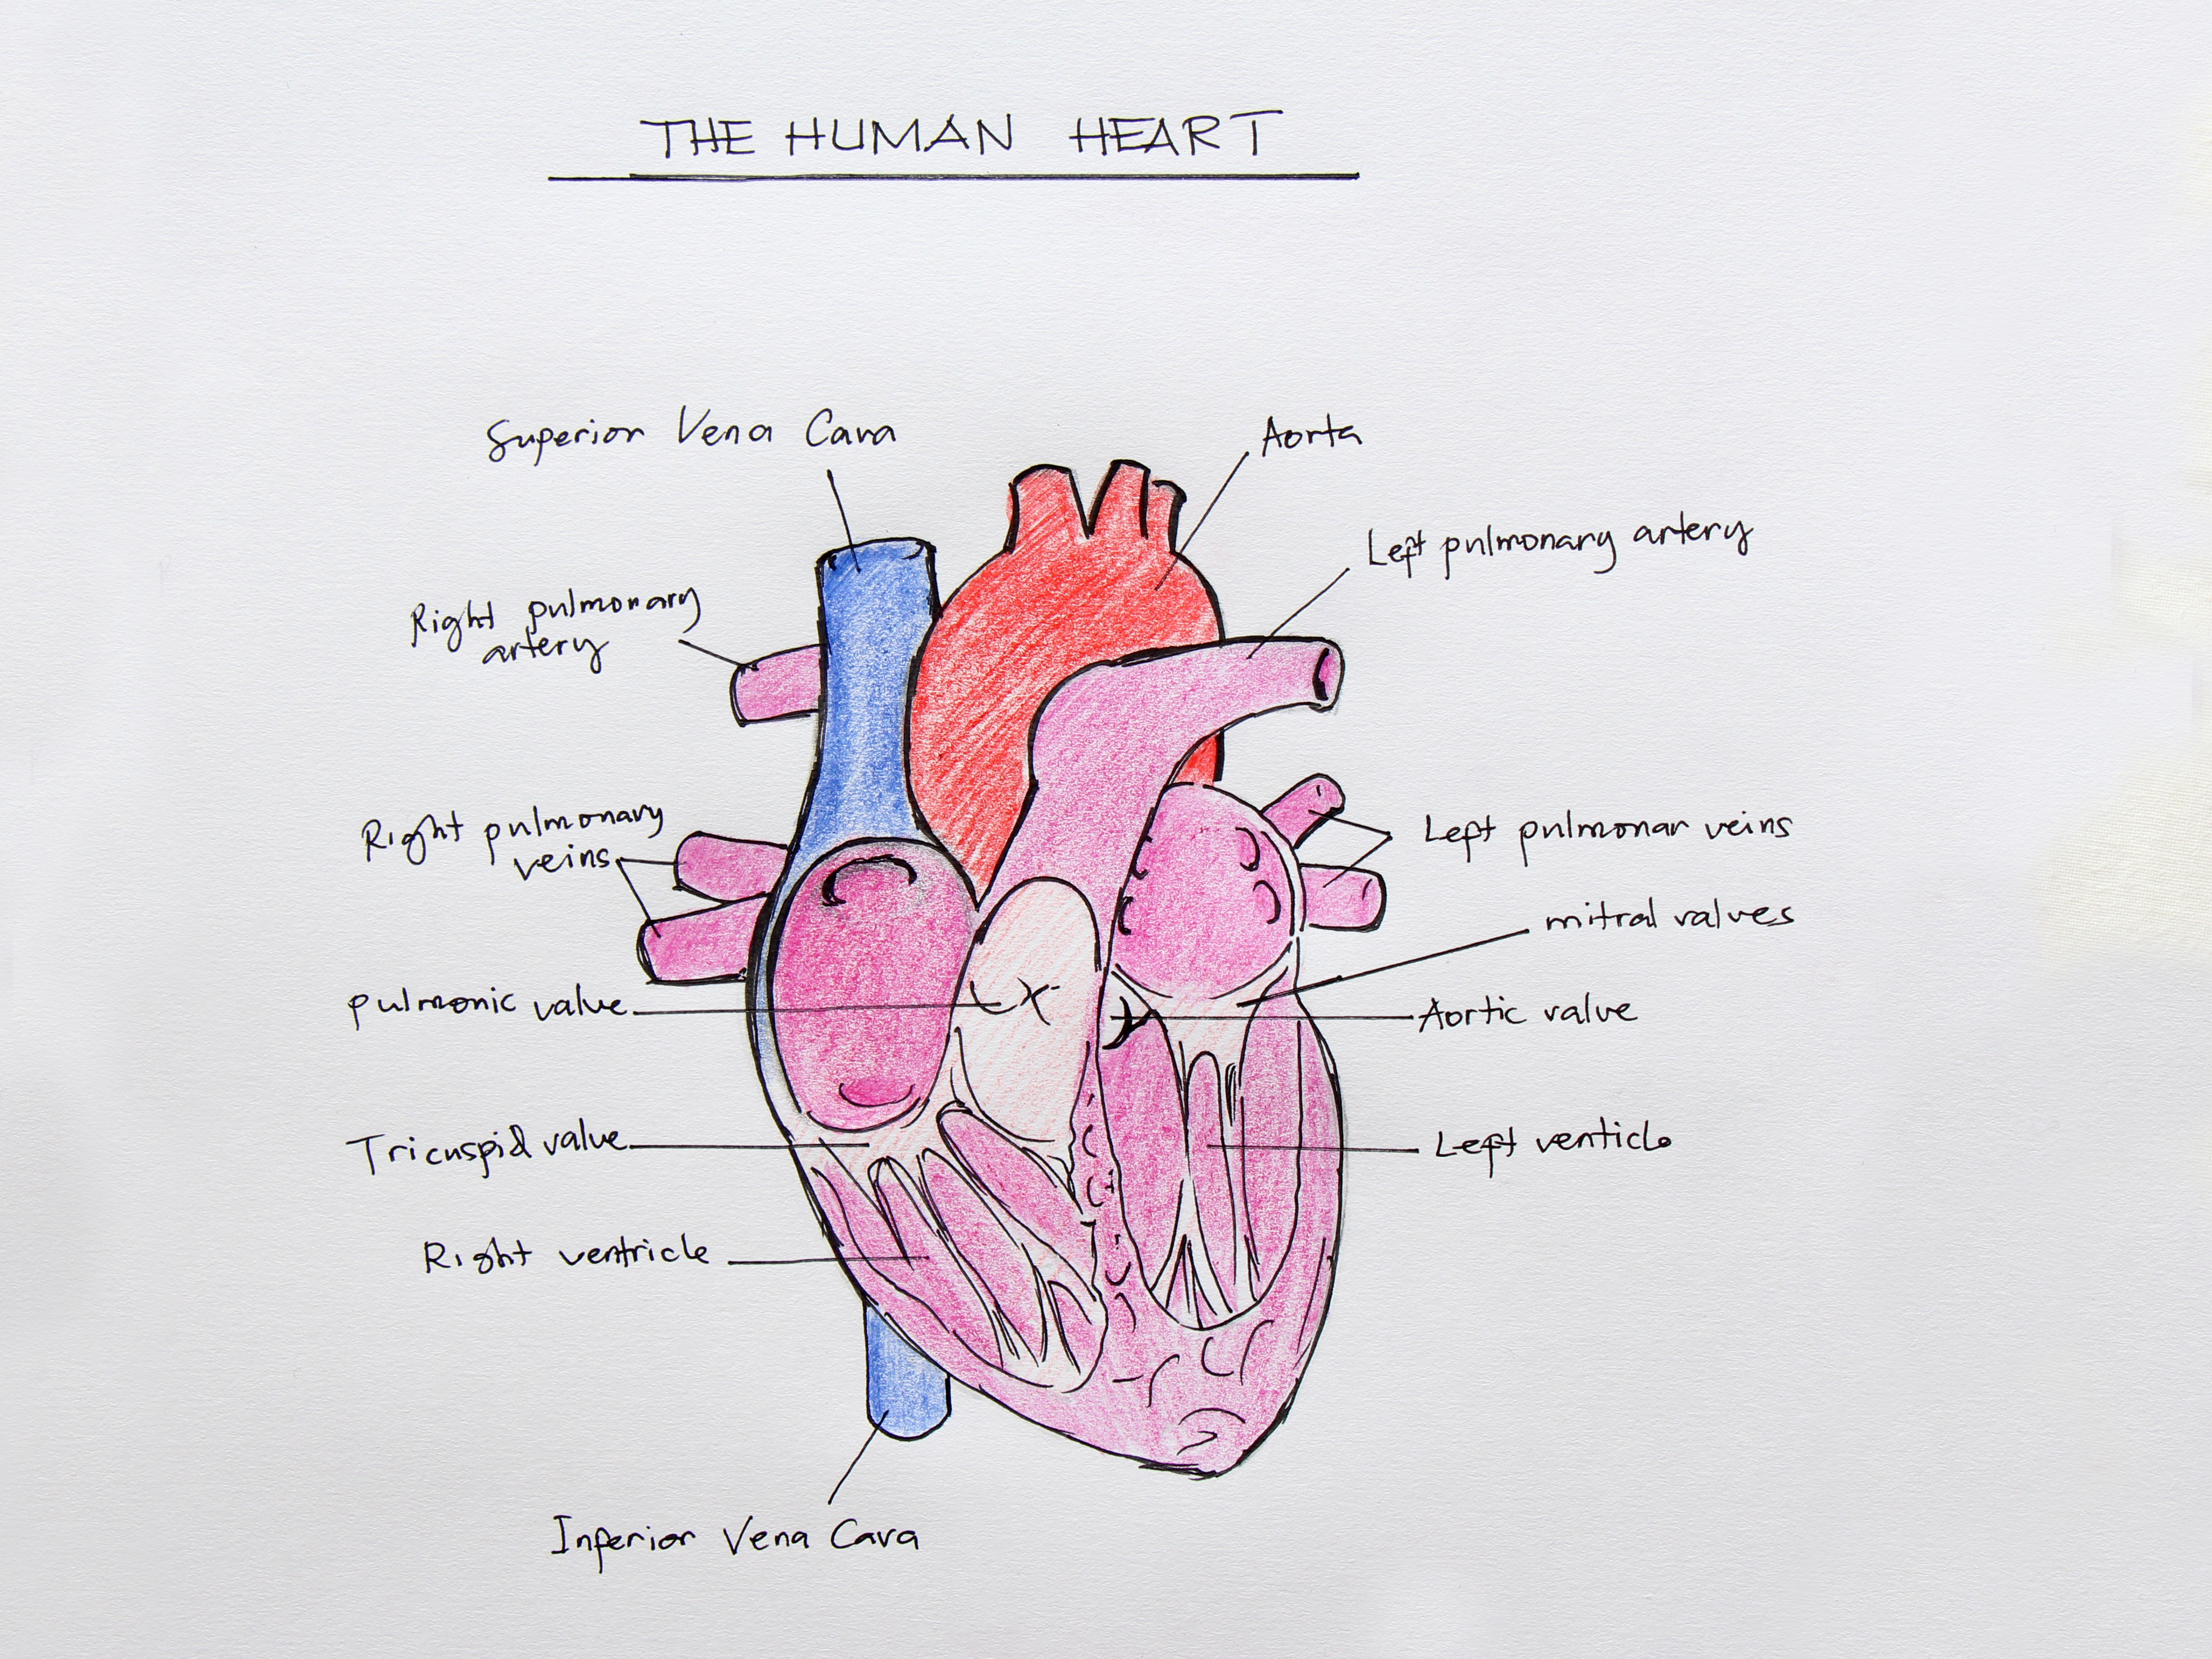
Drawing the internal structure of the heart can feel a little like trying to map a tiny, muscular traffic circle during rush hour. There are chambers, valves, vessels, arrows, colors, labels, and that one mysterious curve everyone calls the aorta. But once you understand the heart as a two-sided pump, the drawing becomes much easier. You are not just sketching an organ; you are showing a story of blood flow.
This guide explains how to draw the internal structure of the heart step by step, using simple shapes, accurate labels, and a clear layout. Whether you are preparing a school diagram, biology notebook page, medical illustration practice sheet, or educational blog graphic, the goal is the same: make the heart understandable at first glance.
Understanding the Internal Structure Before You Draw
Before the pencil touches the paper, remember this basic idea: the heart has four chambers, four main valves, a dividing wall called the septum, and several major blood vessels. The right side handles oxygen-poor blood traveling to the lungs, while the left side handles oxygen-rich blood heading out to the body.
Here is the funny part: in most heart diagrams, the “right side” of the heart appears on the left side of the page. That is because diagrams usually show the heart as if it is facing you. So when you label the right atrium and right ventricle, they go on the viewer’s left. This one detail saves students from many dramatic eraser battles.
Materials You Need
You do not need fancy art tools to draw a good heart diagram. A pencil, eraser, black pen, red pencil, blue pencil, and a blank sheet of paper are enough. If you want a cleaner educational diagram, use a ruler for label lines and a fine-tip marker for final outlines.
Use blue for oxygen-poor blood and red for oxygen-rich blood. This color system is common in educational diagrams because it quickly shows where blood is going. Just remember: blood is not actually bright blue inside the body. Blue is a teaching shortcut, not a vampire fact.
Step 1: Draw the Outer Heart Shape
Start with a rounded cone-like shape. The top should be wider, and the bottom should narrow toward a soft point called the apex. The apex leans slightly to the viewer’s right, which represents the anatomical left side of the heart.
Do not draw a Valentine heart. That shape is great for greeting cards, but it will not help anyone identify the left ventricle. Think of the real heart as a tilted, muscular pouch with a broad top and a tapered bottom.
Drawing Tip
Keep the outer outline light at first. You will add vessels and chambers later, and the first version does not need to be perfect. Anatomy drawing rewards patience, not pencil pressure.
Step 2: Divide the Heart Into Right and Left Sides
Draw a vertical curved line down the center of the heart. This represents the septum, the muscular wall that separates the right and left sides. Make the septum slightly curved rather than perfectly straight, because the heart is not built like a filing cabinet.
The septum is important because it keeps oxygen-poor and oxygen-rich blood separate. In your drawing, it should be clear enough that viewers can see the heart as two connected but separate pumping systems.
Step 3: Add the Four Chambers
Now divide each side into an upper and lower chamber. The upper chambers are the atria, and the lower chambers are the ventricles.
Right Atrium
Place the right atrium in the upper left area of your drawing. It receives oxygen-poor blood returning from the body through the superior vena cava and inferior vena cava.
Right Ventricle
Place the right ventricle below the right atrium. It pumps oxygen-poor blood to the lungs through the pulmonary artery.
Left Atrium
Place the left atrium in the upper right area of your drawing. It receives oxygen-rich blood from the lungs through the pulmonary veins.
Left Ventricle
Place the left ventricle below the left atrium. Make this chamber slightly thicker or larger because it pumps blood through the aorta to the entire body. It is the heavyweight champion of the heart chambers, minus the boxing gloves.
Step 4: Draw the Four Heart Valves
Valves work like one-way doors. They open to let blood move forward and close to prevent blood from flowing backward. In a heart diagram, valves are usually drawn as small flap-like shapes between chambers or at vessel exits.
Tricuspid Valve
Draw the tricuspid valve between the right atrium and right ventricle. It allows blood to move from the right atrium into the right ventricle.
Pulmonary Valve
Draw the pulmonary valve where the right ventricle leads into the pulmonary artery. This valve opens as blood leaves for the lungs.
Mitral Valve
Draw the mitral valve between the left atrium and left ventricle. It is also called the bicuspid valve because it has two flaps.
Aortic Valve
Draw the aortic valve between the left ventricle and the aorta. This valve controls blood flow from the heart into the body’s largest artery.
Step 5: Add the Major Blood Vessels
The major vessels are what make the internal heart structure look complete. Without them, the drawing looks like four rooms with no doors to the outside world.
Superior and Inferior Vena Cava
Draw two blue vessels entering the right atrium. The superior vena cava enters from above and brings blood from the upper body. The inferior vena cava enters from below and brings blood from the lower body.
Pulmonary Artery
Draw a blue vessel leaving the right ventricle and branching toward the lungs. Even though it is an artery, it carries oxygen-poor blood. This is one of the classic exceptions students need to remember.
Pulmonary Veins
Draw red vessels entering the left atrium from both sides. These veins bring oxygen-rich blood back from the lungs. Again, this is an exception: pulmonary veins carry oxygen-rich blood.
Aorta
Draw the aorta as a large red arch rising from the left ventricle. It curves over the top of the heart and sends oxygen-rich blood to the body. In many diagrams, the aorta looks like a candy cane with medical responsibilities.
Step 6: Show Blood Flow With Arrows
Arrows turn your drawing from a static picture into a working explanation. Use blue arrows for oxygen-poor blood and red arrows for oxygen-rich blood.
The correct flow is: body to vena cava, vena cava to right atrium, right atrium through tricuspid valve to right ventricle, right ventricle through pulmonary valve to pulmonary artery, pulmonary artery to lungs, lungs to pulmonary veins, pulmonary veins to left atrium, left atrium through mitral valve to left ventricle, left ventricle through aortic valve to aorta, and aorta to the body.
If that sounds long, remember this shortcut: right side goes to lungs; left side goes to body. That phrase alone can rescue a diagram from chaos.
Step 7: Label the Internal Heart Diagram Clearly
Good labels make a heart drawing useful. Place labels outside the heart and use straight lines pointing to each part. Avoid cramming words inside the chambers unless your handwriting is tiny and heroic.
Your essential labels should include right atrium, right ventricle, left atrium, left ventricle, septum, tricuspid valve, pulmonary valve, mitral valve, aortic valve, superior vena cava, inferior vena cava, pulmonary artery, pulmonary veins, and aorta.
Step 8: Add Wall Thickness and Details
To make the drawing more anatomically accurate, thicken the wall around the left ventricle. The left ventricle has a stronger muscular wall because it must pump blood through the entire body. The right ventricle only sends blood to the lungs, which are nearby.
You can also lightly shade the heart muscle around the chambers. Keep the shading subtle. The purpose is clarity, not turning your biology homework into a Renaissance mural.
Common Mistakes to Avoid
One common mistake is switching the right and left sides. Always remember that the diagram is usually shown from the front, so the heart’s right side appears on the viewer’s left.
Another mistake is coloring all arteries red and all veins blue. That rule works in many body diagrams, but not in the pulmonary circuit. The pulmonary artery carries oxygen-poor blood to the lungs, while the pulmonary veins carry oxygen-rich blood back to the heart.
A third mistake is forgetting the valves. Without valves, the internal structure of the heart is incomplete. Valves explain why blood moves in one direction instead of sloshing around like soup in a moving car.
Simple Practice Method for Beginners
For your first practice drawing, use basic shapes. Draw four rounded boxes for the chambers, a curved line for the septum, flap shapes for the valves, and tubes for the vessels. Once the layout makes sense, make the shape more realistic.
This method works because anatomy drawing is part science and part design. You are organizing information visually. Accuracy matters, but readability matters too. A slightly simplified diagram that teaches clearly is better than a realistic sketch that confuses everyone within a ten-foot radius.
Advanced Details You Can Add
If you want a more advanced internal heart structure drawing, add the chordae tendineae and papillary muscles. The chordae tendineae are cord-like structures that help anchor the atrioventricular valves. Papillary muscles attach to these cords and help prevent valve flaps from opening backward during ventricular contraction.
You can also add the heart wall layers: endocardium on the inside, myocardium as the muscular middle layer, and epicardium on the outer surface. For most school diagrams, these layers are optional. For anatomy students, they add useful depth.
How to Make the Diagram Look Clean for Web Publishing
If you are creating a heart diagram for a blog or online lesson, keep the design simple. Use high contrast, large labels, and enough white space. Many readers will view your page on a phone, so tiny labels can become microscopic sadness.
Use a caption under the image explaining that blue shows oxygen-poor blood and red shows oxygen-rich blood. Also mention that the heart’s right side appears on the left side of the diagram because the viewer is looking at the heart from the front.
Experience-Based Tips for Drawing the Internal Structure of the Heart
The best way to learn how to draw the internal structure of the heart is to stop treating it like a single complicated object. Treat it like a map. When students begin with the outer shape, they often get stuck trying to make it look realistic immediately. A better approach is to sketch the route of blood first. Once the route is clear, the chambers and vessels naturally fall into place.
One helpful experience is to draw the heart three times in one sitting. The first drawing should be rough and ugly on purpose. Use it only to place the chambers and arrows. The second drawing should focus on labels and valves. The third drawing should combine everything into a clean final version. This method removes the pressure to make the first sketch perfect. The first sketch is allowed to be a mess. In fact, it is supposed to be a mess. That is where learning happens.
Another practical tip is to say the blood-flow pathway out loud while drawing. For example: “Body, vena cava, right atrium, tricuspid valve, right ventricle, pulmonary valve, pulmonary artery, lungs.” Speaking the route while sketching helps connect memory with movement. It may feel silly, but it works. Many learners remember the heart better when their hand, eyes, and voice all participate.
Coloring should come after the structure is correct, not before. Beginners often grab red and blue pencils too early and end up decorating mistakes. First, confirm that the pulmonary artery is blue, the pulmonary veins are red, and the aorta is red. Then color with confidence. Nothing says “I understand circulation” like correctly coloring the pulmonary vessels, because those are the sneaky exceptions.
When labeling, use the same order every time. Start with the four chambers, then the four valves, then the great vessels, then the septum. This creates a repeatable checklist. If a label is missing, you will notice it quickly. For web content, this checklist also helps readers follow the tutorial without feeling lost.
Finally, compare your finished drawing with a reliable anatomy reference, but do not obsess over artistic perfection. A useful heart diagram is not judged by how dramatic it looks. It is judged by whether someone can understand the structure and blood flow after looking at it for a few seconds. If your diagram clearly shows the chambers, valves, vessels, septum, and arrows, congratulations: your heart drawing has a pulse.
Conclusion
Learning how to draw the internal structure of the heart becomes much easier when you build the diagram from function to form. Start with the four chambers, divide the sides with the septum, add the valves, connect the major vessels, and finish with arrows showing blood flow. Use blue for oxygen-poor blood and red for oxygen-rich blood, but remember the pulmonary artery and pulmonary veins are special exceptions.
A strong heart diagram is clear, labeled, and logical. It does not need to look like a medical textbook illustration on the first try. With practice, your drawing will become cleaner, more accurate, and more useful for learning. The heart may be a powerful organ, but on paper, it becomes manageable one chamber at a time.
Note: This article is for educational drawing and anatomy-learning purposes. It is not a medical diagnosis guide or a substitute for professional medical training.