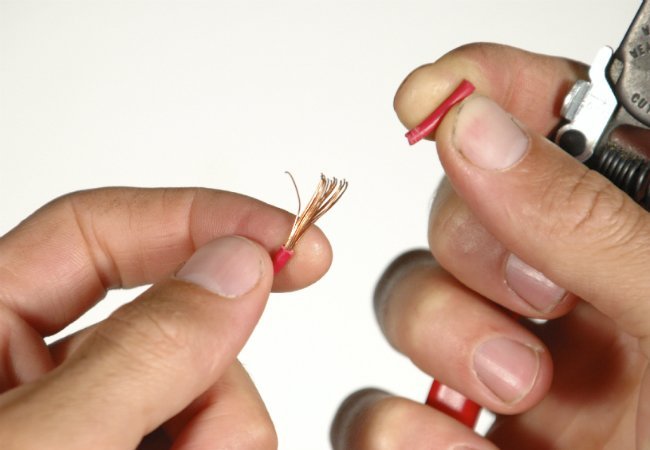
Stripping wire sounds like one of those jobs that should require exahe copper gets nicked, and a tiny home repair begins behaving like a major infrastructure project.
Fortunately, learning how to strip wire is straightforward when you use the right technique. This guide explains three practical methods: using a dedicated wire stripper, carefully scoring insulation with a utility knife, and using scissors when no better tool is available. It also covers wire gauges, solid versus stranded conductors, common mistakes, and the small details that help produce safe, dependable electrical connections.
Safety note: Never strip or handle household wiring while it is energized. Turn off the correct breaker, prevent anyone from restoring power, and verify that voltage is absent with an appropriate tester before touching conductors. Professional safety guidance consistently treats de-energizing and voltage verification as essential steps rather than optional precautions.
What Does It Mean to Strip Wire?
Electrical wire usually consists of a conductive metal core surrounded by insulation. Stripping wire means removing a measured section of that insulation without cutting, scraping, thinning, or breaking the conductor underneath.
The exposed conductor can then be inserted into an approved connector, wrapped around a terminal screw, crimped into a fitting, or connected according to the device manufacturer’s instructions. The amount of insulation removed depends on the connector or terminalnot on whatever length looks impressive.
Many receptacles, switches, connectors, and fixtures include a strip-length gauge or specify a measurement in their instructions. Use that measurement. Too little exposed wire may prevent a secure connection. Too much may leave bare copper outside the connector, where it can contact other conductors or conductive surfaces.
Before You Begin: Identify the Wire
Check the wire gauge
American Wire Gauge, commonly abbreviated as AWG, identifies conductor size. On typical manual wire strippers, the holes are labeled with gauge numbers. Selecting the correct opening allows the cutting edges to slice through insulation while clearing the conductor.
Do not guess based only on appearance. Read the printing on the cable jacket, check the project documentation, or use the gauge feature built into an appropriate tool. Wire-stripping tools are manufactured for specific gauge ranges, which is why one model may handle common residential conductors while another is intended for small electronics wire. ine whether the conductor is solid or stranded
Solid wire contains one metal conductor. Stranded wire contains numerous fine strands bundled together. Stranded wire is more flexible, but its individual strands are easier to cut accidentally.
Some stripper holes have different ratings for solid and stranded wire. For example, one tool may strip 10- to 18-AWG solid wire but only 12- to 20-AWG stranded wire. Always follow the markings on the tool rather than assuming one opening works equally well for both. guish individual insulation from an outer cable jacket
Removing insulation from one conductor is not always the same job as removing the outer sheath from nonmetallic cable. A dedicated cable ripper, jacket stripper, or tool designed for NM cable offers better control than attacking the jacket with whichever sharp object happens to be nearby.
After opening a cable jacket, inspect the insulation on every conductor inside. A hidden slice in the insulation is not a souvenir from a successful project; it is damage that must be corrected.
Tools and Materials
- Manual or self-adjusting wire stripper
- Voltage tester appropriate for the circuit
- Utility knife with a sharp blade
- Sturdy scissors
- Safety glasses
- Scrap wire for practice
- Project instructions or the connector’s strip-length guide
A dedicated wire stripper is the preferred tool. Precision stripping holes, gauge markings, adjustable stops, and self-adjusting jaws are designed to make insulation removal more repeatable. Automatic models can grip and strip common solid and stranded conductors in one squeeze, while some tools also accommodate common NM cable sizes.
How to Strip Wire Safely
1. Shut off or disconnect the power
For a lamp, appliance, or low-voltage device, unplug it and remove batteries or other power sources where applicable. For household branch-circuit wiring, switch off the appropriate breaker at the service panel.
2. Prevent accidental re-energization
Tell other occupants that electrical work is underway. Use an appropriate breaker lockout device when necessary, especially when the panel is out of sight. A handwritten note is better than nothing, but it is not a magical force field.
3. Verify that the circuit is de-energized
Do not assume that a circuit is safe because a breaker label says “bedroom” and you happen to be standing in a bedroom. Panels can be mislabeled, circuits can share boxes, and equipment can have more than one power source.
Use a suitable voltage tester according to its manufacturer’s directions. Professional testing guidance recommends confirming that the tester works on a known live source before and after checking the circuit, often called a live-dead-live test. sure the required strip length
Look for a molded strip gauge on the device, a diagram on the connector package, or a measurement in the installation instructions. Mark the insulation lightly when repeatability matters.
5. Support the wire
Hold the conductor firmly enough to control it, but avoid sharp bends near the stripping point. Work in good lighting with the wire directed away from your face and body.
Method 1: Strip Wire With a Wire Stripper
This is the fastest, cleanest, and most reliable method for ordinary electrical work. Manual strippers are affordable, compact, and far less likely to damage a conductor than improvised blades when used correctly.
Step 1: Find the correct stripping hole
Match the wire’s gauge and type to the markings on the stripper. Be sure you are looking at the stripping section rather than the cutter, crimper, screw shear, or another mysterious-looking opening whose purpose you have not yet investigated.
Step 2: Insert the wire
Place the conductor in the correct hole with the desired strip length extending beyond the jaws. Keep the tool approximately perpendicular to the wire so the cut circles the insulation evenly.
Step 3: Close the handles
Squeeze until the stripping edges cut through the insulation. You should feel resistance from the coating, followed by a cleaner stop as the blades reach their designed depth.
Step 4: Pull off the insulation
Maintain pressure on the handles and pull the stripper toward the wire’s end. The insulation should slide away in one piece. Some users find that a very slight twist helps release stubborn insulation, but aggressive twisting can score the conductor.
Step 5: Inspect the exposed wire
Look for cuts, flattened areas, missing strands, or deep scratches. A clean solid conductor should remain round and smooth. A stripped stranded conductor should retain all or nearly all of its original strands in an orderly bundle.
Precision-ground stripping openings are specifically designed to remove insulation without nicking the conductor. Self-adjusting tools add a movable stop and tension control, making them useful when preparing many conductors or switching between wire sizes.
Method 2: Strip Wire With a Utility Knife
A utility knife can remove insulation when a dedicated stripper is unavailable or when working with an unusual cable jacket. However, it requires patience and a light touch. A knife can easily slice into copper, sever fine strands, or continue its journey into a finger that did not volunteer for the project.
Step 1: Place the wire on a stable surface
Whenever possible, position the wire on a scrap piece of wood or another firm, nonconductive work surface. Do not hold the cutting area against your palm or thigh.
Step 2: Score the insulation lightly
At the required strip length, roll the wire under the blade while applying minimal pressure. The goal is to score the insulation around its circumference, not to chop through it.
For very small wire, bending the scored insulation gently may help it split. For thicker insulation, make several shallow passes rather than one deep cut.
Step 3: Make a shallow lengthwise slit if needed
When the insulation remains stubborn, make a short, shallow cut from the score line toward the end of the wire. Keep the blade pointed away from your body and stop immediately if you feel it contact metal.
Step 4: Peel off the insulation
Use your fingers or pliers to lift and remove the scored sleeve. Do not scrape the conductor repeatedly with the knife.
Step 5: Examine the conductor carefully
Knife damage is sometimes subtle. Rotate the conductor under bright light and check the entire circumference. If the copper is deeply scored, cut the damaged portion off and try again.
Knife stripping works best as a controlled scoring operation. It is not a test of strength, speed, or your ability to imitate a movie character defusing a bomb with six seconds left on the clock. Dedicated cable-stripping tools reduce exposure to open blades and generally provide more consistent depth control.
Method 3: Strip Wire With Scissors
Scissors are a last-resort option for light, flexible wire. They are less precise than wire strippers and can crush or cut the conductor if too much pressure is applied. This method is better suited to a small craft, speaker, or low-voltage repair than to preparing an entire box of household conductors.
Step 1: Open the scissors partway
Place the wire near the base of the blades, where you have the most control. Do not close the scissors as though you are cutting ribbon at a grand opening.
Step 2: Apply very gentle pressure
Close the blades only enough to bite into the insulation. Stop before reaching the metal conductor.
Step 3: Rotate the wire
Turn the wire gradually so the blades score a ring around the insulation. Maintain consistent, light pressure throughout the rotation.
Step 4: Pull off the insulation
Once the coating is scored all the way around, bend it slightly and slide it off the end. If it does not release easily, deepen the score in tiny increments rather than clamping harder.
Step 5: Inspect for crushed or severed strands
Scissor blades can flatten solid conductors and remove strands from flexible wire. Trim and restart if the conductor is damaged.
This method follows the basic principle of scoring the insulation gently before pulling it away, but scissors should not replace a proper stripper for routine electrical work.
How to Avoid Nicking the Conductor
A nick creates a weak point. Solid wire may break when it is bent around a terminal, while stranded wire loses current-carrying material each time a strand is severed. Damage can also interfere with a connector’s grip.
- Match the stripper opening to the wire gauge and conductor type.
- Keep stripping blades clean, sharp, and properly aligned.
- Do not use the cutting jaws as stripping jaws.
- Make shallow scores when using a knife or scissors.
- Practice on scrap wire before working with short conductors in a crowded box.
- Cut off damaged sections instead of hiding them inside a connector.
When a wire is already too short to trim safely, stop and evaluate the correct repair. Depending on the situation, that may involve an approved splice, an extension within an accessible electrical box, or assistance from a licensed electrician.
Common Wire-Stripping Mistakes
Removing too much insulation
Long stretches of bare copper do not create a “stronger” connection. They create more opportunity for accidental contact. Strip only the length specified for the connector or terminal.
Removing too little insulation
If insulation enters an area meant to clamp bare conductor, the connection may not seat properly. The solution is to restrip the wire to the correct length, not to tighten the terminal with heroic force.
Using the wrong gauge opening
A hole that is too large may fail to cut the insulation. A hole that is too small can cut into the conductor. When uncertain, begin with the larger opening and move down cautiously.
Pulling at an angle
Pulling sideways can bend solid wire or stretch and separate stranded conductors. Pull the insulation straight off whenever possible.
Twisting stranded wire too aggressively
A gentle twist can keep strands organized, but overtightening the bundle can deform it or make it unsuitable for certain terminals. Follow the connector manufacturer’s instructions.
Assuming insulated handles make live work safe
Some electrical tools carry insulation ratings, but a rated handle does not turn unqualified live electrical work into a sensible DIY project. De-energizing remains the basic rule. Only qualified people should work on exposed energized parts under controlled procedures.
When to Stop and Call an Electrician
Wire stripping is a basic skill, but the surrounding project may not be basic. Contact a qualified electrician when you find:
- Aluminum branch-circuit wiring
- Burned, brittle, melted, or discolored insulation
- Warm outlets, switches, or cover plates
- Repeatedly tripping breakers
- Unknown conductors or multiple power sources
- Overcrowded or damaged electrical boxes
- Wiring that is too short for a compliant connection
- A project beyond your training or local code knowledge
The U.S. Consumer Product Safety Commission advises consumers to seek professional help for warning signs such as unusually warm devices and cautions against attempting ordinary DIY repairs on problematic aluminum wiring.
Practical Experience: Lessons That Make Wire Stripping Easier
The most useful lesson from repeated DIY electrical projects is that speed arrives naturally after consistency. Trying to strip wire quickly before mastering the motion usually produces a collection of copper fragments, mangled insulation, and inventive vocabulary. Practicing on scrap wire is faster in the long run.
A good practice session uses several pieces of the same wire. Mark identical strip lengths, prepare each end, and line up the results. This immediately reveals whether the tool is being held straight and whether the selected opening is correct. Clean strips look remarkably boringand boring is excellent when electricity is involved.
Another common discovery is that tool quality matters, but tool selection matters more. An expensive stripper used in the wrong gauge opening can still damage wire. A basic manual stripper matched correctly to the conductor can produce professional-looking results. Easy-to-read markings and smooth, aligned jaws are often more valuable than a handle covered in enough features to resemble a spacecraft dashboard.
Short wires inside existing boxes present a different challenge. When only a few inches of conductor remain, pulling hard on the insulation can stress the wire where it enters the cable jacket or box. In these situations, support the wire close to the stripping point and use controlled movements. If a mistake would leave too little wire for a safe connection, practicing on an offcut first becomes especially important.
Stranded wire teaches patience. Even when the insulation comes off cleanly, the bundle may flare. Gather the strands gently with your fingers, keeping every strand in the connection. Finding one tiny copper strand sticking out after installing a connector is irritating; failing to notice it is worse.
Lighting also makes a surprisingly large difference. A conductor that looks perfect in a dim basement may reveal a deep knife score under a bright work light. Rotating the stripped end through a full turn exposes damage that cannot be seen from one angle. Safety glasses are useful as well, particularly when a short sleeve of insulation suddenly launches itself across the room.
Experienced DIYers also learn to keep a small container for stripped insulation and wire scraps. Tiny pieces of copper become sharp debris, and short wire clippings have an uncanny talent for appearing under knees. A clean work area makes inspection easier and prevents scraps from entering electrical boxes or equipment.
One final lesson is knowing when the stripping task is not the real problem. Brittle insulation, scorched copper, unusual wiring, and crowded boxes are not invitations to become more creative. They are signs to pause. A cleanly stripped conductor cannot rescue a fundamentally unsafe installation.
The best result is therefore not merely exposed copper. It is the correct amount of undamaged conductor, prepared for an approved connection, with the circuit confirmed de-energized and the finished work inspected carefully. Once that routine becomes automatic, stripping wire stops feeling fussy and starts feeling satisfyingly precise.
Conclusion
For most projects, a dedicated wire stripper is the clear winner. It is faster, more accurate, and easier to control than a knife or scissors. A utility knife can handle unusual insulation or cable jackets when used with shallow scoring motions, while scissors are best reserved for occasional light-duty or low-voltage work.
Regardless of the method, the important principles remain the same: disconnect power, verify the absence of voltage, follow the required strip length, match the tool to the wire gauge, and inspect the conductor before making a connection. Copper may be forgiving enough to bend, but it is not forgiving enough to ignore.
Editorial research note: This guide synthesizes safety and tool guidance from established U.S. home-improvement publications, electrical-safety organizations, government agencies, testing specialists, retailers, and tool manufacturers.