Some Christmas decorations arrive in velvet-lined boxes and make you whisper, “Please don’t drop that.” Others start as a humble sheet of paper, a pair of scissors, and a glue stick that has mysteriously lost its cap again. This project belongs proudly to the second group. Easy 3D paper ornaments are budget-friendly, beginner-friendly, kid-friendly with supervision, and surprisingly elegant when you choose the right paper and repeat a few simple shapes.
For Day 2 of paper Christmas decorations, we are moving beyond flat cutouts and stepping into the magical little world of dimension. A folded circle becomes a bauble. A stack of paper strips turns into a spinner. A few scored diamonds become a star. Nothing here requires advanced crafting skills, expensive equipment, or the patience of a professional gift-wrapper at a department store in December. You just need neat folds, a little glue, and the courage to say, “That ornament is charmingly handmade,” when one side looks slightly more enthusiastic than the other.
This guide walks you through several easy 3D paper ornament styles, including paper ball ornaments, accordion honeycomb ornaments, folded stars, layered snowflakes, and recycled Christmas card decorations. You can make them for a Christmas tree, window garland, mantel display, classroom craft day, gift topper, or festive table setting. Best of all, they are light enough for delicate branches and inexpensive enough to make by the dozen.
Why 3D Paper Ornaments Are Perfect for Christmas Decorating
Paper ornaments have a special holiday superpower: they look thoughtful without demanding a dramatic budget. Cardstock, scrapbook paper, old book pages, wrapping paper scraps, and last year’s Christmas cards can all become beautiful handmade Christmas decorations. Instead of buying another box of plastic ornaments that look exactly like everyone else’s, you can create decorations with color, texture, and personality.
The 3D effect is what makes these ornaments feel finished. Flat paper shapes are cute, but folded, layered, curved, or interlocked paper catches light from different angles. Metallic cardstock sparkles near string lights. Matte paper creates a cozy Scandinavian look. Patterned scrapbook paper brings cheerful vintage energy. Even plain white printer paper can look snowy and modern when folded into stars or snowflakes.
Another advantage is flexibility. You can create a coordinated set using two or three colors, or make a joyful mix from whatever paper scraps are hiding in your drawer. These easy Christmas paper crafts also work well for families because adults can handle cutting and scoring while kids choose colors, assemble pieces, and add stickers, ribbons, or tiny drawings.
Materials You Will Need
You do not need a craft room that looks like a glitter tornado recently passed through. A basic setup is enough for most 3D paper Christmas ornaments.
Basic Supplies
- Cardstock, scrapbook paper, construction paper, wrapping paper, or recycled Christmas cards
- Scissors or a craft knife with adult supervision
- Glue stick, craft glue, double-sided tape, or hot glue for stronger attachment
- Ruler
- Pencil
- Hole punch
- String, twine, ribbon, fishing line, or ornament hooks
- Optional: bone folder, scoring tool, beads, sequins, stickers, glitter, markers, or metallic pens
Best Paper Choices for 3D Ornaments
For ornaments that need structure, medium-weight cardstock is usually the best choice. It holds its shape better than printer paper but still folds without making you feel like you are wrestling a cereal box. Scrapbook paper is great for patterned ornaments, while foil cardstock creates a polished look. Construction paper works well for kids’ crafts, though it may bend more easily over time.
If you are making honeycomb ornaments or delicate folded shapes, lighter paper can be easier to manipulate. If you are making stars, layered snowflakes, or paper strip baubles, cardstock gives a cleaner result. Recycled Christmas cards are excellent for sturdy 3D ball ornaments because the printed designs already feel festive. Basically, before you throw away that card from Aunt Linda with the glittery cardinal on it, give it a second career.
Project 1: Easy 3D Paper Ball Ornaments
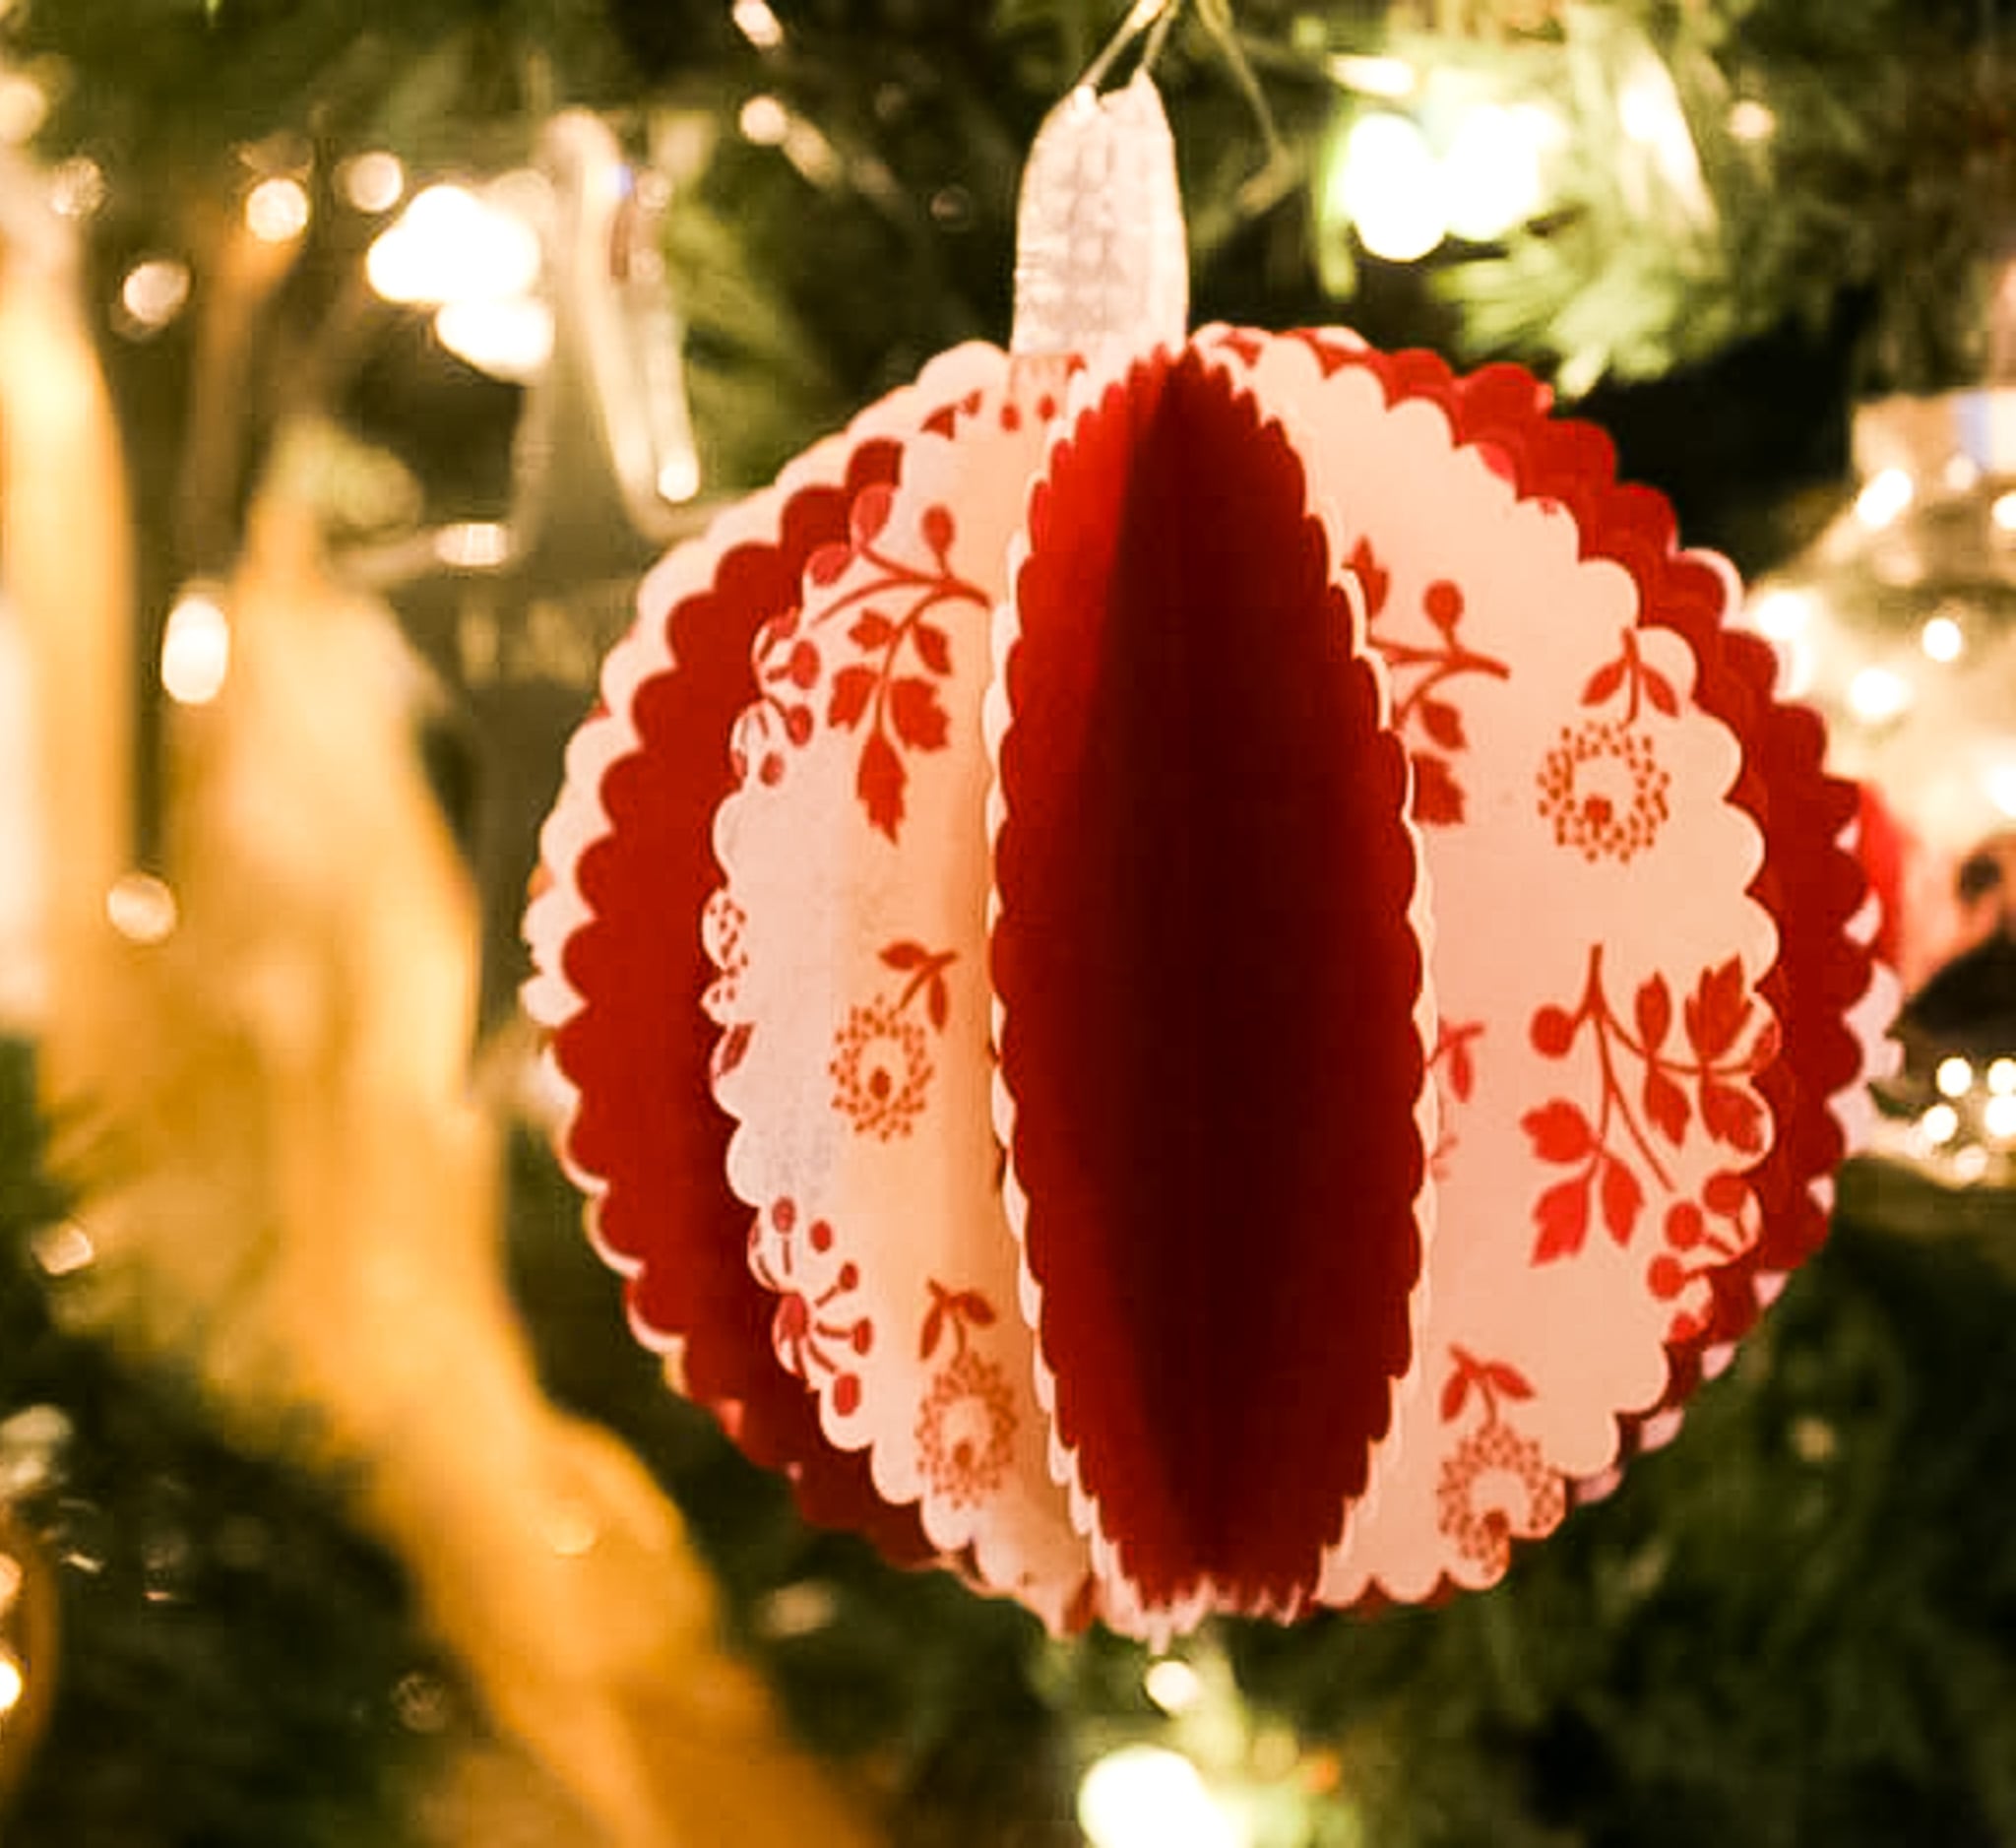
Paper ball ornaments are one of the simplest ways to create dimension. They look like little baubles, but they are made from repeated circles folded and glued together.
How to Make Them
Cut 8 to 12 circles from cardstock or scrapbook paper. The circles should be the same size; a mug, jar lid, or round cookie cutter makes an easy template. Fold each circle in half with the patterned side facing inward. Glue one half-circle to the next half-circle, continuing until all pieces are connected. Before closing the final seam, place a loop of string down the center so the ornament can hang. Glue the last sides together and gently fan out the shape.
For a fuller ornament, use more circles. For a cleaner modern look, use fewer circles and heavier paper. You can alternate two colors, use all one pattern, or combine old holiday cards for a cheerful patchwork effect. If the edges do not line up perfectly, trim lightly around the outside after the glue dries. Do not panic-trim while the glue is wet; that is how ornaments become accidental potatoes.
Project 2: Paper Strip Spinner Ornaments
Paper strip ornaments are quick, playful, and excellent for using leftover cardstock. They can look like lanterns, spinners, or round baubles depending on how you arrange the strips.
How to Make Them
Cut six to eight strips of paper about 1 inch wide and 6 to 8 inches long. Punch a small hole at both ends of each strip. Stack the strips neatly and fasten one end with a small brad, bead-and-wire loop, or a knot of string. Repeat on the other end, then gently spread the strips around into a sphere shape. Add a hanging loop at the top.
This ornament works beautifully with double-sided paper because both sides show when the strips curve outward. Try red and white stripes for a candy-cane look, kraft paper for rustic charm, or metallic cardstock for a more polished Christmas tree decoration. You can also place a bead at the top and bottom to make the ornament look more finished.
Project 3: Folded 3D Paper Stars
Paper stars are classic Christmas decorations for a reason. They can be rustic, elegant, bright, minimalist, or completely dramatic depending on the paper. A 3D star looks impressive, but the basic method is simple: fold, score, pinch, and shape.
How to Make Them
Start by cutting two identical star shapes from cardstock. Use a template if you want crisp symmetry. Score a straight line from each star point to the opposite inner corner. Fold along the scored lines, alternating mountain and valley folds so the star begins to puff outward. Repeat with the second star. Glue the edges together, leaving one point slightly open if you want to insert a hanging loop. Press carefully until the glue sets.
For extra sparkle, brush the edges lightly with glue and dip them in fine glitter. If glitter makes you nervous because it tends to migrate into shoes, hair, and possibly future generations, use metallic markers instead. White stars look snowy, gold stars feel traditional, and deep green stars add a sophisticated woodland mood.
Project 4: Accordion Honeycomb Paper Ornaments
Honeycomb ornaments look fancy, but they rely on a repeating accordion fold. They are great for party-style Christmas decorations, window displays, and cheerful garlands.
How to Make Them
Cut several identical rectangles or half-circle shapes from lightweight paper. Fold each piece back and forth like an accordion. Glue the folded pieces together side by side until they form a fan. Open the fan into a circle or globe shape and secure the ends. Add a ribbon loop at the top.
The secret is consistency. Keep folds the same width and press them firmly. A bone folder helps, but the edge of a ruler also works. Tissue paper creates a soft honeycomb effect, while thin craft paper gives more structure. These ornaments are beautiful in clusters above a dining table or along a mantel, especially when you vary the sizes.
Project 5: Layered Paper Snowflake Ornaments
Layered snowflakes are perfect if you want a 3D effect without building a full ball or star. The idea is simple: stack similar snowflake shapes with small spacers between them so shadows create depth.
How to Make Them
Cut two to four snowflake shapes from cardstock. They can be identical or slightly different sizes. Place small foam dots, folded paper tabs, or tiny pieces of cardboard between each layer. Stack the snowflakes from largest to smallest, rotating each layer slightly so the points do not sit exactly on top of each other. Punch a hole near the top and add a ribbon.
This is one of the easiest ways to make handmade paper ornaments look store-bought. White-on-white feels snowy and elegant. Silver, pale blue, and pearl paper create an icy look. For a cozy farmhouse style, use kraft paper and white paint pen details. The layered method also works for Christmas trees, bells, angels, gingerbread shapes, and gift tags.
Project 6: Recycled Christmas Card 3D Ornaments
Christmas cards often have beautiful artwork, thick paper, and sentimental value. Instead of stacking them in a drawer until the drawer becomes a festive archaeological site, turn them into ornaments.
How to Make Them
Choose cards with colorful designs. Cut several identical circles, diamonds, or ornament shapes. Fold each piece down the middle and glue the backs together, just as you would for a paper ball ornament. Position the best parts of the card art on the outside. Add string before closing the final seam.
You can also cut strips from cards and create paper strip spinner ornaments. Cards with metallic foil or embossed details look especially good because they add texture without extra supplies. This is a lovely way to preserve memories while making eco-friendly Christmas decorations.
Design Ideas for a Beautiful Tree
To make your paper Christmas ornaments look intentional, choose a small color palette before you start. Red, white, and kraft paper feels classic. Navy, silver, and white looks wintery. Pink, mint, and gold creates a sweet modern theme. Black, white, and metallic gold makes paper ornaments feel surprisingly upscale.
Size also matters. A tree looks more balanced when ornaments vary in scale. Make large 3D paper stars for deeper branches, medium paper balls for eye-level areas, and small layered snowflakes for the branch tips. Since paper ornaments are lightweight, they are perfect for filling gaps without weighing down the tree.
For a polished finish, repeat one detail across every ornament. Use the same ribbon, the same bead, the same metallic pen outline, or the same tiny bow. Repetition tells the eye, “Yes, this was a design choice,” even if you are crafting at 11:42 p.m. while watching a holiday movie and wondering where the scissors went.
Common Mistakes and Easy Fixes
The Ornament Looks Lopsided
This usually happens when pieces are different sizes or folds are not centered. Use a template, stack pieces before cutting, and fold carefully. If the ornament is already glued, trim the outside lightly after it dries.
The Glue Will Not Hold
Some glossy papers resist glue sticks. Try double-sided tape, tacky craft glue, or hot glue for heavier cardstock. Hold seams together with paper clips while they dry.
The Paper Cracks When Folded
Heavy cardstock can crack along fold lines. Score the fold first using a scoring tool, empty ballpoint pen, or the back of a butter knife. Fold slowly and press with a ruler or bone folder.
The Ornament Looks Too Plain
Add edge details. A thin line of metallic marker, a dusting of glitter, tiny punched dots, ribbon tails, or a bead at the bottom can make a simple paper ornament look finished.
Where to Use 3D Paper Christmas Ornaments
These decorations are not limited to the Christmas tree. Tie them to wrapped gifts as reusable gift toppers. Hang them from a branch centerpiece. Tape them to windows with clear thread for a floating effect. String several together for a garland. Place small paper stars around a holiday table setting. Attach name tags and use them as place cards for Christmas dinner.
They are also excellent for classrooms, office decorating, church craft nights, and family gatherings. Set up a small ornament-making station with pre-cut shapes, glue, ribbon, and markers. People can craft while chatting, and nobody has to pretend they understand complicated instructions. That alone is a holiday miracle.
Experience Notes: What I Learned Making Easy 3D Paper Ornaments
The first thing I learned while making 3D paper ornaments is that paper has opinions. Thin paper wants to wrinkle if you look at it too seriously. Heavy cardstock wants to fold like a tiny door with a bad hinge. Glossy paper looks gorgeous but sometimes refuses glue like it has hired a tiny legal team. Once you know that, the whole process becomes easier. Choose the paper based on the ornament, not just the color. For folded stars, medium cardstock is your friend. For honeycomb ornaments, lighter paper behaves better. For strip ornaments, double-sided cardstock makes everything look cleaner because no sad white underside appears when the ornament spins.
The second lesson is to make one test ornament before cutting enough pieces for a whole tree. This sounds obvious, but holiday crafting often begins with unrealistic confidence. You cut 72 circles, pour cocoa, turn on music, and then discover that your circles are too large for the branches or too small to show the pattern. A test ornament saves time, paper, and the quiet emotional spiral of realizing your “simple craft night” has become a geometry-based character test.
Spacing matters more than fancy supplies. A paper ball ornament looks best when each folded circle is lined up neatly. A layered snowflake looks more dimensional when the spacers are placed near the center rather than right at the fragile tips. A strip ornament hangs better when the top and bottom holes are centered. These are small details, but they make handmade ornaments feel crisp instead of chaotic.
I also learned that imperfections are part of the charm, but only up to a point. A slightly uneven fold looks handmade. A glue blob the size of a gumdrop looks like a cry for help. Use less glue than you think you need, especially with lightweight paper. If using liquid glue, spread it thinly with a scrap of paper. If using hot glue, apply tiny dots and work quickly. For kids, glue sticks and double-sided tape are usually less dramatic and easier to control.
The most satisfying part of these ornaments is how quickly they multiply. One paper ball is cute. Six paper balls look like a theme. Twelve paper balls, five stars, and a handful of snowflakes suddenly look like you planned an entire handmade Christmas collection. They also photograph beautifully because the folds and layers create shadows. If you are decorating a tree, place paper ornaments near warm white lights. The light catches the edges and makes even simple cardstock look special.
Finally, 3D paper ornaments bring people into the decorating process. Store-bought ornaments are pretty, but handmade ornaments tell little stories. A recycled card ornament might remind you of someone. A crooked star might become the family favorite. A child’s marker-covered paper bauble may not match the color palette, but it will absolutely steal the show. That is the real magic of paper Christmas decorations: they turn ordinary materials into keepsakes, and they do it without requiring a huge budget, a professional workshop, or a glitter-covered meltdown.
Conclusion
Easy 3D paper ornaments are proof that Christmas decorating does not need to be expensive or complicated to feel beautiful. With cardstock, scissors, glue, and a few simple folding techniques, you can create paper Christmas decorations that look festive, personal, and full of charm. Paper balls, folded stars, honeycomb ornaments, layered snowflakes, and recycled card baubles all offer different styles, but they share the same basic promise: big holiday impact from simple materials.
Whether you are decorating a full Christmas tree, hosting a craft afternoon, creating handmade gift toppers, or adding a cozy touch to your mantel, these ornaments are easy to customize. Choose colors that fit your home, repeat shapes for a coordinated look, and do not be afraid of small imperfections. Handmade decorations should have personality. After all, Christmas is not a showroom. It is a season of warmth, creativity, and occasionally finding a paper circle stuck to your sweater three hours later.
Note: For children’s craft sessions, pre-cut small pieces in advance and supervise the use of scissors, craft knives, hot glue, and small embellishments such as beads.