Apple TV is usually the quiet little black box that behaves itself. It streams your shows, remembers your apps, connects to your AirPods, and politely waits for you to lose the remote under the couch. But every now and then, it decides to act like a tiny theater critic: frozen screen, endless update loop, flashing light, missing apps, strange audio behavior, or a menu that moves with all the speed and grace of cold oatmeal.
That is when knowing how to restore an Apple TV becomes useful. Restoring can fix stubborn software problems, clear out old settings before selling or giving away the device, or bring an Apple TV back from an update that went sideways. The catch is that the right method depends on your Apple TV model. Apple TV 4K, Apple TV HD, and older Apple TV generations do not all restore the same way.
This guide walks through three practical ways to restore an Apple TV: using the built-in reset menu, restoring with a computer, and recovering newer models with an iPhone when the recovery screen appears. We will also cover what to do before you restore, what each option erases, and how to avoid turning a simple reset into a full-blown living-room tech opera.
Before You Restore: Know What You Are About to Erase
Restoring an Apple TV is not the same as restarting it. A restart is like telling the device to take a deep breath. A restore is more like sending it back to factory school with a freshly sharpened pencil. It removes settings, account information, app arrangements, Wi-Fi details, and other local data from the Apple TV. Your Apple ID purchases and subscriptions do not disappear forever, but you will need to sign in again and set things up afterward.
Before choosing any restore method, check three things. First, identify your model. From the Apple TV Home screen, go to Settings > General > About and look for the model information. If the device will not show a picture, check the label on the bottom of the Apple TV or the original box. Second, make sure you have a stable internet connection if you plan to use an option that installs software updates. Third, keep the Apple TV connected to power during the process unless the instructions specifically tell you to unplug it temporarily.
If your Apple TV is merely slow, glitchy, or refusing to cooperate with one app, try a restart first. On Apple TV 4K, you can restart from Settings > System > Restart, unplug the power cord briefly, or use the remote button combination described by Apple for your remote model. If the problem survives a restart, then yes, it may be time for the digital broom.
Way 1: Restore Apple TV from the Settings Menu
The easiest and most common way to restore an Apple TV is through the Settings app. This is the best method when your Apple TV still turns on, responds to the remote, and can reach the menu. It is also the method to use before selling, gifting, or handing the device to a relative who will absolutely call you later because “Netflix looks different.”
For Apple TV 4K and Apple TV HD
On Apple TV 4K or Apple TV HD, go to Settings > System > Reset. You will usually see two main options: Reset and Reset and Update.
Reset returns the Apple TV to factory settings without requiring an internet connection. It is the faster option and works well if you simply want to erase personal information or clear settings. Choose this if you are preparing the device for someone else and you do not need to download the latest tvOS during the process.
Reset and Update restores the Apple TV to factory settings and installs available software updates. This option requires internet access and takes longer, but it is often the better choice when you are troubleshooting bugs, update issues, app crashes, or strange system behavior. Think of it as cleaning the kitchen and finally replacing that sponge nobody wants to talk about.
After selecting the option, leave the Apple TV plugged in until the reset process finishes. The screen may go blank, the device may restart, and progress may look slow for a while. Do not unplug it just because it appears to be thinking deeply about its life choices.
For Apple TV 3rd Generation or Earlier
Older Apple TV models use a different menu path. Go to Settings > General > Reset. From there, you may see Reset All Settings and Restore.
Reset All Settings removes settings, accounts, and configuration details. Restore returns the Apple TV to factory settings and installs software updates, which means it needs an internet connection. For an older device that still works but feels haunted by past settings, this built-in restore option is usually the cleanest starting point.
When This Method Works Best
Use the Settings method when the device is responsive, you have a working remote, and your TV still shows the Apple TV interface. It is ideal for routine factory resets, preparing the Apple TV for resale, fixing persistent app issues, clearing strange settings, or starting fresh after years of shared household logins.
However, this method will not help much if your Apple TV is stuck on a warning symbol, showing only a black screen with a flashing indicator light, or unable to complete an update. In those cases, move to the next method.
Way 2: Restore Apple TV HD or Older Models with a Computer
If your Apple TV HD or Apple TV 3rd generation is showing a warning symbol, stuck during an update, or displaying a black screen with a flashing light, restoring it with a computer may solve the problem. This method is especially useful when the device cannot reach the Settings menu.
The important model detail is this: Apple TV HD has a USB-C port for service and support, while Apple TV 3rd generation uses Micro-USB for service and support. Apple TV 4K models do not have the same computer-restore port, so this method generally applies to Apple TV HD and some earlier models.
What You Need
You need a Mac or Windows PC, a high-speed internet connection, and the correct cable. Use a USB-C cable for Apple TV HD or a Micro-USB cable for Apple TV 3rd generation. The cable must support data transfer. This detail matters because some cables are charge-only, which is wonderful if you are charging a gadget and completely useless if you are trying to restore an Apple TV. Also, do not plug a Lightning cable into an Apple TV service port. The device is already stressed; do not make it question reality.
On a Mac, you will usually use Finder. On a Windows PC, use the Apple Devices app or iTunes, depending on your setup. Make sure your computer software is current before starting so the Apple TV is recognized properly.
Computer Restore Steps
Start by unplugging the HDMI cable and power cord from the Apple TV. Connect the USB-C or Micro-USB cable to the Apple TV, then connect the other end to your computer. For Apple TV HD or Apple TV 3rd generation, plug the Apple TV power cord back in after connecting it to the computer.
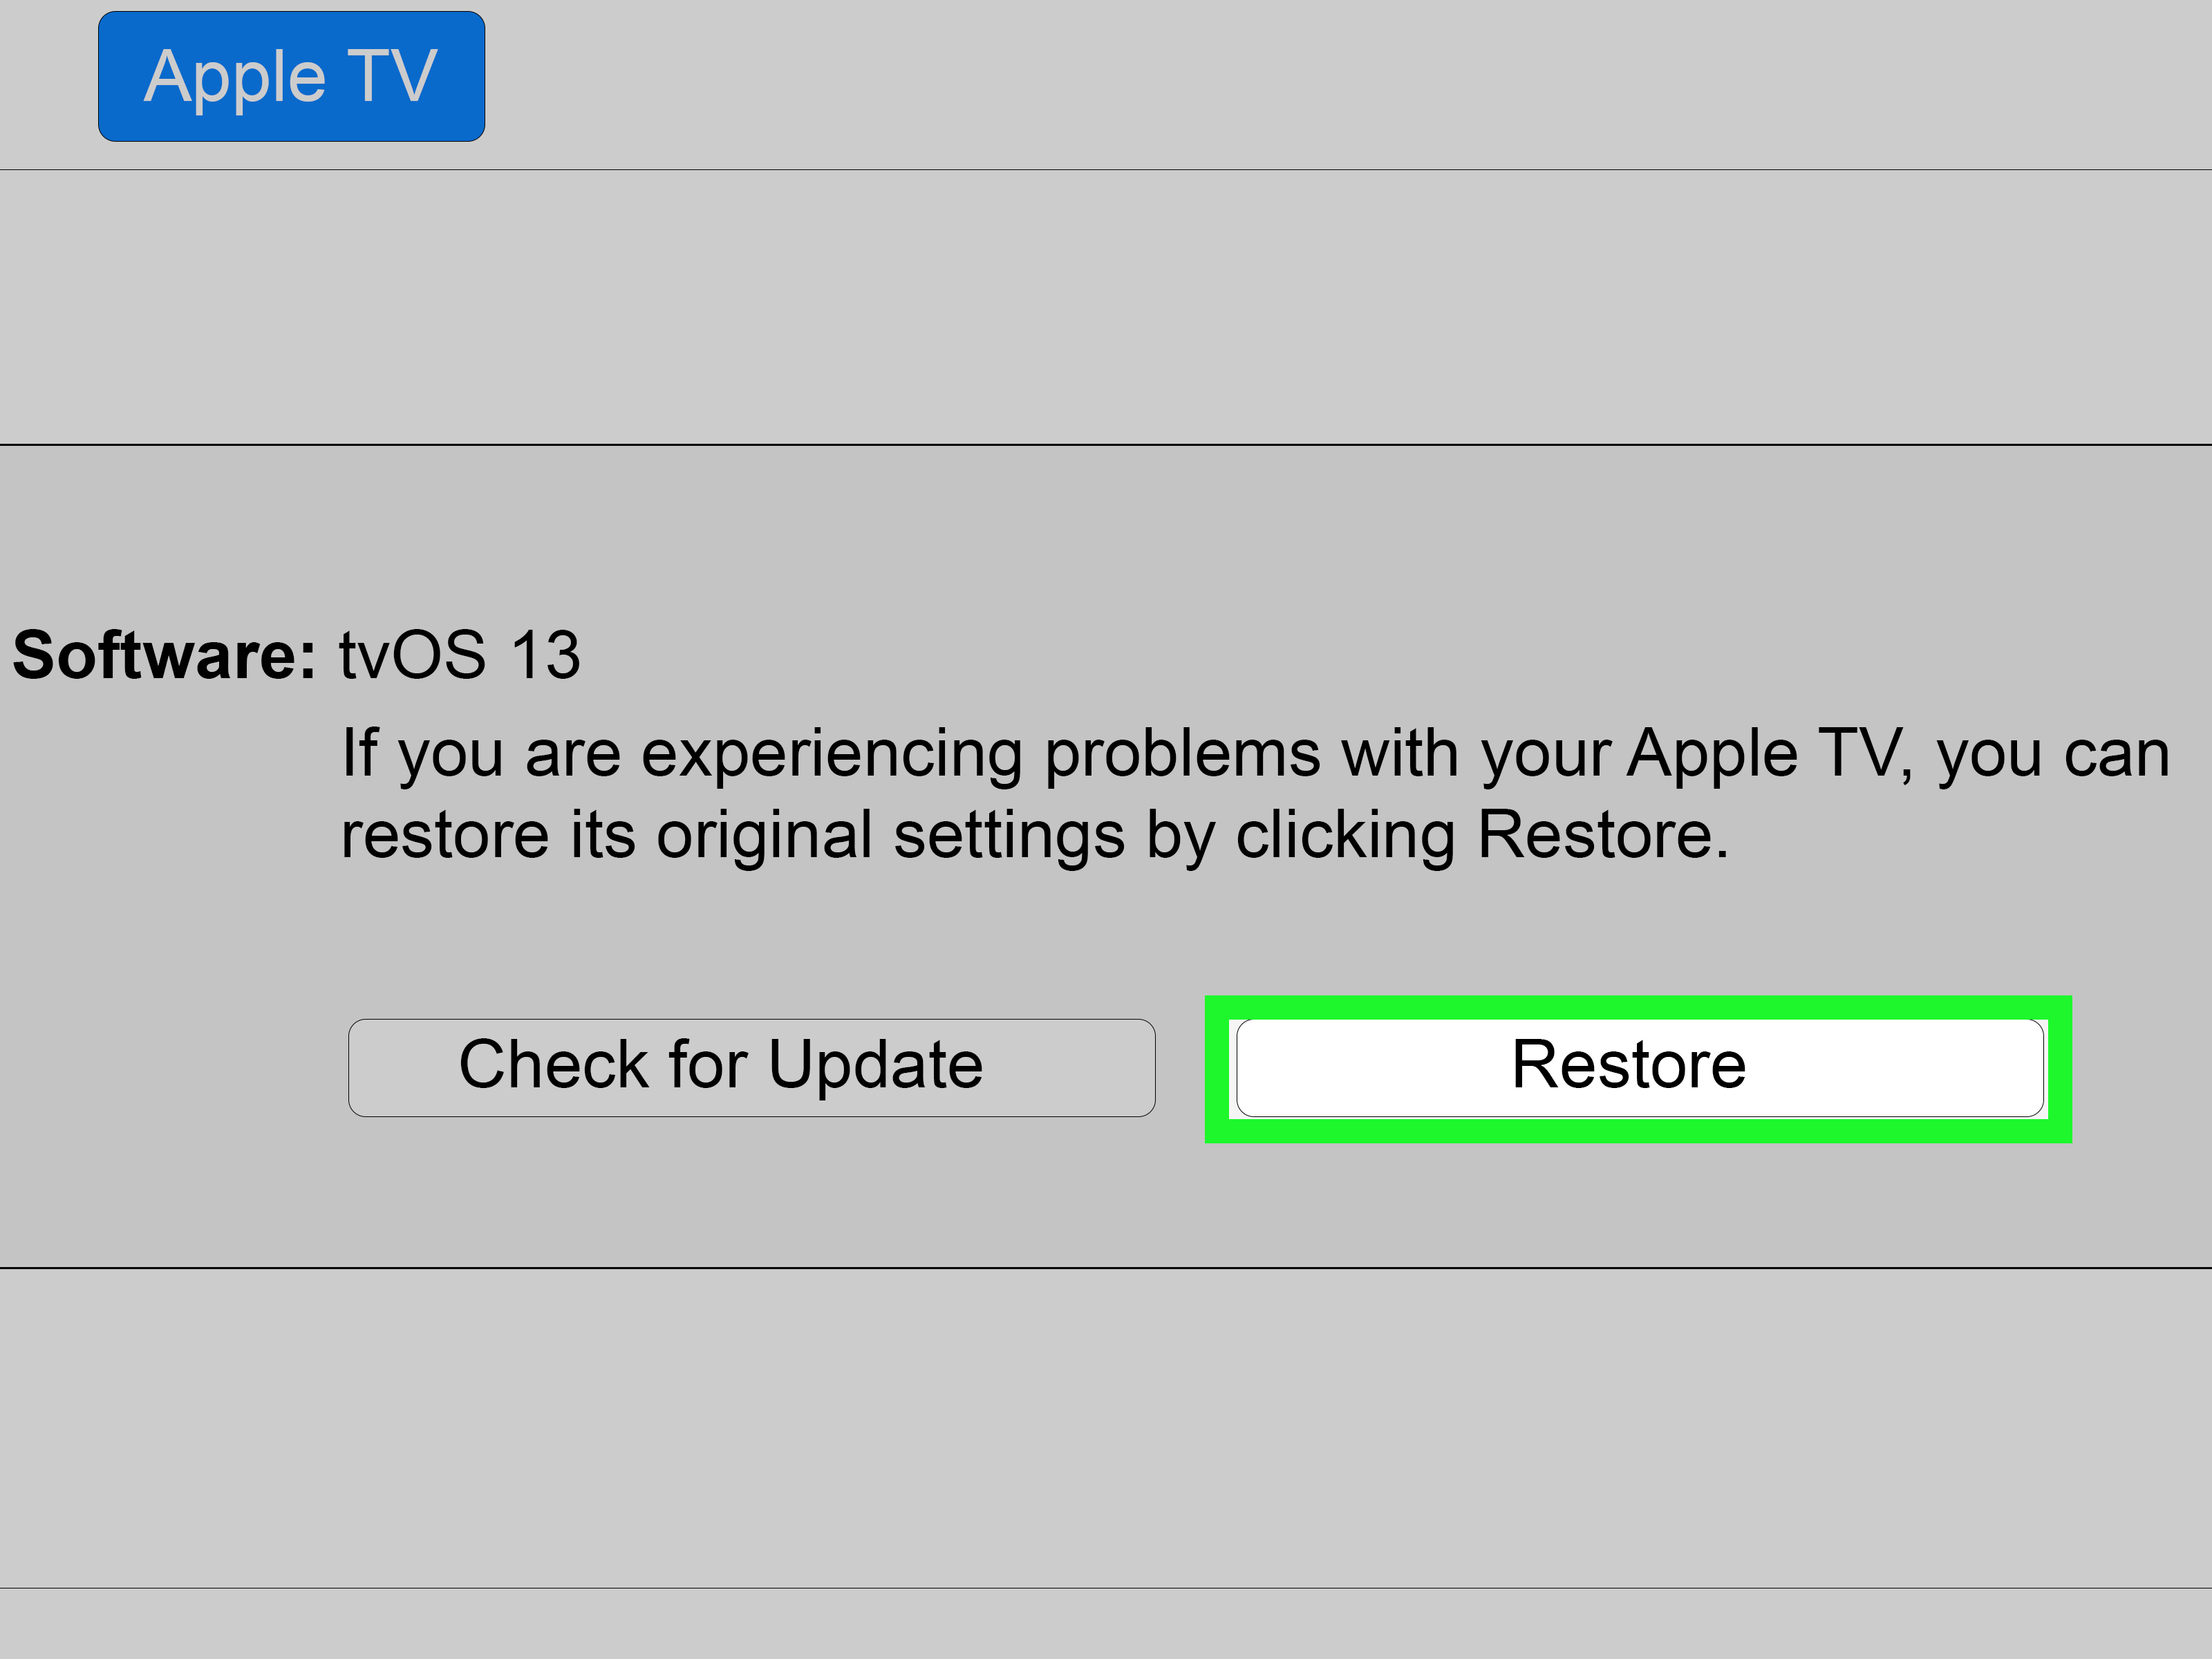
Open Finder on a Mac, or open the Apple Devices app or iTunes on a Windows PC. When the Apple TV appears, select it. Choose Restore Apple TV. During the restore, do not disconnect the USB cable, power cord, or computer. The computer downloads the needed software and reinstalls it on the Apple TV.
When the restore finishes, disconnect the USB-C or Micro-USB cable and reconnect the Apple TV to your television with HDMI and power. Then set it up again from the beginning.
If the Computer Does Not Detect Your Apple TV
If the Apple TV does not appear in Finder, the Apple Devices app, or iTunes, the cable is the first suspect. Try another USB-C or Micro-USB cable that you know supports data transfer. Avoid USB hubs if possible and connect directly to the computer. If you see restore errors, update your computer software, restart both devices, and try again.
If none of that works, the problem may be deeper than a home restore can fix. At that point, it is smarter to contact Apple Support or visit an Apple Store or Apple Authorized Service Provider than to spend your Saturday reenacting a detective show with cables.
Way 3: Recover Apple TV with an iPhone or Get Service for Serious Problems
Newer Apple TV recovery has become more flexible. If an Apple TV HD or later running tvOS 17 or later has a serious problem, your TV may show an image of an iPhone next to an Apple TV. That is not a decorative screensaver. It means the Apple TV can be recovered using a nearby iPhone.
How iPhone-Based Apple TV Recovery Works
To use this method, your iPhone must be updated to iOS 17 or later. Unlock the iPhone and hold it close to the Apple TV. A recovery notification should appear on the iPhone. Follow the on-screen steps, and leave the Apple TV connected to power while the recovery completes. You can continue using the iPhone normally during the process.
This method is especially helpful for Apple TV 4K owners because Apple TV 4K models do not offer the same simple USB computer-restore route as Apple TV HD. In the past, serious Apple TV 4K restore problems often pushed users toward service. The iPhone recovery method gives many users a cleaner path before booking a repair.
When to Use This Method
Use iPhone recovery when the Apple TV displays the iPhone-and-Apple-TV recovery image. Do not use random button tricks from forum threads as your first move, especially if official recovery instructions are available on screen. Unofficial shortcuts may work for some people, but they can also create confusion if you do not know exactly which remote and tvOS version you have.
If your Apple TV 4K shows a warning symbol during a software update, or if you see a black screen with a flashing indicator light, Apple’s guidance may point toward service. Before assuming the box is finished, check the basics: connect the Apple TV directly to the TV instead of through an AV receiver or HDMI switch, try a different HDMI cable, test another power outlet, and unplug the power cord for a short reset. If the problem remains, professional service is the safest next step.
What Happens After Recovery
After a successful recovery or restore, your Apple TV restarts and walks you through setup. You can sign in with your Apple ID, reconnect Wi-Fi or Ethernet, install apps, and adjust video and audio settings again. If you use an iPhone or iPad for setup, the process can be much faster because it can transfer basic account and network details.
Which Apple TV Restore Method Should You Choose?
Choose the Settings method if your Apple TV still works well enough to navigate menus. Choose the computer method if you have Apple TV HD or Apple TV 3rd generation and the device is stuck, showing a warning symbol, or unable to restore from Settings. Choose iPhone recovery if your Apple TV HD or newer displays the iPhone recovery image and you have an iPhone running iOS 17 or later.
The model matters more than most people realize. Apple TV HD has a USB-C service port. Apple TV 3rd generation has Micro-USB. Apple TV 4K models are different, which is why iPhone recovery and Apple Support are more relevant for severe restore problems on those devices. Before you start, identify the model, gather the right cable or iPhone, and make sure the Apple TV has stable power.
Common Mistakes to Avoid When Restoring Apple TV
Unplugging Too Soon
The most common mistake is impatience. Restores and updates can look frozen even when work is still happening. If you are using Reset and Update or restoring through a computer, software must download, install, and restart. Give it time, and keep the device connected unless official instructions say otherwise.
Using the Wrong Cable
A charge-only cable may look identical to a data cable. Unfortunately, your computer can only restore the Apple TV if the cable transfers data. If the Apple TV does not appear on your computer, test a different cable before assuming the device is broken.
Restoring Before Trying a Restart
If the issue is minor, a restart may solve it without erasing anything. Try restarting the Apple TV, checking the HDMI connection, updating tvOS, and testing your network before choosing a full factory restore. Restoring is useful, but it is not the first hammer you should swing at every nail.
Forgetting App Logins
After restoring, you may need to sign in to streaming apps again. Make sure you know your Apple ID password, Wi-Fi password, and key subscription logins. Nothing ruins movie night quite like realizing you restored the Apple TV beautifully but cannot remember the password to the app with the movie everyone wanted.
Real-World Experience: What Restoring an Apple TV Actually Feels Like
In real homes, Apple TV restore problems rarely arrive at a convenient time. They show up five minutes before a family movie, during a sports event, or right when someone says, “Let’s just watch one episode.” That is why the best restore strategy is not only technical; it is emotional damage control for the living room.
The most common experience is the slow decline. At first, one app freezes. Then the remote feels delayed. Then the Apple TV refuses to update. People often blame the Wi-Fi, the TV, the remote, the couch, and occasionally Mercury retrograde. A restart may help for a few days, but if the problem keeps returning, a factory reset from Settings can feel like opening a window in a stuffy room. The device comes back lighter, cleaner, and less committed to being dramatic.
Another common situation happens when someone buys a used Apple TV or receives one from a friend. The device may still have old apps, old settings, and account leftovers. In that case, restoring from Settings is not just troubleshooting; it is basic digital hygiene. You do not want someone else’s app layout, restrictions, Wi-Fi networks, or mystery settings following you around. A clean restore gives you a true fresh start.
Computer restores are a little more nerve-racking because they involve cables, software, and the classic question: “Why does this computer not see the thing I clearly plugged in?” The lesson here is simple: the cable matters. Many users waste time with a USB cable that only charges. Once they switch to a proper data cable and connect directly to the computer, the restore process suddenly behaves like it read the manual.
iPhone-based recovery feels the most modern. When the TV shows an iPhone next to an Apple TV, it looks almost too simple, but the process is designed to guide you. The best experience comes when the iPhone is already updated, unlocked, and close to the Apple TV. Keep the Apple TV powered, follow the prompts, and resist the urge to unplug everything just because the screen is quiet.
After restoring, take five extra minutes to set up the Apple TV carefully. Turn on automatic updates if you want fewer future surprises. Reinstall only the apps you actually use. Check video and audio settings, especially if you use a soundbar, receiver, Dolby Atmos, or Match Content options. A restore is also a nice excuse to clean up the Home Screen. Nobody needs twelve abandoned apps sitting there like digital lawn chairs.
The best takeaway from experience is this: restoring an Apple TV is not scary when you match the method to the model. Start with the least destructive option, know when a full restore is necessary, and do not panic if the device restarts more than once. Most Apple TV problems are software tangles, not streaming-box tragedies. And when the restore works, the reward is immediate: the remote responds, the apps open, the update finishes, and everyone can finally stop troubleshooting and return to the important business of arguing over what to watch.
Conclusion
Restoring an Apple TV is one of the most effective ways to fix stubborn software problems, prepare the device for a new owner, or recover from failed updates. The best method depends on the model and the symptoms. If the Apple TV still responds, restore it from Settings. If you have Apple TV HD or an older supported model with a service port, a computer restore can reinstall the software. If your Apple TV HD or newer displays the iPhone recovery image, use a nearby updated iPhone to recover it.
Take your time, use the right cable, keep the device powered, and try a restart before wiping everything. Apple TV may be small, but when it misbehaves, it deserves a calm plannot a dramatic unplugging ceremony. With the right restore method, your streaming box can return to doing what it does best: serving movies, shows, music, and the occasional screensaver so beautiful it makes everyone stop talking for thirty seconds.