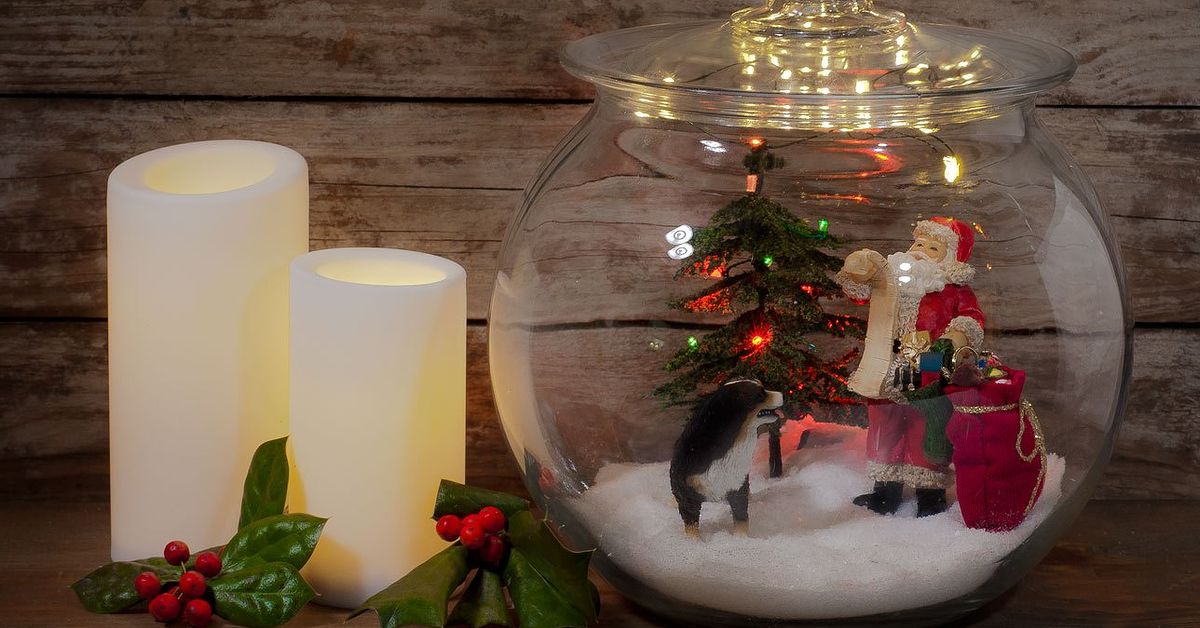
Note: This guide is for a dry decorative Christmas jar scene, not a liquid snow globe. Use battery-powered LED lights only, keep hot glue away from children, and give every glued piece time to dry before you proudly announce, “Yes, I made that tiny winter wonderland myself.”
A miniature Christmas jar scene is the kind of holiday craft that looks fancy enough for a mantel, sweet enough for a handmade gift, and easy enough that you do not need to own a craft room, a glue-gun holster, or a suspiciously organized ribbon drawer. With one clear jar, a little faux snow, a few tiny decorations, and a dash of patience, you can create a cozy Christmas village in a jar that feels like it came from a storybook.
This project is also beautifully flexible. You can make a rustic woodland jar with bottle brush trees and pine cones, a classic Santa scene with red ribbon and glitter, a snowy farmhouse display with a miniature cabin, or a playful kids’ version with tiny deer, penguins, or toy cars carrying Christmas trees. The best part? The jar does most of the work. Glass instantly makes simple materials look charming, like they have been promoted from “craft supplies” to “heirloom holiday decor.”
Below, you will learn how to make a cute miniature Christmas jar scene step by step, including what supplies to use, how to arrange the scene, how to avoid common mistakes, and how to personalize it so your finished jar looks magical instead of mildly attacked by glitter.
What Is a Miniature Christmas Jar Scene?
A miniature Christmas jar scene is a small holiday display built inside a glass jar. Think of it as a snow globe’s calmer cousin. Instead of filling the jar with water and shaking it, you create a dry winter scene using faux snow, mini trees, tiny houses, ornaments, figurines, lights, ribbon, and other small Christmas decorations.
These DIY Christmas jar scenes are popular because they are inexpensive, customizable, and beginner-friendly. You can use Mason jars, apothecary jars, recycled food jars, cloche-style glass containers, or even small spice jars for tiny ornaments. They work as Christmas centerpieces, shelf decor, handmade gifts, party favors, office decorations, or cozy windowsill accents.
Why This DIY Christmas Jar Craft Works So Well
The magic of this project comes from scale. A tiny tree looks adorable. A tiny reindeer looks adorable. A tiny mailbox covered in snow? Suddenly you are emotionally invested in whether the imaginary mail carrier is wearing mittens.
Miniature Christmas decor works because it invites people to lean in and notice details. A jar scene can tell a small story: Santa arriving at a cabin, a deer wandering through a snowy forest, a red truck hauling a Christmas tree, or a quiet village glowing under fairy lights. Unlike large holiday decorations, these jars do not demand much space. They add charm to small apartments, shelves, entry tables, desks, and bedrooms without turning the room into the North Pole’s storage unit.
Supplies You Will Need
You do not need expensive materials to make a beautiful miniature Christmas jar scene. Many items can be found at craft stores, dollar stores, thrift shops, or in your holiday decoration bin. Recycled jars are especially useful, as long as they are clean, dry, and label-free.
Basic Materials
- One clear glass jar with a lid, such as a Mason jar, jam jar, or apothecary jar
- Faux snow, Epsom salt, white sand, cotton batting, or fine white glitter
- Mini bottle brush trees
- Small Christmas figurines, houses, deer, snowmen, cars, or ornaments
- Hot glue gun and glue sticks
- Craft glue or strong clear-drying adhesive
- Ribbon, twine, bells, greenery, or small bows
- Battery-powered micro LED lights, optional
- Tweezers or long craft pliers for placing small pieces
- Scissors
- A paper plate, tray, or parchment paper to catch glitter and snow
Optional Decorative Extras
- Mini pine cones
- Tiny wrapped presents
- Small wooden houses
- Artificial berries
- Silver or gold stars
- Mini wreaths
- White acrylic paint for snowy accents
- Mod Podge for frosted glass effects
- Chunky glitter for sparkle
- Cardstock signs, such as “North Pole” or “Merry Christmas”
Choosing the Best Jar
The best jar depends on the scene you want to build. A wide-mouth Mason jar is the easiest choice because your hand, or at least a pair of tweezers, can fit inside. Tall jars are wonderful for forest scenes with trees and lights. Short jars work well for compact snowman scenes, tiny villages, and handmade Christmas gifts.
Before you start, check that the jar is clear and clean. Remove labels with warm soapy water, then wipe away sticky residue. Dry the jar completely. Moisture inside the jar can clump faux snow, fog the glass, and make your tiny Christmas village look like it has unfortunate weather conditions.
Step 1: Plan the Mini Christmas Scene Before Gluing
Before opening the glue, arrange your miniatures outside the jar. This step saves your project from becoming a festive traffic jam. Place the largest item first, such as a house, truck, Santa, or snowman. Then add trees, animals, gifts, and smaller details around it.
A good miniature scene usually has three layers: a focal point, supporting decorations, and background texture. For example, your focal point might be a tiny cabin. The supporting decorations could be two bottle brush trees and a deer. The background texture could be faux snow, glitter, and a few dots of white paint on the glass.
Try not to overcrowd the jar. Miniature scenes need breathing room. If you pack in too many items, the final look can shift from “enchanted winter village” to “holiday yard sale in a snowstorm.”
Step 2: Build a Base Inside the Lid or Jar
There are two main ways to build your Christmas jar scene. You can glue the scene to the inside of the lid and turn the jar upside down, or you can build the scene upright on the bottom of the jar. Both methods work, but each creates a different look.
Option A: Lid-Based Scene
For a classic snow globe style, glue your miniatures to the inside of the jar lid. When the lid is screwed on, the jar flips upside down and the scene stands inside the glass dome. This is ideal for small scenes with a tree, car, snowman, or figurine.
Option B: Upright Jar Scene
For a terrarium-style display, build the scene on the bottom of the jar. This works best with large jars, apothecary jars, cookie jars, or jars you want to leave openable. It is also easier if you are adding LED lights, because the battery pack can be hidden under faux snow or behind a house.
For beginners, the upright method is usually simpler. Gravity behaves. The tiny trees behave. Your patience behaves. Mostly.
Step 3: Add the Snow Layer
Pour a thin layer of faux snow, Epsom salt, white sand, or cotton batting into the jar. Start with less than you think you need. You can always add more, but removing excess snow from a miniature scene is like trying to un-toast bread.
If you want a clean, soft look, use fine faux snow or Epsom salt. For sparkle, mix in a pinch of white or iridescent glitter. For a fluffy snowdrift effect, pull apart cotton batting and tuck it around trees and figurines. If you want the snow to stay fixed in place, add a thin layer of glue before sprinkling the snow, then let it dry.
Step 4: Glue the Main Pieces
Glue the largest miniature into place first. Use hot glue for quick hold, or a stronger clear-drying adhesive if the piece is heavy or slick. If you are using a ceramic house or plastic figurine, lightly roughing the bottom with sandpaper can help the glue grip better.
Hold each piece steady for a few seconds after placing it. This is not the moment to multitask, check your phone, or suddenly remember the cookies in the oven. Miniatures can tip while the glue is still soft, and a leaning Christmas tree can make the entire scene look like the North Pole has zoning problems.
Step 5: Add Trees, Figures, and Tiny Details
Once the main piece is secure, add smaller decorations. Bottle brush trees are a classic choice because they instantly create a snowy forest effect. Place taller trees toward the back and shorter pieces near the front. This creates depth and helps the scene look intentional.
Add a deer beside a tree, a snowman near a house, or a tiny red truck in the foreground. A small sign made from cardstock can add personality. Try phrases such as “Merry Christmas,” “North Pole,” “Tree Farm,” or “Hot Cocoa This Way.” A tiny sign is not required, but it does make the jar feel like a place where cheerful elves would have very strong opinions about cocoa toppings.
Step 6: Add Lights for a Cozy Glow
Battery-powered micro LED lights can make a miniature Christmas jar scene look magical, especially at night. Choose warm white lights for a cozy cabin look or cool white lights for an icy winter scene. Avoid plug-in lights inside closed jars, and do not use real candles. Glass jars and open flames are not the kind of holiday drama anyone needs.
If you are building an upright jar scene, place the battery pack at the back or bottom of the jar and cover it with faux snow, cotton batting, or a small piece of fabric. Arrange only a few lights inside the scene so it glows softly instead of looking like a tiny airport runway.
Step 7: Decorate the Outside of the Jar
The outside of the jar is your finishing touch. Tie ribbon, twine, or velvet around the neck of the jar. Add a small bell, sprig of faux greenery, mini pine cone, or gift tag. For a farmhouse Christmas look, use burlap ribbon and jute twine. For a classic holiday style, choose red plaid ribbon. For a snowy glam look, use silver ribbon and a little white glitter.
You can also frost the outside of the glass. Brush a thin layer of Mod Podge onto selected areas of the jar, then sprinkle faux snow or fine glitter over it while wet. Leave some clear glass visible so people can still see the scene inside. A frosty border around the bottom or top of the jar looks especially pretty.
Step 8: Let Everything Dry
Let the jar dry fully before moving it, wrapping it, or placing it on display. Hot glue sets quickly, but stronger craft adhesives may need several hours. If you used Mod Podge, paint, or glitter glue, allow extra drying time so the finish does not smear.
Once dry, gently shake the jar only if the decorations are firmly attached and the scene is designed for movement. For most dry jar scenes, it is better to tilt and handle them carefully. They are sturdy, but they are still tiny winter worlds, not maracas.
Cute Miniature Christmas Jar Scene Ideas
1. Woodland Deer Jar
Create a natural winter scene with faux snow, two bottle brush trees, a tiny deer, and a few miniature pine cones. Tie jute twine around the jar and add a small wooden tag for a rustic finish.
2. Red Truck Christmas Tree Jar
Use a mini red truck carrying a tiny Christmas tree as the focal point. Add snow around the wheels, place a few trees behind it, and finish with red plaid ribbon. This style is cheerful, nostalgic, and very “Christmas movie small town.”
3. Santa’s Stopover Jar
Place a tiny Santa figurine near a miniature house or chimney. Add gifts, snow, and a small sign that says “Special Delivery.” This is a fun option for kids or anyone who still believes Santa has excellent logistics.
4. Minimal Scandinavian Jar
Use one white tree, one wooden house, and a soft layer of snow. Keep the color palette neutral with white, beige, wood tones, and a touch of greenery. This version is simple, calm, and stylish enough for modern holiday decor.
5. Candy Cane Village Jar
Add red and white mini decorations, peppermint-style ribbon, small candy cane picks, and white glitter snow. This scene looks playful and sweet, though it is best to use fake candy if you plan to store the jar for future Christmases.
Helpful Tips for a Better-Looking Jar Scene
First, use odd numbers when arranging decorations. Groups of three or five usually look more natural than pairs. For example, try three trees instead of two, or one house with three small accents around it.
Second, vary the height of your items. A scene with everything at the same height can look flat. Mix a tall tree, a medium figurine, and a low snowdrift or gift box to create visual movement.
Third, keep the front of the jar clear. Before gluing, decide which side is the “front.” Place the best details facing that direction. This prevents your tiny snowman from spending the season staring emotionally at the back wall of the jar.
Fourth, do not overdo the glitter. Glitter is festive, but too much can cover the details and make the glass cloudy. Use it like seasoning. A little sparkle is magical. A full glitter blizzard is a craft-table incident.
Common Mistakes to Avoid
One common mistake is using decorations that are too large for the jar. Always test the fit before gluing. Screw on the lid or place the jar over the arrangement to make sure nothing bumps the glass.
Another mistake is adding too much snow before placing the miniatures. Deep snow can bury small details and make figurines unstable. Start with a light layer, then add small amounts around the base of each piece.
Also avoid using paper decorations directly against wet glue or damp materials. Paper signs and cardstock houses can warp if exposed to too much moisture. If you want to include paper pieces, keep them dry or seal them first with a light coat of clear craft sealer.
Finally, do not rush the drying time. A jar scene may look finished after ten minutes, but glue can still be soft underneath. Let it cure before wrapping or gifting. Your future self will appreciate not having to explain why Santa slid sideways into a tree.
How to Turn Your Christmas Jar Scene Into a Gift
A miniature Christmas jar scene makes a thoughtful handmade gift because it feels personal without being overly complicated. To turn it into a gift, add a ribbon around the lid, attach a handwritten tag, and write a short note explaining the theme. For example: “A tiny winter forest for your desk” or “A little Christmas village to brighten your shelf.”
You can personalize the scene based on the recipient. For a dog lover, add a tiny puppy. For a teacher, include a mini chalkboard sign. For a grandparent, add a classic village house and warm lights. For a coworker, make a small desk-friendly jar with a tree, snowman, and simple ribbon.
How to Store Your Miniature Christmas Jar Scene
After the holidays, store your jar scene in a box with tissue paper or bubble wrap around it. Keep it upright if the scene is built on the bottom of the jar. If it is lid-based, make sure the lid is secure before packing. Store it in a dry place away from heat, moisture, and direct sunlight.
If you used battery-powered lights, remove the batteries before storing. This helps prevent corrosion and keeps the lights ready for next year. Label the box clearly so you do not accidentally place heavy ornaments on top of your tiny handcrafted masterpiece.
My Real-World Experience Making Miniature Christmas Jar Scenes
The first time I made a miniature Christmas jar scene, I thought it would take fifteen minutes. This was adorable confidence. In reality, I spent fifteen minutes choosing the jar, another fifteen deciding which tiny tree looked the most emotionally balanced, and at least five minutes trying to rescue a miniature deer that had glued itself to my finger. Still, the finished jar looked so charming that I immediately understood why people make more than one.
One useful lesson is that the jar shape matters more than expected. A narrow jar can look elegant, but it is difficult to arrange items inside unless you have long tweezers and the patience of a holiday saint. A wide-mouth jar is much easier, especially for beginners. You can place the miniatures exactly where you want them and adjust the snow without performing tiny surgery through a glass tunnel.
I have also learned that less really is more. My early jar scenes were packed with trees, deer, gifts, lights, berries, bells, and enough glitter to alert passing aircraft. They were festive, yes, but the details got lost. The best-looking jars usually had one clear focal point: a cabin, a red truck, a snowman, or a single beautiful tree. The supporting pieces made the scene feel complete, but they did not fight for attention.
Another experience-based tip is to test the lighting before final assembly. Micro LED lights can completely change the mood of a jar. Warm lights make the scene feel cozy and nostalgic, while cool lights feel crisp and snowy. However, too many lights inside a small jar can overwhelm the miniatures. A short strand tucked around the back or base is usually enough. The goal is “gentle Christmas glow,” not “tiny stadium event.”
When making these jars with kids, I recommend preparing the small pieces in advance and letting children choose the theme. Adults can handle hot glue, while kids can add faux snow, choose ribbon, place safe decorations, and name the scene. Children often create the funniest stories. A snowman becomes mayor. A deer becomes the delivery driver. A tiny tree becomes “the fancy one.” That storytelling is part of what makes this Christmas craft memorable.
For gifting, I have found that handmade tags make a big difference. A simple kraft-paper tag with the recipient’s name turns the jar from “cute decoration” into “thoughtful keepsake.” I also like adding the year on the bottom of the jar or inside the lid. Years later, that small detail gives the decoration sentimental value.
The biggest surprise is how calming the process can be. Building a tiny Christmas world forces you to slow down. You focus on small choices: where the tree goes, how much snow to add, whether the ribbon should be plaid or velvet. In a season that can feel loud, busy, and slightly powered by cookie frosting, making a miniature Christmas jar scene is a quiet little pause. You end up with a decoration, yes, but also with the satisfying feeling that you made something joyful with your own hands.
Conclusion
Learning how to make a cute miniature Christmas jar scene is a simple way to bring handmade charm into your holiday decor. With a glass jar, faux snow, mini trees, tiny figures, and a few thoughtful details, you can create a winter wonderland that feels personal, cozy, and delightfully magical.
The secret is to plan before gluing, choose a clear focal point, layer your decorations carefully, and leave enough space for the scene to shine. Whether you make a rustic woodland jar, a glowing village scene, a red truck Christmas display, or a sweet snowman jar, this DIY Christmas craft is easy to customize and fun to share.
Best of all, miniature Christmas jar scenes prove that holiday decorating does not have to be expensive or complicated. Sometimes the most memorable decorations come from small jars, tiny trees, a pinch of snow, and one brave crafter willing to negotiate with glitter.