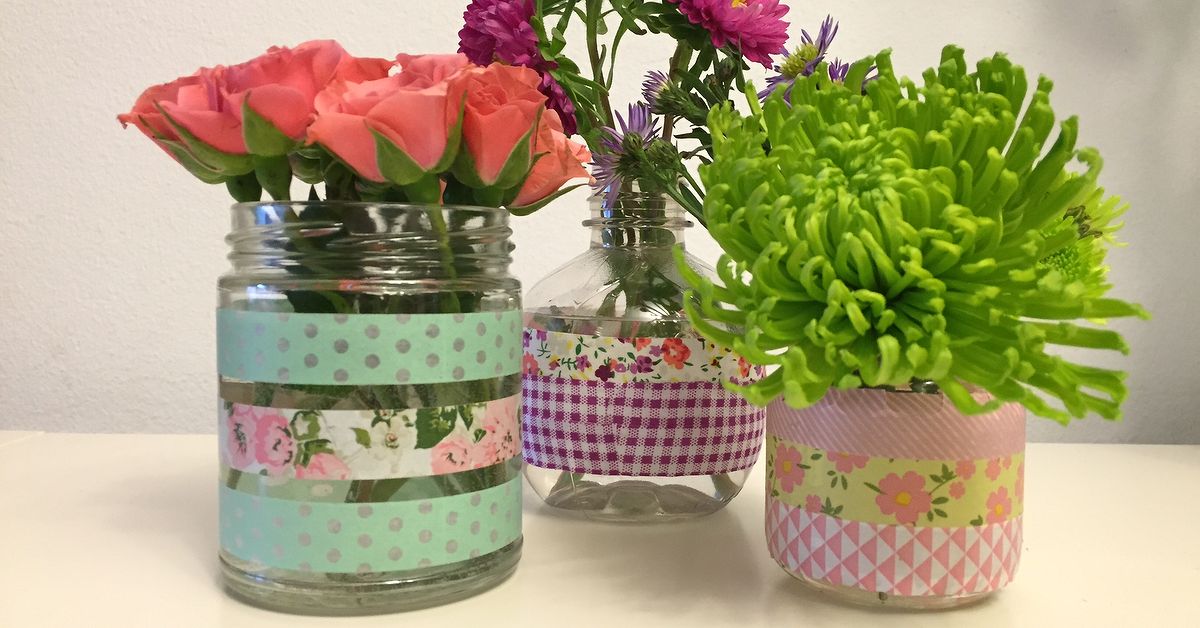
Some DIY projects require a power drill, a weekend of emotional preparation, and at least one dramatic trip to the hardware store. Washi tape flower vases are not those projects. This cheerful craft is quick, inexpensive, beginner-friendly, and surprisingly stylish. With a plain glass jar, bottle, or ceramic vase and a few rolls of patterned washi tape, you can create a custom flower vase that looks charming on a desk, dining table, windowsill, party table, or gift tray.
The magic of washi tape flower vases is that they turn ordinary containers into personalized decor without paint, glue, complicated tools, or the terrifying possibility of permanently ruining something. Washi tape is lightweight, decorative paper tape that comes in endless colors, patterns, widths, and finishes. It can be torn by hand, repositioned while you work, layered creatively, and removed more easily than many permanent adhesives. In other words, it is basically the friendly golden retriever of the craft supply drawer.
Whether you are decorating for spring, making handmade Mother’s Day gifts, planning budget wedding centerpieces, styling a baby shower, or simply trying to give old jars a second life, this project is a winner. It is simple enough for kids, relaxing enough for adults, and flexible enough for anyone who believes “I’ll just use one roll of tape” right before using seven.
What Are Washi Tape Flower Vases?
Washi tape flower vases are flower containers decorated with strips, shapes, borders, or patterns made from washi tape. The base can be a mason jar, recycled jam jar, glass bottle, bud vase, ceramic vase, tin can, or even a clean plastic container. The tape becomes the design element, adding color, texture, and personality without changing the basic function of the vase.
Traditional washi is associated with Japanese paper-making, and modern washi tape borrows that paper-like feel for decorative crafting. It is usually thin, flexible, and slightly translucent depending on the brand and color. Because it is available in florals, stripes, polka dots, metallics, geometrics, solids, vintage prints, seasonal motifs, and minimalist patterns, it works with almost every decorating style.
A washi tape vase can look playful, elegant, rustic, modern, romantic, or party-ready. The final look depends on the tape you choose and how you apply it. Wrap a jar in pastel florals and you have a sweet spring centerpiece. Use black-and-white geometric tape on a slim bottle and you have modern desk decor. Add gold tape bands to a clear vase and suddenly it looks like it shops at boutique home stores and says things like “curated.”
Why This DIY Vase Project Is So Popular
The popularity of DIY washi tape vases comes from one very attractive fact: the project gives you a big visual payoff for very little effort. You do not need to be an artist. You do not need perfect handwriting. You do not need to know the difference between eggshell and satin paint finishes. You simply need a clean surface, decorative tape, and a willingness to smooth out the occasional wrinkle.
It Is Budget-Friendly
Washi tape is often inexpensive, especially compared with buying new decorative vases for every season or event. A few rolls can decorate several small jars or add accents to larger vases. Recycled containers make the project even more affordable. Empty pasta sauce jars, candle jars, juice bottles, and small glass yogurt jars can become beautiful mini vases after a good wash and a little tape therapy.
It Is Renter-Friendly and Commitment-Free
Since washi tape is generally removable, this craft is ideal for people who enjoy changing decor often. You can create a floral vase for spring, peel off the design later, and replace it with warm earth tones for fall. This makes it perfect for apartments, dorm rooms, temporary event decor, classrooms, and anyone whose design style changes every time they open Pinterest.
It Works for Gifts and Events
A washi tape flower vase makes a thoughtful handmade gift. Fill it with fresh flowers, paper flowers, dried stems, or even pens for a practical desk arrangement. It is also useful for weddings, birthday parties, bridal showers, baby showers, garden parties, teacher appreciation gifts, and holiday tables. When you need several matching centerpieces, washi tape can unify different jar shapes with one consistent color palette.
Materials You Need
One of the best things about this project is that the supply list is short. You probably already own half of it, especially if you are the type of person who saves glass jars “because they might be useful someday.” Congratulations, today is that someday.
Basic Supplies
- Clean glass jars, bottles, bud vases, ceramic vases, or tin cans
- Washi tape in your chosen colors and patterns
- Scissors or a craft knife
- Ruler or measuring tape
- Soft cloth or paper towel
- Rubbing alcohol or mild soap for cleaning the vase surface
- Fresh, dried, or artificial flowers
Optional Supplies
- Twine, ribbon, jute cord, or raffia
- Gift tags or paper labels
- Mod Podge or clear sealant for a more durable finish
- Bone folder, old gift card, or fingernail for smoothing tape
- Painter’s tape for temporary measuring guides
- Small pebbles or floral frogs to stabilize stems
How to Make Washi Tape Flower Vases
Making washi tape flower vases is simple, but a few smart steps will make the difference between “cute handmade decor” and “a jar that lost a fight with a sticker drawer.” Take your time with cleaning, spacing, and smoothing. The project is easy, but neatness helps the final vase look intentional.
Step 1: Choose the Right Vase or Jar
Start with a container that matches the style and size of your flowers. Tall bottles are great for single stems, eucalyptus, lavender, tulips, or dried grasses. Short jars work well for casual bouquets, daisies, carnations, herbs, or wildflowers. A wide-mouth mason jar is perfect for a full farmhouse-style arrangement, while a narrow glass bottle creates an elegant bud vase.
Straight-sided containers are easiest for beginners because the tape lies flat. Curved vases can still work, but you may need shorter tape pieces or vertical strips to prevent puckering. If this is your first project, choose a jar with a smooth surface and a fairly straight section. Your future self will thank you politely.
Step 2: Clean and Dry the Surface
Wash the jar or vase with warm soapy water and remove any labels or sticky residue. Dry it completely. For best adhesion, wipe the outside with rubbing alcohol and let it air-dry. Washi tape sticks better to clean, dry surfaces than to dust, grease, fingerprints, or mysterious kitchen residue from 2019.
Step 3: Plan Your Design
Before applying tape, decide on your layout. You can create horizontal stripes, vertical bands, diagonal wraps, checkerboard squares, color-blocked sections, tiny flags, floral clusters, or geometric shapes. For a polished look, limit your palette to two or three tape designs. For a cheerful maximalist look, use several patterns but repeat colors so the vase feels coordinated rather than chaotic.
A simple design idea is to wrap three bands of tape around the lower third of the vase. Another attractive option is to place vertical strips from the base upward, alternating patterns. You can also cut triangles, dots, rectangles, or petal shapes from washi tape and arrange them like confetti or flowers across the vase.
Step 4: Apply the Washi Tape Smoothly
Begin at the back of the vase so the tape seam is less visible. Press down one end of the tape and slowly wrap it around the container, keeping the strip level. Smooth as you go with your thumb, a bone folder, or the edge of an old gift card. If the strip goes crooked, lift it gently and reposition it before pressing firmly.
For horizontal stripes, use the rim or base of the jar as a visual guide. For precise spacing, measure and mark tiny points with removable painter’s tape. For vertical designs, cut strips first and line them up from top to bottom. On rounded areas, shorter pieces are easier to control than one long strip.
Step 5: Trim the Edges
Use sharp scissors or a craft knife to create clean tape ends. If the tape overlaps, trim it neatly at the back. For a professional-looking finish, make sure all seams face the same direction. This small detail matters, especially if you are making several vases for an event table.
Step 6: Add Flowers and Finishing Touches
Once the design is complete, add water if using fresh flowers. Keep the water level below any tape placed near the lower portion of the vase, especially if the tape is not sealed. Add flowers, greenery, or dried stems. You can finish the neck of the vase with twine, ribbon, a gift tag, or a small paper label.
Design Ideas for Washi Tape Flower Vases
The best part of this project is that there is no single correct design. Washi tape is forgiving, and flower vases can be customized for every room, season, and occasion. Below are several creative directions to try.
1. Minimalist Stripe Vase
Choose one solid-color tape and one thin metallic tape. Wrap a single band around the middle of a clear glass bottle, then add a narrow metallic stripe above and below it. This style looks clean, modern, and elegant. Pair it with white tulips, green stems, or a single orchid branch.
2. Spring Floral Jar Vase
Use pastel floral washi tape around a mason jar or recycled jam jar. Add a soft ribbon around the neck and fill it with daisies, baby’s breath, ranunculus, or garden roses. This makes a charming Mother’s Day gift, Easter table accent, or cheerful windowsill arrangement.
3. Boho Dried Flower Vase
Choose warm-toned tape in terracotta, cream, mustard, dusty pink, or sage green. Apply vertical strips around a small bottle and tie jute cord near the top. Add dried lavender, bunny tails, pampas grass, or preserved eucalyptus. The result feels relaxed, earthy, and very “I own linen napkins.”
4. Rainbow Kids’ Craft Vase
Let kids decorate a plastic jar or sturdy glass container with bright tape strips, polka dots, and torn shapes. Add paper flowers or artificial napkins.”
< stems for a safer classroom or party project. This is a fun activity for birthdays, rainy days, summer camp crafts, and handmade gifts for grandparents.
5. Wedding Centerpiece Vases
For budget wedding decor, collect clear bottles and jars in similar sizes. Use washi tape in the wedding colors to create matching bands around each vase. Add simple flowers such as carnations, baby’s breath, spray roses, or greenery. Group three small vases together for a centerpiece that looks intentional without requiring a florist-level budget.
6. Holiday-Themed Vase
Washi tape comes in seasonal patterns, which makes it easy to update vases throughout the year. Try red, white, and blue tape for the Fourth of July; orange and black for Halloween; plaid or metallic tape for Christmas; or soft pink and red for Valentine’s Day. Swap the flowers to match the season and you have instant holiday decor.
Best Flowers to Use in Washi Tape Vases
Because washi tape vases are often lightweight or made from upcycled jars, choose flowers that suit the container’s size and stability. Heavy blooms in a narrow bottle can tip over, which is not the kind of drama anyone requested.
Fresh Flower Options
- Daisies: Casual, cheerful, and perfect for colorful tape designs.
- Carnations: Affordable, long-lasting, and available in many colors.
- Tulips: Elegant for spring vases with simple tape bands.
- Baby’s breath: Light, airy, and ideal for small jars.
- Spray roses: Romantic and great for gifts or party centerpieces.
- Herbs: Mint, rosemary, and basil can look beautiful in kitchen vases.
Dried and Artificial Flower Options
Dried flowers are especially practical because they do not require water, which helps protect the tape from moisture. Try lavender, strawflowers, dried eucalyptus, wheat stems, bunny tails, or small preserved bouquets. Artificial flowers also work well for long-term displays, classroom crafts, dorm rooms, and event decorations made in advance.
Tips for a Cleaner, Longer-Lasting Finish
Washi tape is easy to use, but it is not always waterproof or permanent. If you want your vase to last longer, especially with fresh flowers, follow a few practical tips.
Keep Tape Away From Water
Avoid placing tape where water will drip or sit. If you are filling the vase with fresh flowers, dry the outside completely after adding water. Place decorative tape on the upper half or exterior dry areas of the container when possible.
Seal the Tape for Durability
If you want a more permanent design, brush a thin layer of clear decoupage medium or craft sealant over the tape. Test first on a small piece because some tapes may darken, wrinkle, or change texture when sealed. Sealing is helpful for vases that will be handled often, transported, or used for events.
Use Short Pieces on Curves
Curved vases can cause tape to wrinkle. Instead of forcing one long strip around a rounded shape, cut shorter pieces and overlap them slightly. You can also use vertical strips, small geometric shapes, or torn pieces for a collage effect.
Repeat Patterns for a Professional Look
Repetition makes even a simple craft look designed. Use the same tape band on every vase in a group, repeat one color throughout the arrangement, or keep all tape seams facing backward. These little choices create visual harmony.
Common Mistakes to Avoid
This craft is forgiving, but a few common mistakes can make the finished vase look less polished. Luckily, most of them are easy to fix.
Using Too Many Competing Patterns
Washi tape is adorable, which is exactly why it can trick you into using every roll you own. For a balanced vase, combine bold patterns with solids or simple stripes. If every strip screams for attention, the flowers may quietly file a complaint.
Skipping Surface Prep
Tape sticks poorly to oily, dusty, or damp surfaces. Always clean and dry the vase before decorating. This step takes only a minute and can prevent peeling edges later.
Ignoring the Flowers
The vase and flowers should work together. Busy tape pairs best with simple flowers. Simple tape can handle fuller, more colorful bouquets. Think of the vase as the outfit and the flowers as the accessories. Someone gets to sparkle, but not everyone needs sequins.
Making the Vase Top-Heavy
If your container is narrow or lightweight, use fewer stems or add small stones to the bottom for stability. This is especially useful for tall bottles and bud vases.
Creative Ways to Use Washi Tape Flower Vases
Once you make one vase, you will probably start looking at every empty jar like it has untapped potential. Here are practical ways to use your finished vases around the home and beyond.
Home Decor
Place a small washi tape vase on a nightstand, bathroom counter, kitchen windowsill, bookshelf, entry table, or home office desk. A tiny vase with a single stem can make a room feel more thoughtful without taking up much space.
Party Centerpieces
Use matching tape designs to create a set of centerpieces for birthdays, showers, brunches, and backyard dinners. Mix jar heights for visual interest and keep the flower palette consistent.
Handmade Gifts
Fill a decorated vase with flowers and add a handwritten tag. This works beautifully for teachers, neighbors, coworkers, hosts, grandparents, and friends. It feels personal without requiring you to knit a sweater or learn pottery.
Desk and Craft Storage
When the flowers fade, reuse the vase as a pencil cup, makeup brush holder, paintbrush container, or craft supply organizer. Washi tape jars are especially cute for holding scissors, markers, paper clips, and small tools.
Experience-Based Notes: What I Learned Making Washi Tape Flower Vases
The first thing you learn when making washi tape flower vases is that the project looks almost suspiciously easy. You clean a jar, wrap tape around it, add flowers, and suddenly everyone thinks you have a lifestyle brand. But after making several versions, you start noticing the small details that separate a quick craft from a vase that genuinely looks display-worthy.
The most important lesson is to respect the shape of the container. Straight-sided jars are wonderfully cooperative. The tape goes on smoothly, the stripes stay even, and you feel like a crafting genius. Curved bottles, however, require patience. If you try to wrap one long strip around a rounded shoulder, the tape may wrinkle or lift. Shorter strips work much better. Vertical pieces also look more natural on curved surfaces, especially when you alternate colors or create a sunburst effect from the base.
Another useful discovery is that simple designs often look more expensive. It is tempting to use every floral, glitter, metallic, and polka-dot roll in the drawer, but restraint helps. One of the best vases can be made with a plain glass bottle, two narrow gold bands, and one soft floral strip near the bottom. Add white flowers or greenery and the result looks clean and intentional. The tape does not have to cover the whole vase to make an impact.
I also learned that fresh flowers and paper tape need a little boundary-setting. Water drips can loosen tape, especially around the base of the vase. For fresh arrangements, it is smarter to place the tape higher on the jar or seal it if the vase will be used repeatedly. Dried flowers are the easiest match because they remove the water problem completely. Lavender, dried eucalyptus, and bunny tails look especially good with muted or botanical washi tape.
For gifting, the vase feels more polished when the tape design matches the occasion. Soft pinks and florals work beautifully for Mother’s Day. Navy, gold, and white feel elegant for winter holidays. Bright rainbow tape makes a cheerful teacher gift. Adding a small tag tied with twine turns a simple jar into something that looks planned instead of last-minute, even if it was absolutely last-minute. No judgment; the vase will keep your secret.
The biggest practical tip is to make several vases at once. Once the supplies are out, it takes very little extra time to decorate two or three containers. A group of small vases looks better than one lonely jar, especially on a dining table or mantel. Vary the heights but repeat at least one tape color so the collection feels connected.
Finally, washi tape flower vases are satisfying because they make creativity feel accessible. You can finish one in under 20 minutes, change the design later, and use materials that might otherwise be thrown away. It is a low-pressure project with a high cuteness return. And in the world of DIY, that is basically winning the lottery, except with fewer taxes and more tiny floral tape.
Conclusion
Washi tape flower vases are proof that beautiful home decor does not have to be expensive, complicated, or permanent. With a clean jar, a few rolls of decorative tape, and a small bouquet, you can create custom vases for gifts, parties, holidays, or everyday decorating. The project is flexible enough for beginners and creative enough for experienced crafters who want a quick win.
The key is to start with a clean surface, choose a simple color palette, apply the tape carefully, and match the vase design to the flowers. Whether you prefer minimalist stripes, romantic florals, boho dried stems, or bright kid-friendly patterns, washi tape gives you endless ways to refresh ordinary containers. It is affordable, removable, and fun, which is exactly what a good DIY project should be.
Note: This article is written as original, publish-ready content based on practical DIY, crafting, and home-decor knowledge. No source-link placeholders or citation artifacts are included.
{

  "meta_title": "Washi Tape Flower Vases: Easy DIY Decor",

  "meta_description": "Learn how to make washi tape flower vases with easy steps, design ideas, tips, and creative uses for gifts, parties, and home decor.",

  "sapo": "Washi tape flower vases are the kind of DIY project that makes you feel crafty without requiring a garage full of tools. With a clean jar, a few rolls of colorful tape, and your favorite flowers, you can create charming handmade decor for your home, gifts, parties, weddings, or seasonal displays. This guide shows you how to choose the right vase, apply washi tape neatly, avoid common mistakes, and style your finished piece with fresh, dried, or artificial flowers. It is simple, budget-friendly, removable, and endlessly customizable.",

  "keywords": [

    "washi tape flower vases",

    "DIY washi tape vase",

    "washi tape crafts",

    "decorated glass jars",

    "flower vase ideas",

    "handmade vase decor",

    "easy DIY home decor"

  ]

}</pre