Hanging drywall is one of those home improvement jobs that looks simple from across the room. After all, it is just big flat sheets, a few screws, and a wall, right? Then you pick up a 4-by-8 sheet, discover it has the personality of a stubborn refrigerator door, and suddenly understand why professional drywall crews move with the calm confidence of people who have made peace with gravity.
The good news is that you do not need magic, secret contractor handshakes, or forearms made of rebar to get better results. You need planning, sharp cuts, smart fastening, and a healthy respect for seams. Whether you are finishing a basement, replacing damaged wallboard, remodeling a room, or learning how to hang drywall for the first time, the difference between “good enough” and “that looks professional” usually comes down to the little decisions made before the joint compound ever comes out of the bucket.
This guide covers seven practical drywall installation tips that help reduce cracks, screw pops, ugly joints, wasted panels, and the emotional damage caused by realizing your outlet cutout is three inches away from the outlet. Let’s hang drywall like a pro, or at least like someone who has watched the pros and taken excellent notes.
1. Plan the Drywall Layout Before You Lift a Sheet
The first pro move happens before the first panel touches the wall. Professionals plan the drywall layout so seams land in smart places, boards are used efficiently, and awkward little filler strips are avoided whenever possible. Drywall is forgiving in some ways, but a bad layout creates extra finishing work, and finishing work is where drywall projects go to test your patience.
Measure the room carefully
Start by measuring wall length and height, then calculate the square footage of each wall and ceiling. A standard 4-by-8 sheet covers 32 square feet, while 4-by-10 and 4-by-12 panels cover more area and can reduce seams on long walls. Fewer seams usually means less taping, less mudding, and fewer chances to create a wall that looks like it has been through a minor earthquake.
Do not subtract windows and doors too aggressively when estimating materials. It is better to have a little extra drywall than to pause the job because you are short half a sheet. Extra material also gives you breathing room for mistakes, damaged corners, and those mysterious cuts that looked right on the tape measure but wrong in real life.
Stagger joints for strength and easier finishing
A good drywall hanging pattern avoids lining up seams from one row to the next. Staggering butt joints improves wall strength and makes seams easier to conceal. On walls, horizontal installation is often preferred because it can reduce the total length of seams and place the tapered seam at a comfortable working height. It also helps avoid full-height vertical seams that can be more noticeable after finishing.
Plan so the ends of panels land in the center of studs or joists. A drywall edge floating in space is not charming; it is a future crack wearing a disguise. Mark stud locations on the floor, ceiling, or adjacent panels so you can find them quickly once the sheet is in place.
2. Choose the Right Drywall and Tools for the Job
Drywall is not one-size-fits-all. Choosing the correct panel type and having the right tools ready can make installation smoother and safer. Standard half-inch drywall is common for many interior walls, while thicker five-eighths-inch panels are often used where fire resistance, sound control, or ceiling rigidity is needed. Moisture-resistant drywall may be appropriate in bathrooms, laundry areas, or other damp locations, but it is not a substitute for proper ventilation or waterproofing in wet zones.
Use the right basic tools
You do not need a truck full of tools, but you do need the essentials. A sharp utility knife, drywall T-square, tape measure, pencil, rasp, screw gun or drill with a drywall bit, keyhole saw, chalk line, and panel lift can save hours. A drywall lift is especially helpful for ceilings. Trying to hold a ceiling sheet overhead while driving screws is possible, but so is eating soup with a fork. The question is why you would do that to yourself.
For fastening, use proper drywall screws. Coarse-thread screws are commonly used for wood framing, while fine-thread screws are often used for steel studs. For many standard installations, 1 1/4-inch drywall screws are used with half-inch panels over wood framing, but always match screw length to panel thickness, framing type, and local code requirements.
Store panels correctly
Drywall panels should be stored flat on a clean, dry surface. Leaning sheets against a wall for too long can lead to bowing or damaged edges. Before installation, inspect each sheet for broken corners, crushed edges, moisture damage, or paper tears. Damaged edges can turn into ugly seams, and ugly seams are basically little billboards that say, “I skipped prep.”
3. Prepare the Framing Like the Final Wall Depends on It
Drywall follows the framing underneath it. If the studs are bowed, twisted, proud, recessed, or missing blocking where panels need support, the finished wall will show it. You cannot mud your way out of bad framing forever. Joint compound is wonderful, but it is not a structural therapist.
Check studs and joists before hanging
Run a long straightedge or level across the studs. Look for high spots, low spots, loose framing, or nails and screws sticking out. Fix warped studs, plane down proud areas, add shims where needed, and install backing at corners or unsupported edges. Around tubs, stair openings, closet returns, and inside corners, extra blocking can make the difference between a solid installation and a floppy edge that cracks later.
Also inspect electrical and plumbing locations. Nail plates should protect wiring or pipes that pass too close to the stud face. Mark electrical boxes on the floor or nearby panels before covering them. This simple habit helps prevent misplaced cuts and reduces the risk of driving screws where screws definitely do not belong.
Mark framing clearly
Once a drywall sheet is lifted into position, stud locations disappear behind the panel. Marking the centerline of studs on the floor and ceiling makes fastening easier and more accurate. For ceilings, mark joist or strapping lines on the wall or on the panel itself so screws land where they should. Guessing is not a layout strategy; it is how drywall screws end up wandering across the sheet like confused ants.
4. Hang Ceilings First, Then Work From the Top Down
One of the most useful drywall installation tips is simple: hang the ceiling first. Ceiling panels help support the top edges of wall panels, and wall panels can then be pushed up tight against the ceiling board for a cleaner inside corner. If you install walls first, you may create awkward ceiling gaps that are harder to finish neatly.
Use help for ceiling panels
Ceiling drywall is heavy, awkward, and extremely committed to falling down until it is fastened. Use a drywall lift, T-brace, or at least one capable helper. Lift the panel tight to the joists, start fastening near the center, and work outward. This helps flatten the sheet against the framing and reduces the risk of bulges or loose areas.
When possible, install ceiling drywall perpendicular to the joists. This layout can improve support and reduce sagging. Make sure all edges are properly supported, and avoid butt joints that land between joists unless backing has been installed.
Hang upper wall panels before lower panels
After the ceiling is up, hang the top row of wall panels first. Push the upper sheet tight against the ceiling panel, then fasten it. The lower sheet can be lifted into place with a drywall foot lift or a simple wedge. Leave a small gap at the floor, commonly about 1/4 to 1/2 inch, so the panel does not wick moisture from the floor and has room for minor movement. Baseboard will cover the gap, so there is no need to make the drywall kiss the subfloor.
5. Cut Cleanly and Respect Doors, Windows, and Outlets
Clean cuts make drywall easier to hang and much easier to finish. Ragged edges, oversized outlet holes, and seams that line up with window or door corners can create headaches later. The goal is not perfection on every cut, but controlled, thoughtful cutting that leaves enough material where the wall needs strength.
Score, snap, and trim
For straight cuts, mark the panel, use a T-square, score the face paper with a sharp utility knife, snap the gypsum core, and cut the back paper. Smooth rough edges with a drywall rasp. Keep utility knife blades sharp; a dull blade is more dangerous because it requires more pressure and is more likely to wander. Drywall has enough surprises without adding a knife adventure.
For electrical boxes, measure carefully from two fixed reference points. Mark the box location on the panel, cut with a keyhole saw or rotary cutout tool, and test-fit before final fastening. If using a router-style cutout tool, make sure wires are tucked safely inside the box and power is off when appropriate.
Avoid seams at opening corners
Do not place drywall seams directly in line with the corners of doors or windows when you can avoid it. Openings are stress points, and seams at those corners are more likely to crack over time. A stronger method is to hang a full panel across the opening, then cut out the opening after the panel is secured. This reduces weak spots and helps the wall finish more cleanly.
When trimming around doors and windows, cut flush to the framing and fasten securely after the opening is trimmed. Take your time here. A careful cut around a window today prevents a heroic mudding session tomorrow.
6. Fasten Drywall Correctly Without Breaking the Paper
Fastening is where many DIY drywall projects go from “looking good” to “why is that screw smiling at me?” The goal is to pull the drywall tight to the framing without tearing the paper face. The paper is part of the panel’s strength. Break it, and the screw loses holding power.
Use proper screw spacing
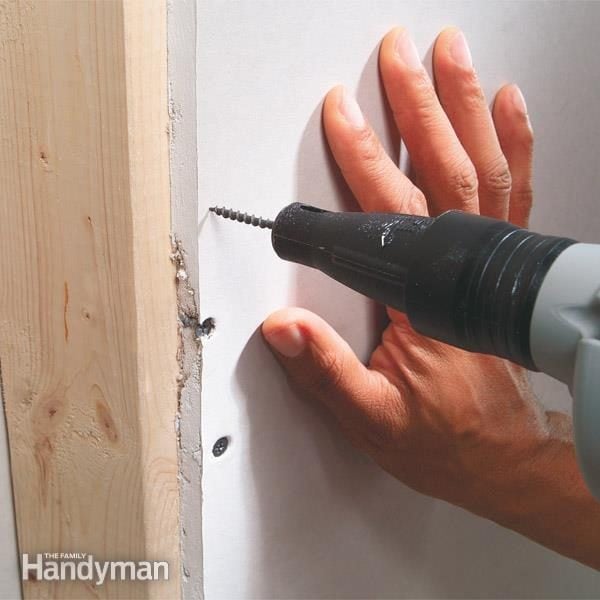
For many common drywall installations, screws are spaced about 16 inches apart on walls and about 12 inches apart on ceilings, though exact spacing can vary by panel type, framing, adhesive use, fire-rated assemblies, and local building code. Keep fasteners at least about 3/8 inch from panel edges to avoid crumbling the gypsum edge.
Start fastening near the center of the panel and work toward the edges. This helps seat the sheet flat against the framing. If you start at the perimeter and trap a slight bow in the middle, the panel may not sit properly. That is the drywall equivalent of buttoning a shirt wrong and pretending nobody will notice.
Set screw heads just below the surface
A properly set drywall screw creates a shallow dimple without tearing the face paper. If the screw is too high, it will interfere with taping and finishing. If it is too deep, it breaks the paper and weakens the hold. A drywall screw gun or a dimpler bit helps create consistent depth.
If you accidentally overdrive a screw, do not simply leave it and hope joint compound has mercy. Drive another screw nearby into the same framing member, set it correctly, and leave the damaged screw in place or remove it if appropriate. The replacement screw should do the actual holding.
7. Think Ahead to Taping, Mudding, and the Final Finish
Professional-looking drywall is not just about hanging sheets. It is about hanging them in a way that makes finishing easier. Every seam you create becomes a taping job. Every bad screw becomes a patch. Every gap becomes a tiny negotiation between joint compound and gravity.
Keep tapered edges together when possible
The long edges of drywall panels are tapered so tape and joint compound can sit slightly below the finished surface. Whenever possible, join tapered edges to tapered edges. Butt joints, where cut ends meet, are harder to hide because they do not have a recessed edge. You will need to feather compound wider over butt joints to make them disappear.
Do not force panels tightly together if it causes them to buckle or damage the edges. Edges should touch moderately, but drywall should not be jammed into place like luggage into an overhead bin. If a panel does not fit, trim it.
Minimize future cracks
Stagger seams, support all edges, avoid seams at opening corners, and fasten consistently. Install corner bead straight and securely on outside corners. For inside corners, leave a clean line and avoid broken edges that require heavy filling. A clean hanging job makes taping faster, sanding lighter, and painting more rewarding.
Before finishing, remove loose paper, trim fuzz from cut edges, check for proud screws, and vacuum dust from joints. Drywall dust has a talent for getting everywhere, including places that were not invited to the renovation. Wear eye protection and a suitable dust mask or respirator when cutting, sanding, or working in dusty conditions.
Common Drywall Hanging Mistakes to Avoid
Even careful DIYers can run into trouble. The most common drywall mistakes include poor layout, missing studs with screws, overdriven fasteners, unsupported edges, seams aligned with doors or windows, and panels forced too tightly into corners. Another frequent problem is trying to hang drywall alone when the job clearly needs another set of hands or a lift.
Also avoid using construction adhesive as the only method of attachment. Adhesive can help reduce movement and fastener pops when used correctly, but drywall still needs mechanical fasteners. The wall should be secured, not merely persuaded.
Finally, do not rush the measuring stage. Drywall punishes careless measuring in public. A small mistake can become a visible patch, and a visible patch can become the only thing your eyes see every time you walk into the room.
Safety Tips for Hanging Drywall
Drywall work is physical. Sheets are heavy, edges can crumble, tools are sharp, and dust can irritate your lungs and eyes. Wear safety glasses, gloves when handling panels, and a dust mask or respirator when cutting or sanding. Lift with help, use a panel carrier when available, and keep the work area clear of scraps that can become ankle traps.
Turn off power when working around electrical boxes if there is any risk of contact with wiring. Do not drive screws into areas where pipes or wires may be hidden close to the surface. If something feels unsafe, pause and inspect. A professional-looking wall is not worth a professional-level trip to urgent care.
Extra Experience: What Hanging Drywall Teaches You the Hard Way
After you have hung a few sheets of drywall, you start learning lessons that no product label can fully explain. The first lesson is that drywall rewards patience more than strength. Yes, the panels are heavy, but the person who plans the lift, clears the path, marks the studs, and sets up support will usually outperform the person who tries to muscle every sheet into place while muttering motivational nonsense under their breath.
One useful experience is to dry-fit difficult pieces before committing. Around closets, alcoves, sloped ceilings, and old framing, walls are rarely as square as they looked when you were standing across the room feeling optimistic. A panel that should fit perfectly on paper may need a slight trim because a corner is out of square or a stud has decided to live its truth. Test-fitting helps you catch these issues before the panel is covered in screws.
Another lesson is that marking matters more than memory. You may think you will remember where every stud, outlet, pipe, and fixture box is located. You will not. Once the sheet is up and you are balancing a drill, memory becomes suspiciously artistic. Mark the floor, ceiling, and panel edges. Snap chalk lines for ceiling joists. Write light pencil notes where they will be covered later. Future you will be grateful, and future you is already dealing with enough dust.
Experienced installers also know when to use larger panels. A 4-by-12 sheet can be harder to move, but it may eliminate several seams on a long wall. If you have enough help and the room allows it, longer sheets can reduce finishing time dramatically. On the other hand, forcing oversized panels into a tight stairwell or small bathroom can turn a smart idea into a slapstick routine. Choose panel size based on access, layout, and manpower, not pride.
Ceilings deserve special respect. A drywall lift is not a luxury if you are working without a full crew; it is a sanity-preserving device. Even with a helper, a lift allows better positioning and safer fastening. Start screws in the center area and work outward so the sheet pulls flat. If you see a gap between the panel and framing, stop and correct it before adding more screws. Screws should secure the panel to the framing, not bend reality.
Cutouts are another place where experience shows. Beginners often make outlet holes too large because they are afraid the box will not fit. Pros aim for neat, snug openings because oversized gaps make device covers harder to align and can create air leaks or weak-looking details. Measure from two directions, double-check the orientation of the sheet, and remember that the front and back of a panel are not interchangeable once you have marked cutouts.
Finally, good drywall hanging teaches humility. There will be a chipped corner, a screw that misses, a panel that needs trimming, or a seam you wish you had placed differently. That is normal. The key is to fix mistakes correctly instead of burying them under a mountain of compound. Add backing where needed, reset bad screws, trim rough paper, and keep moving. Drywall is not about never making mistakes; it is about not letting small mistakes become permanent decorations.
Conclusion
Hanging drywall like a pro is not about speed alone. It is about smart layout, solid framing, clean cuts, safe lifting, correct screw spacing, and thinking ahead to the finishing stage. The best drywall jobs look simple when they are done because the hard thinking happened early. Plan your seams, mark your framing, support your edges, set your screws properly, and give yourself enough time to work carefully.
With these seven tips for hanging drywall like a pro, your next wall or ceiling project can look cleaner, finish smoother, and require less sanding drama. And in drywall work, less sanding drama is basically a love language.