Cutting in may be the least glamorous part of painting a room. Nobody posts celebratory photos of themselves crouching beside a baseboard while gripping an angled brush with the concentration of a bomb technician. Yet those narrow strips around ceilings, windows, doors, and trim can determine whether a paint job looks professionally finished or suspiciously homemade.
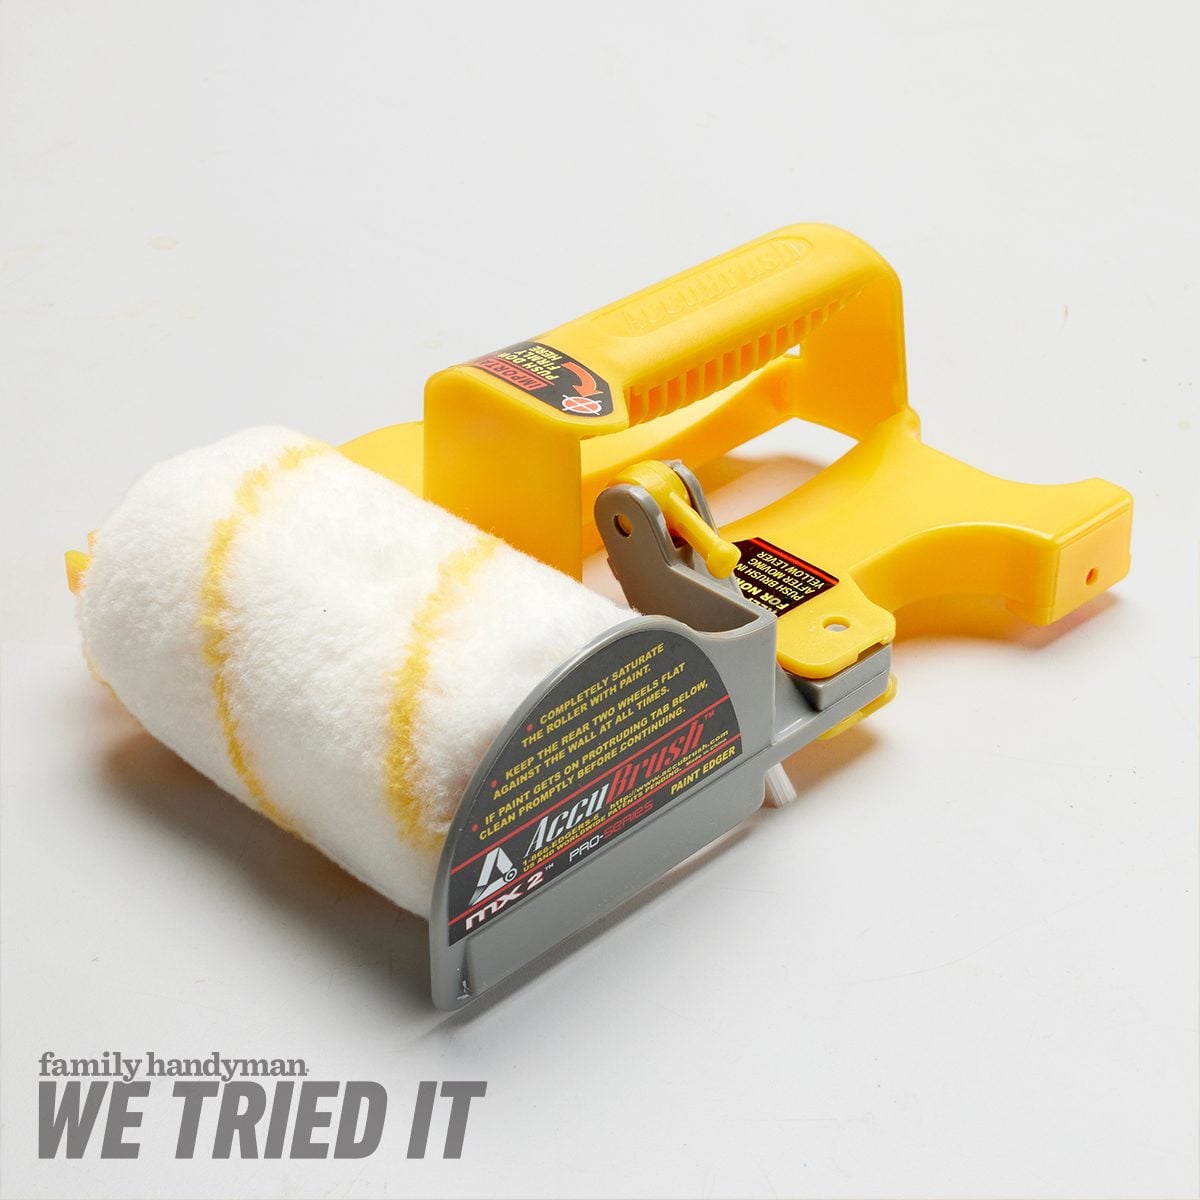
The Accubrush Paint Edger promises a faster route to crisp paint lines. Instead of relying entirely on painter’s tape or a steady hand, the tool combines a small roller, a precision brush, and a protective shield. The roller applies paint to the wall, the tiny brush moves that paint toward the boundary, and the shield attempts to keep it off the neighboring surface.
That sounds delightfully simple. But painting gadgets have a long history of looking magical in demonstrations and considerably less magical when introduced to an uneven ceiling, a crooked door frame, or a wall textured like cottage cheese. This Accubrush review examines what the tool does well, where it struggles, and whether it deserves space in your painting kit.
What Is the Accubrush Paint Edger?
The Accubrush is a paint edging tool designed to create a wide cut-in band while producing a relatively sharp line beside trim, ceilings, and other boundaries. The handheld MX model is commonly used around doors, windows, crown molding, and baseboards. Pole-mountable versions are also available for reaching higher areas.
Its design has three important parts:
- A four-inch roller that carries and spreads more paint than a typical edging brush.
- A small edge-defining brush that transfers paint closer to the boundary.
- A protective shield that rides against the adjacent surface and helps prevent smears.
The roller and brush are washable and reusable. Replacement rollers and brushes are available, which is useful because dried paint is undefeated in its campaign to destroy neglected painting tools.
The basic idea is clever: combine the speed and texture of a roller with the precision of a brush. Because the resulting painted strip is several inches wide, a standard wall roller can overlap it easily when filling the center of the wall.
Why Cutting In Is Harder Than It Looks
Traditional cutting in is usually performed with a two- or two-and-a-half-inch angled sash brush. In experienced hands, that method is accurate, flexible, and fast. In inexperienced hands, it can produce a line that gently wanders toward the ceiling before panicking and diving back toward the wall.
Painter’s tape reduces the need for a perfectly steady hand, but taping an entire room takes time. Tape can also allow paint to bleed underneath when applied over dusty, damaged, or heavily textured surfaces. Removing it too late may pull away dried paint; removing it too early can create smears.
Paint pads and wheeled edgers offer another alternative. They are inexpensive and easy to maneuver, although paint can accumulate on their guide wheels and transfer onto trim. Some pads also leave a different surface texture from the main roller, creating a visible frame around the room after the paint dries.
The Accubrush attempts to solve several of these problems at once, but its effectiveness still depends on wall condition, loading technique, paint consistency, and operator patience.
How We Evaluated the Accubrush
This assessment combines the tool’s documented specifications with established hands-on evaluations from DIY publications, independent painters, and home-improvement reviewers. We compared those findings with professional guidance on cutting in, maintaining a wet edge, matching roller texture, and avoiding picture framing.
The main questions were practical:
- Does it create a clean paint line?
- Is it genuinely faster than an angled brush?
- Can an average DIY painter learn to use it quickly?
- Does it work equally well around ceilings, trim, and textured surfaces?
- How much cleanup and touching up are required?
Accubrush Performance: Where It Works Best
Around Door and Window Trim
Straight runs beside door casings and window frames are the Accubrush’s happiest habitat. The shield has a firm surface to follow, and the roller can move smoothly without constant repositioning. Once the roller is evenly loaded, the small brush carries paint close to the trim while the shield keeps most of it where it belongs.
The result is usually faster than cutting the same area with a standard brush, especially for someone who would otherwise tape every frame. The rolled texture also blends more naturally with the rest of the wall than a broad strip applied only with a brush.
Along Baseboards
The tool can perform well above straight baseboards, although the working angle may feel awkward when the painter is kneeling near the floor. Keeping the tool flat is essential. Tilting it can allow paint to creep beneath the shield or prevent the small brush from reaching the edge.
Dust is a frequent troublemaker near baseboards. Vacuuming and wiping the wall beforehand helps the guide move smoothly and prevents debris from joining the paint film as permanent decorative confetti.
At the Ceiling Line
Ceiling edges produce more mixed results. On a smooth, straight ceiling line, the Accubrush can create a respectable boundary and move significantly faster than careful freehand brushing. It is less convincing when the ceiling is textured, uneven, or poorly finished.
A popcorn or heavily stippled ceiling may prevent the shield from sitting flush. Small gaps can remain, while raised texture can collect paint from the roller or brush. In those situations, a quality angled brush usually offers greater control.
On Smooth and Lightly Textured Walls
Smooth drywall and mild orange-peel texture are generally good candidates. The adjustable brush position helps compensate for modest surface variation, and the roller leaves a finish that can be blended with the main wall roller.
Heavy knockdown texture is more challenging. The shield travels across the high points while paint may fail to reach deeper recesses. Pressing harder rarely solves the problem and may instead create streaks, wheel tracks, or paint transfer.
Near Inside Corners
The Accubrush cannot completely eliminate brushwork. Its housing prevents the roller and guide from reaching all the way into inside corners or extremely tight architectural details. A small angled brush is still needed to finish those areas and touch up the starting and stopping points.
That is not necessarily a deal-breaker. Think of the Accubrush as a production tool for long edges, not a tiny robot that handles every last inch while you supervise from a lawn chair.
What We Liked About the Accubrush Paint Edger
It Can Save Considerable Time
For a room with several windows, doors, and long runs of baseboard, the Accubrush can reduce the hours spent cutting in or applying painter’s tape. Its roller holds more paint than a trim brush, allowing the user to cover several feet before reloading.
It Creates a Roller-Compatible Texture
Brush-only cut-in areas may dry with a slightly different texture from rolled walls. Because the Accubrush applies most of the coating with a mini roller, the perimeter is less likely to look like a picture frame surrounding the room.
The Learning Curve Is Manageable
The basic movement is simple: load the roller, remove excess paint, place the shield against the boundary, and move the tool steadily. Most beginners should become more consistent after a few practice passes on cardboard or an inconspicuous section of wall.
It May Reduce Tape Consumption
Painter’s tape remains useful for protecting vulnerable surfaces, but the Accubrush can make full-room taping unnecessary. That saves preparation time, cleanup time, and the strangely large amount of money a person can spend on blue strips of adhesive paper.
Where the Accubrush Struggles
The Shield Must Stay Clean
The protective guide is the tool’s greatest strength and its most demanding maintenance point. Paint can accumulate along the inside edge during loading or use. Once that happens, the shield may stamp paint directly onto the ceiling or trim it was supposed to protect.
Wiping the shield frequently is not optional. Keep a damp cloth nearby and inspect the guide whenever the roller is reloaded.
Overloading Produces Messy Results
A heavily saturated roller may drip, push paint beneath the shield, or deposit a ridge near the boundary. The roller should be evenly coated but not carrying enough paint to qualify as a beverage container.
It Does Not Love Irregular Architecture
Curved trim, deep profiles, narrow spaces, wavy ceiling lines, and rough masonry are poor matches for a rigid guide. A brush can flex and respond to those shapes; the Accubrush cannot.
Perfectionists May Still Want a Brush
The tool can create clean-looking lines, but it may leave a tiny unpainted gap on certain surfaces or require touching up near corners. Professional painters who already cut in quickly with an angled brush may not gain much speed. The strongest benefit is for DIYers who find traditional cutting in slow or stressful.
How to Use an Accubrush Paint Edger Successfully
-
Prepare the boundary.
Clean dust and grease from the wall, trim, and ceiling edge. Fill obvious gaps with paintable caulk where appropriate, then allow repairs to dry completely.
-
Practice before approaching visible trim.
Test the tool on cardboard or a hidden wall section. This reveals how much paint the roller needs and how firmly the tool should be pressed.
-
Load the roller evenly.
Roll it through the tray several times, then remove excess paint. Do not intentionally coat the shield or guide wheels.
-
Start slightly away from the edge.
Place the roller on the wall first, distribute a little paint, and then move the guide toward the boundary. Dropping a fully loaded tool directly against white trim is an excellent way to begin an unplanned trim-painting project.
-
Keep the tool flat.
The roller, small brush, and shield must remain correctly aligned with the surface. Avoid twisting the handle or applying uneven pressure.
-
Use steady, overlapping passes.
Move at a controlled pace and overlap each pass slightly. Racing may create skips, while crawling can leave excess paint and ridges.
-
Check the shield frequently.
Wipe away paint before it reaches the contact edge. This single habit can determine whether the finished line looks sharp or resembles an abstract interpretation of sharpness.
-
Roll the main wall while the edge remains wet.
Work in manageable sections and overlap the freshly edged strip with the larger wall roller. Maintaining a wet edge helps minimize lap marks and differences in sheen.
-
Finish tight spots with an angled brush.
Use a small brush in corners and other areas the Accubrush housing cannot reach.
Accubrush vs. Other Paint-Edging Methods
| Method | Best Feature | Main Limitation |
|---|---|---|
| Accubrush Paint Edger | Fast coverage with roller-like texture | Needs frequent shield cleaning and struggles on irregular surfaces |
| Angled Sash Brush | Maximum flexibility and precision | Requires skill and may be slower for beginners |
| Painter’s Tape | Provides reassurance for unsteady painters | Time-consuming and may bleed or pull paint |
| Paint Pad Edger | Inexpensive and easy to find | Guide wheels can collect paint; texture may differ |
The Accubrush occupies a useful middle ground. It is faster than slow, cautious brushwork and more productive than many small paint pads. However, it cannot match the adaptability of a skilled painter using a premium angled brush.
Who Should Buy the Accubrush?
The Accubrush makes the most sense for homeowners who paint several rooms, dislike taping, and have mostly straight trim on smooth or moderately textured walls. It may also help landlords, property managers, and frequent DIY remodelers complete repetitive wall-painting projects more efficiently.
It is less compelling for someone painting one small room, working around highly decorative molding, or already comfortable cutting in freehand. A first-time painter should also keep a quality angled brush nearby rather than treating the Accubrush as a total replacement.
Our Verdict
The Accubrush Paint Edger is not a miracle device, but it is more than a late-night-infomercial curiosity. On long, straight edges beside windows, doors, and baseboards, it can apply paint quickly and produce a clean, roller-compatible finish. It is especially helpful for DIY painters who lack confidence with a sash brush or would otherwise spend hours applying tape.
Its weaknesses are predictable. The shield requires regular wiping, tight corners still need brushwork, and textured ceilings can expose the limitations of a rigid guide. Used with reasonable expectations, however, the Accubrush can be a legitimate time-saving painting tool.
Extended Experience Notes: What Using the Accubrush Is Really Like
The first important experience is learning that the Accubrush rewards restraint. A beginner’s instinct is often to load the roller generously so the tool can travel farther between trips to the paint tray. That approach usually creates more work. Excess paint migrates toward the shield, gathers along the edge, and eventually appears where it should not. A lighter, even load produces cleaner lines and makes the tool easier to control. After several passes, the correct amount becomes obvious: the roller should look fully coated without dripping or developing glossy pools between its fibers.
The second lesson involves speed. The Accubrush is marketed as a faster alternative to traditional cutting in, but moving the tool as quickly as possible does not produce the best results. The real time savings come from maintaining a steady rhythm. Load, roll, inspect, wipe, and continue. Once that routine develops, a long baseboard or door casing can be edged surprisingly quickly. Interrupting the process to repair a smear costs more time than slowing down for two seconds to check the shield. It is the painting equivalent of fastening a seat belt: mildly inconvenient until the exact moment it becomes extremely convenient.
Another noticeable part of the experience is the sound and physical feedback. The guide and roller can make a faint dragging or rolling noise, particularly on textured drywall. That does not necessarily indicate damage, but it reminds the user to avoid excessive pressure. The tool should glide rather than scrape. Heavy pressure can force paint into unwanted areas, leave guide marks, or prevent the roller from turning freely. On a smooth wall, the movement feels predictable. On knockdown texture, the tool may bounce slightly, making the finished boundary less uniform.
Room layout also changes the value of the Accubrush. In a basic bedroom with two doors, one window, straight baseboards, and a smooth ceiling, the tool can handle a large percentage of the edging. In a dining room filled with crown molding, built-in cabinets, decorative trim, and narrow wall sections, the constant repositioning may erase much of the advantage. The Accubrush is most satisfying when it can travel through uninterrupted runs. It feels less impressive when every few inches present a new corner, projection, or ornamental obstacle.
Cleanup is straightforward as long as it begins before the paint dries. The roller, miniature brush, shield, and surrounding plastic should be rinsed thoroughly according to the paint manufacturer’s instructions. The small brush deserves special attention because dried material near its base can reduce flexibility and interfere with future edging. Cleaning immediately may feel tedious after a long project, but postponing it turns reusable components into oddly shaped souvenirs.
The overall experience is therefore positive but conditional. The Accubrush does not eliminate preparation, attention, or touch-up work. What it eliminates is some of the repetitive labor involved in creating wide cut-in bands along uncomplicated edges. For the right room and the right user, that is enough to make it genuinely useful. The best approach is to pair it with a dependable angled brush: use the Accubrush for production, use the brush for details, and let each tool perform the job it handles best.
Editorial note: This article synthesizes manufacturer information, documented hands-on product evaluations, independent painter observations, and established professional painting guidance. Performance may vary according to wall texture, trim condition, paint viscosity, tool maintenance, and user technique.