Research note: The safety, preparation, painting, curing, and styling recommendations are grounded in guidance from the EPA, CPSC, Sherwin-Williams, Benjamin Moore, Rust-Oleum, Minwax, General Finishes, Home Depot, This Old House, Architectural Digest, and Better Homes & Gardens.
Better Homes & Gardens
+9
U.S. Consumer Product Safety Commission
+9
Sherwin-Williams
+9
article>
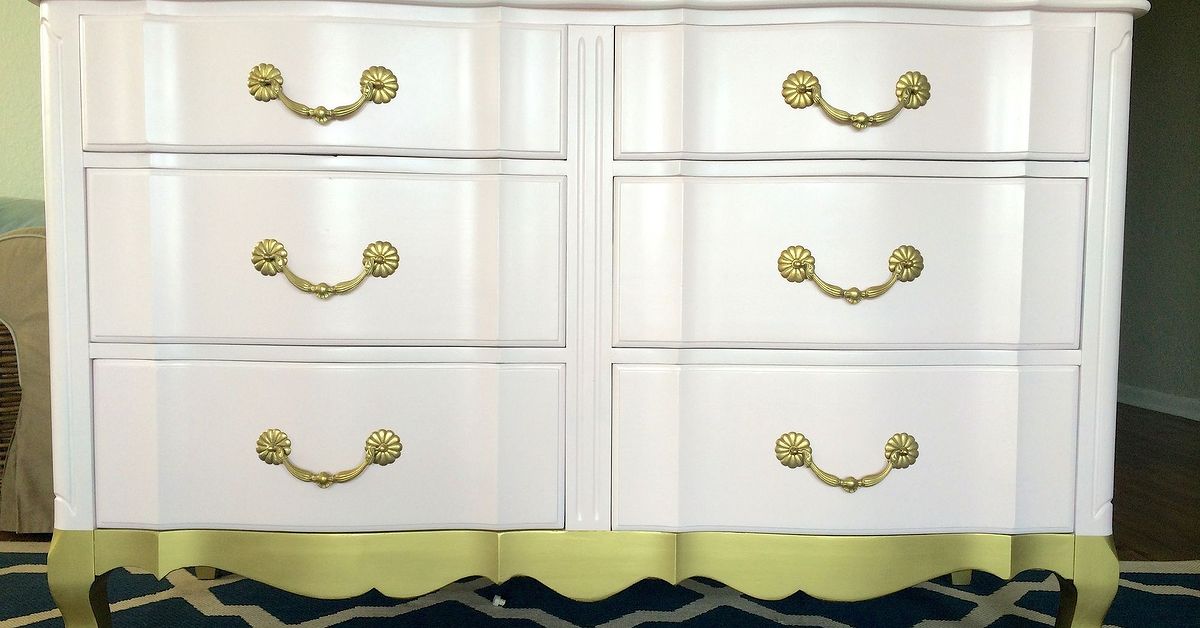
A pink and gold dipped dresser is what happens when practical bedroom storage decides it deserves better lighting and a tiny red carpet. The soft pink finish adds warmth and personality, while the metallic gold detail supplies just enough glamour to make the piece feel custom rather than crafty.
This furniture makeover works especially well on thrift-store dressers, inherited pieces, builder-basic furniture, and older wooden chests that are structurally sound but visually stuck somewhere between “forgettable brown” and “why did everyone own this in 1997?” With thoughtful preparation, a balanced color scheme, and patient application, an ordinary dresser can become a polished focal point for a bedroom, nursery, guest room, dressing area, or stylish entryway.
The project is also flexible. The gold can cover the feet, the lower portion of the case, the drawer edges, or only the hardware. The pink can be barely-there blush, dusty rose, warm coral, muted mauve, or a confident raspberry. There is no single correct formula, but there are several ways to keep the finished dresser elegant, durable, and free from mysterious paint bubbles that appear precisely when you begin feeling proud of yourself.
Why Pink and Gold Work So Well Together
Pink and gold share warm undertones, which helps them feel naturally connected. Gold brings depth and reflected light to a painted surface, while pink keeps the metallic finish from looking too formal. Together, they can appear romantic, playful, vintage-inspired, Art Deco, modern, or surprisingly sophisticated.
The shade of pink determines much of the mood. Pale blush creates a light, refined look that works beautifully with white walls, light oak, cream textiles, and delicate brass accents. Dusty rose feels more mature and pairs well with walnut, charcoal, olive green, and black. Coral pink adds energy, while deep raspberry creates a bolder statement suitable for eclectic or maximalist interiors.
Gold also comes in several personalities. Bright yellow gold is dramatic and festive. Champagne gold is softer and easier to blend into neutral rooms. Antique gold brings a slightly aged character, while rose gold leans romantic and contemporary. Before painting, compare the metallic finish with the pink color in the actual room. Artificial lighting can make a subtle blush look peach, lavender, or suspiciously similar to strawberry yogurt.
Plan the Dipped Design Before Opening the Paint
The term “dipped” describes a finish that makes part of the furniture look as though it was lowered into a contrasting color. On a dresser, the effect is commonly applied to the feet or lower several inches of the frame. A straight horizontal boundary creates a modern look, while an angled line feels more playful.
Popular Pink and Gold Dresser Designs
- Gold-dipped feet: Paint the dresser pink and apply metallic gold only to the bottom portion of each leg.
- Gold lower section: Continue the gold across the legs, apron, and lower part of the dresser case for a stronger color-blocked effect.
- Gold drawer details: Paint the body pink, then add gold to drawer edges, recessed panels, or narrow trim.
- Metallic hardware only: Use gold knobs or pulls as a restrained accent when the pink color is already bold.
- Gold top with pink body: Create a glamorous statement surface, although this area will require a durable protective finish.
When in doubt, begin with gold-dipped feet and coordinated hardware. This approach creates a clear visual connection without covering so much of the dresser that it begins resembling a trophy with socks in it.
Materials and Tools
Gathering everything before starting prevents the familiar DIY ritual of discovering that the missing brush, screwdriver, or roll of tape is currently living at a hardware store fifteen minutes away.
- Mild soap or furniture-safe degreasing cleaner
- Clean lint-free cloths and microfiber towels
- Screwdriver or drill for removing hardware
- Wood filler and a putty knife
- Medium- and fine-grit sandpaper or sanding sponges
- Vacuum with a brush attachment
- Bonding or stain-blocking primer suitable for the dresser material
- Interior furniture, cabinet, enamel, mineral, or quality acrylic paint in pink
- Metallic gold paint or gold spray paint compatible with the surface
- Small foam roller and quality synthetic brushes
- Painter’s tape and measuring tape
- Drop cloth, gloves, protective eyewear, and appropriate respiratory protection
- Optional clear topcoat in matte, satin, or semi-gloss
- Replacement knobs, pulls, and an anti-tip furniture anchor
How to Make a Pink and Gold Dipped Dresser
1. Inspect the Dresser Carefully
Before choosing paint, confirm that the dresser deserves the makeover. Check for loose joints, cracked drawer bottoms, missing stops, damaged veneer, swollen particleboard, sticking drawers, and signs of moisture or pests. Cosmetic problems are manageable; serious structural damage may require repairs before decorating begins.
Identify the material as accurately as possible. Solid wood, wood veneer, laminate, medium-density fiberboard, and particleboard require slightly different preparation. Veneer must be sanded gently because the decorative wood layer may be thin. Laminate usually benefits from a high-adhesion bonding primer. Exposed MDF edges may absorb primer and need an additional coat.
If the piece is vintage and its paint history is unknown, avoid aggressive sanding until the old coating has been evaluated for lead. Disturbing unsafe paint can release hazardous dust. Keep children and pets away from the work area, provide ventilation, and follow current product and government safety guidance.
2. Remove Drawers and Hardware
Take out all drawers and label their positions with removable tape. Older handmade furniture sometimes fits best in its original arrangement, and drawer three may become deeply offended if asked to live where drawer one used to be.
Remove knobs, pulls, escutcheons, decorative plates, and other detachable hardware. Store screws in a labeled container or resealable bag. If the existing holes do not match the new hardware, fill them before priming and drill fresh holes after carefully measuring the new placement.
3. Clean Every Paintable Surface
Paint adheres poorly to furniture polish, skin oils, cooking residue, dust, or mystery grime. Wash the dresser with a mild cleaning solution appropriate for the existing finish. Pay special attention to drawer fronts, handles, top edges, and areas near the floor.
Use a clean damp cloth to remove cleaner residue, then allow the furniture to dry completely. Do not rush from cleaning directly into sanding while moisture remains trapped in joints or porous material.
4. Repair Damage
Fill dents, deep scratches, unused hardware holes, and chipped corners with paintable wood filler. Apply it slightly above the surface so it can be sanded flush after drying. Deep repairs are usually more successful when built in thin layers rather than packed into the cavity all at once.
Reattach loose veneer with an appropriate wood adhesive and clamp it flat. Tighten joints and replace damaged drawer glides when necessary. A beautiful finish cannot compensate for a drawer that requires the strength of a competitive rower to open.
5. Scuff-Sand the Finish
A sound existing finish usually does not need to be stripped to bare wood. The goal is to remove shine, smooth repairs, and create a surface that helps the primer grip. Sand gently and evenly, moving with the wood grain whenever it is visible.
Use a medium grit for rough repairs and a finer grit for general scuffing. Be especially cautious around veneer edges, decorative molding, and corners, where sandpaper can cut through the surface quickly. Once sanding is complete, vacuum the dresser and wipe away remaining dust with a lint-free cloth.
6. Apply the Correct Primer
Primer improves adhesion, evens out porosity, and may prevent dark stains or wood tannins from bleeding through pale pink paint. Use a bonding primer on glossy laminate or slick factory finishes. A stain-blocking primer is helpful on woods known for tannin bleed or pieces marked by water rings and previous discoloration.
Apply primer with a brush in corners and detailed areas, then use a small foam roller on broad flat surfaces. Thin, even coverage is better than a thick layer. Allow the primer to dry according to its label, lightly sand obvious texture if recommended, and remove all dust before painting.
7. Paint the Dresser Pink
Stir the pink paint thoroughly without whipping air into it. Begin with edges, corners, and trim, then roll the larger surfaces. Maintain a wet edge and avoid repeatedly brushing areas that have started to dry, because overworking paint creates drag marks and uneven sheen.
Two thin coats generally look smoother and cure more reliably than one heroic coat. Pale pink over a dark dresser may require an additional coat for full, even coverage. Follow the manufacturer’s recoat time rather than judging only by touch. Paint can feel dry on top while remaining soft underneath.
For a cleaner professional appearance, paint the drawer fronts and visible outer edges but avoid coating the drawer sides or runners unless there is enough clearance. Excess paint in these areas can cause sticking.
8. Measure the Gold-Dipped Area
Once the pink finish has dried sufficiently for tape, stand the dresser upright and decide where the metallic section should begin. Measure upward from the floor at several points and make light pencil marks. A consistent height creates a crisp architectural effect.
Wrap painter’s tape around each leg or across the lower case. Press the tape down firmly, especially around curves and corners. For the sharpest line, seal the tape edge with a very thin coat of the pink base color. Any seepage will then match the existing surface. After that coat dries, apply the gold.
9. Add the Metallic Gold Finish
Metallic paint contains reflective particles that may reveal brush direction, so apply it in controlled, thin coats. Use a small smooth brush, foam applicator, or compatible spray paint depending on the design and product instructions. Several light coats usually create a more even metallic appearance than one heavy application.
When spraying, work outdoors or in a properly ventilated protected area. Mask every surface that should remain pink and follow the distance, temperature, shaking, drying, and recoating directions printed on the container. Heavy spray coats may wrinkle, sag, or remain tacky.
Remove painter’s tape while the final coat is still slightly soft unless the product directions recommend otherwise. Pull the tape back slowly at an angle. If the paint has fully hardened across the tape edge, score the boundary gently with a sharp craft knife before removal.
10. Refinish or Replace the Hardware
Original hardware can be cleaned and reused, especially when it has attractive shapes or vintage character. Before applying metallic paint, remove grease and oxidation, lightly scuff the surface, and use a primer intended for metal when required.
New brass-toned hardware offers an instant upgrade. Match the gold undertone as closely as practical, but do not panic over tiny differences. A room containing multiple warm metal finishes often looks more collected and less like every accessory arrived in the same cardboard box.
11. Protect the Finish
Some furniture and cabinet paints are formulated to cure into a durable finish without a separate sealer. Others benefit from a compatible clear topcoat, particularly on the dresser top, drawer fronts, and high-touch areas.
Choose a water-clear product when working over pale pink paint because certain oil-based finishes can warm or amber the color. Test the complete paint and topcoat system on a hidden area or sample board before coating the entire dresser. Apply thin layers and avoid excessive brushing over metallic paint, which may disturb the reflective particles.
12. Let the Dresser Cure
Drying and curing are not the same thing. A surface may feel dry within hours but require days or weeks to reach maximum hardness. During that period, handle the dresser carefully, avoid heavy decorative objects, and do not place sticky liners or rubber feet on the fresh finish.
Reinstall hardware gently, return drawers to their labeled positions, and attach the dresser securely to the wall using an appropriate anti-tip restraint. Anchoring is particularly important in homes with children, but it is a sensible safety measure in any room.
Styling the Finished Dresser
A pink and gold dresser already has a strong visual identity, so surrounding décor should support it rather than audition for the same role. A round brass mirror, white ceramic lamp, woven basket, small plant, or framed black-and-white artwork can provide balance.
For a calm bedroom, pair blush pink with ivory bedding, light wood, and muted green. For an Art Deco-inspired look, add black accents, geometric artwork, velvet, and stronger metallic details. In a nursery, keep the styling soft with cream, natural rattan, and warm gray. A deeper rose dresser can handle richer companions such as navy, emerald, charcoal, and walnut.
Leave some open space on top. Covering every inch with perfume bottles, trays, books, candles, and decorative objects hides the furniture’s finish and complicates cleaning. The dresser should look styled, not as though a tiny boutique lost control of its inventory.
Common Mistakes to Avoid
Skipping the Cleaning Stage
Sanding grime into the surface does not count as cleaning. Remove oils and polish before abrading or priming.
Using the Wrong Primer
A general-purpose primer may not bond reliably to glossy laminate or block stubborn stains. Match the primer to the surface and the problem you are trying to solve.
Applying Thick Coats
Heavy paint may sag, wrinkle, remain soft, or chip more easily. Thin coats require patience but create a smoother and more durable result.
Taping Too Soon
Painter’s tape can lift fresh pink paint if the base coat has not dried and hardened enough. Follow the paint label and use tape designed for delicate surfaces when necessary.
Ignoring Cure Time
Loading the dresser with heavy objects the next morning can leave permanent impressions. Give the coating time to harden before normal use.
Using Too Much Gold
Metallic paint is visually powerful. A carefully placed accent usually looks more refined than coating every trim line, drawer edge, corner, knob, and visible molecule in gold.
Experience Notes: What the Pink and Gold Dresser Makeover Taught Me
The most valuable lesson from working on a pink and gold dipped dresser was that the exciting part of a furniture makeover is rarely the part that determines whether it succeeds. Choosing the colors was delightful. Watching the first pink coat cover an outdated brown finish was extremely satisfying. Photographing the completed piece felt like a small design victory. However, the less glamorous stepscleaning corners, filling dents, sanding repairs, and waiting for primer to drymade the final result possible.
I also learned that pink must be tested in the room where the dresser will live. The first sample looked like a sophisticated dusty blush under daylight. In warm evening light, it became much peachier. A second sample with a slightly cooler undertone remained balanced throughout the day and looked better beside the room’s cream walls. Painting a sample board saved me from repainting an entire dresser and provided another reminder that tiny paint chips are confident little liars.
The gold finish required experimentation as well. My first brush coat looked streaky because the metallic particles followed every brush movement. The problem improved when I used less paint, kept the strokes moving in one direction, and built the color gradually. On the rounded feet, a small foam applicator created a smoother result. For the hardware, spray paint produced a more uniform finish, but only after the pieces were cleaned, scuffed, primed, and arranged so every angle could be reached.
Painter’s tape created another useful lesson. Measuring from the floor instead of from the bottom of each leg produced a more level gold boundary because the feet were not perfectly identical. I marked the height several times, connected the points visually, and stepped back before painting. From close range, every measurement seemed correct. From across the room, one taped line was obviously slanted. Furniture has a remarkable ability to reveal mistakes only after you stand far enough away to feel inconvenienced.
Patience mattered most after the dresser appeared finished. The paint felt dry, the hardware was ready, and I wanted to put everything back immediately. Waiting longer prevented scratches around the pulls and dents on the top. Even then, I treated the surface gently during the curing period. A finished coating becomes more durable over time, and the first few days are not the moment to test it with a heavy lamp, a stack of books, and an enthusiastic houseplant.
The final piece changed the room more than expected. The pink gave the old dresser a softer shape, while the gold feet visually lifted it from the floor. Reusing the original hardware preserved some of its character, and the metallic finish made the details easier to notice. The makeover did not erase the furniture’s age; it gave that age a clearer purpose. Instead of looking dated, the dresser looked intentionally vintage and pleasantly glamorous.
Perhaps the best experience was realizing that a successful furniture transformation does not require perfection. One repaired corner remained slightly uneven, and a close inspection revealed a faint brush mark near the back. Neither flaw mattered once the dresser was assembled and styled. The overall proportions, color balance, smoothness, and functionality mattered far more. The project became a useful, attractive piece of furniture rather than a museum object afraid of socks.
Final Thoughts
A pink and gold dipped dresser combines creative color, practical storage, and attainable furniture restoration in one rewarding project. The design can be subtle or dramatic, but the strongest results come from disciplined preparation: inspect the piece, clean it thoroughly, repair damage, sand carefully, select the proper primer, and apply thin coats.
Keep the gold intentional, allow the finish to cure, and secure the dresser to the wall before putting it into regular use. With those details handled, the finished piece can deliver years of service while looking far more expensive than its humble beginnings suggest. It may still hold ordinary T-shirts and mismatched socks, but it will do so with considerably more confidence.
:::