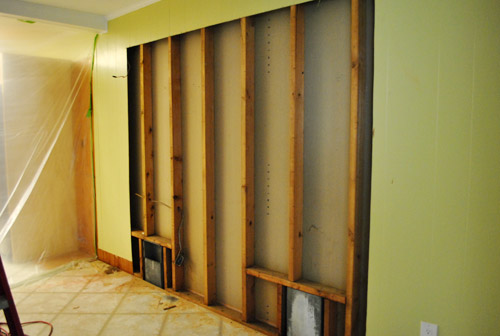
Opening the kitchen wall to make a doorway sounds simple at first. You look at the wall, imagine a charming new passage, grab a tape measure, and suddenly your kitchen has main-character energy. But before anyone starts swinging tools like they are auditioning for a home renovation show, it is worth knowing what that wall is doing besides blocking your path to the snacks.
A new kitchen doorway can improve traffic flow, connect a dining room, brighten a cramped layout, and make an older home feel more open without committing to a full open-concept remodel. It can also create structural, electrical, plumbing, HVAC, flooring, drywall, and permit issues if planned poorly. In other words, this is not just “cut a rectangle and celebrate.” It is more like “study the rectangle, respect the rectangle, then frame the rectangle correctly.”
This guide explains what homeowners should know before opening a kitchen wall, including how to evaluate the wall, when to call a structural engineer, what a proper doorway opening needs, how to plan finishes, and what real-world lessons can save your budget from crying quietly in the corner.
Why Open A Kitchen Wall For A Doorway?
Kitchens are not just rooms where food happens. They are traffic intersections, coffee stations, family meeting zones, homework counters, pet-feeding headquarters, and occasionally the place where someone dramatically announces, “There’s nothing to eat,” while standing in front of a full refrigerator.
Adding a doorway can solve several common layout problems. A closed-off kitchen may feel dark, inconvenient, or disconnected from the rest of the home. A doorway can create a better path between the kitchen and dining room, mudroom, living room, pantry, hallway, or backyard entrance. It may also help the kitchen function better during parties, holidays, and weekday chaos.
Unlike removing an entire wall, creating a doorway can preserve some separation. That matters if you want better flow but still prefer to hide dirty dishes from guests. A doorway gives you connection without turning every cooking experiment into a public performance.
First Question: Is The Kitchen Wall Load-Bearing?
The most important question is whether the wall is load-bearing. A load-bearing wall supports weight from above and transfers that weight down to the foundation. A non-load-bearing wall, often called a partition wall, mainly divides rooms. Both walls may look similar once they are covered in drywall, because houses enjoy keeping secrets.
Common clues can help you make an educated guess. Walls running perpendicular to ceiling joists are more likely to carry load. Walls stacked above beams, posts, foundation lines, basement supports, or walls on lower floors may also be structural. Exterior walls are usually load-bearing. Walls near the center of the house often deserve extra suspicion.
However, clues are not confirmation. Before opening a kitchen wall, especially in an older home or a multi-story house, a qualified contractor, architect, or structural engineer should verify the wall. Removing or cutting into a load-bearing wall without proper support can lead to sagging ceilings, cracked drywall, stuck doors, uneven floors, and in severe cases, serious structural damage. That is not “rustic charm.” That is your house asking for help.
What Happens If The Wall Is Load-Bearing?
A load-bearing wall can often be opened, but the missing section must be replaced with a properly sized structural support. Typically, this means a header, beam, or engineered lumber installed above the new doorway, supported by framing members at both sides of the opening. The header acts like a bridge over the doorway, carrying loads that the removed studs used to support.
The size of the header depends on the span, loads above, number of stories, roof structure, local building code, and other conditions. A small opening in a single-story home may require a different solution than a wide doorway in a two-story house. For larger openings, engineered lumber or steel may be required. This is where professional calculations matter.
Temporary support is also part of the process. Before structural studs are removed, the load above must be safely supported. Professionals often build temporary walls or bracing systems to carry the load during construction. This step is not optional. Gravity has never once said, “No worries, take your time.”
Permits: The Boring Step That Saves You Later
Permit rules vary by city, county, and state, but structural changes usually require a building permit. If the project involves moving electrical wiring, plumbing, gas lines, ductwork, or mechanical systems, additional trade permits may be needed. Even when a wall is non-load-bearing, local rules may still require approval if the work changes the layout, affects fire separation, or touches building systems.
Permits can feel annoying, especially when you are excited to see progress. But permitted work creates a record that the project was inspected and completed according to local requirements. That record can matter during resale, refinancing, insurance claims, and future renovations. The unpermitted shortcut may seem cheaper until a home inspector discovers it later and everyone starts using phrases like “corrective work.”
Look For Hidden Electrical, Plumbing, And HVAC
Kitchen walls are busy. Behind the drywall, you may find electrical wiring, switches, outlets, plumbing lines, drain pipes, vent pipes, gas lines, ductwork, exhaust routes, blocking, insulation, old repairs, or mysterious cable from a technology era nobody wants to discuss.
Before cutting, inspect from accessible areas such as the basement, crawlspace, attic, or adjacent cabinets. A stud finder with electrical detection can help, but it is not a guarantee. If the wall has outlets, switches, a thermostat, a range hood route, a water line to a refrigerator, or plumbing from a room above, assume rerouting may be part of the job.
Electrical work should meet current code and may require a licensed electrician. Plumbing and gas changes should be handled by qualified pros. Moving one doorway six inches to the left may sound minor, but if that wall contains a drain stack, your budget may suddenly develop dramatic plot twists.
Older Homes Need Extra Caution
If the home was built before 1978, lead-based paint may be present. Disturbing painted surfaces can create lead dust, which is especially dangerous for children and pregnant people. Renovation work in older homes should follow lead-safe practices, and professionals working on applicable pre-1978 homes may need EPA certification.
Older homes can also contain asbestos in certain materials, outdated wiring, old plaster, unusual framing, and previous renovations that were done with more enthusiasm than accuracy. This does not mean older homes are bad. It means they are full of history, character, and sometimes a pipe exactly where your beautiful doorway was supposed to go.
Choosing The Right Doorway Size
The doorway should feel natural in the home. A narrow opening may technically connect two rooms but still feel cramped. A very wide opening may improve flow but require more structural work and finish repairs. Common interior door widths include 28, 30, 32, and 36 inches, while cased openings can be wider if the structure allows.
Think about how people will move through the space. Will two people pass comfortably? Will someone carrying a tray, laundry basket, grocery bags, or a holiday turkey have enough room? Will the doorway interfere with cabinets, appliances, seating, light switches, or door swings? In kitchens, clearances matter because appliances already compete for space like tiny metal landlords.
If you plan to install an actual door, account for the rough opening, jamb, casing, hinges, swing direction, and floor transitions. If you want an open passage without a door, a finished cased opening may be cleaner and more flexible.
Understanding The Framing Around A New Doorway
A framed doorway is more than a hole in the wall. Typical framing includes king studs, jack studs, a header, cripple studs above the header when needed, and secure connections to surrounding framing. The king studs run full height from bottom plate to top plate. Jack studs support the header. The header spans the opening and transfers load around the doorway.
In a non-load-bearing wall, the header may be simpler because it does not carry major structural weight. In a load-bearing wall, the header or beam must be sized correctly and supported properly. The difference matters. A doorway in a partition wall is carpentry. A doorway in a structural wall is engineering plus carpentry, with paperwork wearing a hard hat.
Design Details That Make The Doorway Look Intentional
The best doorway openings look like they were always part of the house. The worst ones look like someone got impatient and framed a rectangle during a thunderstorm. Good design choices make a huge difference.
Match Trim And Casing
Use casing profiles that match or complement the existing trim. In older homes, trim may be thicker, wider, or custom-milled. Matching it helps the new opening blend into the architecture.
Align The Opening With Existing Features
Whenever possible, align the doorway with nearby windows, hallways, cabinet lines, or room centerlines. A doorway that is slightly off for no reason can bother people forever, like a crooked picture frame that learned carpentry.
Plan The Floor Transition
Opening a wall may expose missing flooring beneath the old bottom plate. If two rooms have different flooring, you may need a threshold, transition strip, patch, or larger flooring repair. Do not ignore this detail. Floors love revealing secrets after demolition.
Consider Light And Sightlines
A doorway can bring borrowed light into a dark kitchen. It can also create a direct view of cluttered counters from the front entry. Stand in both rooms and imagine the finished sightline before committing.
Budgeting For The Project
The cost to open a kitchen wall depends on whether the wall is load-bearing, the size of the opening, local labor rates, permit fees, finish materials, and the amount of electrical, plumbing, or HVAC rerouting involved. A simple non-load-bearing doorway may be relatively affordable. A structural opening with engineering, temporary support, beam installation, inspections, drywall repair, trim, paint, and floor patching can cost much more.
Budget categories often include design or engineering, permit fees, demolition, framing, beam or header materials, electrical changes, plumbing or duct adjustments, drywall, trim, paint, flooring repairs, cleanup, and contingency. A contingency is not pessimism; it is wisdom wearing work boots. For older homes, add extra room for surprises.
Common Mistakes To Avoid
Assuming The Wall Is Not Structural
Never assume a wall is non-load-bearing because it looks thin or because a neighbor removed a similar wall. Houses are built differently, modified differently, and occasionally held together by decisions nobody wants to defend.
Forgetting About Utilities
Electrical and plumbing reroutes can change the scope quickly. Investigate before finalizing the doorway location.
Skipping Permits
Unpermitted structural work can create problems during resale or inspection. It may also require expensive correction later.
Ignoring Finish Work
Drywall, trim, paint, and flooring often take longer than expected. The opening may be framed in a day, but making it look beautiful is where patience earns its paycheck.
Making The Opening Too Small
A doorway should improve movement. If it feels tight on paper, it will feel tighter in real life, especially when someone is carrying groceries and another person is standing exactly where they should not be standing.
Should You DIY Or Hire A Professional?
A confident homeowner with carpentry experience may be able to create a doorway in a clearly non-load-bearing wall that contains no wiring, plumbing, ductwork, or hazardous materials. Even then, careful planning and local code awareness matter.
For load-bearing walls, structural uncertainty, older homes, utility reroutes, masonry, multi-story houses, or wider openings, professional help is the smarter route. A structural engineer can specify the support. A licensed contractor can coordinate the work. Electricians, plumbers, and HVAC technicians can handle their trades safely and legally.
The goal is not to prove you are brave. The goal is to end with a safe, attractive doorway and a kitchen that does not require an apology letter to future buyers.
Step-By-Step Planning Checklist
Before any wall is opened, use a planning checklist. Start by defining the purpose of the doorway. Is it for traffic flow, light, entertaining, accessibility, or connecting two spaces? Next, choose a proposed location and width. Then investigate whether the wall may be load-bearing and schedule professional verification if needed.
Check for visible signs of electrical, plumbing, gas, or HVAC systems. Review local permit requirements. Decide whether the opening will have a swinging door, pocket door, barn door, or cased opening. Consider trim style, flooring transitions, paint matching, and how the opening affects cabinets and appliances.
Finally, build a realistic budget and timeline. Include a contingency for surprises. If the wall is structural, do not begin demolition until the support plan, permits, materials, and qualified labor are ready.
Experience Notes: Real Lessons From Opening A Kitchen Wall
The most useful experience with opening a kitchen wall is this: the visible wall is only the cover story. The real story is hidden inside. Many homeowners begin with a simple dream, such as “let’s add a doorway to the dining room,” and quickly discover that the project touches half the house. That does not make it a bad project. It just means the planning phase deserves respect.
One common lesson is that doorway placement matters more than people expect. A doorway that looks perfect on a sketch may feel awkward when you stand in the actual kitchen. Cabinet doors need room to open. Refrigerator doors need swing space. A dishwasher door may drop down into the walking path. Dining chairs need clearance. The best approach is to mark the proposed opening on the wall with painter’s tape and live with it for a few days. Walk through the space while carrying groceries, plates, laundry, or a cup of coffee. If the taped opening feels natural, you are closer to the right decision.
Another lesson is that finish work can be more emotional than framing. Framing is loud, dusty, and dramatic, but it is also relatively straightforward for a skilled pro. Matching old texture, old paint, old trim, and old flooring can be the part that tests everyone’s patience. In some homes, the existing wall paint has faded, so a small patch becomes obvious. In other homes, the flooring under the removed wall does not match either room. Planning for these repairs early prevents the finished doorway from looking like an afterthought.
Homeowners also learn that “small opening” does not always mean “small project.” If the wall contains a switch, outlet, vent, water line, or drain, the scope expands. A doorway may need an electrician to relocate switches to a practical spot. If the existing switch was exactly where the new opening goes, someone must decide where the new switch belongs. That sounds minor until you enter a dark kitchen and slap the wall where the switch used to be.
Dust control is another real-world lesson. Opening a wall can spread fine dust into nearby rooms, cabinets, drawers, and air returns. Good containment, plastic sheeting, floor protection, careful cleanup, and HVAC precautions are worth the effort. Kitchen projects are especially sensitive because dust and food storage are not best friends.
The best experiences usually happen when homeowners slow down before speeding up. They verify the structure, check permits, plan utilities, select finishes, and hire the right help when needed. The result is a doorway that improves the home every day. It makes cooking easier, entertaining smoother, and the kitchen feel less isolated. Done well, opening the kitchen wall does not just create a passage. It changes how the house lives.
Conclusion
Opening the kitchen wall to make a doorway can be one of the most rewarding small-to-medium home remodeling projects. It can improve flow, brighten rooms, connect gathering spaces, and make an older layout feel more practical. But the project deserves careful planning because walls are rarely empty, and some are doing important structural work.
Before cutting into a kitchen wall, confirm whether it is load-bearing, check for hidden utilities, understand permit requirements, and plan the finished look. For structural walls, older homes, wide openings, or any uncertainty, bring in qualified professionals. A doorway should make your home feel better, not make your ceiling develop trust issues.
With the right plan, a new kitchen doorway can look original, function beautifully, and turn a closed-off kitchen into a more welcoming part of the home. Measure twice, verify the structure, budget for surprises, and remember: the best renovation is the one that still looks great after the dust settles.