There are many Raspberry Pi “clones” in the world, and most of them arrive with cheerful names, familiar 40-pin headers, and the confidence of a board that has never had to debug a bootloader at 2 a.m. But a truly compatible Raspberry Pi clone is a very different beast. It is not enough to look like a Pi, smell faintly of solder, and promise “GPIO compatibility” in bold letters. Real compatibility means running Raspberry Pi software, understanding Raspberry Pi boot behavior, supporting the accessory ecosystem, and behaving predictably with the hardware that makers, educators, and embedded engineers already trust.
That is why the wonderfully dramatic idea behind “Make A Compatible Raspberry Pi Clone – But Your Pi Must Die” is so fascinating. The central concept is almost comic-book-level engineering: if you cannot easily buy the exact Raspberry Pi system-on-chip as a normal component, you can remove one from an actual Raspberry Pi and build your own board around it. Congratulations, you have made a Raspberry Pi clone. Condolences, your donor Pi did not survive the audition.
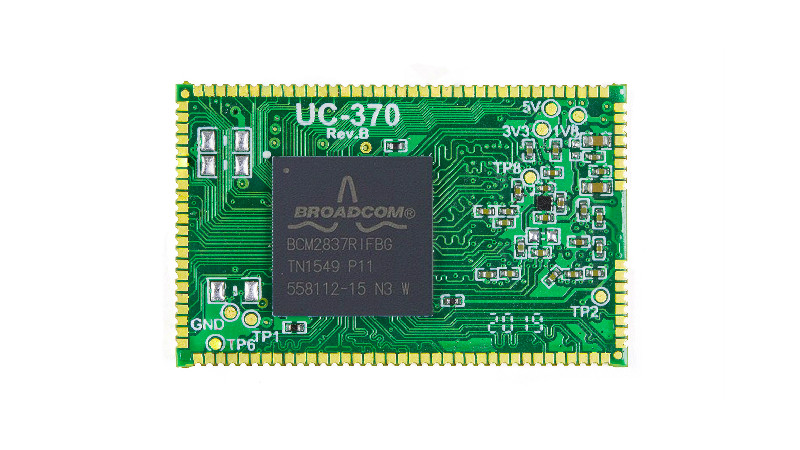
At the heart of the story is an Arducam experiment that removed the Broadcom SoC from a Raspberry Pi 3 and placed it on a tiny 40 mm × 25 mm system-on-module. The goal was not to make a cheap knockoff. It was to create a compact, application-specific board that could run Raspberry Pi software while fitting into spaces where a standard Pi or even an older Compute Module setup might be mechanically awkward. It is part clever hack, part hardware archaeology, and part reminder that the Raspberry Pi ecosystem is valuable because it is more than a board: it is a complete stack of silicon, firmware, Linux support, documentation, accessories, and community knowledge.
Why a “Compatible Raspberry Pi Clone” Is Harder Than It Sounds
Many single-board computers advertise Raspberry Pi compatibility, and some do a very good job for certain uses. A board may offer a similar 40-pin GPIO layout, HDMI output, USB ports, camera connectors, or even a Pi-like form factor. For basic projectsblinking LEDs, reading sensors over I2C, running a small serverthis may be perfectly fine. But when people say “compatible,” they often mean several different things at once.
Mechanical Compatibility
Mechanical compatibility means the board physically fits where a Raspberry Pi would fit. The mounting holes line up. The ports are in familiar places. Cases, HATs, cooling solutions, and brackets may work without a wrestling match. This is the easiest compatibility to see and the easiest to misunderstand. A board can fit in a Pi case and still behave very differently once Linux starts poking at the hardware.
Electrical Compatibility
Electrical compatibility means the GPIO pins, voltage levels, power input, reset behavior, and peripheral interfaces act as expected. Raspberry Pi GPIO uses 3.3V logic, and the 40-pin header has become a standard of its own. But “same-looking header” does not guarantee the same alternate functions, pull-up behavior, boot-time pin states, or driver support. That little row of pins is not a decorative comb; it is a tiny negotiation table where hardware assumptions either shake hands or start a bar fight.
Software Compatibility
Software compatibility is the big one. Raspberry Pi OS, device tree overlays, camera support, boot firmware, GPU behavior, and kernel patches all matter. A board using a different SoC may run Linux beautifully, but it may not run the same Raspberry Pi binaries, use the same camera stack, or support the same overlays. For hobby projects, that may be a weekend inconvenience. For a product team, it can become an expensive maintenance swamp wearing a cute SBC hat.
The Broadcom Problem: The Brain Is the Board
Raspberry Pi boards have historically relied on Broadcom SoCs, such as the BCM2835, BCM2837, BCM2711, and BCM2712 families. These chips are not commonly available in the same casual way that makers can buy microcontrollers, sensors, voltage regulators, or bags of mysterious resistors at 1 a.m. The result is a strange supply-chain reality: for many developers, the simplest way to obtain a Raspberry Pi SoC has been to buy a Raspberry Pi.
That reality explains why a truly compatible clone is so unusual. Alternative SBC makers can choose other Arm SoCs from Allwinner, Rockchip, Amlogic, NXP, or other vendors. Many of those chips are powerful, affordable, and completely reasonable for embedded systems. But they are not Raspberry Pi chips. They do not boot exactly like a Pi. They do not rely on the same firmware stack. They do not automatically inherit the mountain of Pi-specific software assumptions that have built up over more than a decade.
That is why the Arducam approach was so extreme and so interesting. Instead of approximating a Raspberry Pi with another processor, it reused the actual heart of a Pi. It was less “inspired by Raspberry Pi” and more “Raspberry Pi, but after a very intense spa treatment involving hot air, BGA rework, and mild tragedy.”
Arducam’s Tiny Pi-Inspired System-on-Module
Arducam is best known for camera hardware, especially modules and accessories for embedded vision projects. Its Pi-compatible module experiment made sense in that context. Camera systems often need small boards, predictable software support, and direct access to Raspberry Pi camera tools. A full-size Raspberry Pi can be too wide, too tall, too port-heavy, or too awkward for compact imaging devices.
The Arducam module reportedly used a Raspberry Pi 3 SoC transplanted from a donor board and placed onto a small custom PCB. That PCB became a postage-stamp-style system-on-module. The interesting part was not just its size; it was the software continuity. Because the real Raspberry Pi silicon was still there, the module could run Raspbian, now known as Raspberry Pi OS. That single fact changes the engineering conversation.
Instead of porting software to a different board, developers could keep much of the Raspberry Pi software model. Instead of asking whether a camera driver, overlay, or binary blob would behave on a different SoC, they were working with familiar silicon. The catch, of course, is that every module began with a sacrifice. Somewhere, a perfectly useful Raspberry Pi 3 had to give up its brain. Cue tiny violin, played through PWM audio.
Why Not Just Use a Compute Module?
The obvious question is: why not use a Raspberry Pi Compute Module? That is exactly what Compute Modules are for. A Compute Module contains the core Raspberry Pi computing hardware without the standard consumer connectors. A carrier board then adds only the ports, power circuitry, storage, cameras, displays, and industrial interfaces the final product actually needs.
For most serious embedded designs, this is the sensible path. Raspberry Pi Compute Module 4 and Compute Module 5 expose rich interfaces through high-density connectors, support optional eMMC storage, and are intended for custom carrier boards. Compute Module 5, for example, combines the core components of Raspberry Pi 5 with Broadcom BCM2712 silicon, multiple RAM options, optional eMMC storage, and two 100-pin connectors. That is a much cleaner production story than removing BGAs from finished boards while whispering apologies to the PCB.
Older Compute Modules used a DDR2 SODIMM-style form factor. That design worked, but it could be mechanically inconvenient in some tight or vibration-prone applications. Compute Module 4 moved to dual 100-pin high-density connectors, shrinking the footprint and giving hardware designers more flexibility. Compute Module 5 keeps that general idea and brings Raspberry Pi 5-class performance to embedded systems. In other words, the modern answer to “How do I make a custom Raspberry Pi product?” is usually “use a Compute Module,” not “perform silicon taxidermy.”
When a Clone Makes Senseand When It Absolutely Does Not
A compatible Raspberry Pi clone made from real Raspberry Pi silicon is brilliant as a proof of concept. It demonstrates that the ecosystem value is tied directly to the SoC and its firmware expectations. It also shows what engineers may do when official form factors do not fit a niche requirement. But as a production method, it is difficult to recommend unless your factory also moonlights as a wizard academy.
Removing a BGA chip from a finished board requires specialized equipment, experience, inspection, cleaning, and often reballing. Thermal profiles matter. Board warping matters. Solder joint reliability matters. Yield matters. One sloppy process step can turn an ambitious module into a decorative rectangle of regret. For a one-off experiment, that is part of the fun. For a product shipping to customers, it is a reliability audit waiting to happen.
There is also the sustainability issue. Destroying a complete Raspberry Pi to harvest one component creates waste. If the donor boards are already damaged or unusable, the idea becomes more defensible. But buying new boards just to strip them is hard to justify when Compute Modules, custom carrier boards, official customization programs, and alternative SoMs exist.
The Real Compatibility Checklist
If you want to build something that behaves like a Raspberry Pi, you need to think beyond the processor. A convincing Raspberry Pi-compatible board has to address boot behavior, GPIO, storage, power, thermals, mechanical layout, camera and display support, device tree overlays, and accessory identification.
Boot and Firmware
Raspberry Pi boot behavior is unusual compared with many conventional computers. The GPU firmware has historically played a major role in early startup, bringing up memory and hardware before the Arm CPU takes over. Newer boards such as Raspberry Pi 4 and Raspberry Pi 5 also use EEPROM-based bootloaders. That means a compatible design must respect Raspberry Pi boot expectations, storage ordering, firmware updates, and configuration files.
Device Tree and Overlays
Raspberry Pi uses device tree overlays to describe attached hardware. The familiar dtoverlay and dtparam settings in config.txt can enable interfaces such as I2C, SPI, audio, cameras, displays, and custom add-ons. This is one of the reasons the Raspberry Pi ecosystem scales so well: one kernel can support many hardware arrangements when the correct overlay describes what is connected.
GPIO and HAT Support
The 40-pin GPIO header is a major part of the Raspberry Pi identity. It supports power pins, ground pins, I2C, SPI, UART, PWM, and general input/output. But proper HAT or HAT+ compatibility requires more than copying the pinout. The HAT+ specification uses ID EEPROM data so the Raspberry Pi firmware can detect add-on boards and load the correct device tree overlay. The ID pins are reserved for board detection, and compliant designs must follow strict electrical rules.
Power and Thermal Design
Power is where many “it worked on my bench” projects go to retire. Raspberry Pi models have different power requirements, and Raspberry Pi 5-class designs need more careful thermal planning than older boards. A clone or carrier board must supply stable 5V power, handle USB current expectations, and avoid voltage drops during peak load. Heat sinks, airflow, copper area, and enclosure design can be the difference between a reliable embedded product and a tiny toaster with HDMI.
Raspberry Pi Clones vs. Raspberry Pi Alternatives
It is useful to separate “clone” from “alternative.” A clone aims to behave like a Raspberry Pi as closely as possible. An alternative offers a different board that may be faster, cheaper, more available, or better suited to certain workloads. Boards from Odroid, Radxa, Orange Pi, Libre Computer, ASUS, NVIDIA, and others can be excellent choices. Some provide stronger CPUs, better AI acceleration, native eMMC, NVMe support, or more modern interfaces.
The tradeoff is usually ecosystem friction. Raspberry Pi has enormous software support, extensive documentation, beginner-friendly tools, GPIO libraries, camera support, and a huge accessory market. Alternatives can be powerful but may require more manual kernel work, vendor images, driver hunting, or community troubleshooting. For an expert, that can be an acceptable cost. For a classroom, product team, or weekend maker who wants to finish before the next geological era, Raspberry Pi compatibility has real value.
What Modern Designers Should Learn from the “Pi Must Die” Hack
The most important lesson is not “destroy your Raspberry Pi.” Please do not read the title and sprint toward the hot-air station with a heroic soundtrack playing. The lesson is that compatibility is a system-level property. The SoC, bootloader, firmware, operating system, device tree, GPIO map, power design, and mechanical interface all work together.
If your project needs the Raspberry Pi software ecosystem, start with an official Raspberry Pi board or Compute Module. If the form factor is wrong, design a carrier board. If you need industrial reliability, use eMMC, proper power supervision, thermal testing, and mechanical retention. If you need a different processor, be honest that you are building a Raspberry Pi alternative, not a clone.
The Arducam module remains inspiring because it asked a bold engineering question: what if the Raspberry Pi were not the board, but the silicon and software personality inside it? The answer is exciting, but also inconvenient. You can make a tiny compatible module, but unless the chip supply chain cooperates, you may have to sacrifice a donor board. That is fine for a lab experiment. For production, it is a red flag wearing safety goggles.
Practical Design Advice for a Pi-Compatible Product
For anyone designing a Raspberry Pi-based product today, the practical path is clearer than it was years ago. Use Compute Module 4 or Compute Module 5 for new embedded systems unless you have a very specific reason not to. Design a carrier board that includes only what the product needs. Keep high-speed signals short and impedance-controlled. Follow official mechanical drawings. Use a proven power supply design. Respect the GPIO voltage limits. Do not treat HAT EEPROM pins as spare I/O just because they look lonely.
For software, build your system around Raspberry Pi OS or a carefully maintained Linux image. Document every overlay, kernel parameter, bootloader setting, and custom driver. Freeze known-good firmware versions for production when appropriate, but maintain a plan for security and bug-fix updates. Test cold boots, warm boots, power loss, storage corruption, thermal throttling, camera startup, display detection, USB load, and field recovery. Boring tests are where exciting failures go to be discovered before customers discover them for you.
The Fun Part: Why Makers Love This Stuff
There is something deeply charming about the “Pi must die” approach because it captures the maker spirit at its most dramatic. It is impractical, educational, slightly ridiculous, and technically impressive all at once. It says, “The official route does not fit, so let us find out what is physically possible.” That mindset has produced countless breakthroughs, plus a few smoking breadboards that nobody needs to mention at family dinner.
Hardware hacking teaches humility. Software can often be fixed with a patch. Hardware asks whether you remembered the pull-up resistor three months ago. A Pi-compatible clone asks even more: did you understand the boot chain, the power rails, the BGA footprint, the RAM routing, the firmware assumptions, and the emotional needs of an operating system that expected to wake up on a normal Raspberry Pi?
That is why this project is worth discussing even if most readers should never reproduce it. It shows the hidden depth beneath a familiar board. Raspberry Pi looks simple because the hard parts have been packaged beautifully. Once you try to clone it, the simple board becomes a dense web of engineering decisions.
Extra Experience Notes: Living with the Idea of a Raspberry Pi Clone
In real projects, the fantasy of a perfect Raspberry Pi clone usually appears after a prototype has already succeeded. A team builds on a standard Pi, the demo works, the investors smile, and then someone asks, “Can we make it smaller, cheaper, and more rugged?” This is where the adventure begins. The first instinct is often to search for a smaller clone. The smarter instinct is to list every dependency the prototype has on Raspberry Pi-specific behavior.
For example, a camera-based device may depend on the Raspberry Pi camera stack, CSI connector behavior, libcamera support, overlays, GPU memory configuration, and a particular sensor driver. A robotics controller may depend on PWM timing, I2C bus reliability, UART pin mapping, and HAT auto-configuration. A kiosk may depend on HDMI detection, USB boot, watchdog behavior, and thermal stability inside an enclosure. In each case, “just use another board” may sound easy until the software stack starts filing complaints.
One practical experience is that mechanical constraints often look scarier than software constraints at first, but software usually wins the prize for long-term annoyance. Moving connectors, shrinking a board, or designing a carrier can be difficult, but once validated, hardware stays still. Software, on the other hand, keeps changing. Kernel versions move. Firmware changes. Camera pipelines evolve. Bootloader settings gain new options. A true Raspberry Pi-compatible design is valuable because it reduces the number of custom patches you must carry forever, and forever is a long time in embedded Linux years.
Another experience is that power quality deserves more respect than it gets. Raspberry Pi boards are forgiving enough for hobby use, but embedded products need cleaner planning. Add a camera, a USB modem, an SSD, a display, or a motor driver, and suddenly the innocent 5V rail becomes the plot twist. Brownouts can masquerade as storage failures, driver bugs, Wi-Fi problems, or random crashes. Before blaming Linux, check the voltage drop. Linux has many talents, but it cannot negotiate with a sagging power supply.
Thermal testing is equally important. A board that idles happily on a desk may throttle inside a sealed plastic enclosure under summer sunlight. Raspberry Pi 5-class performance is excellent for a small board, but performance creates heat. A compact clone or custom carrier should include thermal paths, airflow assumptions, realistic workloads, and worst-case ambient testing. If the enclosure becomes warm enough to make users say “huh,” your product has already started a conversation you did not intend.
Accessory compatibility also teaches painful lessons. A HAT that works on a standard Raspberry Pi may physically collide with a custom carrier. A pHAT may assume certain pins are free. A display may require a specific overlay. A power HAT may expect the host to behave according to newer HAT+ rules. The more your design borrows from the Raspberry Pi ecosystem, the more carefully you must honor its conventions. Compatibility is not a vibe; it is a checklist.
The best approach is to treat Raspberry Pi compatibility as a design requirement from day one. Decide whether you need binary compatibility, GPIO compatibility, HAT compatibility, camera compatibility, case compatibility, or simply user familiarity. Those are different goals. A board can satisfy one and fail another. Once those goals are clear, the engineering path becomes less magical and more manageable.
And finally, keep the humor. Custom embedded design can be a long journey through datasheets, impedance calculations, boot logs, and mysterious failures that vanish whenever someone senior enters the room. The “Pi must die” phrase is funny because it exaggerates a real engineering truth: sometimes compatibility has a cost. The trick is to pay that cost intelligently. Use official modules when possible. Use alternative SBCs when compatibility is not critical. Use heroic chip transplants only when the point is learning, proving a concept, or creating the kind of hardware story that makes engineers lean closer and say, “Wait, you did what?”
Conclusion
“Make A Compatible Raspberry Pi Clone – But Your Pi Must Die” is more than a catchy title. It is a window into the real meaning of hardware compatibility. A Raspberry Pi is not just a credit-card-sized computer; it is a tightly integrated platform of Broadcom silicon, firmware, Linux support, GPIO conventions, overlays, accessories, documentation, and community trust. Arducam’s tiny SoM experiment showed that a truly compatible clone is possible when the real Raspberry Pi silicon comes along for the ride. But it also showed why the official Compute Module path exists and why most product designers should use it.
The best Raspberry Pi clone may not be a clone at all. It may be a Compute Module on a smart carrier board, a carefully selected alternative SBC, or a custom design that honestly defines which parts of Raspberry Pi compatibility matter. The donor-Pi approach is clever, memorable, and slightly tragic. It proves a point with style. But for production, your Raspberry Pi does not need to die. It probably just needs a better carrier board.